Spring
一、Spring框架概述
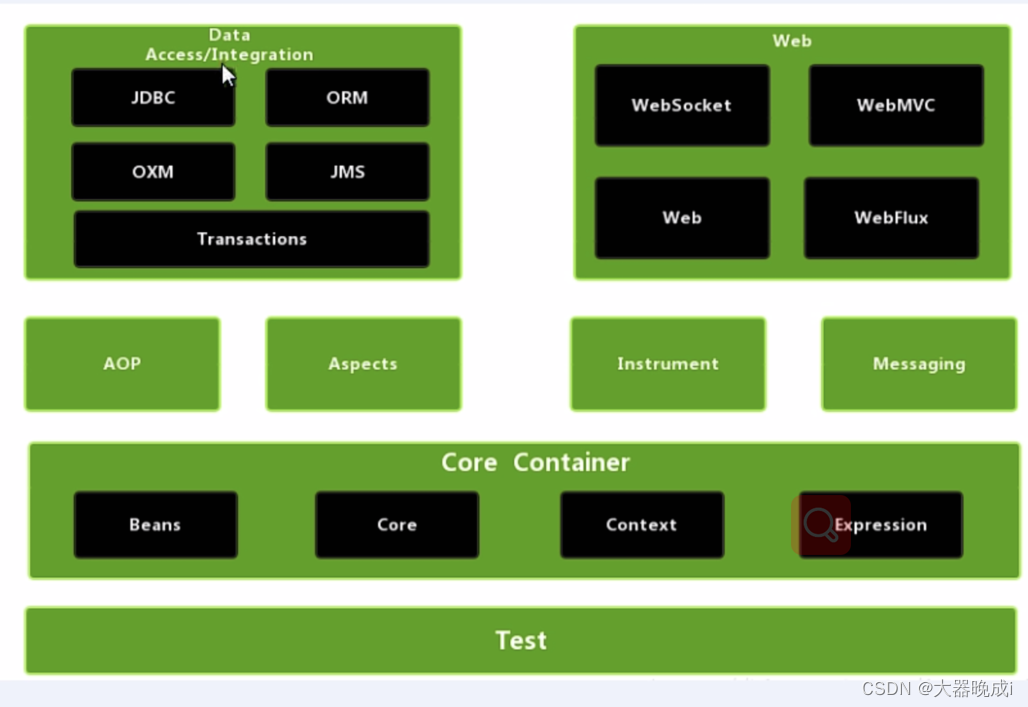
1.spring是什么
spring是一个轻量级开源的JavaEE框架
spring可以解决企业应用开发的复杂性
spring有两个核心部分:IOC和AOP
IOC:控制反转,把创建对象过程交给spring进行管理。
AOP:面向切面,不修改源代码进行功能增强。
2.spring的特点
方便解耦,简化开发
AOP编程的支持
声明式事务的支持
方便程序的测试
方便集成各种优秀框架
降低Java EE API的使用难度
Java 源码是经典学习范例
3.spring入门案例
- 创建maven工程
- 导入spring的依赖
<dependency>
  <groupId>org.springframework</groupId>
  <artifactId>spring</artifactId>
  <version>2.5.6</version>
</dependency>
- 创建实体类对象并且编写方法
public class User {
  public  void sout(){
      System.out.println ("你好,spring5");
  }
}
- 创建spring配置文件 bean1.xml
<?xml version="1.0" encoding="UTF-8"?>
<beans xmlns="http://www.springframework.org/schema/beans"
     xmlns:xsi="http://www.w3.org/2001/XMLSchema-instance"
     xsi:schemaLocation="http://www.springframework.org/schema/beans http://www.springframework.org/schema/beans/spring-beans.xsd">

         <!--配置User对象的创建-->
  <bean id="user" class="com.spring.User"></bean>

 </beans>
- 进行测试代码编写
public class UserTest {
  @Test
  public  void testSout(){
      //1,加载spring配置文件
      ApplicationContext context=
          new ClassPathXmlApplicationContext ("bean1.xml");
      //2.获得配置创建的对象
      User user = (User) context.getBean ("user", User.class);
      System.out.println (user);

     user.sout ();

 }
}
二、IOC容器
1. IOC底层原理
1.1 什么是IOC
- IOC就是控制反转,把对象创建和对象之间的调用过程交给spring进行管理
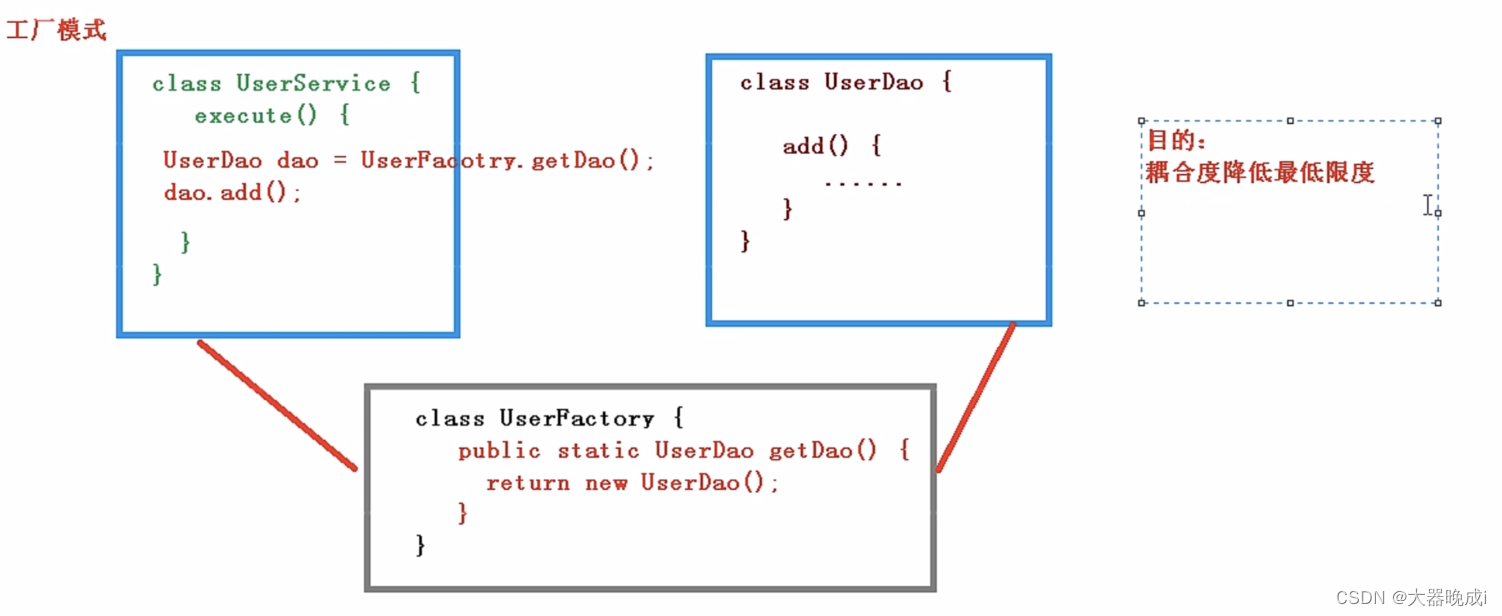
- 使用IOC的目的:为了耦合度降低
- 做入门案例就是IOC的实现
1.2 IOC底层原理
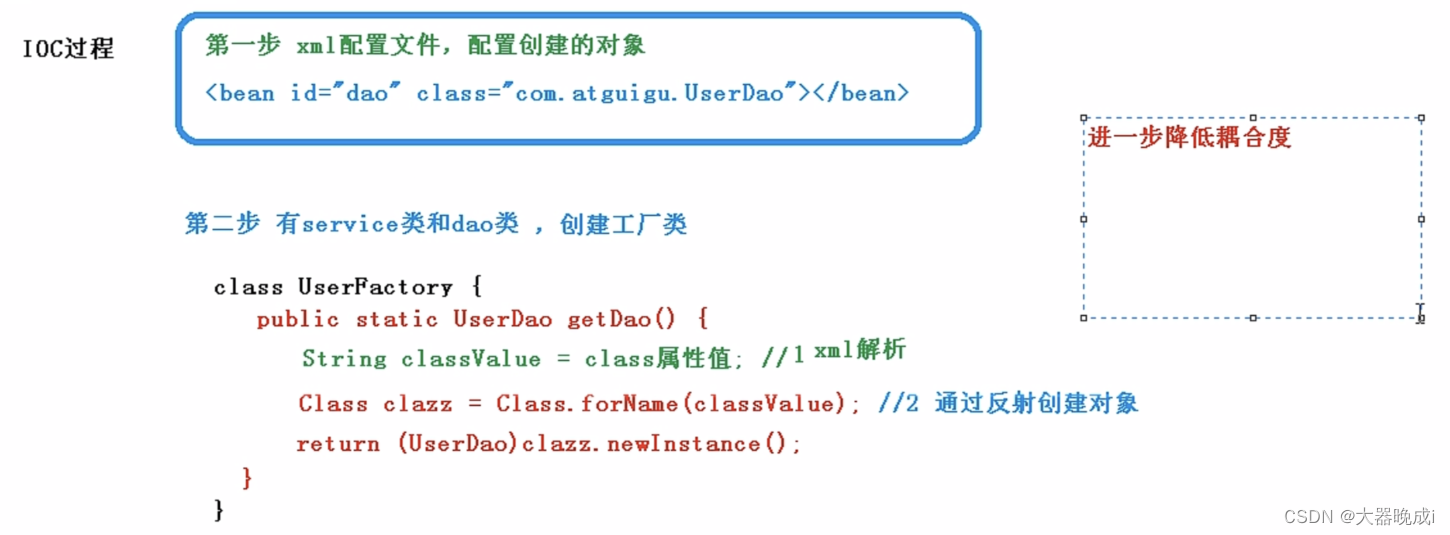
IOC底层原理主要用到了:xml解析、工厂模式、反射
工厂模式
IOC过程
2. IOC接口
IOC思想基于IOC容器完成,IOC容器底层就是对象工厂
BeanFactory
Spring提供IOC容器实现两个方式:(两个接口)
- BeanFactory :IOC容器基本实现,是spring内部使用的接口,不提供开发人员进行使用。
- 加载配置文件的时候不会创建对象,在获取(使用)才去创建对象
- ApplicationContext :BeanFactory 接口的子接口,提供更多更强大的功能,一般由开发人员进行使用。
- 加载配置文件的时候就会把配置文件对象进行创建
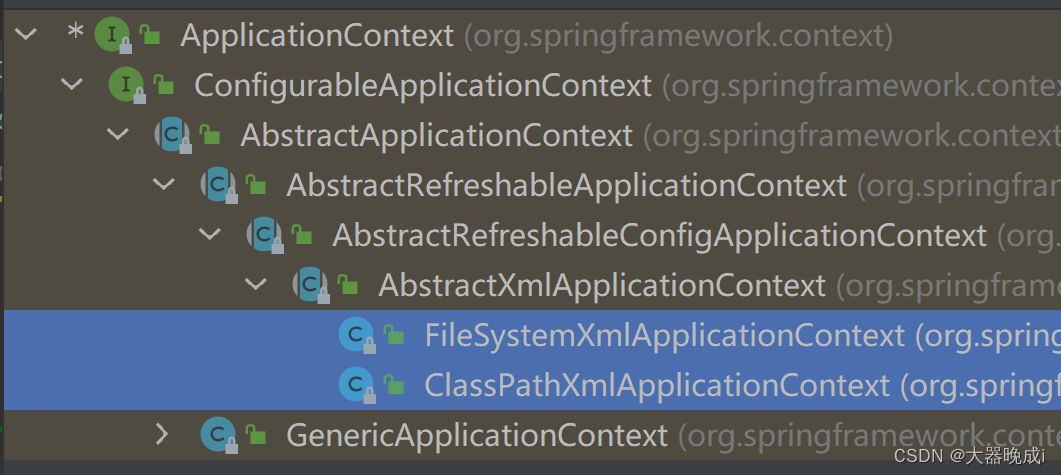
ApplicationContext
ApplicationContext 接口的主要实现类:
3. IOC操作Bean管理
3.1 什么是bean管理?
bean管理指的是两个操作:
- spring 创建对象
- spring 注入属性
3.2 Bean管理的两种方式
- 基于XML
- 基于注解
3.3 IOC操作Bean管理(基于XML方式)
3.3.1 基于XML方式创建对象bean标签
在spring配置文件中,使用bean标签,标签里面添加对应的属性,就可以实现对象创建。
注意:创建对象时,默认也是执行无参构造方法完成对象的创建
bean标签的属性介绍:
- id 属性: 唯一标识
- class 属性:类的全路径(包类路径)
<!--配置User对象的创建-->
<bean id="user" class="com.spring.User"></bean>
3.3.2 基于XML方式注入属性
DI:依赖注入,就是注入属性
①方法一:使用set注入
- 创建实体类的属性,设置set方法
    package com.spring;

    public class Book {
        private  String bookname;
        private  int id;

        //方式一:set注入
        public void setBookname(String bookname) {
            this.bookname = bookname;
        }

        public void setId(int id) {
            this.id = id;
        }

        @Override
        public String toString() {
            return "Book{" + "bookName='" + bookname + '\'' + ", id=" + id + '}';
        }
    }
- 在spring配置下的 bean 标签下使用 property 完成属性注解
<?xml version="1.0" encoding="UTF-8"?>
<beans xmlns="http://www.springframework.org/schema/beans"
       xmlns:xsi="http://www.w3.org/2001/XMLSchema-instance"
       xsi:schemaLocation="http://www.springframework.org/schema/beans http://www.springframework.org/schema/beans/spring-beans.xsd">

    <!--配置User对象的创建-->

    <bean id="book" class="com.spring.Book">
        <!--    使用  property 完成属性注解
        name: 类里面的属性名称
        value: 值
        -->
        <property name="bookname" value="活着"></property>
        <property name="id" value="1"></property>

    </bean>

</beans>
- 测试
@Test
public  void BookTest(){
    //1,加载spring配置文件
    ApplicationContext context=
        new ClassPathXmlApplicationContext ("bean1.xml");
    //2.获得配置创建的对象
    Book book = context.getBean ("book", Book.class);
    System.out.println (book.toString ());
}
②方法二:使用有参数的构造器进行注入
- 创建实体类对象,并设置有参构造器
package com.spring;

public class Person {
    private  String pname;
    private  int age;

    //有参构造器
    public Person(String pname, int age) {
        this.pname = pname;
        this.age = age;
    }

    @Override
    public String toString() {
        return "Person{" + "pname='" + pname + '\'' + ", age=" + age + '}';
    }
}
- 在spring的配置中的bean标签下,使用constructor-arg 属性进行注入
<?xml version="1.0" encoding="UTF-8"?>
<beans xmlns="http://www.springframework.org/schema/beans"
       xmlns:xsi="http://www.w3.org/2001/XMLSchema-instance"
       xsi:schemaLocation="http://www.springframework.org/schema/beans http://www.springframework.org/schema/beans/spring-beans.xsd">
    <!--配置User对象的创建-->


    <bean id="person" class="com.spring.Person">
        <!-- 还可以使用name属性:
<constructor-arg name="pname" value="霸王花"></constructor-arg>-->
        <constructor-arg index="0" value="霸王花"></constructor-arg>
        <constructor-arg index="1" value="18"></constructor-arg>
    </bean>

</beans>
- 测试
@Test
public  void personTest(){
    //1,加载spring配置文件
    ApplicationContext context=
        new ClassPathXmlApplicationContext ("bean1.xml");
    //2.获得配置创建的对象
    Person person = context.getBean ("person", Person.class);
    System.out.println (person.toString ());
}
③p名称空间注入(了解)
使用p名称空间注入,可以简化基于XML配置方式
- 添加p名称空间在配置文件中
<?xml version="1.0" encoding="UTF-8"?>
<beans xmlns="http://www.springframework.org/schema/beans"
       xmlns:xsi="http://www.w3.org/2001/XMLSchema-instance"

       xmlns:p="http://www.springframework.org/schema/p"

       xsi:schemaLocation="http://www.springframework.org/schema/beans http://www.springframework.org/schema/beans/spring-beans.xsd">

    <!--配置User对象的创建-->
    <bean id="book" class="com.spring.Book" p:bookname="海绵宝宝" p:id="9">

    </bean>
</beans>
-
进行属性注入,在bean标签里面进行操作
-
测试同①
3.3.3XML注入其他类型属性
- 字面值
- 注入属性——外部bean
- 注入属性——内部bean和级联赋值
①字面量
字面量:
- 空值null
<property name="bookname">
    <null/>
</property>
-
属性值包含特殊符号
特殊符号:
1. 把<>进行转义
2. 把特殊符号内容写进CDATA
        <property name="bookname" >
               <value>
                 <![CDATA[<<南京>>]]>
               </value>
              </property>
②注入属性——外部bean
注入属性——外部bean
- 创建两个类service类和dao类
package dao;
public class User implements UserDao {
    @Override
    public void show() {
        System.out.println ("我是user");
    }
}
package dao;

public interface UserDao {
    public  void show();
}
- 在service调用里面的方法
package service;

import dao.UserDao;

public class UserService {

    private UserDao userdao;

    public void setUserdao(UserDao userdao) {
        this.userdao = userdao;
    }

    public  void test(){
        System.out.println ("我是userservice");
        userdao.show ();

    }
}
- 在spring的配置文件中进行配置
    <?xml version="1.0" encoding="UTF-8"?>
    <beans xmlns="http://www.springframework.org/schema/beans"
           xmlns:xsi="http://www.w3.org/2001/XMLSchema-instance"
    xsi:schemaLocation="http://www.springframework.org/schema/beans http://www.springframework.org/schema/beans/spring-beans.xsd">
     <bean name="userService" class="service.UserService">
    <!--     注入userDao对象-->
         <property name="userdao" ref="userDao"></property>
     </bean>
     <bean name="userDao" class="dao.User"></bean>

    </beans>
- 测试
    @Test
    public  void testSout(){
        //1,加载spring配置文件
        ApplicationContext context=
            new ClassPathXmlApplicationContext ("bean1.xml");
        //2.获得配置创建的对象
        UserService userService = context.getBean ("userService",UserService.class);
        userService.test ();
    }
③注入属性——内部bean
- 创建两个类Emp类和Dept类
    package bean;

    public class Emp {
        private  String name;
        private  int age;

        private  Dept dept;

        public void setDept(Dept dept) {
            this.dept = dept;
        }

        public void setName(String name) {
            this.name = name;
        }

        public void setAge(int age) {
            this.age = age;
        }

        @Override
        public String toString() {
            return "Emp{" + "name='" + name + '\'' + ", age=" + age + ", dept=" + dept + '}';
        }
    }
package bean;

public class Dept {
    private  int did;

    public void setDid(int did) {
        this.did = did;
    }

    @Override
    public String toString() {
        return "Dept{" + "did=" + did + '}';
    }
}
- 在spring的配置文件中进行配置
    <?xml version="1.0" encoding="UTF-8"?>
    <beans xmlns="http://www.springframework.org/schema/beans"
           xmlns:xsi="http://www.w3.org/2001/XMLSchema-instance"
           xsi:schemaLocation="http://www.springframework.org/schema/beans http://www.springframework.org/schema/beans/spring-beans.xsd">
        <bean id="emp" class="bean.Emp">
            <property name="name" value="霸王花"></property>
            <property name="age" value="18"></property>

            <!-- 内部bean      -->
            <property name="dept">
                <bean id="dept" class="bean.Dept">
                    <property name="did" value="9"></property>
                </bean>
            </property>
             </bean>
- 测试
@Test
public  void test(){
    //1,加载spring配置文件
    ApplicationContext context=
        new ClassPathXmlApplicationContext ("bean2.xml");
    //2.获得配置创建的对象
    Emp emp = context.getBean ("emp", Emp.class);
    System.out.println (emp.toString ());
}
④注入属性——级联赋值
方法一:
<?xml version="1.0" encoding="UTF-8"?>
<beans xmlns="http://www.springframework.org/schema/beans"
       xmlns:xsi="http://www.w3.org/2001/XMLSchema-instance"
       xsi:schemaLocation="http://www.springframework.org/schema/beans http://www.springframework.org/schema/beans/spring-beans.xsd">

    <bean id="emp" class="bean.Emp">
        <property name="name" value="霸王花"></property>
        <property name="age" value="18"></property>


        <!--级联赋值-->
        <property name="dept" ref="dept"></property>
    </bean>

    <bean id="dept" class="bean.Dept">
        <property name="did" value="0"></property>
    </bean>
</beans>
方法二:
需要提前在emp类中生成dept的get方法
<?xml version="1.0" encoding="UTF-8"?>
<beans xmlns="http://www.springframework.org/schema/beans"
       xmlns:xsi="http://www.w3.org/2001/XMLSchema-instance"
       xsi:schemaLocation="http://www.springframework.org/schema/beans http://www.springframework.org/schema/beans/spring-beans.xsd">

    <bean id="emp" class="bean.Emp">
        <property name="name" value="霸王花"></property>
        <property name="age" value="18"></property>


        <!--级联赋值-->
        <property name="dept.did" value="66"></property>

    </bean>
</beans>
⑤注入属性——集合
- 注入数组类型属性
- 注入 List 集合类型属性
- 注入 Map 集合类型属性
    <?xml version="1.0" encoding="UTF-8"?>
    <beans xmlns="http://www.springframework.org/schema/beans"
           xmlns:xsi="http://www.w3.org/2001/XMLSchema-instance"

           xsi:schemaLocation="http://www.springframework.org/schema/beans http://www.springframework.org/schema/beans/spring-beans.xsd">

        <bean id="stu" class="collection.Stu" >

            <!-- 数组类型注入 使用array或者list标签-->
        <property name="course">
            <array>
                <value>数学</value>
                <value>语文</value>
                <value>英语</value>
            </array>
        </property>

            <!-- List类型属性注入       -->
            <property name="list">
                <list>
                    <value>善良</value>
                    <value>诚实</value>
                </list>
            </property>

            <!-- map类型属性注入       -->
            <property name="maps">
                <map>
                    <entry key="JAVA" value="java"></entry>
                    <entry key="SPRING" value="spring"></entry>
                </map>
            </property>

        </bean>
    </beans>
在集合里面设置对象类型的值
<bean id="collelist1" class="collection.Couse">
    <property name="cname" value="mybatis" ></property>
</bean>
<bean id="collelist2" class="collection.Couse">
    <property name="cname" value="spring" ></property>
</bean>
<bean id="collelist3" class="collection.Couse">
    <property name="cname" value="maven" ></property>
</bean>


<bean id="stu" class="collection.Stu" >
    <property name="clist">
        <list>
            <ref bean="collelist1"></ref>
            <ref bean="collelist2"></ref>
            <ref bean="collelist3"></ref>
        </list>
    </property>

</bean>
把集合注入部分提取出来
- 在spring配置文件中引入名称空间util
    <?xml version="1.0" encoding="UTF-8"?>
    <beans xmlns="http://www.springframework.org/schema/beans"
           xmlns:xsi="http://www.w3.org/2001/XMLSchema-instance"

           xmlns:p="http://www.springframework.org/schema/p"
           xmlns:util="http://www.springframework.org/schema/util"

           xsi:schemaLocation="http://www.springframework.org/schema/beans http://www.springframework.org/schema/beans/spring-beans.xsd

                               http://www.springframework.org/schema/util http://www.springframework.org/schema/util/spring-util.xsd">
           </beans>
- 使用 util 标签完成 list 集合注入提取
<!--1. 提取List集合类型属性注入-->
<util:list id="Booklist">
    <value>活着</value>
    <value>边城</value>
    <value>平凡的世界</value>
</util:list>

<!--2. 提取List集合类型属性注入使用-->
<bean id="book" class="collection.Book">
    <property name="bookName" ref="Booklist"></property>
</bean>
- 测试
⑥IOC操作bean管理(FactoryBean)
spring 有两种类型的bean,一种是普通bean, 另外一种是工厂bean(FactoryBean)
普通bean :在配置文件中定义bean类型就是返回类型
工厂bean :在配置文件定义bean 类型可以和返回类型不一样
- 创建类,让这个类成为工厂bean,实现接口FactoryBean
- 实现接口里面的方法,在实现的方法中定义返回的bean类型
package bean;

import org.springframework.beans.factory.FactoryBean;

//1.第一步:实现接口FactoryBean
public class Dept implements FactoryBean<Emp> {


    //2.getObject()
    @Override
    public Emp getObject() throws Exception {
        Emp emp=new Emp ();
        emp.setAge (18);
        emp.setName ("大器晚成");
        return emp;
    }


    //3.
    @Override
    public Class<?> getObjectType() {
        return null;
    }

    //4.判断是否式单例
    @Override
    public boolean isSingleton() {
        return FactoryBean.super.isSingleton ();
        //return true;
    }
}
package bean;

public class Emp {
    private  String name;
    private  int age;

    public void setName(String name) {
        this.name = name;
    }

    public void setAge(int age) {
        this.age = age;
    }

    @Override
    public String toString() {
        return "Emp{" + "name='" + name + '\'' + ", age=" + age ;
    }
}
<?xml version="1.0" encoding="UTF-8"?>
<beans xmlns="http://www.springframework.org/schema/beans"
       xmlns:xsi="http://www.w3.org/2001/XMLSchema-instance"
       xsi:schemaLocation="http://www.springframework.org/schema/beans http://www.springframework.org/schema/beans/spring-beans.xsd">

    <bean id="dept" class="bean.Dept"></bean>
</beans>
@Test
public  void test2(){
    ApplicationContext applicationContext=
        new ClassPathXmlApplicationContext ("bean1.xml");
    Emp dept = applicationContext.getBean ("dept", Emp.class);
    System.out.println (dept.toString ());
}
⑦IOC操作bean管理(bean的作用域)
在spring里面,设置创建bean实例有两种:单实例 和 多实例
可以通过判断新对象的地址值是否一致来判断,若一致,则为单实例,不一致,则为多实例
在spring里面,默认情况下,bean是单实例对象
如何设置单实例还是多实例
通过bean标签里面的scope
- singleton: 表示单实例对象,当scope的值设置为它时,加载spring配置文件时候就会创建单实例对象。
- prototype:表示多实例对象,当scope的值设置为它时,不是在加载spring配置文件时创建对象,而是在调用getBean()方法时创建多实例对象。
⑧IOC操作bean管理(bean的生命周期)
生命周期:从对象创建到销毁的过程
bean的生命周期:
- 通过构造器创建bean实例(无参数构造)
- 为bean的属性设置值和对其他bean引用(调用set方法)
- 把bean实例传递bean后置处理器的方法 postProcessBeforeInitialization
- 调用bean的初始化方法(需要进行配置初始化的方法)
- 把bean实例传递bean后置处理器的方法 postProcessAfterInitialization
- bean可以使用了(对象获取到了)
- 当容器关闭时,调用bean的销毁的方法(需要进行配置销毁的方法)
package collection;

public class Couse {
    private  String cname;

    public Couse() {
        System.out.println ("1. 通过构造器创建bean实例(无参数构造)");
    }

    public void setCname(String cname) {
        this.cname = cname;
        System.out.println ("2. 为bean的属性设置值和对其他bean引用(调用set方法)");
    }

    public  void initMethod(){
        System.out.println ("4. 调用bean的初始化方法(需要进行配置初始化的方法)");
    }

    public  void destroyMethod(){
        System.out.println ("7. 当容器关闭时,调用bean的销毁的方法(需要进行配置销毁的方法)");
    }

    @Override
    public String toString() {
        return "Couse{" + "cname='" + cname + '\'' + '}';
    }
}
package collection;

import org.springframework.beans.factory.config.BeanPostProcessor;

public class MyBeanPost implements BeanPostProcessor {
    @Override
    public java.lang.Object postProcessBeforeInitialization(java.lang.Object bean, java.lang.String beanName)
        throws org.springframework.beans.BeansException {
        System.out.println ("3.把bean实例传递bean后置处理器的方法postProcessBeforeInitialization");
        return  bean ;
    }

    @Override
    public java.lang.Object postProcessAfterInitialization(java.lang.Object bean, java.lang.String beanName)
        throws org.springframework.beans.BeansException {
        System.out.println ("5.把bean实例传递bean后置处理器的方法postProcessAfterInitialization");
        return  bean;
    }
}
<?xml version="1.0" encoding="UTF-8"?>
<beans xmlns="http://www.springframework.org/schema/beans"
       xmlns:xsi="http://www.w3.org/2001/XMLSchema-instance"
       xsi:schemaLocation="http://www.springframework.org/schema/beans http://www.springframework.org/schema/beans/spring-beans.xsd">

    <bean id="course" class="collection.Couse"
          init-method="initMethod" destroy-method="destroyMethod">

        <property name="cname" value="JAVA"></property>

    </bean>

    <bean id="myBeanPost" class="collection.MyBeanPost"></bean>
</beans>
@Test
public  void testLife(){
    ClassPathXmlApplicationContext context=
        new ClassPathXmlApplicationContext ("beanLife.xml");
    Couse course = context.getBean ("course", Couse.class);
    System.out.println ("6.bean可以使用了(对象获取到了)");
    System.out.println (course.toString ());

    context.close ();
}
⑨IOC管理XML方式(自动装配)
什么是自动装配?
根据指定装配规则(名称或者属性类型),spring自动将匹配的属性值进行注入
<!--自动装配:autowire
        byType:根据类型自动装配
        byName:根据名称自动装配

        注意:
        注入的bean的id必须和类属性名称一样
        -->
<bean id="emp" class="bean.Emp" autowire="byType"></bean>
<bean id="dept" class="bean.Dept"></bean>
⑩IOC操作bean管理 (外部属性文件)
-
直接配置数据库信息
- 配置德鲁伊连接池
- 引入德鲁伊连接池依赖jar包
<dependency>
    <groupId>com.alibaba</groupId>
    <artifactId>druid</artifactId>
    <version>1.1.10</version>
</dependency>
<!--直接配置连接池 -->
<bean id="dataSource" class="com.alibaba.druid.pool.DruidDataSource">
<property name="driverClassName" value="com.mysql.jdbc.Driver"/>
<property name="url" value="jdbc:mysql://localhost:3306/mybatis?characterEncoding=UTF-8&useSSL=false"/>
<property name="username" value="root"/>
<property name="password" value="fan1116."/>
</bean>
- 引入外部属性文件配置数据库连接池
- 引入context名称空间
- 在spring配置文件使用标签context:property-placeholder 引入外部属性文件
- 创建jdbc.properties文件
- 进行引入
<?xml version="1.0" encoding="UTF-8"?>
<beans xmlns="http://www.springframework.org/schema/beans"
       xmlns:xsi="http://www.w3.org/2001/XMLSchema-instance"

       xmlns:context="http://www.springframework.org/schema/context"
       xsi:schemaLocation="http://www.springframework.org/schema/beans http://www.springframework.org/schema/beans/spring-beans.xsd
                           http://www.springframework.org/schema/context http://www.springframework.org/schema/context/spring-context.xsd
                           ">

    <bean id="dataSource" class="com.alibaba.druid.pool.DruidDataSource">

        <!-- 引入外部属性文件       -->
        <context:property-placeholder location="jdbc.properties"/>

        <property name="driver" value="${jdbc.driver}"/>
        <property name="url" value="${jdbc.url}"/>
        <property name="username" value="${jdbc.username}"/>
        <property name="password" value="${jdbc.password}"/>
    </bean>
</beans>
3.4 IOC操作Bean管理(基于注解)
什么是注解
什么是注解:
- 注解是代码特殊标记,格式:@注解名称(属性名称=属性值…)
使用注解,注解作用在类上,方法上面,属性上面
使用注解的目的:简化XML配置
spring针对Bean管理中创建对象提供注解
- @Component
- @Service
- @Controller
- @Repository
- 上面四个注解功能是一样的,都可以用来创建bean实例
①基于注解方式实现对象创造
- 引入注解的依赖
<!-- https://mvnrepository.com/artifact/org.springframework/spring-aop -->
<dependency>
    <groupId>org.springframework</groupId>
    <artifactId>spring-aop</artifactId>
    <version>5.3.16</version>
</dependency>
- 开启组件扫描
<?xml version="1.0" encoding="UTF-8"?>
<beans xmlns="http://www.springframework.org/schema/beans"
       xmlns:xsi="http://www.w3.org/2001/XMLSchema-instance"

       xmlns:p="http://www.springframework.org/schema/p"
       xmlns:context="http://www.springframework.org/schema/context"
       xsi:schemaLocation="http://www.springframework.org/schema/beans http://www.springframework.org/schema/beans/spring-beans.xsd
                           http://www.springframework.org/schema/context http://www.springframework.org/schema/context/spring-context.xsd">


    <!-- 开启组件扫描   -->
    <!-- 扫描多个包,之间可以用逗号, 隔开  或者扫描上层目录  -->
    <context:component-scan base-package="mapper"></context:component-scan>

</beans>
- 创建类,添加注解
package mapper;

import org.springframework.stereotype.Component;
//注解里面的value属性值可以不写,默认是小写类名
@Component(value = "userMapper")
public class UserMapper {
    public  void show(){
        System.out.println ("usermapper.....");
    }
}
- 测试
@Test
public void test(){
    ApplicationContext applicationContext=
        new ClassPathXmlApplicationContext ("beannote.xml");
    UserMapper userMapper = applicationContext.getBean ("userMapper", UserMapper.class);
    System.out.println (userMapper);
    userMapper.show ();


}
②开启组件扫描的细节
<?xml version="1.0" encoding="UTF-8"?>
<beans xmlns="http://www.springframework.org/schema/beans"
       xmlns:xsi="http://www.w3.org/2001/XMLSchema-instance"

       xmlns:p="http://www.springframework.org/schema/p"
       xmlns:context="http://www.springframework.org/schema/context"
       xsi:schemaLocation="http://www.springframework.org/schema/beans http://www.springframework.org/schema/beans/spring-beans.xsd
                           http://www.springframework.org/schema/context http://www.springframework.org/schema/context/spring-context.xsd">
    <!-- 开启组件扫描   -->
    <!-- 扫描多个包,之间可以用逗号, 隔开  或者扫描上层目录  -->
    <!--  全部扫描      -->
    <context:component-scan base-package="mapper"></context:component-scan>


    <!--    示例一
        use-default-filters="false":不适用默认情况下的全部扫描
        context:include-filter:扫描那些内容
        这里是指,扫描mapper包下所有带Component注解的
        -->
    <context:component-scan base-package="mapper" use-default-filters="false">
        <context:include-filter type="annotation" expression="org.springframework.stereotype.Component"/>
    </context:component-scan>


    <!--    示例二
         use-default-filters="false":不适用默认情况下的全部扫描
         context:exclude-filter:不扫描那些内容
         这里是指,不扫描mapper包下所有带Controller注解的
         -->
    <context:component-scan base-package="mapper" >
        <context:exclude-filter type="annotation" expression="org.springframework.stereotype.Controller"/>
    </context:component-scan>

</beans>
③基于注解方式实现属性注入
- @AutoWired :根据属性类型进行自动装配
- @Qualifier :根据属性名称进行注入
- @Qualifier要和@AutoWired 搭配一块使用
- @Resource :可以根据类型注入,也可以根据名称注入
- @Value :注入普通类型属性
基于注解方式实现属性注入
@Autowired:根据属性类型进行自动装配
- 创建对象service和dao,在类添加创建对象注解
package dao;

import jdk.jfr.Registered;
import org.springframework.stereotype.Repository;

@Repository
public class UserImpl implements UserDao {

    @Override
    public void show() {
        System.out.println ("我是user");
    }
}
package service;

import dao.UserDao;
import org.springframework.beans.factory.annotation.Autowired;
import org.springframework.stereotype.Service;

@Service
public class UserService {

    //添加属性,不需要添加set方法
    @Autowired  //根据类型进行注入
    private UserDao userdao;
    public  void test(){
        System.out.println ("我是userservice");
        userdao.show ();
    }
}
-
在service注入dao对象,在service类添加dao类型属性,在属性上面使用注解
-
开启组件扫描
<?xml version="1.0" encoding="UTF-8"?>
<beans xmlns="http://www.springframework.org/schema/beans"
       xmlns:xsi="http://www.w3.org/2001/XMLSchema-instance"

       xmlns:p="http://www.springframework.org/schema/p"
       xmlns:context="http://www.springframework.org/schema/context"
       xsi:schemaLocation="http://www.springframework.org/schema/beans http://www.springframework.org/schema/beans/spring-beans.xsd
                           http://www.springframework.org/schema/context http://www.springframework.org/schema/context/spring-context.xsd">

    <!-- 开启组件扫描   -->
    <!-- 扫描多个包,之间可以用逗号, 隔开  或者扫描上层目录  -->
    <!--  全部扫描      -->
    <context:component-scan base-package="dao,service"></context:component-scan>
</beans>
- 测试
@Test
public  void test(){
    ApplicationContext applicationContext=
        new ClassPathXmlApplicationContext ("beannote.xml");
    UserService userService = applicationContext.getBean ("userService", UserService.class);
    System.out.println (userService);
    userService.test ();
}
3.5 完全注解开发
- 创建配置类,替代xml配置文件
package config;

import org.springframework.context.annotation.ComponentScan;
import org.springframework.context.annotation.Configuration;

@Configuration //创建配置类,替代xml配置文件
@ComponentScan(basePackages = {"dao,service"})
public class SpringConfig {

}
- 测试类
@Test
public  void test2(){

    //1.加载配置类
    //与之前写法不同,注意
    ApplicationContext applicationContext=
        new AnnotationConfigApplicationContext (SpringConfig.class);

    UserService userService = applicationContext.getBean ("userService", UserService.class);
    System.out.println (userService);
    userService.test ();
}
三、AOP
1. AOP是什么
AOP是什么:
-
AOP,即面向切面编程,利用AOP可以对业务逻辑的各个部分进行隔离,从而使得业务逻辑各部分之间的 耦合度 降低,提高程序的可重用性,同时提高了开发的效率。
-
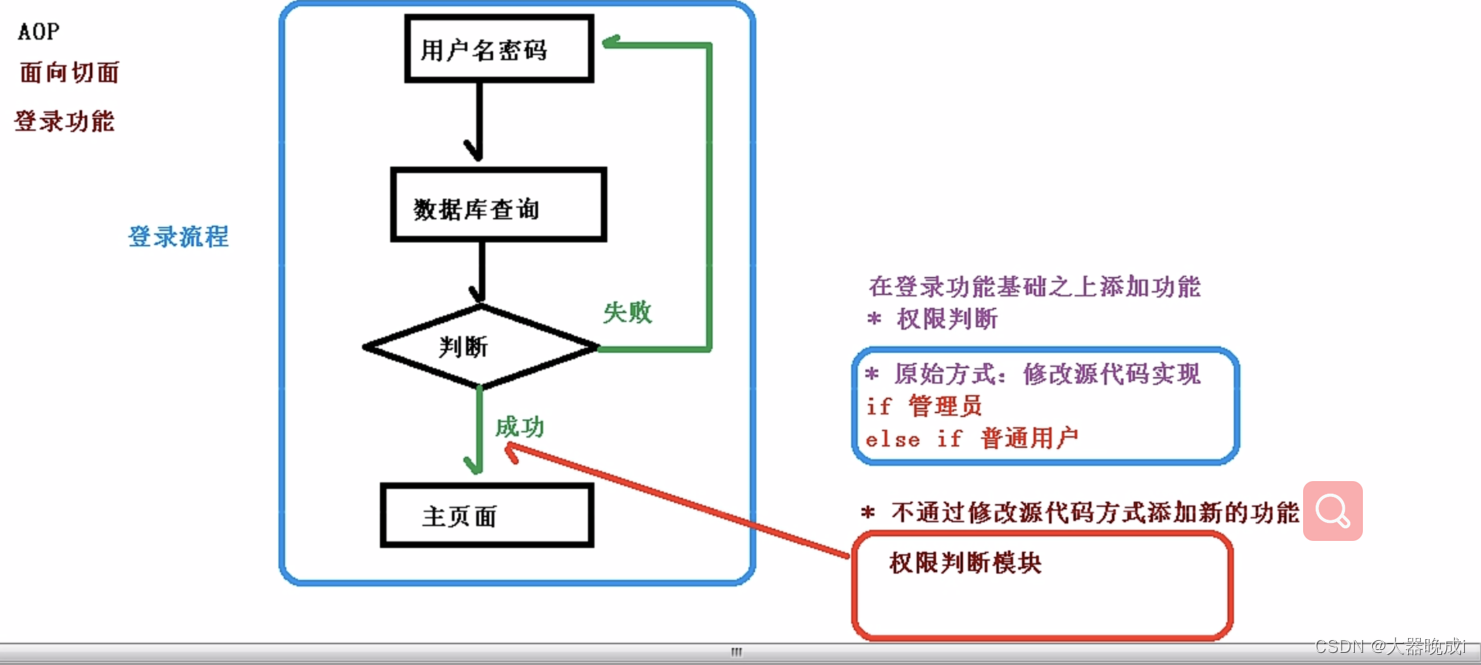
通俗描述:不通过修改源代码方式,在主干功能里面添加新功能
使用登录的例子来进行说明
2. AOP底层原理
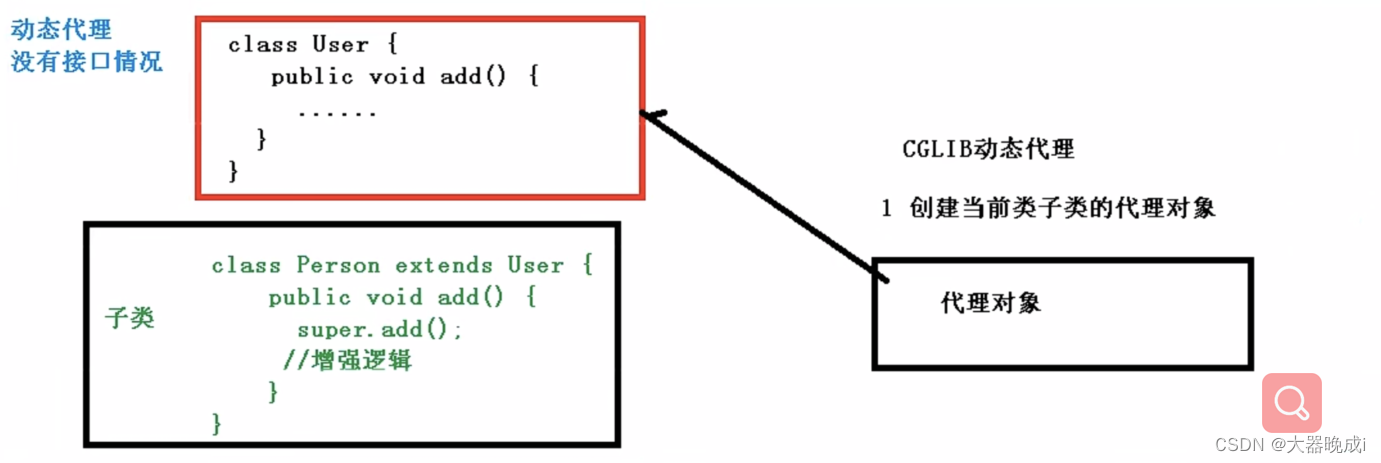
AOP底层使用动态代理方式
动态代理:
-
有接口 的情况,使用JDK动态代理
- 创建接口实现类的代理对象,增强类的方法

-
没有接口 的情况,使用 CGLIB动态代理
- 创建子类的代理对象,增强类的方法
3.AOP(JDK动态代理实现)
使用JDK动态代理
- 在Proxy类里面的方法创建代理对象
- 调用newProxyInstance方法
? 三个参数
- 类加载器
- 增强方法所在类,这个类实现的接口,支持多个接口
- 实现接口 InvocationHandler ,创建代理对象,写增强的方法
- 创建接口和相关类
package dao;

public interface UserDao {
    public  int add(int a,int b);
    public  String update(String id);
}
package dao;
public class UserImpl implements UserDao {
    @Override
    public int add(int a, int b) {
        System.out.println ("add方法执行了");
        return a+b;
    }

    @Override
    public String update(String id) {
        System.out.println ("update方法执行了");
        return id;
    }
}
- 在Proxy类里面的方法创建代理对象,调用newProxyInstance方法
package dao;

import java.lang.reflect.InvocationHandler;
import java.lang.reflect.Method;
import java.lang.reflect.Proxy;
import java.util.Arrays;

public class JDKProxy {
    public static void main(String[] args) {

        UserImpl userDao=new UserImpl ();
        //创建接口实现类对象代理
        Class[] interfaces={UserDao.class};

        UserDao dao = (UserDao) Proxy.newProxyInstance (JDKProxy.class.getClassLoader (), interfaces, new UserDaoProxy (userDao));
        int result = dao.add (3, 6);
        System.out.println ("result="+result);
        //        String id = dao.update ("9");
        //        System.out.println ("id:"+id);

    }
}
//创建代理对象代码
class UserDaoProxy implements InvocationHandler{
    private  Object obj;

    //1. 创建谁的代理对象,把谁传过来
    //有参数构造传递
    public  UserDaoProxy(Object obj){
        this.obj=obj;

    }

    //增强的逻辑
    @Override
    public Object invoke(Object proxy, Method method, Object[] args) throws Throwable {
        //方法之前
        System.out.println ("方法之前..."+method.getName ()+":传递的参数"+ Arrays.toString (args));
        //增强的方法
        Object res = method.invoke (obj, args);

        //方法之后
        System.out.println ("方法执行之后:"+obj);
        return res;
    }
}
4.AOP术语
- 连接点 :类里哪些方法可以被增强,这些方法成为连接点
- 切入点 :实际被真正增强的方法,称为切入点
- 通知(增强):
- 实际增强的逻辑部分称为通知(增强)
- 通知有多种类型:
- 前置通知
- 后置通知
- 环绕通知
- 异常通知
- 最终通知
- 切面 :是动作,把通知应用到切入点的过程
5.AOP的操作
①基于AspectJ 实现AOP操作
spring框架一般基于AspectJ实现AOP操作
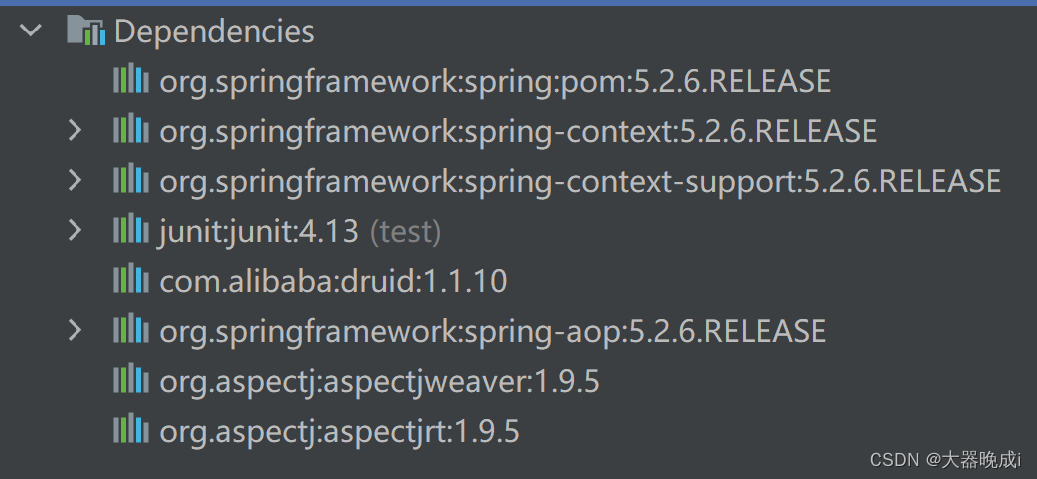
- AspectJ :不是spring的组成部分,是独立AOP框架,一般把AspectJ 和Spring 框架一起使用,进行AOP操作。
基于AspectJ 实现AOP操作
- 基于XML配置文件实现
- 基于注解方式实现
依赖
②切入点的表达式
切入点表达式的作用:知道对哪个类里面的哪个方法进行增强
语法结构:
execution([权限修饰符] [返回类型] [类全路径] 方法名称)
举例 1 :对com.spring.dao.UserDao类里的add方法进行增强
- execution(*com.spring.dao.UserDao.add(…) )
举例 2 :对com.spring.dao.UserDao类里的所有的方法进行增强
- execution(com.spring.dao.UserDao.(…) )
举例 3 :对com.spring.dao的所有类里的所有的方法进行增强
- execution(com.spring.dao..*(…) )
③AspectJ注解
- 创建类,在类里定义方法
package aopanno;
import org.springframework.stereotype.Component;

@Component
//被增强类
public class UUser {
    public   void add(){
        System.out.println ("add....");
    }
}
-
创建增强类(编写增强逻辑)
-
在增强类里面,创建方法,让不同方法代表不同通知类型
package aopanno;

import org.aspectj.lang.ProceedingJoinPoint;
import org.aspectj.lang.annotation.*;
import org.springframework.stereotype.Component;
@Component
@Aspect
//增强类
public class UUserPoxy {

    //相同切入点的抽取
    @Pointcut(value = "execution(* aopanno.UUser.add(..))")
    public  void pointdemo(){

    }
//前置通知
//@Before注解作为前置通知
@Before (value = "pointdemo()") //方法一:相同切入点的抽取
//    @Before (value = " execution(* aopanno.UUser.add(..))") //方法二:使用切入点的表达式
public  void before(){
    System.out.println ("before...");
}
//最终通知
@After (value = "pointdemo()")
public  void after(){
    System.out.println ("after...");
}

@AfterReturning(value = "pointdemo()")
public  void AfterReturning(){
    System.out.println ("AfterReturning...");
}

//异常通知
@AfterThrowing(value = "pointdemo()")
public  void AfterThrowing(){
    System.out.println ("AfterThrowing...");
}
//环绕通知
@Around (value = "pointdemo()")
public  void around(ProceedingJoinPoint proceedingJoinPoint) throws Throwable {
    System.out.println ("环绕之前...");

    //被增强的方法执行
    proceedingJoinPoint.proceed ();

    System.out.println ("环绕之后...");
}

}
- 进行通知的配置
-
在spring的配置文件中,开启注解扫描
-
使用注解创建被增强类和增强类对象
-
在增强类上面添加注解@Aspect
-
在spring配置文件中开启Aspect生成代理对象
<?xml version="1.0" encoding="UTF-8"?>
<beans xmlns="http://www.springframework.org/schema/beans"
       xmlns:xsi="http://www.w3.org/2001/XMLSchema-instance"        xmlns:context="http://www.springframework.org/schema/context"
       xmlns:aop="http://www.springframework.org/schema/aop"

       xsi:schemaLocation="http://www.springframework.org/schema/beans http://www.springframework.org/schema/beans/spring-beans.xsd

                           http://www.springframework.org/schema/context http://www.springframework.org/schema/context/spring-context.xsd
                           http://www.springframework.org/schema/aop http://www.springframework.org/schema/aop/spring-aop.xsd
                           ">
    <!--  在spring的配置文件中,开启注解扫描-->
    <context:component-scan base-package="aopanno"></context:component-scan>

    <!-- 在spring配置文件中开启Aspect生成代理对象-->
    <aop:aspectj-autoproxy></aop:aspectj-autoproxy>
</beans>
- 配置不同类型的通知
- 在增强类的里面,在通知方法上面添加通知类型注解,使用切入点表达式配置
- 优化:相同的切入点抽取
-
在类里创建方法,使用**@Pointcut**标签
@Pointcut(value = "execution(* aopanno.UUser.add(..))")
- 补充:有多个增强类对同一个方法进行增强,设置增强类优先级
- 在增强类上面添加注解**@Order**(数字类型值),数字类型值越小,优先级越高
④AspectJ配置文件(了解)
- 创建两个类,增强类和被增强类,创建方法
package aopXML;

public class Book {
    public  void buy(){
        System.out.println ("buy...");
    }
}
package aopXML;
//增强类
public class BookProxy {
    public  void before(){
        System.out.println ("before...");
    }
}
-
在spring 配置文件中创建两个类的对象
-
在spring配置文件中配置切入点
<?xml version="1.0" encoding="UTF-8"?>
<beans xmlns="http://www.springframework.org/schema/beans"
       xmlns:xsi="http://www.w3.org/2001/XMLSchema-instance"

       xmlns:context="http://www.springframework.org/schema/context"
       xmlns:aop="http://www.springframework.org/schema/aop"

       xsi:schemaLocation="http://www.springframework.org/schema/beans http://www.springframework.org/schema/beans/spring-beans.xsd

                           http://www.springframework.org/schema/context http://www.springframework.org/schema/context/spring-context.xsd
                           http://www.springframework.org/schema/aop http://www.springframework.org/schema/aop/spring-aop.xsd
                           ">

    <!--    创建对象-->
    <bean id="book" class="aopXML.Book"></bean>
    <bean id="bookProxy" class="aopXML.BookProxy"></bean>

    <!--    配置aop增强-->
    <aop:config>
        <!--        切入点-->
        <aop:pointcut id="p" expression="execution(* aopXML.Book.buy(..))"/>

        <!--        配置切面-->
        <aop:aspect ref="bookProxy">
            <!--            增强配置在具体的方法上-->
            <aop:before method="before" pointcut-ref="p"></aop:before>
        </aop:aspect>
    </aop:config>

</beans>
- 测试类
⑤完全注解开发 跳转到测试
创建配置类,不需要使用XML文件
@Configuration
@ComponentScan(basePackages = {"aopXML"})
@EnableAspectJAutoProxy(proxyTargetClass = true)


public class ConfigAop {
}
四、JdbcTemplate
1.什么是JdbcTemplate
spring框架是对JDBC进行封装,使用JdbcTemplate方便对数据库操作
2.JdbcTemplate准备工作
配置德鲁伊数据库连接池
- 导入依赖
- 配置德鲁伊数据库连接池
<?xml version="1.0" encoding="UTF-8"?>
<beans xmlns="http://www.springframework.org/schema/beans"
       xmlns:xsi="http://www.w3.org/2001/XMLSchema-instance"

       xmlns:context="http://www.springframework.org/schema/context"
       xmlns:aop="http://www.springframework.org/schema/aop"
       xsi:schemaLocation="
                           http://www.springframework.org/schema/beans http://www.springframework.org/schema/beans/spring-beans.xsd
                           http://www.springframework.org/schema/context http://www.springframework.org/schema/context/spring-context.xsd
                           http://www.springframework.org/schema/aop http://www.springframework.org/schema/aop/spring-aop.xsd
                           ">

    <!--    开启组件扫描-->
    <context:component-scan base-package="service,dao"></context:component-scan>
<!--直接配置连接池 -->
<bean id="dataSource" class="com.alibaba.druid.pool.DruidDataSource" destroy-method="close">
<property name="driverClassName" value="com.mysql.jdbc.Driver"/>
<property name="url" value="jdbc:mysql://localhost:3306/spring?characterEncoding=UTF-8&useSSL=false"/>
<property name="username" value="root"/>
<property name="password" value="fan1116."/>
</bean>
<!-- JdbcTemplate对象-->
<bean id="jdbcTemplate" class="org.springframework.jdbc.core.JdbcTemplate">
<!-- 注入dataSource-->
<property name="dataSource" ref="dataSource"></property>
</bean>
-
配置JdbcTemplate对象,注入dataSource
-
创建service类,创建dao类,在dao注入JdbcTemplate对象,在service里面注入dao属性
package service;

import dao.BookDao;
import org.springframework.beans.factory.annotation.Autowired;
import org.springframework.stereotype.Service;

@Service
public class BookService {
    //注入属性
    @Autowired
    private BookDao bookDao;
}
package dao;

import org.springframework.beans.factory.annotation.Autowired;
import org.springframework.jdbc.core.JdbcTemplate;
import org.springframework.stereotype.Repository;

@Repository
public class BookImpl implements BookDao{
    //注入JdbcTemplate
    @Autowired
    private JdbcTemplate jdbcTemplate;
}
3.JdbcTemplate操作数据库—增添改操作
-
创建数据库表,并且创建实体类
-
编写service和dao
-
在dao进行数据库操作
-
调用JdbcTemplate对象里面update、delete、insert 方法实现添加操作
-
第一个参数:sql 语句
-
第二个参数:可变参数,设置sql 语句值
-
-
package dao;

import entity.Book;
import org.springframework.beans.factory.annotation.Autowired;
import org.springframework.jdbc.core.JdbcTemplate;
import org.springframework.stereotype.Repository;

@Repository
public class BookImpl implements BookDao{

    //注入JdbcTemplate
    @Autowired
    private JdbcTemplate jdbcTemplate;

    @Override
    public void add(Book book) {
        String sql="insert into book values(?,?,?)";
        Object[] args={book.getName (), book.getPrise (), book.getId ()};

        int add = jdbcTemplate.update (sql,args );
        System.out.println ("成功增加:"+add+"条数据");
    }

    @Override
    public void update(Book book) {
        String sql="update book set name=?,prise=? where id=?";

        Object[] args={book.getName (), book.getPrise (), book.getId ()};
        int update = jdbcTemplate.update (sql, args);
        System.out.println ("成功修改:"+update+"条数据");
    }

    @Override
    public void delete(Integer id) {
        String sql="delete from book where id=?";
        int delete = jdbcTemplate.update (sql, id);
        System.out.println ("成功删除:"+delete+"条数据");

    }
}


package service;

import dao.BookDao;
import entity.Book;
import org.springframework.beans.factory.annotation.Autowired;
import org.springframework.stereotype.Service;

@Service
public class BookService {
    //注入属性
    @Autowired
    private BookDao bookDao;

    public  void addBook(Book book){
        bookDao.add(book);
    }

    public  void updataBook(Book book){
        bookDao.update (book);
    }

    public  void deleteBook(Integer id){
        bookDao.delete (id);
    }
}
- 测试类
@Test
public  void addtest(){
    ApplicationContext applicationContext=
        new ClassPathXmlApplicationContext ("bean1.xml");
    BookService bookService = applicationContext.getBean ("bookService", BookService.class);

    bookService.addBook (new Book ("活着1",99,null));

}

@Test
public  void updatetest(){
    ApplicationContext applicationContext=
        new ClassPathXmlApplicationContext ("bean1.xml");
    BookService bookService = applicationContext.getBean ("bookService", BookService.class);

    bookService.updataBook (new Book ("活着",33,10));
}

@Test
public  void deleteTest(){
    ApplicationContext applicationContext=
        new ClassPathXmlApplicationContext ("bean1.xml");
    BookService bookService = applicationContext.getBean ("bookService", BookService.class);

    bookService.deleteBook (1);

}
4.JdbcTemplate操作数据库—查询功能
-
查询返回某个值
调用JdbcTemplate对象里面queryForObject方法实现查询操作

- 第一个参数:sql 语句
- 第二个参数:返回类型Class
-
查询返回某个对象
调用JdbcTemplate对象里面queryForObject方法实现查询操作

- 第一个参数:sql 语句
- 第二个参数:RowMapper,是接口,返回不同类型数据,使用这个接口里面实现类完成数据封装
- 第三个参数:sql语句查询的值
-
查询返回一个集合
调用JdbcTemplate对象里面query方法实现查询操作

- 第一个参数:sql 语句
- 第二个参数:RowMapper,是接口,返回不同类型数据,使用这个接口里面实现类完成数据封装
- 第三个参数:sql语句查询的值
BookImpl
package dao;

import entity.Book;
import org.springframework.beans.factory.annotation.Autowired;
import org.springframework.jdbc.core.BeanPropertyRowMapper;
import org.springframework.jdbc.core.JdbcTemplate;
import org.springframework.stereotype.Repository;

import java.util.List;

@Repository
public class BookImpl implements BookDao{
    //注入JdbcTemplate
    @Autowired
    private JdbcTemplate jdbcTemplate;


    @Override
    public int  seletCount() {
        String sql="select count(*)from book" ;
        Integer integer = jdbcTemplate.queryForObject (sql, Integer.class);
        System.out.println ("一共查询出:"+integer+"条记录");
        return integer;
    }

    @Override
    public Book seletBook(Integer id) {
        String sql="select * from book where id=?";
        Book book = jdbcTemplate.queryForObject (sql, new BeanPropertyRowMapper<Book> (Book.class),id);

        System.out.println (book);
        return book;
    }

    @Override
    public List<Book> findAllBook() {
        String sql="select * from book ";
        List<Book> list = jdbcTemplate.query (sql, new BeanPropertyRowMapper<Book> (Book.class));
        System.out.println (list.toString ());
        return list;
    }


}
BookService
package service;

import dao.BookDao;
import entity.Book;
import org.springframework.beans.factory.annotation.Autowired;
import org.springframework.stereotype.Service;

@Service
public class BookService {
    //注入属性
    @Autowired
    private BookDao bookDao;

    public  int    findCount(){
        return    bookDao.seletCount ();

    }

    public  void  findDocument(Integer id){
        bookDao.seletBook (id);
    }

    public  void findAll(){
        bookDao.findAllBook ();
    }
}
测试类
@Test
public  void test1(){
    ApplicationContext applicationContext=
        new ClassPathXmlApplicationContext ("bean1.xml");
    BookService bookService = applicationContext.getBean ("bookService", BookService.class);

    bookService.findCount ();

}

@Test
public  void test2(){
    ApplicationContext applicationContext=
        new ClassPathXmlApplicationContext ("bean1.xml");
    BookService bookService = applicationContext.getBean ("bookService", BookService.class);
    bookService.findDocument (9);
}

@Test
public  void test3(){
    ApplicationContext applicationContext=
        new ClassPathXmlApplicationContext ("bean1.xml");
    BookService bookService = applicationContext.getBean ("bookService", BookService.class);
    bookService.findAll ();
}
5.JdbcTemplate操作数据库—批量操作
批量操作的统一使用方法
调用JdbcTemplate对象里面 batchUpdate方法实现批量操作

-
第一个参数:sql
-
第二个参数:List集合,添加多条记录数据
BookService
package service;

import dao.BookDao;
import entity.Book;
import org.springframework.beans.factory.annotation.Autowired;
import org.springframework.stereotype.Service;

import java.util.List;

@Service
public class BookService {
    //注入属性
    @Autowired
    private BookDao bookDao;

    //批量添加
    public  void batchAdd(List<Object[]> batchargs){
        bookDao.batchAddBook(batchargs);
    }


    //批量修改
    public  void batchUpdate(List<Object[]> batchargs){
        bookDao.batchUpdateBook(batchargs);
    }

    //批量删除
    public  void batchDelete(List<Object[]> batchargs){
        bookDao.batchDeleteBook(batchargs);
    }

}
BookImpl
package dao;

import entity.Book;
import org.springframework.beans.factory.annotation.Autowired;
import org.springframework.jdbc.core.BeanPropertyRowMapper;
import org.springframework.jdbc.core.JdbcTemplate;
import org.springframework.stereotype.Repository;

import java.util.Arrays;
import java.util.List;

@Repository
public class BookImpl implements BookDao{
    //注入JdbcTemplate
    @Autowired
    private JdbcTemplate jdbcTemplate;


    //批量添加操作
    @Override
    public void batchAddBook(List<Object[]> batchargs) {
        String sql="insert into book values(?,?,?)";
        int[] ints = jdbcTemplate.batchUpdate (sql, batchargs);
        System.out.println (Arrays.toString (ints));
    }
    //批量修改操作
    @Override
    public void batchUpdateBook(List<Object[]> batchargs) {
        String sql="update book set name=?,prise=? where id=?";
        int[] ints = jdbcTemplate.batchUpdate (sql, batchargs);
        System.out.println (Arrays.toString (ints));
    }

    //批量删除操作
    @Override
    public void batchDeleteBook(List<Object[]> batchargs) {
        String sql="delete from book where id=?";
        int[] ints = jdbcTemplate.batchUpdate (sql, batchargs);
        System.out.println (Arrays.toString (ints));
    }


}
测试类
@Test
public  void test(){
    ApplicationContext applicationContext=
        new ClassPathXmlApplicationContext ("bean1.xml");
    BookService bookService = applicationContext.getBean ("bookService", BookService.class);

    List<Object[]> batchargs= new ArrayList ();
    Object[] o1={"西游记",23,null};
    Object[] o2={"红楼梦",88,null};
    Object[] o3={"水浒传",78,null};
    batchargs.add (o1);
    batchargs.add (o2);
    batchargs.add (o3);
    bookService.batchAdd (batchargs);
}

@Test
public  void test2(){
    ApplicationContext applicationContext=
        new ClassPathXmlApplicationContext ("bean1.xml");
    BookService bookService = applicationContext.getBean ("bookService", BookService.class);
    List<Object[]> batchargs= new ArrayList ();
    Object[] o1={"AAA",23,14};
    Object[] o2={"BBB",88,15};
    Object[] o3={"CCC",78,16};
    batchargs.add (o1);
    batchargs.add (o2);
    batchargs.add (o3);
    bookService.batchUpdate (batchargs);
}

@Test
public  void test3(){
    ApplicationContext applicationContext=
        new ClassPathXmlApplicationContext ("bean1.xml");
    BookService bookService = applicationContext.getBean ("bookService", BookService.class);

    List<Object[]> batchargs= new ArrayList ();
    Object[] o1={2};
    Object[] o2={3};

    batchargs.add (o1);
    batchargs.add (o2);

    bookService.batchDelete (batchargs);
}
五、事务管理
1.事务的概念
什么是事务
- 事务是数据库操作最基本单元,逻辑上一组操作,要么都成功,如果有一个失败,所有操作都失败
典型场景:银行转账
A给B转账100元,A少100元,B多100元
事务的四大特性(ACID):
- 原子性:事务的最小工作单位,不可再分
- 一致性:事务必须保证多条DML语句同时成功或失败
- 隔离性:事务A与事务B之间具有隔离
- 持久性:最终数据必须持久化到硬盘文件中,事务才算最终的结束
2.搭建事务操作环境及引入
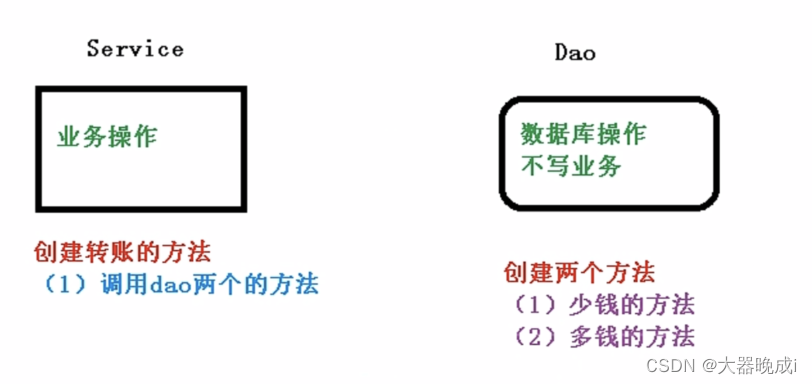
创建数据库表,添加记录
创建service和dao,完成对象创建和注入
- 在service注入dao,在dao注入JdbcTemplate,在JdbcTemplate注入DataSource
在dao里面创建方法:多钱的方法、少钱的方法
在service里面创建转账方法,调用dao的两个方法
引入:如果在多钱和少钱的两个方法之间出现异常,则会出现问题,所以要引入 事务,实现 ACID特性
3.spring事务管理介绍
-
事务添加到JavaEE三层架构里的service层(业务逻辑层)
-
在spring进行事务管理操作有两种方法:
-
声明式事务管理
-
编程式事务管理(了解)
- 开启事务
- 进行业务操作
- 没有发生异常,则提交事务
- 出现异常,事务回滚
- 声明式事务管理:
-
基于注解方法
-
基于XML配置文件方式
- 在spring进行声明式事务管理,底层使用AOP原理
-
spring 事务管理API
提供一个接口,PlatformTransactionManager 代表事务管理器(这个接口针对不同的框架提供不同的实现类,如下图)

4.spring声明式事务管理(注解方式)
DataSourceTransactionManager
- 在spring配置文件配置事务管理器,并且注入数据源
<!--   创建事务管理器 -->
<bean id="transactionManager" class="org.springframework.jdbc.datasource.DataSourceTransactionManager">
    <!--    注入数据源-->
    <property name="dataSource" ref="dataSource"></property>
</bean>
-
开启事务注解
-
在spring配置文件引入名称空间 tx
-
开启事务注解
<!--    开启事务注解-->
<tx:annotation-driven transaction-manager="transactionManager"></tx:annotation-driven>
-
-
在service类(或获取service类里面的方法上,添加事务注解**@Transactional**)
@Transactional 可以添加到类上,也可以添加到类上的方法上
- 如果把这个注解添加到类上面,这个类里面所有的方法都添加事务
- 如果把这个注解添加到类的方法上面,为这个方法添加事务
5.spring声明式事务管理-事务参数
在service类上面添加了注解@Transactional ,在这个注解里面可以配置事务的相关参数
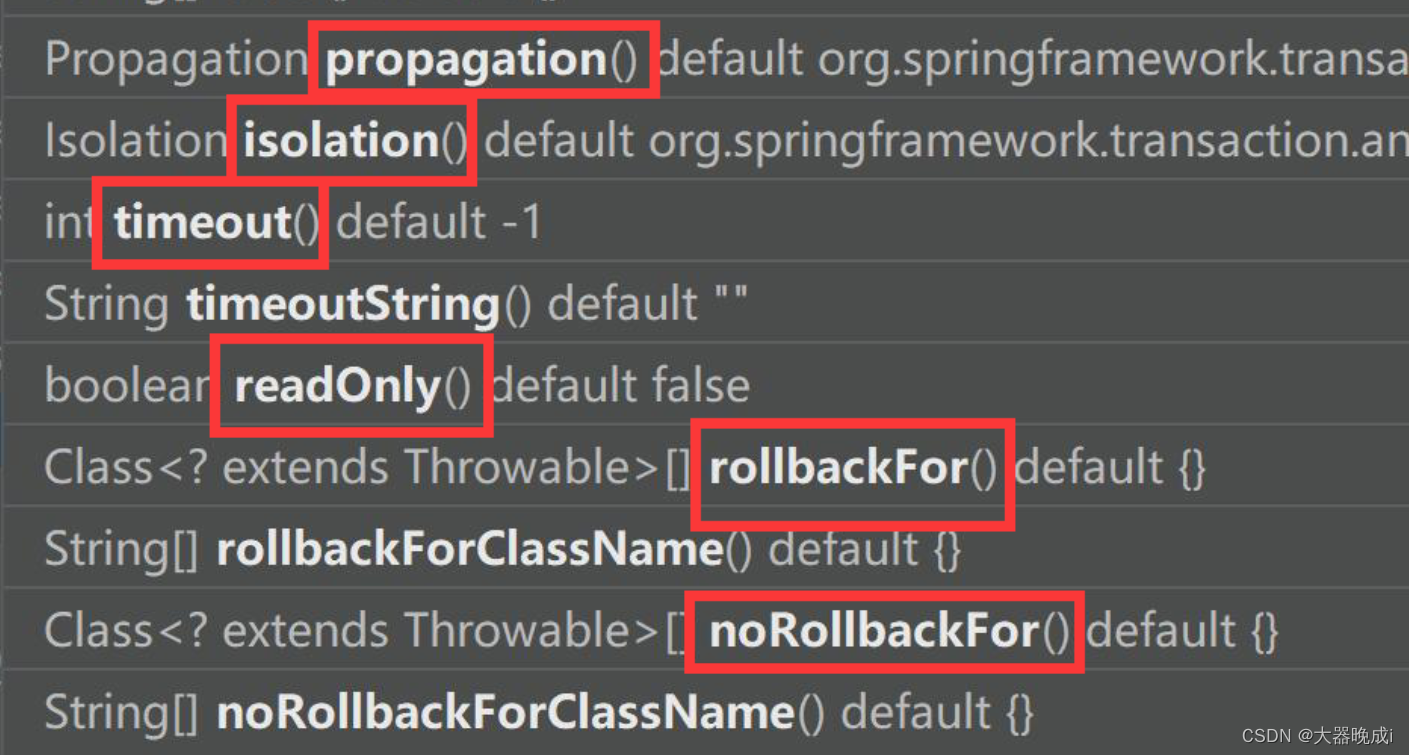
具体参数
-
propagation :事务传播行为
-
事务传播行为:多事务方法(事务方法:对数据库表数据进行变化的操作) 直接进行调用,这个过程事务是如何进行管理的
-

-

-
@Transactional(propagation = Propagation.REQUIRED)
-
-
isolation :事务隔离级别
-
事务有特性成为隔离性,多事务操作之间不会产生影响,不考虑隔离性产生很多问题
-
有三个读问题:脏读、不可重复读、虚读
- 脏读:一个未提交事务读到另一个未提交事务
- 不可重复读:一个未提交事务读到了另一个提交事务修改的数据
- 虚读:一个未提交事务读到了另一个提交事务 添加的数据
-
解决:通过设置事务隔离级别,解决问题
-

-
@Transactional(propagation = Propagation.REQUIRED,isolation = Isolation.REPEATABLE_READ)
-
-
-
timeout :超时时间
- 事务需要在一定事件内进行提交,如果不提交进行回滚,
- 默认值是-1,设置时间以秒为单位进行
-
readOnly :是否只读
- 读:查询操作 写:增加修改删除操作
- readOnly默认值是false,表示可以查询、增减删除
- 当设置成true后,只能进行读操作
-
rollbackFor :回滚
- 设置出现哪些异常进行事务回滚
-
noRollbackFor :不回滚
- 设置出现哪些异常不进行事务回滚
6.spring声明式事务管理(XML方式)
-
在spring 配置文件中进行配置:事务管理器
-
配置通知
-
配置切入点、切面
<?xml version="1.0" encoding="UTF-8"?>
<beans xmlns="http://www.springframework.org/schema/beans"
xmlns:xsi="http://www.w3.org/2001/XMLSchema-instance"
xmlns:aop="http://www.springframework.org/schema/aop"
xmlns:context="http://www.springframework.org/schema/context"
xmlns:tx="http://www.springframework.org/schema/tx"
xsi:schemaLocation="
http://www.springframework.org/schema/beans http://www.springframework.org/schema/beans/spring-beans.xsd
http://www.springframework.org/schema/aop http://www.springframework.org/schema/aop/spring-aop.xsd
http://www.springframework.org/schema/context http://www.springframework.org/schema/context/spring-context.xsd
http://www.springframework.org/schema/tx http://www.springframework.org/schema/tx/spring-tx.xsd
">
<!-- 开启组件扫描-->
<context:component-scan base-package="service,dao"></context:component-scan>
<!--直接配置连接池 -->
<bean id="dataSource" class="com.alibaba.druid.pool.DruidDataSource" destroy-method="close">
<property name="driverClassName" value="com.mysql.jdbc.Driver"/>
<property name="url" value="jdbc:mysql://localhost:3306/spring?characterEncoding=UTF-8&useSSL=false"/>
<property name="username" value="root"/>
<property name="password" value="fan1116."/>
</bean>
<!-- JdbcTemplate对象-->
<bean id="jdbcTemplate" class="org.springframework.jdbc.core.JdbcTemplate">
<!-- 注入dataSource-->
<property name="dataSource" ref="dataSource"></property>
</bean>
<!-- 1. 创建事务管理器 -->
<bean id="transactionManager" class="org.springframework.jdbc.datasource.DataSourceTransactionManager">
<!-- 注入数据源-->
<property name="dataSource" ref="dataSource"></property>
</bean>
<!--2, 配置通知-->
<tx:advice id="txadvice">
<!-- 配置事务参数-->
<tx:attributes>
<!-- 指定那种规则的方法上面添加事务-->
<tx:method name="transfer*" propagation="REQUIRES_NEW" isolation="REPEATABLE_READ" />
<!-- <tx:method name="transfer*"/>-->
</tx:attributes>
</tx:advice>
<!-- 3.配置切入点和切面 -->
<aop:config>
<!-- 配置切入点-->
<aop:pointcut id="pt" expression="execution(* service.UserService.*(..))"/>
<!-- 配置切入面-->
<aop:advisor advice-ref="txadvice" pointcut-ref="pt"></aop:advisor>
</aop:config>
</beans>
7.spring声明式事务管理(完全注解方式)
创建配置类,使用配置类代替XML文件
package config;

import com.alibaba.druid.pool.DruidDataSource;
import org.springframework.context.annotation.Bean;
import org.springframework.context.annotation.ComponentScan;
import org.springframework.context.annotation.Configuration;
import org.springframework.jdbc.core.JdbcTemplate;
import org.springframework.jdbc.datasource.DataSourceTransactionManager;
import org.springframework.transaction.annotation.EnableTransactionManagement;

import javax.sql.DataSource;

@Configuration//配置类
@ComponentScan(basePackages = "dao,service")//组件扫描
@EnableTransactionManagement//开启事务
public class UserConfig {
    // 创建数据库连接池
    @Bean
    public DruidDataSource getDruidDataSource(){
        DruidDataSource dataSource=new DruidDataSource ();
        dataSource.setDriverClassName ("com.mysql.jdbc.Driver");
        dataSource.setUrl ("jdbc:mysql://localhost:3306/spring?characterEncoding=UTF-8&useSSL=false");
        dataSource.setUsername ("root");
        dataSource.setPassword ("fan1116.");
        return dataSource;
    }
    //JdbcTemplate
    @Bean
    public JdbcTemplate getJdbcTemplate(DataSource dataSource){
        //daoioc容器中根据类型找到dataSource
        JdbcTemplate jdbcTemplate=new JdbcTemplate ();
        //注入dataSource
        jdbcTemplate.setDataSource (dataSource);
        return jdbcTemplate;
    }

    //创建事务管理器对象
    @Bean
    public DataSourceTransactionManager getDataSourceTransactionManager(DataSource dataSource){
        DataSourceTransactionManager transactionManager=new DataSourceTransactionManager ();
        transactionManager.setDataSource (dataSource);
        return transactionManager;
    }

}
六、Spring 5新特性
整个spring 5 框架代码基于java8,运行时兼容JDK9,许多不建议使用的类和方法都已经删除
1.整合日志框架
log4j2.xml
spring 5 已经移除了Log4jConfigListener ,官方建议使用 Log4j2
2. Nullable注解和函数式风格
spring 核心容器支持@Nullable注解
- @Nullable注解可以使用在 方法上面,属性上面,参数上面,表示方法返回可以为空,属性值可以为空,参数值可以为空
spring 核心容器支持函数式风格GenericApplicationContext
举例:通过GenericApplicationContext在spring注册对象
@Test
public  void testGenericApplicationContext(){
    //1.创建GenericApplicationContext对象
    GenericApplicationContext context =new GenericApplicationContext ();
    //2.调用context进行对象注册
    context.refresh ();
 //     context.registerBean ("user", User.class,()->new User ()); 写法一:
    context.registerBean ( User.class,()->new User ());  //写法二:
    //3.获取在spring注册的对象
 //        User user = (User) context.getBean ("user");      写法一对应的获取
    User user = (User) context.getBean ("dao.User");

    System.out.println (user);
}
3.spring 5 整合Junit单元测试
依赖
<dependency>
    <groupId>org.springframework</groupId>
    <artifactId>spring-test</artifactId>
    <version>5.2.6.RELEASE</version>
    <scope>test</scope>
</dependency>

<dependency>
    <groupId>junit</groupId>
    <artifactId>junit</artifactId>
    <version>4.13</version>
    <scope>test</scope>
</dependency>


<dependency>
    <groupId>org.junit.jupiter</groupId>
    <artifactId>junit-jupiter-engine</artifactId>
    <version>5.5.2</version>
    <scope>test</scope>
</dependency>
之前的测试
@Test
public  void test(){
    ApplicationContext applicationContext=
        new ClassPathXmlApplicationContext ("bean1.xml");
    UserService userService = applicationContext.getBean ("userService", UserService.class);
    userService.transfer ();
}
Junit 4测试
import org.junit.Test;
import org.junit.runner.RunWith;
import org.springframework.beans.factory.annotation.Autowired;
import org.springframework.test.context.ContextConfiguration;
import org.springframework.test.context.junit4.SpringJUnit4ClassRunner;
import service.UserService;

@RunWith (SpringJUnit4ClassRunner.class)//单元测试框架
@ContextConfiguration("classpath:bean1.xml")//加载配置文件
public class Junit4Test {

    @Autowired
    private UserService userService;

    @Test
    public  void test(){
        System.out.println ("hhhhh");
        userService.transfer ();
    }
}
Junit 5 测试
import org.junit.jupiter.api.Test;
import org.junit.jupiter.api.extension.ExtendWith;
import org.springframework.beans.factory.annotation.Autowired;
import org.springframework.test.context.ContextConfiguration;
import org.springframework.test.context.junit.jupiter.SpringExtension;
import org.springframework.test.context.junit.jupiter.SpringJUnitConfig;
import service.UserService;

//写法一:
//@ExtendWith (SpringExtension.class)
//@ContextConfiguration("classpath:bean1.xml")

//写法二:
@SpringJUnitConfig(locations = "classpath:bean1.xml")


public class Junit5Test {
    @Autowired
    private UserService userService;

    @Test
    public  void test(){
        userService.transfer ();
    }
}