概述
之前我们使用注解的方式(即配置类的方式)来整合了SpringMVC,这一讲中,我们来学校如果定制与接管Spring MVC。
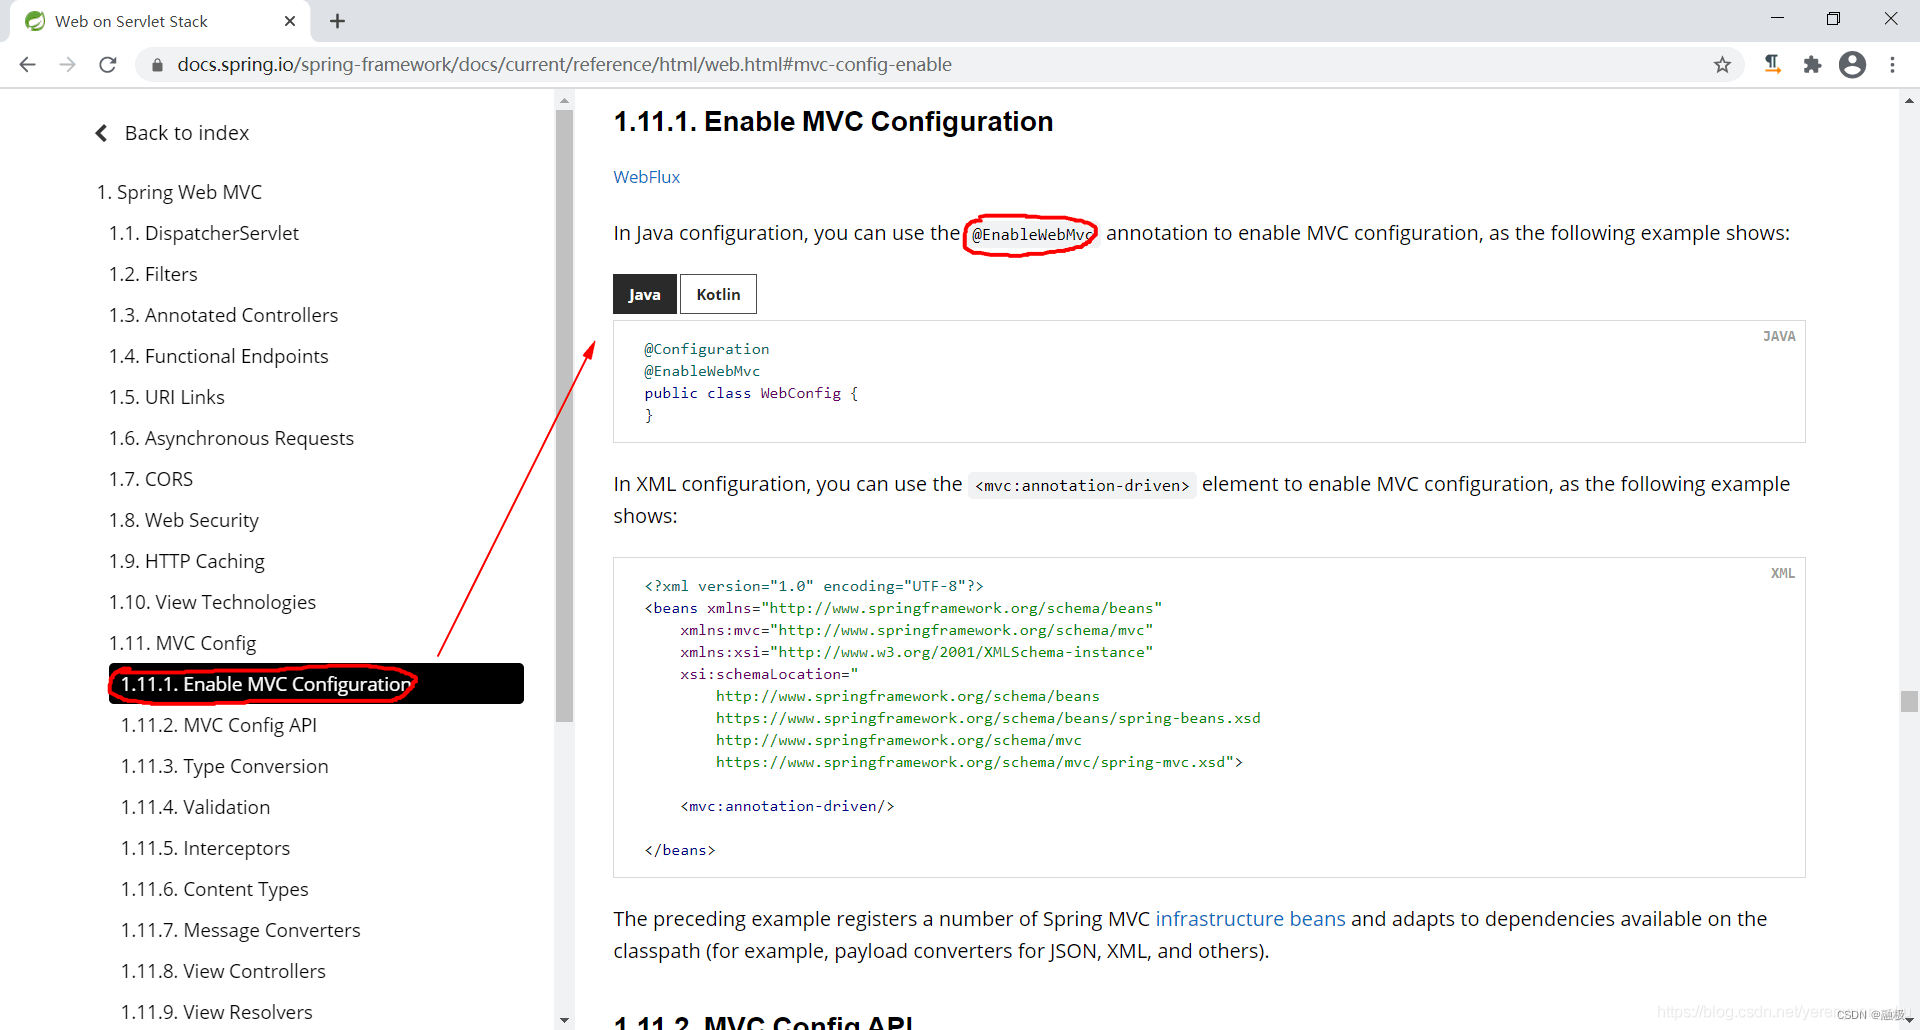
我们以前会在Spring MVC的配置文件中配置非常多的东西,但是现在没有该配置文件了,那么我们该怎么做到上述的这些事情呢?其实非常简单,只要查看Spring MVC的官方文档就知道了,找到1.11.1. Enable MVC Configuration这一小节,映入眼帘的就是一个@EnableWebMvc注解,如下图所示。
定制与接口Spring MVC
第一步,首先你得写一个配置类,然后将@EnableWebMvc注解标注在该配置类上。我们就以上一讲中的AppConfig配置类为例,将@EnableWebMvc注解标注在该配置类上,如下所示。
package com.meimeixia.config;

import org.springframework.context.annotation.ComponentScan;
import org.springframework.context.annotation.FilterType;
import org.springframework.context.annotation.ComponentScan.Filter;
import org.springframework.stereotype.Controller;
import org.springframework.web.servlet.config.annotation.EnableWebMvc;

// 该配置类相当于Spring MVC的配置文件
// Spring MVC容器只扫描Controller,它是一个子容器
// useDefaultFilters=false:禁用默认的过滤规则
@ComponentScan(value="com.meimeixia",includeFilters={
		@Filter(type=FilterType.ANNOTATION, classes={Controller.class})
},useDefaultFilters=false)
@EnableWebMvc
public class AppConfig {
}
@EnableWebMvc注解的作用就是来开启Spring MVC的定制配置功能。我们查看Spring MVC官方文档中的1.11.1. Enable MVC Configuration这一小节的内容,发现在配置类上标注了@EnableWebMvc注解之后,相当于我们以前在xml配置文件中加上了mvc:annotation-driven/这样一个配置,它是来开启Spring MVC的一些高级功能的。
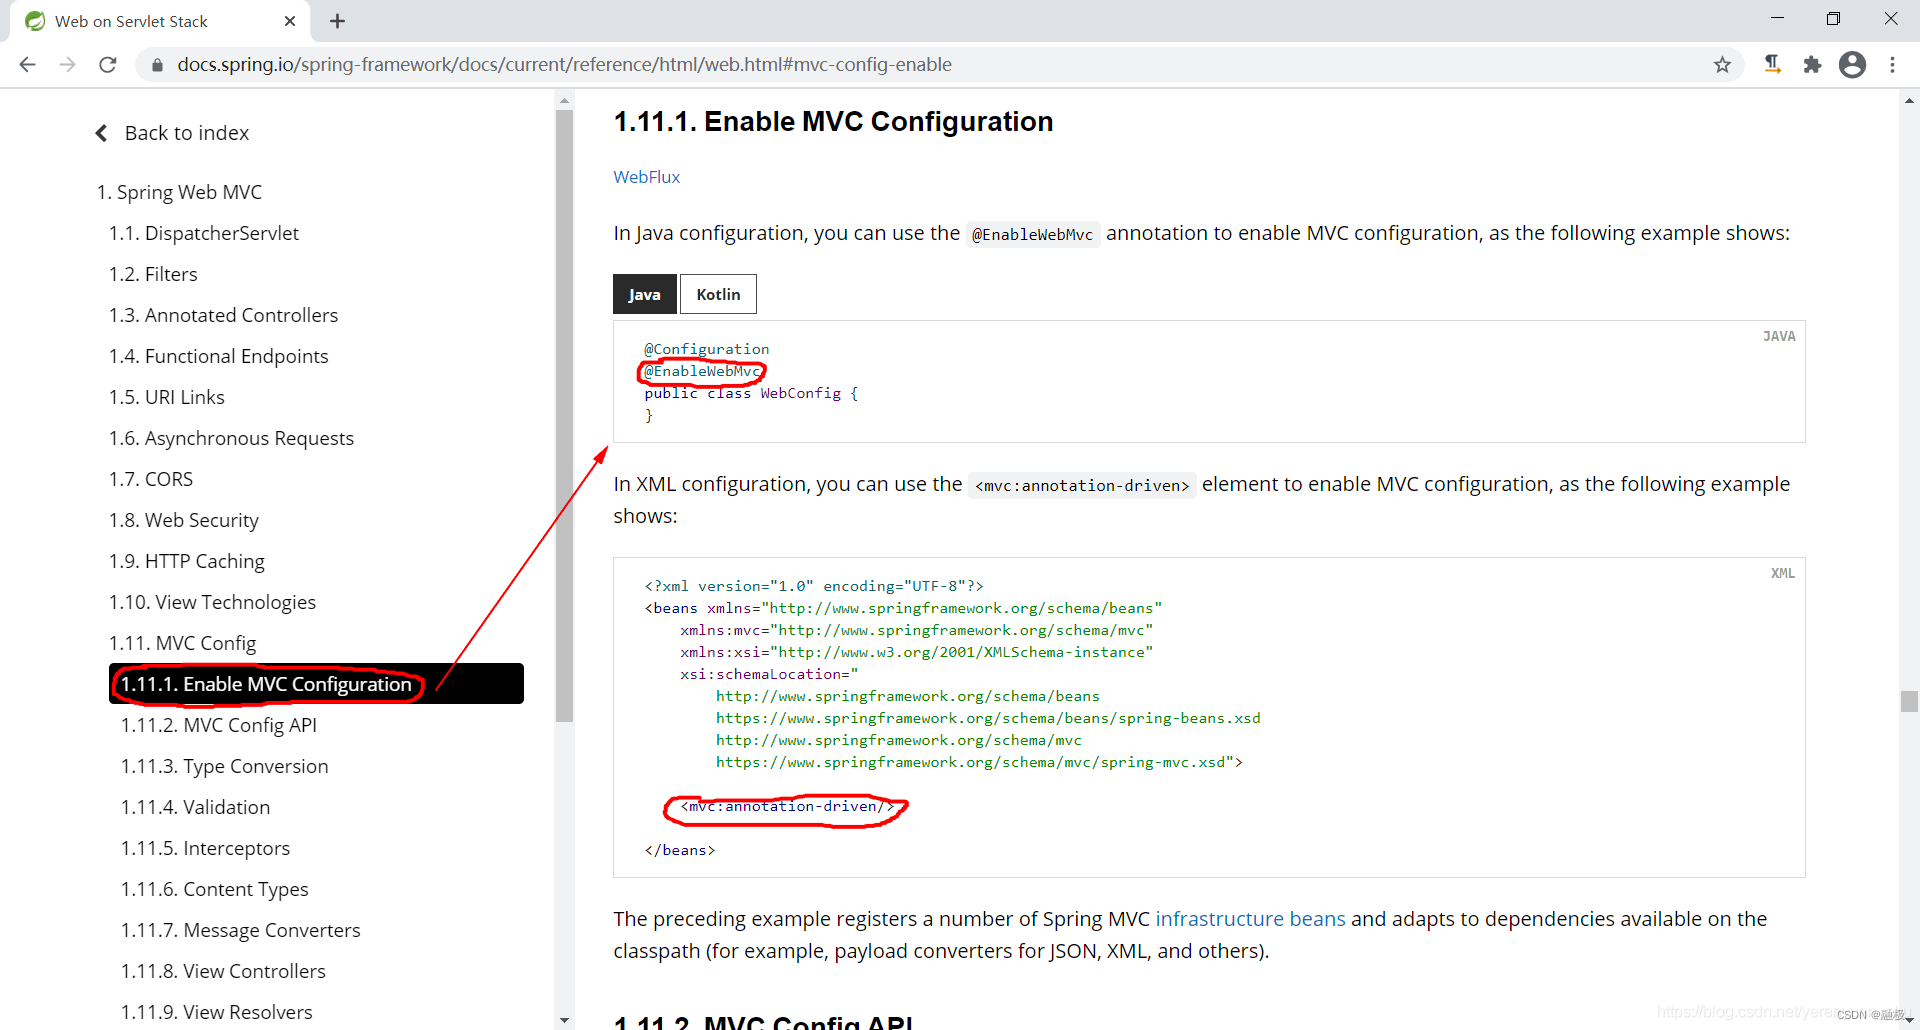
第二步,配置组件。比如视图解析器、视图映射、静态资源映射以及拦截器等等,直接参考Spring MVC的官方文档就可以了。
我们查看一下Spring MVC官方文档中1.11.2. MVC Config API这一小节的内容,发现只须让Java配置类实现WebMvcConfigurer接口,就可以来定制配置。
package com.meimeixia.config;

import java.util.List;

import org.springframework.context.annotation.ComponentScan;
import org.springframework.context.annotation.FilterType;
import org.springframework.format.FormatterRegistry;
import org.springframework.http.converter.HttpMessageConverter;
import org.springframework.context.annotation.ComponentScan.Filter;
import org.springframework.stereotype.Controller;
import org.springframework.validation.MessageCodesResolver;
import org.springframework.validation.Validator;
import org.springframework.web.method.support.HandlerMethodArgumentResolver;
import org.springframework.web.method.support.HandlerMethodReturnValueHandler;
import org.springframework.web.servlet.HandlerExceptionResolver;
import org.springframework.web.servlet.config.annotation.AsyncSupportConfigurer;
import org.springframework.web.servlet.config.annotation.ContentNegotiationConfigurer;
import org.springframework.web.servlet.config.annotation.CorsRegistry;
import org.springframework.web.servlet.config.annotation.DefaultServletHandlerConfigurer;
import org.springframework.web.servlet.config.annotation.EnableWebMvc;
import org.springframework.web.servlet.config.annotation.InterceptorRegistry;
import org.springframework.web.servlet.config.annotation.PathMatchConfigurer;
import org.springframework.web.servlet.config.annotation.ResourceHandlerRegistry;
import org.springframework.web.servlet.config.annotation.ViewControllerRegistry;
import org.springframework.web.servlet.config.annotation.ViewResolverRegistry;
import org.springframework.web.servlet.config.annotation.WebMvcConfigurer;

// 该配置类相当于Spring MVC的配置文件
// Spring MVC容器只扫描Controller,它是一个子容器
// useDefaultFilters=false:禁用默认的过滤规则
@ComponentScan(value="com.meimeixia",includeFilters={
		@Filter(type=FilterType.ANNOTATION, classes={Controller.class})
},useDefaultFilters=false)
@EnableWebMvc
public class AppConfig implements WebMvcConfigurer {

    @Override
    public void configurePathMatch(PathMatchConfigurer configurer) {
        // TODO Auto-generated method stub

    }

    @Override
    public void configureAsyncSupport(AsyncSupportConfigurer configurer) {
        // TODO Auto-generated method stub

    }

    @Override
    public void configureDefaultServletHandling(DefaultServletHandlerConfigurer configurer) {
        // TODO Auto-generated method stub
        configurer.enable()
    }

    // 以下还有非常多的方法,在这里我就不一一写出来了
    // ......
}
我们发现这个WebMvcConfigurer接口里面定义了好多的方法啊!
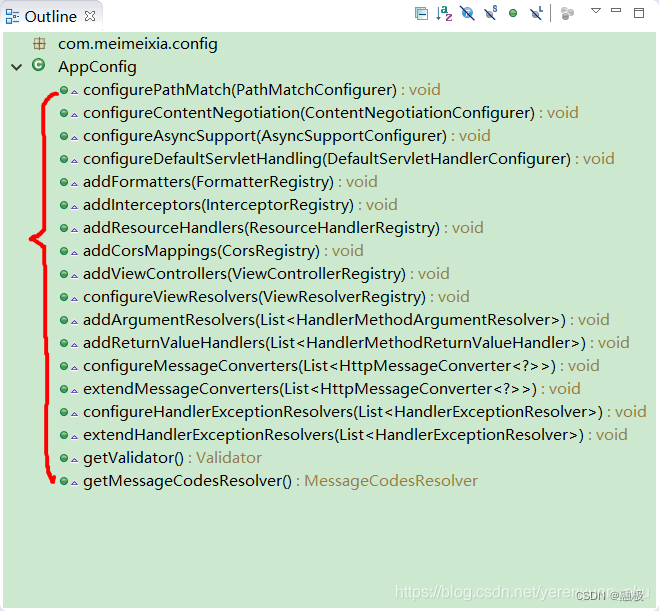
我们看看WebMvcConfigurer接口的源码,如下图所示,我们不妨查看一下该接口的继承树,发现它下面有一个叫WebMvcConfigurerAdapter的适配器。
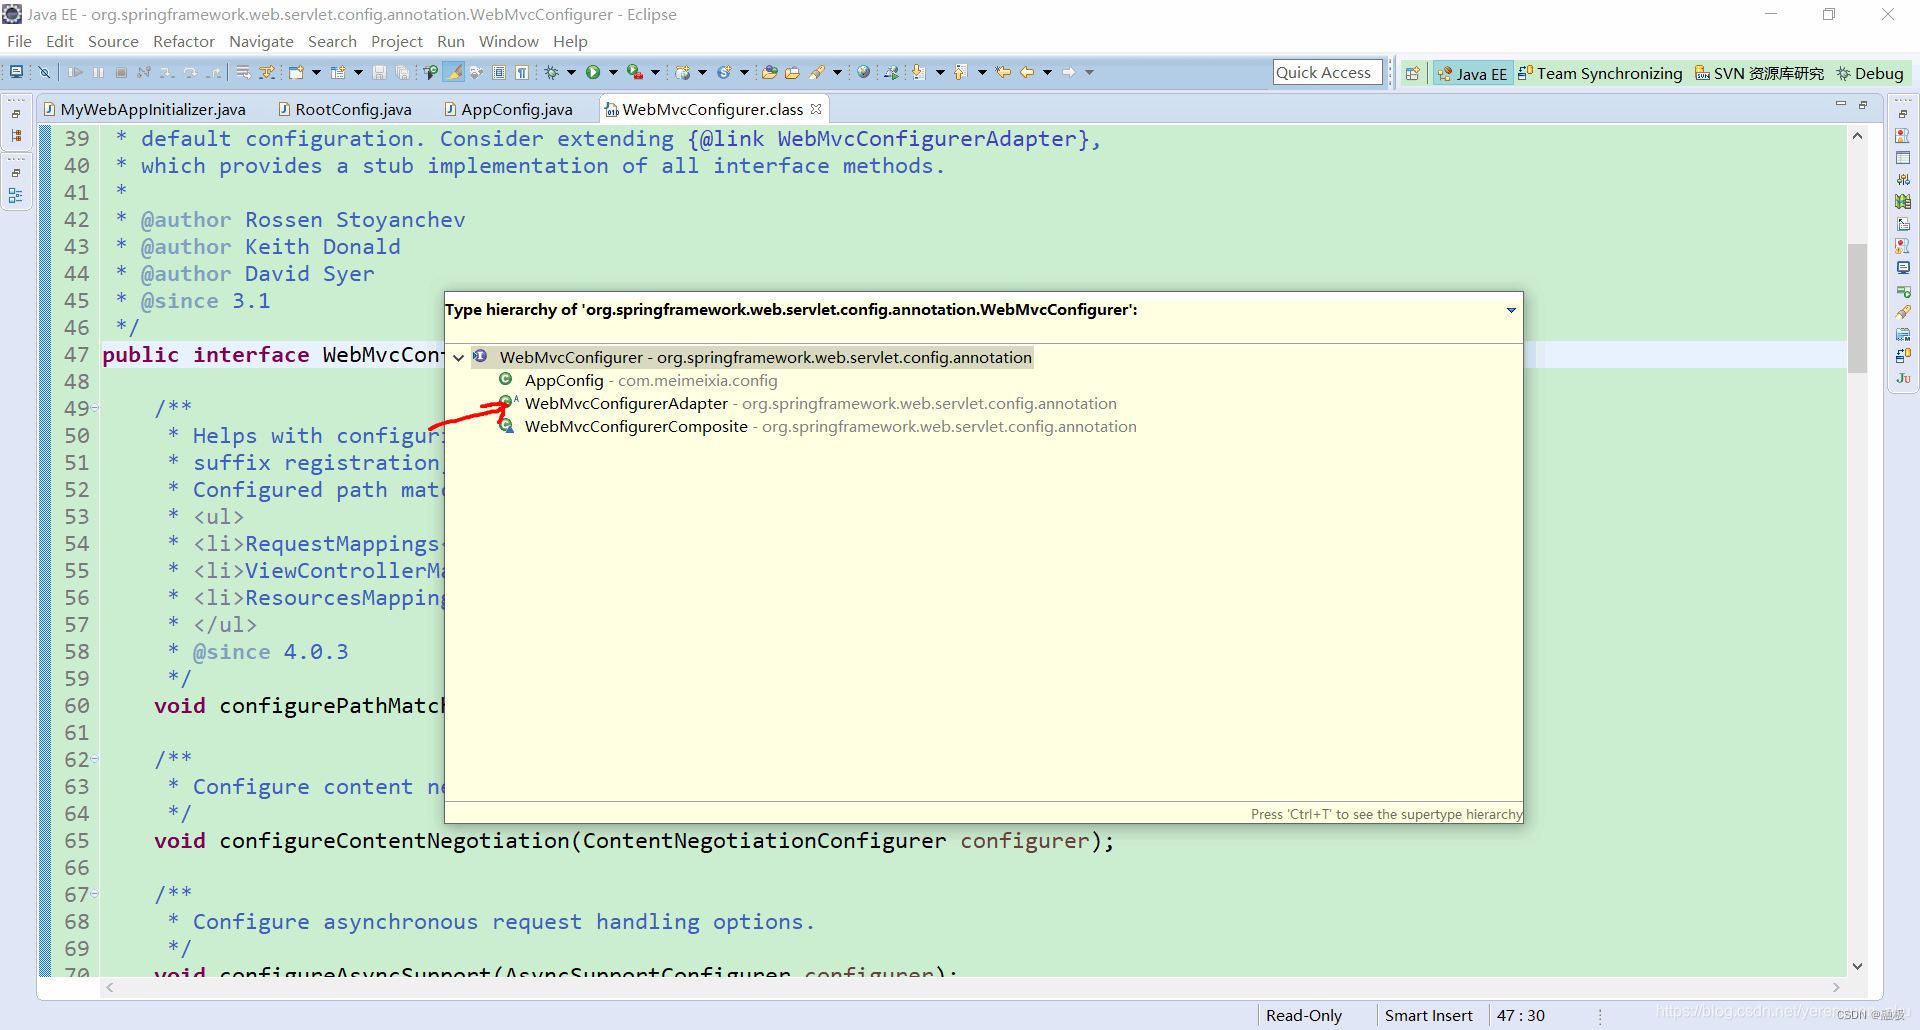
发现它是一个实现了WebMvcConfigurer接口的抽象类,如下图所示。
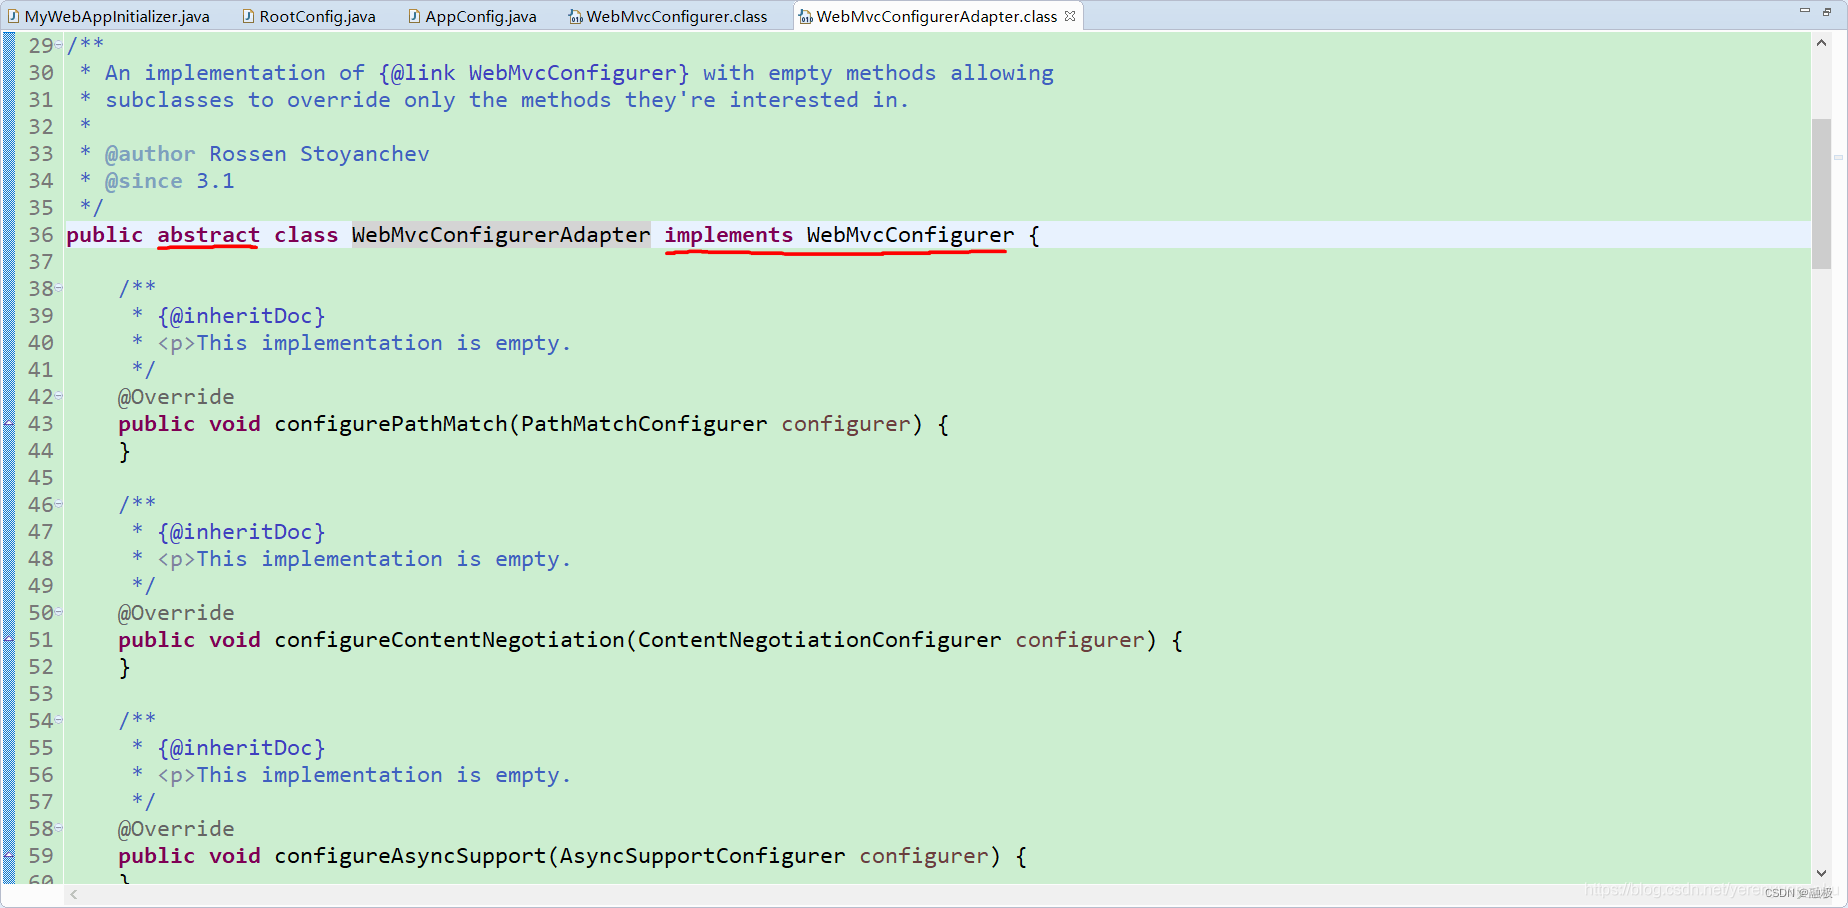
该抽象类把WebMvcConfigurer接口中的方法都实现了,只不过每一个方法里面都是空的而已,所以,我们的配置类继承WebMvcConfigurerAdapter抽象类会比较好一点。
package com.meimeixia.config;

import org.springframework.context.annotation.ComponentScan;
import org.springframework.context.annotation.ComponentScan.Filter;
import org.springframework.context.annotation.FilterType;
import org.springframework.stereotype.Controller;
import org.springframework.web.servlet.config.annotation.EnableWebMvc;
import org.springframework.web.servlet.config.annotation.WebMvcConfigurerAdapter;

// 该配置类相当于Spring MVC的配置文件
// Spring MVC容器只扫描Controller,它是一个子容器
// useDefaultFilters=false:禁用默认的过滤规则
@ComponentScan(value="com.meimeixia",includeFilters={
		@Filter(type=FilterType.ANNOTATION, classes={Controller.class})
},useDefaultFilters=false)
@EnableWebMvc
public class AppConfig extends WebMvcConfigurerAdapter {
}
接下来,我们可以来个性化定制Spring MVC了,因为只须复写WebMvcConfigurerAdapter抽象类中的某些方法就行了。这里,我们不妨先来定制一下视图解析器,要想达成这一目的,只须复写WebMvcConfigurerAdapter抽象类中的configureViewResolvers方法。
package com.meimeixia.config;

import org.springframework.context.annotation.ComponentScan;
import org.springframework.context.annotation.ComponentScan.Filter;
import org.springframework.context.annotation.FilterType;
import org.springframework.stereotype.Controller;
import org.springframework.web.servlet.config.annotation.EnableWebMvc;
import org.springframework.web.servlet.config.annotation.ViewResolverRegistry;
import org.springframework.web.servlet.config.annotation.WebMvcConfigurerAdapter;

// 该配置类相当于Spring MVC的配置文件
// Spring MVC容器只扫描Controller,它是一个子容器
// useDefaultFilters=false:禁用默认的过滤规则
@ComponentScan(value="com.meimeixia",includeFilters={
		@Filter(type=FilterType.ANNOTATION, classes={Controller.class})
},useDefaultFilters=false)
@EnableWebMvc
public class AppConfig extends WebMvcConfigurerAdapter {

	// 定制视图解析器
	@Override
	public void configureViewResolvers(ViewResolverRegistry registry) {
		// TODO Auto-generated method stub
		// super.configureViewResolvers(registry); 注释掉这行代码,因为其父类中的方法都是空的

		// 如果直接调用jsp方法,那么默认所有的页面都从/WEB-INF/目录下开始找,即找所有的jsp页面
		// registry.jsp();

		/*
		 * 当然了,我们也可以自己来编写规则,比如指定一个前缀,即/WEB-INF/views/,再指定一个后缀,即.jsp,
		 * 很显然,此时,所有的jsp页面都会存放在/WEB-INF/views/目录下,自然地,程序就会去/WEB-INF/views/目录下面查找jsp页面了
		 */
		registry.jsp("/WEB-INF/views/", ".jsp");
	}
}
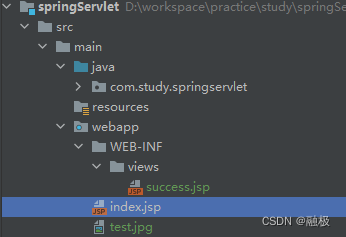
为了达到测试的目的,我们在项目的webapp目录下新建一个WEB-INF/views目录,该目录是专门用于存放jsp页面的,然后再在WEB-INF/views目录新建一个jsp页面,例如success.jsp,其内容如下所示。
<%@ page language="java" contentType="text/html; charset=UTF-8"
    pageEncoding="UTF-8"%>
<!DOCTYPE html PUBLIC "-//W3C//DTD HTML 4.01 Transitional//EN" "http://www.w3.org/TR/html4/loose.dtd">
<html>
<head>
<meta http-equiv="Content-Type" content="text/html; charset=UTF-8">
<title>Insert title here</title>
</head>
<body>
	<h1>success!</h1>
</body>
</html>
接着,我们在HelloController中新增一个如下success方法,以便来处理suc请求。
package com.meimeixia.controller;

import org.springframework.beans.factory.annotation.Autowired;
import org.springframework.stereotype.Controller;
import org.springframework.web.bind.annotation.RequestMapping;
import org.springframework.web.bind.annotation.ResponseBody;

import com.meimeixia.service.HelloService;

@Controller
public class HelloController {

	@Autowired
	HelloService helloService;

	@ResponseBody
	@RequestMapping("/hello")
	public String hello() {
		String hello = helloService.sayHello("tomcat...");
		return hello;
	}

	// 处理suc请求
	@RequestMapping("/suc")
	public String success() {
		// 这儿直接返回"success",那么它就会跟我们视图解析器中指定的那个前后缀进行拼串,来到指定的页面
		return "success";
	}
}
当客户端发送过来一个suc请求,那么HelloController中的以上success方法就会来处理这个请求。由于该方法直接返回了一个success字符串,所以该字符串就会跟我们视图解析器中指定的那个前后缀进行拼串,并最终来到所指定的页面。
简单说就是只要客户端发送过来一个suc请求,那么服务端就会响应/WEB-INF/views/目录下的success.jsp页面给客户端。
OK,我们启动项目,启动成功之后,在浏览器地址栏中输入http://localhost:8080/springmvc-annotation-liayun/suc进行访问,效果如下图所示。
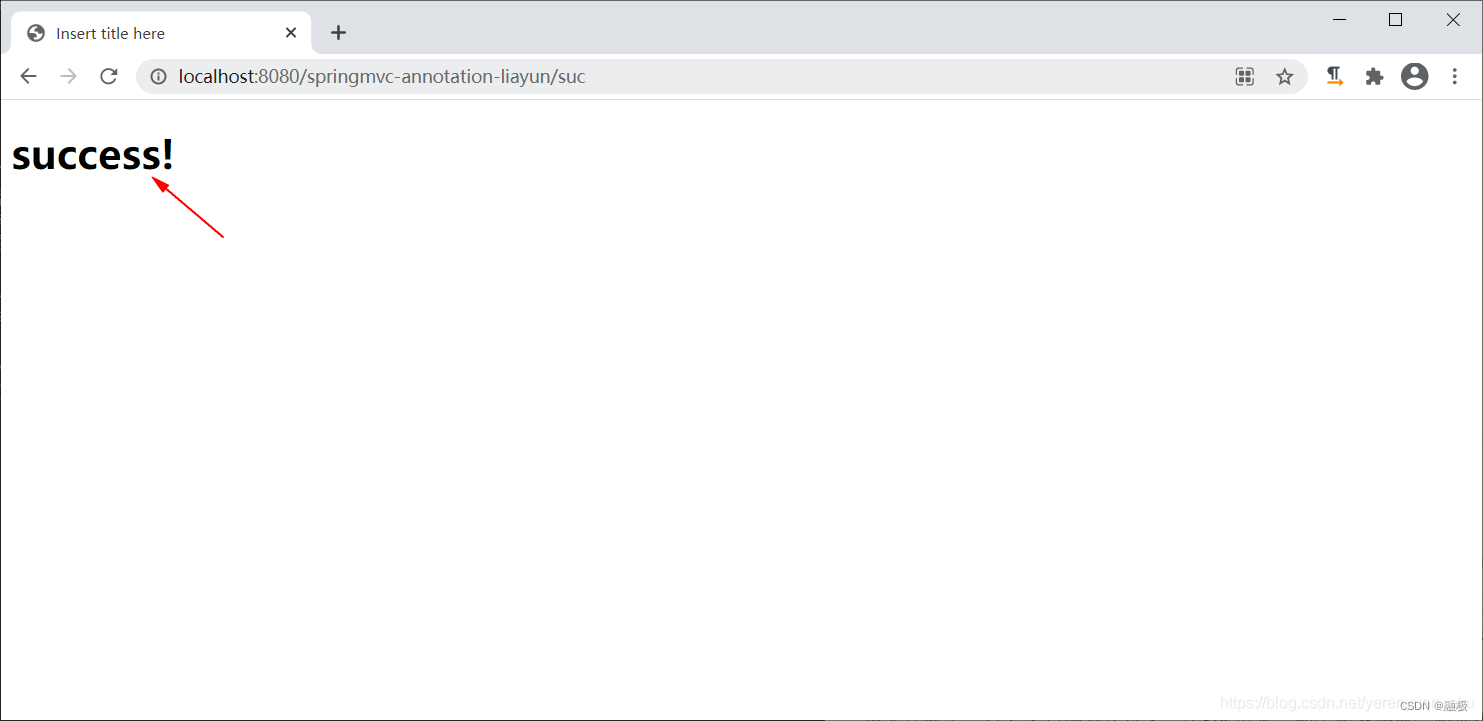
这说明我们已经成功定制了视图解析器,因为定制的视图解析器起效果了。
然后,我们来定制一下静态资源的访问。假设我们项目的webapp目录下有一些静态资源,比如有一张图片,名字就叫test.jpg,打开发现它是一张美女图片。
<%@ page language="java" contentType="text/html; charset=UTF-8"
    pageEncoding="UTF-8"%>
<!DOCTYPE html PUBLIC "-//W3C//DTD HTML 4.01 Transitional//EN" "http://www.w3.org/TR/html4/loose.dtd">
<html>
<head>
<meta http-equiv="Content-Type" content="text/html; charset=UTF-8">
<title>Insert title here</title>
</head>
<body>
	<img alt="" src="test.jpg">
</body>
</html>
此时,在浏览器中访问项目的首页,你会发现上面那张美女图片压根就显示不出来,与此同时,Eclipse控制台会打印如下这样一个警告。

为什么会报以上这样一个警告呢?这是因为请求被Spring MVC拦截处理了,这样,它就得要找@RequestMapping注解中写的映射了,但是实际上呢,test.jpg是一个静态资源,它得交给Tomcat服务器去处理,因此,我们就得来定制静态资源的访问了。
要想达成这一目的,我们只须复写WebMvcConfigurerAdapter抽象类中的configureDefaultServletHandling方法就可以了。
package com.meimeixia.config;

import org.springframework.context.annotation.ComponentScan;
import org.springframework.context.annotation.ComponentScan.Filter;
import org.springframework.context.annotation.FilterType;
import org.springframework.stereotype.Controller;
import org.springframework.web.servlet.config.annotation.DefaultServletHandlerConfigurer;
import org.springframework.web.servlet.config.annotation.EnableWebMvc;
import org.springframework.web.servlet.config.annotation.ViewResolverRegistry;
import org.springframework.web.servlet.config.annotation.WebMvcConfigurerAdapter;

// 该配置类相当于Spring MVC的配置文件
// Spring MVC容器只扫描Controller,它是一个子容器
// useDefaultFilters=false:禁用默认的过滤规则
@ComponentScan(value="com.meimeixia",includeFilters={
		@Filter(type=FilterType.ANNOTATION, classes={Controller.class})
},useDefaultFilters=false)
@EnableWebMvc
public class AppConfig extends WebMvcConfigurerAdapter {

	// 定制视图解析器
	@Override
	public void configureViewResolvers(ViewResolverRegistry registry) {
		// TODO Auto-generated method stub
		// super.configureViewResolvers(registry); 注释掉这行代码,因为其父类中的方法都是空的

		// 如果直接调用jsp方法,那么默认所有的页面都从/WEB-INF/目录下开始找,即找所有的jsp页面
		// registry.jsp();

		/*
		 * 当然了,我们也可以自己来编写规则,比如指定一个前缀,即/WEB-INF/views/,再指定一个后缀,即.jsp,
		 * 很显然,此时,所有的jsp页面都会存放在/WEB-INF/views/目录下,自然地,程序就会去/WEB-INF/views/目录下面查找jsp页面了
		 */
		registry.jsp("/WEB-INF/views/", ".jsp");
	}

	// 定制静态资源的访问
	@Override
	public void configureDefaultServletHandling(DefaultServletHandlerConfigurer configurer) {
		configurer.enable();
	}
}
在以上configureDefaultServletHandling方法中调用configurer.enable(),其实就相当于我们以前在xml配置文件中写上mvc:default-servlet-handler/这样一个配置。
此时,我们重启项目,成功之后,再次来访问项目的首页,发现那张美女图片终于在浏览器页面中显示出来了,效果如下。
定制拦截器
先编写一个拦截器,例如MyFirstInterceptor,要知道一个类要想成为拦截器,那么它必须得实现Spring MVC提供的HandlerInterceptor接口,如下所示。
package com.meimeixia.controller;

import javax.servlet.http.HttpServletRequest;
import javax.servlet.http.HttpServletResponse;

import org.springframework.web.servlet.HandlerInterceptor;
import org.springframework.web.servlet.ModelAndView;

public class MyFirstInterceptor implements HandlerInterceptor {

	// 在页面响应以后执行
	@Override
	public void afterCompletion(HttpServletRequest arg0, HttpServletResponse arg1, Object arg2, Exception arg3)
			throws Exception {
		// TODO Auto-generated method stub
		System.out.println("afterCompletion...");
	}

	// 在目标方法运行正确以后执行
	@Override
	public void postHandle(HttpServletRequest arg0, HttpServletResponse arg1, Object arg2, ModelAndView arg3)
			throws Exception {
		// TODO Auto-generated method stub
		System.out.println("postHandle...");
	}

	// 在目标方法运行之前执行
	@Override
	public boolean preHandle(HttpServletRequest request, HttpServletResponse arg1, Object arg2) throws Exception {
		// TODO Auto-generated method stub
		System.out.println("preHandle...");
		return true; // 返回true,表示放行(目标方法)
	}
}
编写好以上拦截器之后,如果是之前,我们就得在xml配置文件里面像下面这样配置该拦截器。
<mvc:interceptors>
    <mvc:interceptor>
        <mvc:mapping path="/**"/>
        <bean class="com.meimeixia.controller.MyFirstInterceptor"/>
    </mvc:interceptor>
</mvc:interceptors>
而现在我们只须复写WebMvcConfigurerAdapter抽象类中的addInterceptors方法就行了,就像下面这样。
package com.meimeixia.config;

import org.springframework.context.annotation.ComponentScan;
import org.springframework.context.annotation.ComponentScan.Filter;
import org.springframework.context.annotation.FilterType;
import org.springframework.stereotype.Controller;
import org.springframework.web.servlet.config.annotation.DefaultServletHandlerConfigurer;
import org.springframework.web.servlet.config.annotation.EnableWebMvc;
import org.springframework.web.servlet.config.annotation.InterceptorRegistry;
import org.springframework.web.servlet.config.annotation.ViewResolverRegistry;
import org.springframework.web.servlet.config.annotation.WebMvcConfigurerAdapter;

import com.meimeixia.controller.MyFirstInterceptor;

// 该配置类相当于Spring MVC的配置文件
// Spring MVC容器只扫描Controller,它是一个子容器
// useDefaultFilters=false:禁用默认的过滤规则
@ComponentScan(value="com.meimeixia",includeFilters={
		@Filter(type=FilterType.ANNOTATION, classes={Controller.class})
},useDefaultFilters=false)
@EnableWebMvc
public class AppConfig extends WebMvcConfigurerAdapter {

	// 定制视图解析器
	@Override
	public void configureViewResolvers(ViewResolverRegistry registry) {
		// TODO Auto-generated method stub
		// super.configureViewResolvers(registry); 注释掉这行代码,因为其父类中的方法都是空的

		// 如果直接调用jsp方法,那么默认所有的页面都从/WEB-INF/目录下开始找,即找所有的jsp页面
		// registry.jsp();

		/*
		 * 当然了,我们也可以自己来编写规则,比如指定一个前缀,即/WEB-INF/views/,再指定一个后缀,即.jsp,
		 * 很显然,此时,所有的jsp页面都会存放在/WEB-INF/views/目录下,自然地,程序就会去/WEB-INF/views/目录下面查找jsp页面了
		 */
		registry.jsp("/WEB-INF/views/", ".jsp");
	}

	// 定制静态资源的访问
	@Override
	public void configureDefaultServletHandling(DefaultServletHandlerConfigurer configurer) {
		configurer.enable();
	}

	// 定制拦截器
	@Override
	public void addInterceptors(InterceptorRegistry registry) {
		// TODO Auto-generated method stub
		// super.addInterceptors(registry);

		/*
		 * addInterceptor方法里面要传一个拦截器对象,该拦截器对象可以从容器中获取过来,也可以我们自己来new一个,
		 * 很显然,这儿我们是new了一个我们自定义的拦截器对象。
		 *
		 * 虽然创建出了一个拦截器,但是最关键的一点还是指示拦截器要拦截哪些请求,因此还得继续使用addPathPatterns方法来配置一下,
		 * 若在addPathPatterns方法中传入了"/**",则表示拦截器会拦截任意请求,而不管该请求是不是有任意多层路径
		 */
		registry.addInterceptor(new MyFirstInterceptor()).addPathPatterns("/**");
	}
}
OK,我们来看一下以上定制的拦截器能不能生效。重启项目,项目启动成功之后,在浏览器地址栏中输入http://localhost:8080/springmvc-annotation-liayun/suc进行访问,即访问suc请求,发现Eclipse控制台打印出了如下内容。

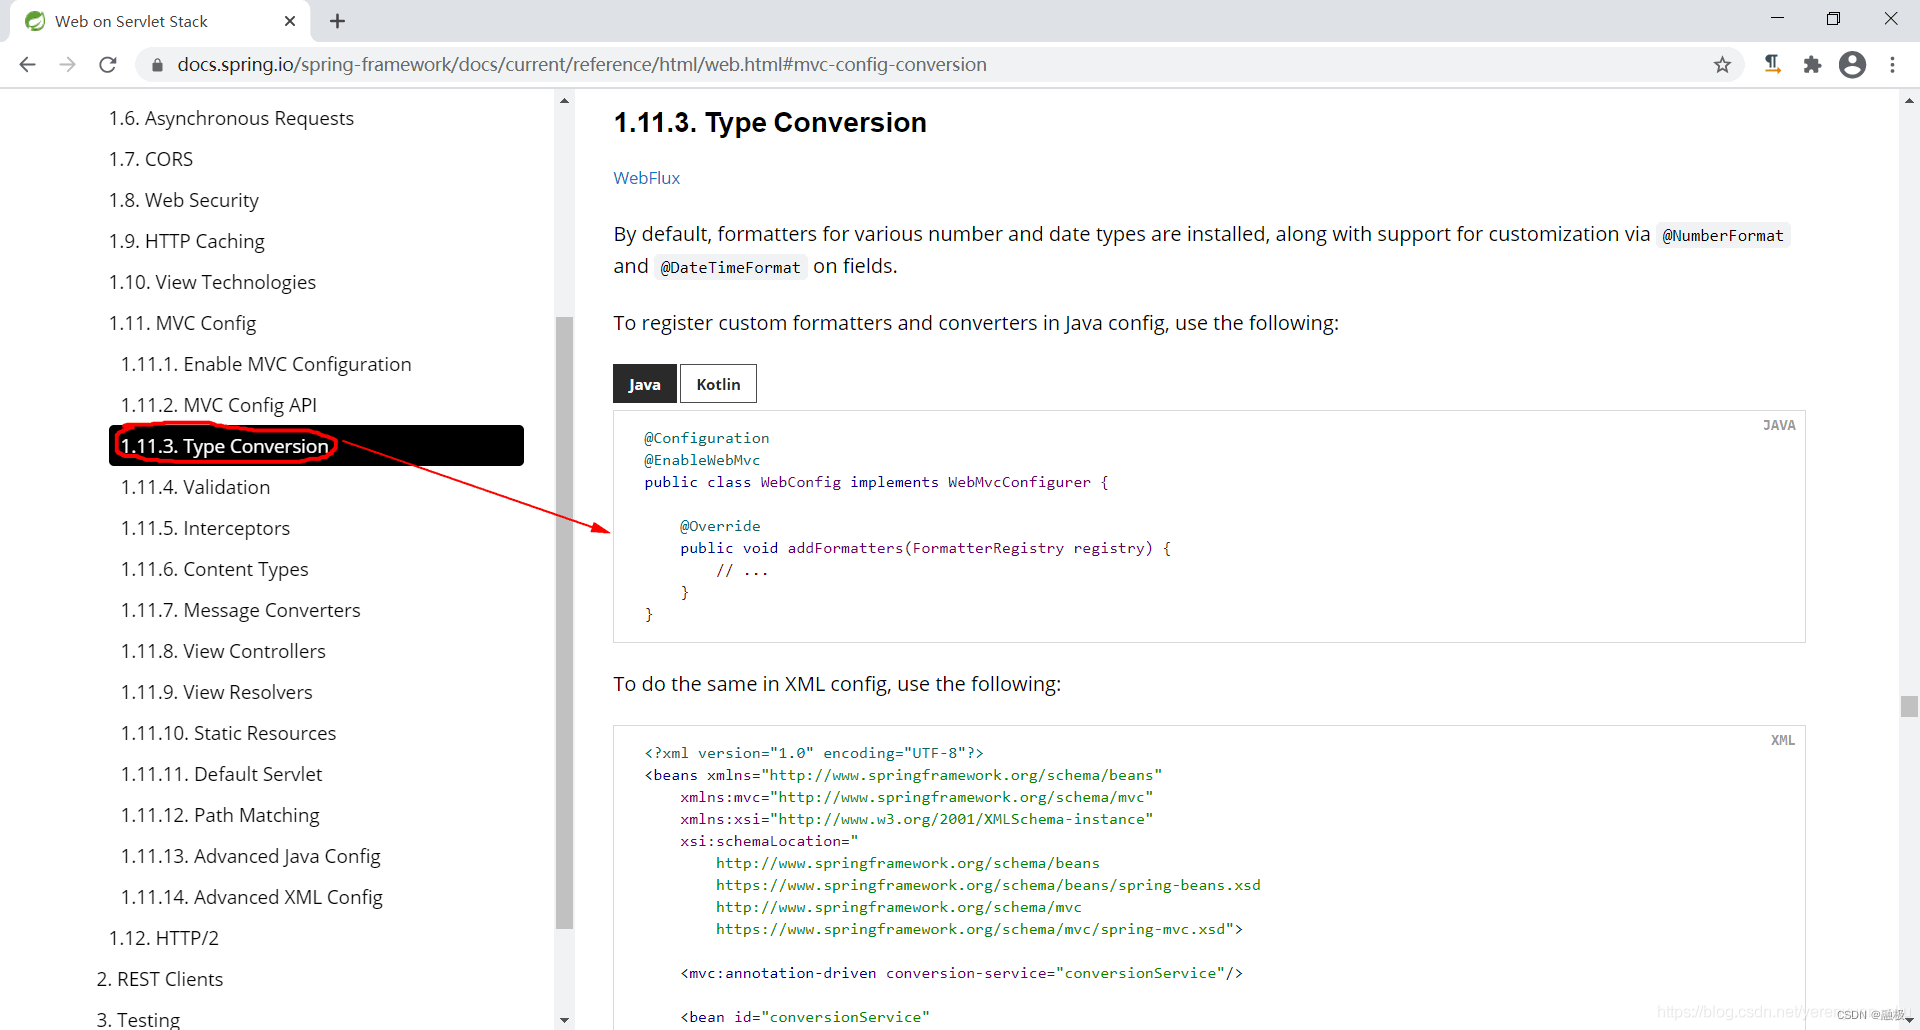
那么,剩余其他的对Spring MVC的个性化定制,参考Spring MVC的官方文档,就是照葫芦画瓢,比方说你要定制类型转换器,那么可以参考Spring MVC官方文档中的1.11.3. Type Conversion这一小节中的内容,主要是参考Java代码。
