目录
Bean的自动装配
自动装配说明
- 自动装配是使用spring满足bean依赖的一种方法;
- spring会在应用上下文中为某个bean寻找其依赖的bean。
1. byName和byType
- 修改bean配置,增加一个属性 autowire=“byName”
<bean id="user" class="com.kuang.pojo.User" autowire="byName">
   <property name="str" value="qinjiang"/>
</bean>
- 修改bean配置,增加一个属性 autowire=“byType”
<bean id="user" class="com.kuang.pojo.User" autowire="byType">
   <property name="str" value="qinjiang"/>
</bean>
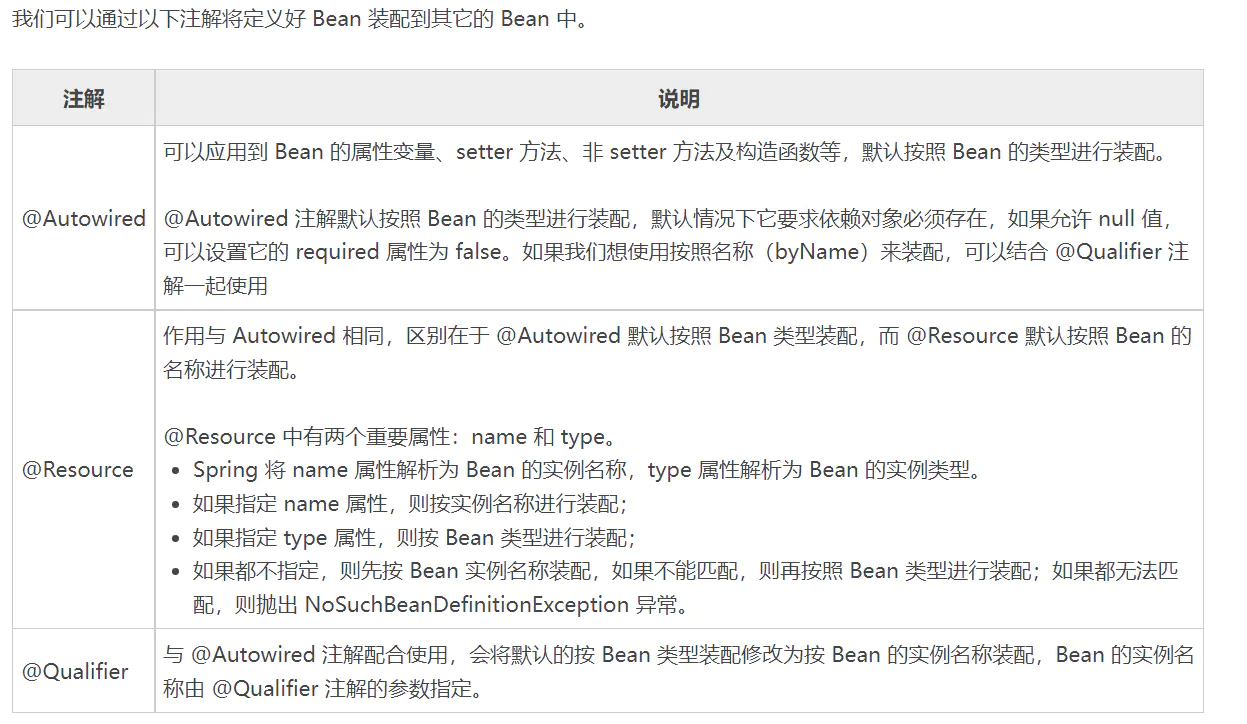
2. @Autowired和@Resource注解
@Autowired和@Resource注解有什么区别?
- @Autowired是Spring提供的注解,@Resource是JDK提供的注解。
- @Autowired是先按类型注入,默认情况下它要求依赖对象必须存在,如果允许null值,可以
设置它required属性为false,如果我们想使用按名称装配,可以结合@Qualifier注解一起使用。 - @Resource是先按名称注入,@Resource有两个中重要的属性:name和type。@Resource如
果没有指定name属性,并且按照默认的名称仍然找不到依赖对象时, @Resource注解会回退到
按类型装配。 但一旦指定了name属性,就只能按名称装配了。
3. 基于注解方式实现依赖注入
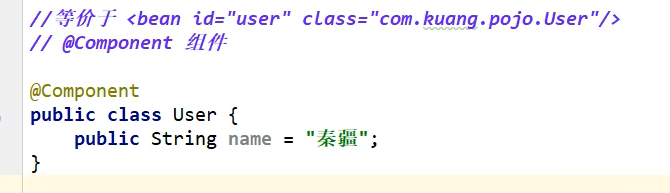
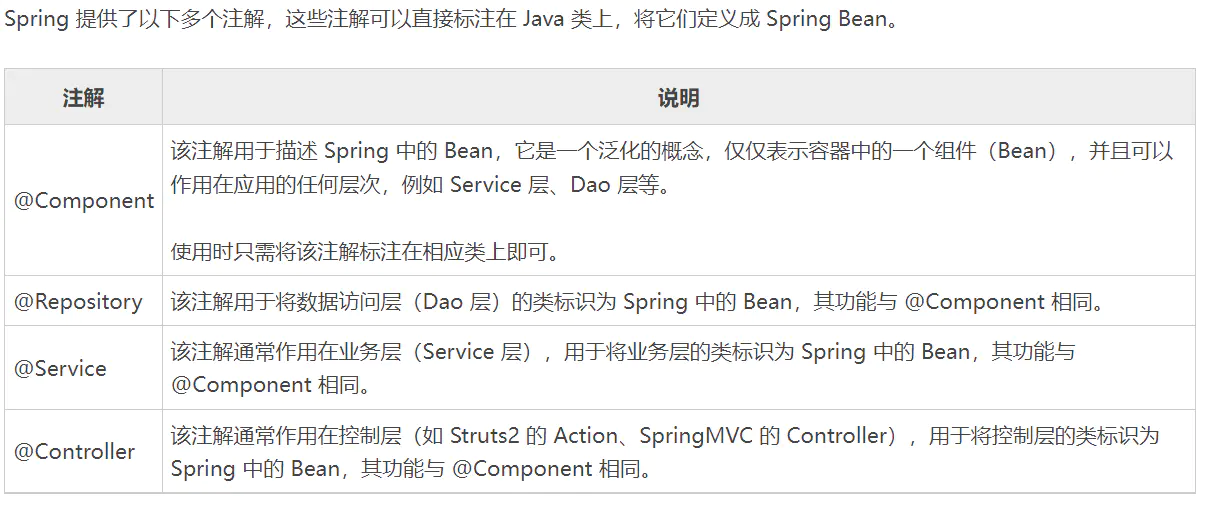
4. 使用注解定义Bean
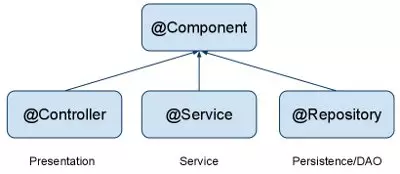
@Component作用就是注解在一个类上,表示将此类标记为Spring容器中的一个Bean,实现bean的注入,它的三个衍生注解:@Controller、@Service、@Repository
5. @Component 和 @Bean 的区别
@Component 和@Bean都是声明一个bean交给spring管理,但他们在使用上有一些区别:
-
作用对象不同: @Component 注解作用于类,而@Bean注解作用于方法。
-
@Component通常是通过类路径扫描来自动侦测以及自动装配到Spring容器中(我们可以使用 @ComponentScan 注解定义要扫描的路径从中找出标识了需要装配的类自动装配到 Spring 的 bean 容器中)。
@Bean 注解通常是我们在标有该注解的方法中定义产生这个 bean,@Bean告诉了Spring这是某个类的示例,当我需要用它的时候还给我。 -
@Bean 注解比 Component 注解的自定义性更强,而且很多地方我们只能通过 @Bean 注解来注册bean。比如当我们引用第三方库中的类需要装配到 Spring容器时,则只能通过 @Bean来实现。
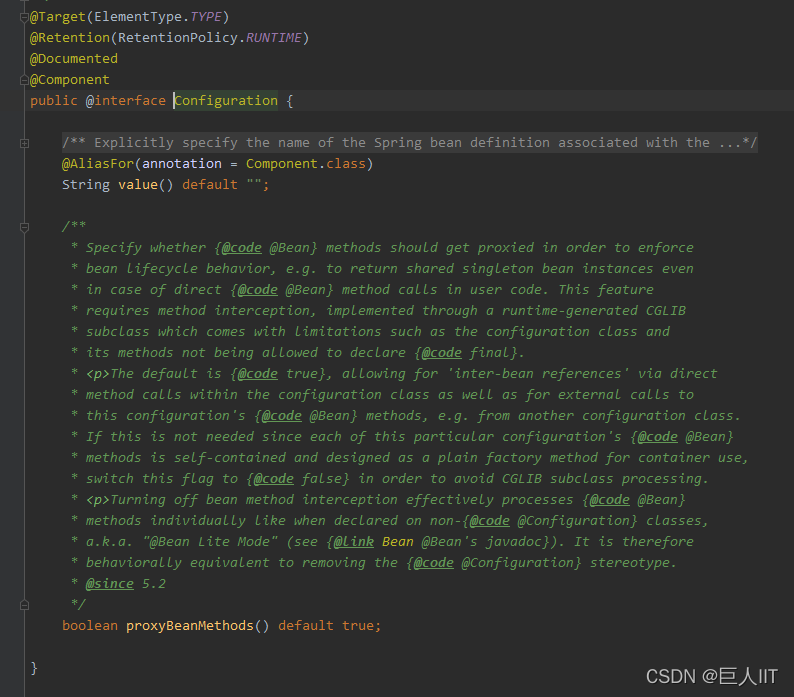
6. 配置类方式(不用xml)
@Configuration 和 @Component 到底有啥区别?
Spring 注解中 @Configuration 和 @Component 的区别总结为一句话就是:
@Configuration 中所有带 @Bean 注解的方法都会被动态代理(cglib),因此调用该方法返回的都是同一个实例。而 @Conponent 修饰的类不会被代理,每实例化一次就会创建一个新的对象。
从定义来看, @Configuration 注解本质上还是 @Component,因此 context:component-scan/ 或者 @ComponentScan 都能处理@Configuration 注解的类。
6.1. @Configuration+@bean
@Configuration+@bean的效果和xml配置效果一样
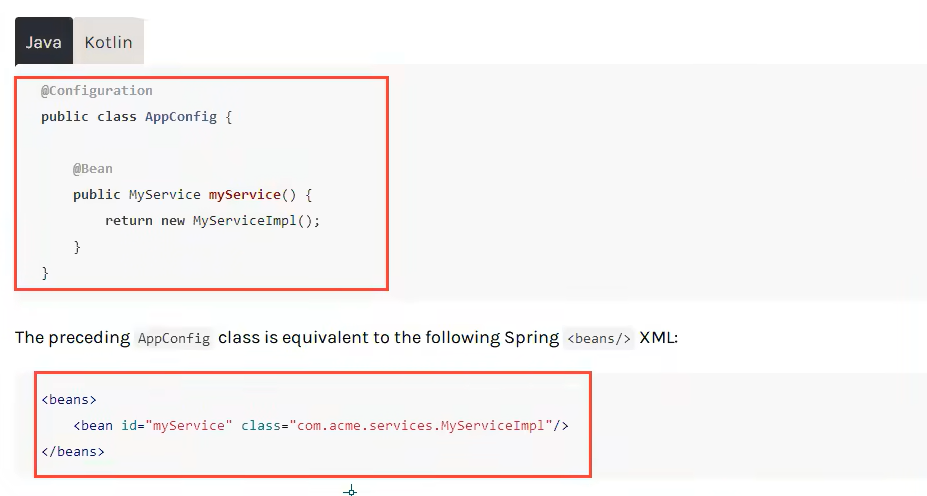
举例:
- User.java
package redis.pojo;

import org.springframework.beans.factory.annotation.Value;

public class User {
    @Value("HAHAHA")
    private String name;

    public String getName() {
        return name;
    }

    public void setName(String name) {
        this.name = name;
    }

    @Override
    public String toString() {
        return "User{" +
                "name='" + name + '\'' +
                '}';
    }
}
- XxConfig.java
package redis.config;

import org.springframework.context.annotation.Bean;
import org.springframework.context.annotation.Configuration;
import redis.pojo.User;

@Configuration
public class XxConfig {
    @Bean
    public User getUser(){
        return new User();
    }
}
- test.java :默认为id默认为@Bean对应的方法名
import org.springframework.context.ApplicationContext;
import org.springframework.context.annotation.AnnotationConfigApplicationContext;
import redis.config.XxConfig;
import redis.pojo.User;

public class test {
    public static void main(String[] args) {
        ApplicationContext context = new AnnotationConfigApplicationContext(XxConfig.class);
        User bean = (User) context.getBean("getUser");
        System.out.println(bean.getName());
    }
}
- 结果输出:
HAHAHA
6.2. @Component+@ComponentScan
举例:
- User.java
package redis.pojo;

import org.springframework.beans.factory.annotation.Value;
import org.springframework.stereotype.Component;

@Component
public class User {
    @Value("HAHAHA")
    private String name;

    public String getName() {
        return name;
    }

    public void setName(String name) {
        this.name = name;
    }

    @Override
    public String toString() {
        return "User{" +
                "name='" + name + '\'' +
                '}';
    }
}
- XxConfig.java
import org.springframework.context.annotation.ComponentScan;

@ComponentScan("redis.pojo")
public class XxConfig {

}
- test.java :默认为id默认为User类的小写user
import org.springframework.context.ApplicationContext;
import org.springframework.context.annotation.AnnotationConfigApplicationContext;
import redis.config.XxConfig;
import redis.pojo.User;

public class test {
    public static void main(String[] args) {
        ApplicationContext context = new AnnotationConfigApplicationContext(XxConfig.class);
        User bean = (User) context.getBean("user");
        System.out.println(bean.getName());
    }
}
- 结果输出:
HAHAHA