前言
- 现在要维护的项目是前几年的旧项目,架构是Spring5 + SpringMVC + SpringJDBC,并非SpringBoot项目,SpringBoot项目集成相对更简单一点;
- 单纯Spring项目集成Swagger的情况不多,网上虽有例子,但是因项目各自情况,照搬总有错误,因此把自己的经验记录下来;
- 因为非Spring Boot项目,所以Knife4j是不能集成的;
一、引入依赖
在项目的pom.xml文件中引入Swagger相关依赖项,如下:
</dependencies>
	<dependency>
		<groupId>io.springfox</groupId>
		<artifactId>springfox-swagger2</artifactId>
		<version>2.9.2</version>
	</dependency>
	<dependency>
		<groupId>io.springfox</groupId>
		<artifactId>springfox-swagger-ui</artifactId>
		<version>2.9.2</version>
	</dependency>
</dependencies>
二、Swagger配置
- 在项目中增加Swagger配置类,示例如下:
/**
 * Swagger配置
 *
 * @Description
 * @Author xhp
 * @Date 2022/10/26 09:36
 **/
@Configuration
@EnableSwagger2
@EnableWebMvc
@ComponentScan(basePackages = {"com.xhp.controller"})
public class SwaggerConfig {

    /**
     * 创建API
     */
    @Bean
    public Docket createRestApi() {
        return new Docket(DocumentationType.SWAGGER_2)
                // 是否启用Swagger
                //.enable(enabled)
                // 用来创建该API的基本信息,展示在文档的页面中(自定义展示的信息)
                .apiInfo(apiInfo())
                // 设置哪些接口暴露给Swagger展示
                .select()
                // 扫描所有有注解的api,用这种方式更灵活
                .apis(RequestHandlerSelectors.withMethodAnnotation(ApiOperation.class))
                // 扫描指定包中的swagger注解
                //.apis(RequestHandlerSelectors.basePackage(""))
                // 扫描所有
                //.apis(RequestHandlerSelectors.any())
                .paths(PathSelectors.any())
                .build();
    }

    /**
     * 添加摘要信息
     */
    private ApiInfo apiInfo() {
        // 用ApiInfoBuilder进行定制
        return new ApiInfoBuilder()
                // 设置标题
                .title("标题:***_接口文档")
                // 描述
                .description("")
                // 作者信息
                .contact(new Contact("xhp", null, null))
                // 版本
                .version("版本号:2.0")
                .build();
    }

}
- 错误预警
-
如未加
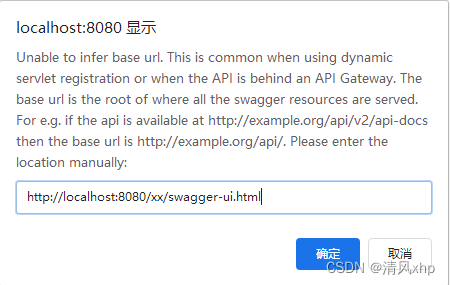
@EnableWebMvc注解,可能会出现Unable to infer base url. This is common when using dynamic servlet registration or when the API is behind an API Gateway. The base url is the root of where all the swagger resources are served. For e.g. if the api is available at http://example.org/api/v2/api-docs then the base url is http://example.org/api/. Please enter the location manually:错误,如下图:

-
如未加
@ComponentScan注解,会出现No operations defined in spec!错误; -
Unable to infer base url错误,即第一条里的弹窗错误,很莫名其妙;在项目调试正常情况下,提交代码,然后小组成员使用都正常,唯有一人的项目出现该错误,且各种尝试都未解决;最后,折衷了一下,本地项目降了一下版本,采用2.6.0就可以了。
-
三、资源访问权限
在项目的权限控制里,如Shiro、Security或Intercepter里,增加Swagger资源的免认证权限,需增加以下两个url:/swagger-ui.html和/webjars/**。
四、查看接口文档
- 编写一个接口类,验证一下。因为我们采用扫描方法注解的方式获取接口,因此我们如下的测试类:
@Api(tags = "接口文档测试")
@RequestMapping("/test")
@Controller
public class SwaggerTestController {

    @ApiOperation("测试接口")
    @GetMapping("/test")
    public ApiResult<User> test() {
        return ApiResult.success(null);
    }
}
- 启动项目,并输入访问地址
项目基础路径+/swagger-ui.html,可看到如下成功页面:

五、功能扩展
- 一般情况,接口文档都是开发/测试时启用,发布时停用,那么我们应该通过配置文件来管理Swagger的启停;
- 先在配置文件(如
config.properties)中,增加配置项,如下:
#swagger开关
swagger.enabled = true
- 在
SwaggerConfig类中,读取配置项并应用,示例代码如下:
@Configuration
@EnableSwagger2
@EnableWebMvc
@ComponentScan(basePackages = {"com.xhp.controller"})
@PropertySource(value = "classpath:config/config.properties", ignoreResourceNotFound = true)
public class SwaggerConfig {

    @Value("${swagger.enabled}")
    private boolean enabled;

    /**
     * 创建API
     */
    @Bean
    public Docket createRestApi() {
        return new Docket(DocumentationType.SWAGGER_2)
                // 是否启用Swagger
                .enable(enabled)
                // 用来创建该API的基本信息,展示在文档的页面中(自定义展示的信息)
                .apiInfo(apiInfo())
                // 设置哪些接口暴露给Swagger展示
                .select()
                // 扫描所有有注解的api,用这种方式更灵活
                .apis(RequestHandlerSelectors.withMethodAnnotation(ApiOperation.class))
                // 扫描指定包中的swagger注解
                //.apis(RequestHandlerSelectors.basePackage(""))
                // 扫描所有
                //.apis(RequestHandlerSelectors.any())
                .paths(PathSelectors.any())
                .build();
    }

    /**
     * 添加摘要信息
     */
    private ApiInfo apiInfo() {
        // 用ApiInfoBuilder进行定制
        return new ApiInfoBuilder()
                // 设置标题
                .title("标题:***_接口文档")
                // 描述
                .description("")
                // 作者信息
                .contact(new Contact("xhp", null, null))
                // 版本
                .version("版本号:2.0")
                .build();
    }

    public boolean isEnabled() {
        return enabled;
    }

    public void setEnabled(boolean enabled) {
        this.enabled = enabled;
    }
}
后记
1、至此,集成工作就完成了,正常使用即可;
2、Swagger提供的注解还是挺多的,且不同版本里,结果展现也不太一致,具体问题具体解决吧。