一、创建maven项目
使用maven的archetype:generate命令创建一个空项目。注意,windows下通过命令行使用maven时,需要将参数用双引号括起来:
mvn -B archetype:generate "-DgroupId=cn.edu.njfu.zyf" "-DartifactId=njfu-sql" "-Dpackage=simple.sql" "-Dversion=0.0.1"二、将普通的maven项目改造成SpringBoot项目
编辑pom.xml文件,在project标签下添加parent标签:
  <parent>
  	<artifactId>spring-boot-starter-parent</artifactId>
    <groupId>org.springframework.boot</groupId>
    <version>2.6.3</version>
    <relativePath/>
  </parent>
然后编辑App.java:
import org.springframework.boot.SpringApplication;
import org.springframework.boot.autoconfigure.SpringBootApplication;

@SpringBootApplication
public class App {
    public static void main( String[] args ){
        SpringApplication.run(App.class, args);
    }
}
三、添加多profile系统
编辑pom.xml文件,在project标签内添加profiles和build标签:
  <profiles>
    <profile>
      <id>dev</id>
      <properties>
        <profiles.active>dev</profiles.active>
      </properties>
      <activation>
        <activeByDefault>true</activeByDefault>
      </activation>
    </profile>
    <profile>
      <id>test</id>
      <properties>
        <profiles.active>test</profiles.active>
      </properties>
    </profile>
  </profiles>

  <build>
    <plugins>
      <plugin>
        <groupId>org.springframework.boot</groupId>
        <artifactId>spring-boot-maven-plugin</artifactId>
      </plugin>
      <plugin>
        <groupId>org.apache.maven.plugins</groupId>
        <artifactId>maven-resources-plugin</artifactId>
        <version>3.1.0</version>
      </plugin>
    </plugins>

    <resources>
      <resource>
        <directory>src/main/resources</directory>
        <excludes>
          <exclude>dev/*</exclude>
          <exclude>test/*</exclude>
        </excludes>
      </resource>
      <resource>
        <directory>src/main/resources/${profiles.active}</directory>
      </resource>
    </resources>
  </build>
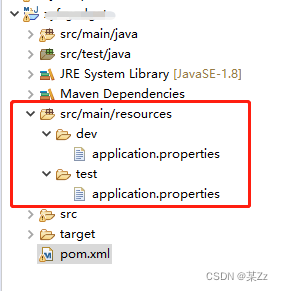
在src/main/resources/路径下分别创建dev文件夹和test文件夹,里面各放一份application.properties文件:

?这样,打包生成jar文件的时候,我们就可以使用mvn install -Ptest/-Pdev来指定打包环境了。
四、添加Swagger系统
编辑pom文件,添加swagger dependency:
  	<!--引入swagger-->
	<dependency>
      <groupId>io.springfox</groupId>
      <artifactId>springfox-swagger2</artifactId>
      <version>2.9.2</version>
	</dependency>
	<dependency>
      <groupId>io.springfox</groupId>
      <artifactId>springfox-swagger-ui</artifactId>
      <version>2.9.2</version>
	</dependency>
新建config package,在它下面添加SwaggerConfig.java:
import org.springframework.context.annotation.Bean;
import org.springframework.context.annotation.Configuration;

import io.swagger.annotations.ApiOperation;
import springfox.documentation.builders.ApiInfoBuilder;
import springfox.documentation.builders.PathSelectors;
import springfox.documentation.builders.RequestHandlerSelectors;
import springfox.documentation.service.ApiInfo;
import springfox.documentation.spi.DocumentationType;
import springfox.documentation.spring.web.plugins.Docket;
import springfox.documentation.swagger2.annotations.EnableSwagger2;

@Configuration
@EnableSwagger2
public class SwaggerConfig {
    @Bean
    public Docket productApi() {
        return new Docket(DocumentationType.SWAGGER_2)
                .apiInfo(apiInfo())
                .select()
                .apis(RequestHandlerSelectors.withMethodAnnotation(ApiOperation.class))  //添加ApiOperiation注解的Controller方法将被扫描
                .paths(PathSelectors.any())
                .build();
    }

    private ApiInfo apiInfo() {
        return new ApiInfoBuilder()
                .title("swagger和springBoot整合")
                .description("swagger的API文档")
                .version("1.0").build();
    }
}
新建一个Controller,添加一个方法:
@RestController
public class GadgetController {

	@Autowired
	private GadgetService gadgetService;

	@ApiOperation(value = "说声hi")
	@RequestMapping(value = "/hello", method = RequestMethod.GET)
	public String hello() {
		return "hello world";
	}
}
这样,项目运行起来后,访问localhost/swagger-ui.html,就能看见后端Controller接口了。
如果项目运行不起来,试着在application.properties里添加一行
spring.mvc.pathmatch.matching-strategy=ant_path_matcher五、添加数据库连接
使用spring data jpa。
用mysql建一张user表(特别常用的对象):
CREATE TABLE `user` (
  `id` bigint(20) NOT NULL AUTO_INCREMENT,
  `employee_number` varchar(32) DEFAULT NULL,
  `password` varchar(32) DEFAULT NULL,
  `email` varchar(32) DEFAULT NULL,
  `name` varchar(16) DEFAULT NULL,
  `created_time` timestamp NOT NULL DEFAULT CURRENT_TIMESTAMP,
  `updated_time` timestamp NOT NULL DEFAULT CURRENT_TIMESTAMP,
  PRIMARY KEY (`id`)
) ENGINE=InnoDB AUTO_INCREMENT=2 DEFAULT CHARSET=utf8
添加如下pom依赖:
    <!-- 引入spring data jpa -->
	<dependency>
      <groupId>org.springframework.boot</groupId>
      <artifactId>spring-boot-starter-data-jpa</artifactId>
      <version>2.6.3</version>
    </dependency>
在application.properties里添加这几行:
spring.datasource.url=jdbc:mysql://localhost:3306/nanlin_sql
spring.datasource.username=root
spring.datasource.password=123456
spring.datasource.driver-class-name=com.mysql.jdbc.Driver
spring.jpa.show-sql=true
spring.jpa.hibernate.ddl-auto=update
spring.jpa.properties.hibernate.dialect=org.hibernate.dialect.MySQL5Dialect
添加User.java(一个特别常用的类),拒绝lombok从我做起:
package simple.sql.model;

import java.time.LocalDateTime;

import javax.persistence.Entity;
import javax.persistence.GeneratedValue;
import javax.persistence.GenerationType;
import javax.persistence.Id;

import org.springframework.format.annotation.DateTimeFormat;


@Entity(name = "user")
public class User {

	@Id
	@GeneratedValue(strategy = GenerationType.AUTO)
	private Long id;
	private String employeeNumber;
	private String password;
	private String name;
	private String email;

	@DateTimeFormat
	private LocalDateTime createdTime;
	private LocalDateTime updatedTime;

	public Long getId() {
		return id;
	}
	public void setId(Long id) {
		this.id = id;
	}
	public String getEmployeeNumber() {
		return employeeNumber;
	}
	public void setEmployeeNumber(String employeeNumber) {
		this.employeeNumber = employeeNumber;
	}
	public String getPassword() {
		return password;
	}
	public void setPassword(String password) {
		this.password = password;
	}
	public String getName() {
		return name;
	}
	public void setName(String name) {
		this.name = name;
	}
	public String getEmail() {
		return email;
	}
	public void setEmail(String email) {
		this.email = email;
	}
	public LocalDateTime getCreatedTime() {
		return createdTime;
	}
	public void setCreatedTime(LocalDateTime createdTime) {
		this.createdTime = createdTime;
	}
	public LocalDateTime getUpdatedTime() {
		return updatedTime;
	}
	public void setUpdatedTime(LocalDateTime updatedTime) {
		this.updatedTime = updatedTime;
	}
}
添加Repository:
package simple.sql.dao;

import org.springframework.data.repository.CrudRepository;
import simple.sql.model.User;

public interface UserRepository extends CrudRepository<User, Long>{

}
添加service和impl:
package simple.sql.service;

import java.util.List;
import simple.sql.model.User;

public interface UserService {
	List<User> listUsers();
}
package simple.sql.service.impl;

import java.util.ArrayList;
import java.util.Collection;
import java.util.Collections;
import java.util.Iterator;
import java.util.List;

import org.springframework.beans.factory.annotation.Autowired;
import org.springframework.stereotype.Service;

import simple.sql.dao.UserRepository;
import simple.sql.model.User;
import simple.sql.service.UserService;

@Service
public class UserServiceImpl implements UserService{

	@Autowired
	private UserRepository userRepository;

	public List<User> listUsers() {
		List<User> result = new ArrayList<User>();

		Iterable<User> users = userRepository.findAll();
		Iterator<User> userIterator = users.iterator();

		while (userIterator.hasNext()) {
			result.add(userIterator.next());
		}
		return result;
	}
}
添加controller:
package simple.sql.controller;

import java.util.List;

import org.springframework.beans.factory.annotation.Autowired;
import org.springframework.web.bind.annotation.RequestMapping;
import org.springframework.web.bind.annotation.RestController;

import io.swagger.annotations.ApiOperation;
import simple.sql.model.CustomResponse;
import simple.sql.model.User;
import simple.sql.service.UserService;

@RestController
@RequestMapping("/user")
public class UserController {

	@Autowired
	private UserService userService;

	@ApiOperation(value = "列出所有用户")
	@RequestMapping("/list")
	public CustomResponse<List<User>> listAllUsers() {
		CustomResponse<List<User>> response = new CustomResponse<List<User>>(0, userService.listUsers());
		return response;
	}
}
启动项目,访问http://localhost:8081/nanlin-sql/user/list?:

六、上传到github
这一步不能太详细。
windows自带ssh-keygen工具,将pub key放在github上自己的设置里
git remote add git@asoghsoghsd.git
git push要是发生了Kex_exchange_identification: Connection closed by remote hostConnection closed by 20.205.243.166 port 22错误,断开vpn即可。
附送一份.gitignore:
# Compiled class file
*.class

# Classpath file
*.classpath

# Log file
*.log

# BlueJ files
*.ctxt

# Mobile Tools for Java (J2ME)
.mtj.tmp/

# Package Files #
*.jar
*.war
*.ear
*.zip
*.tar.gz
*.rar

# virtual machine crash logs, see http://www.java.com/en/download/help/error_hotspot.xml
hs_err_pid*

# eclipse project file
.project

# eclipse settings directory
.settings/

# build outputs
target/
七、集成日志系统
使用logback。logback文档:https://logback.qos.ch/manual/index.html
TBC