目录
一、存储Bean对象
在 Spring 中想要更简单的存储和读取对象的核心是使用注解
1.1 配置扫描路径
想要将Bean对象存储到Spring中,需要配置存储对象的扫描包路径,只有被配置的包下所有类,添加了注解才能被正确识别并保存到Spring中
在spring.xml添加配置:
<?xml version="1.0" encoding="UTF-8"?>
<beans xmlns="http://www.springframework.org/schema/beans"
       xmlns:xsi="http://www.w3.org/2001/XMLSchema-instance"
       xmlns:content="http://www.springframework.org/schema/context"
       xsi:schemaLocation="http://www.springframework.org/schema/beans htt
p://www.springframework.org/schema/beans/spring-beans.xsd http://www.spring
framework.org/schema/context https://www.springframework.org/schema/contex
t/spring-context.xsd">
    <content:component-scan base-package="com.bit"></content:component-scan>
</beans>
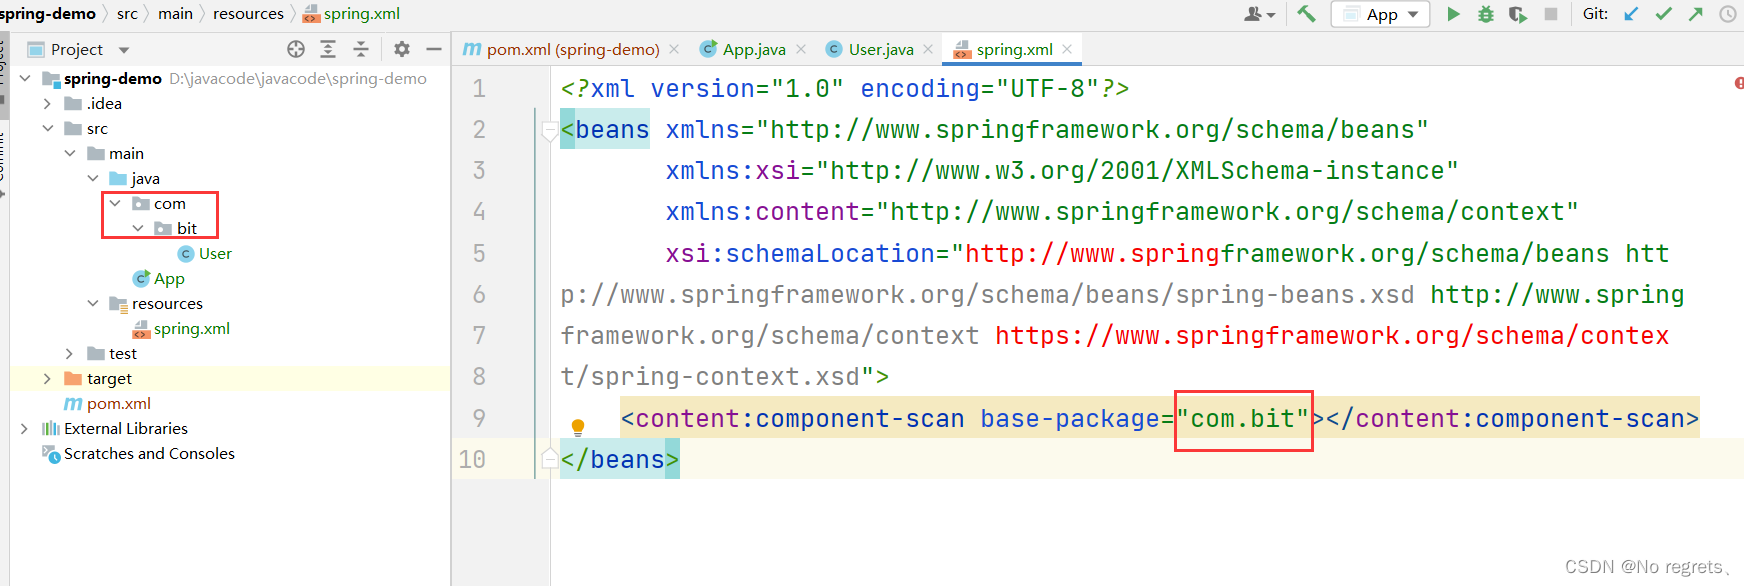
【为什么要在spring的配置文件中,配置扫描路径?】
如果你作为Spring的设计者,如果不要求使用者配置扫描路径,Spring就应该扫描全部类,这样的效率很低
1.2 使用注解存储Bean对象
想要将对象存储在 Spring 中,有两种注解类型可以实现:
- 类注解:
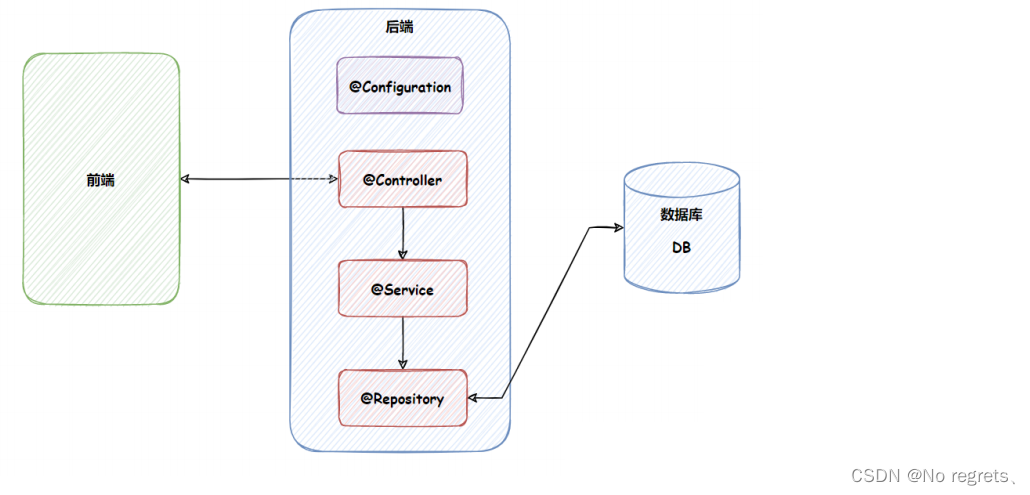
- @Controller:控制器,验证前端传递的参数,起到类似于"安检"的作用
- @Service:服务,服务调用的编排和汇总(安排服务的执行顺序和对服务进行汇总,但并不真正的操作数据),例如前端某个页面提供一个修改头像的功能,这个功能由两步组成(替换头像图片和增加用户积分),服务层的功能是安排这两个服务的执行先后顺序
- @Repository:仓库,直接操作数据库,操作用户的保存头像图片的表和积分表
- @Component:组件,修饰一些工具类,这些工具类与业务无关
- @Configuration:配置,项目的所有配置
- 方法注解:@Bean
【程序的工程分层,调用流程】
下面使用的是Controller注解,其他注解都是类似的
package com.bit;
import org.springframework.stereotype.Controller;
@Controller
public class User {
    public  void method(){
        System.out.println("hello User");
    }
}
1.3 通过上下文读取Bean对象
import com.bit.User;
import org.springframework.context.ApplicationContext;
import org.springframework.context.support.ClassPathXmlApplicationContext;

import javax.jws.soap.SOAPBinding;

public class App {
    public static void main(String[] args) {

        //参数中传的是spring的配置文件名称
        ApplicationContext applicationContext=new ClassPathXmlApplicationContext("spring.xml");

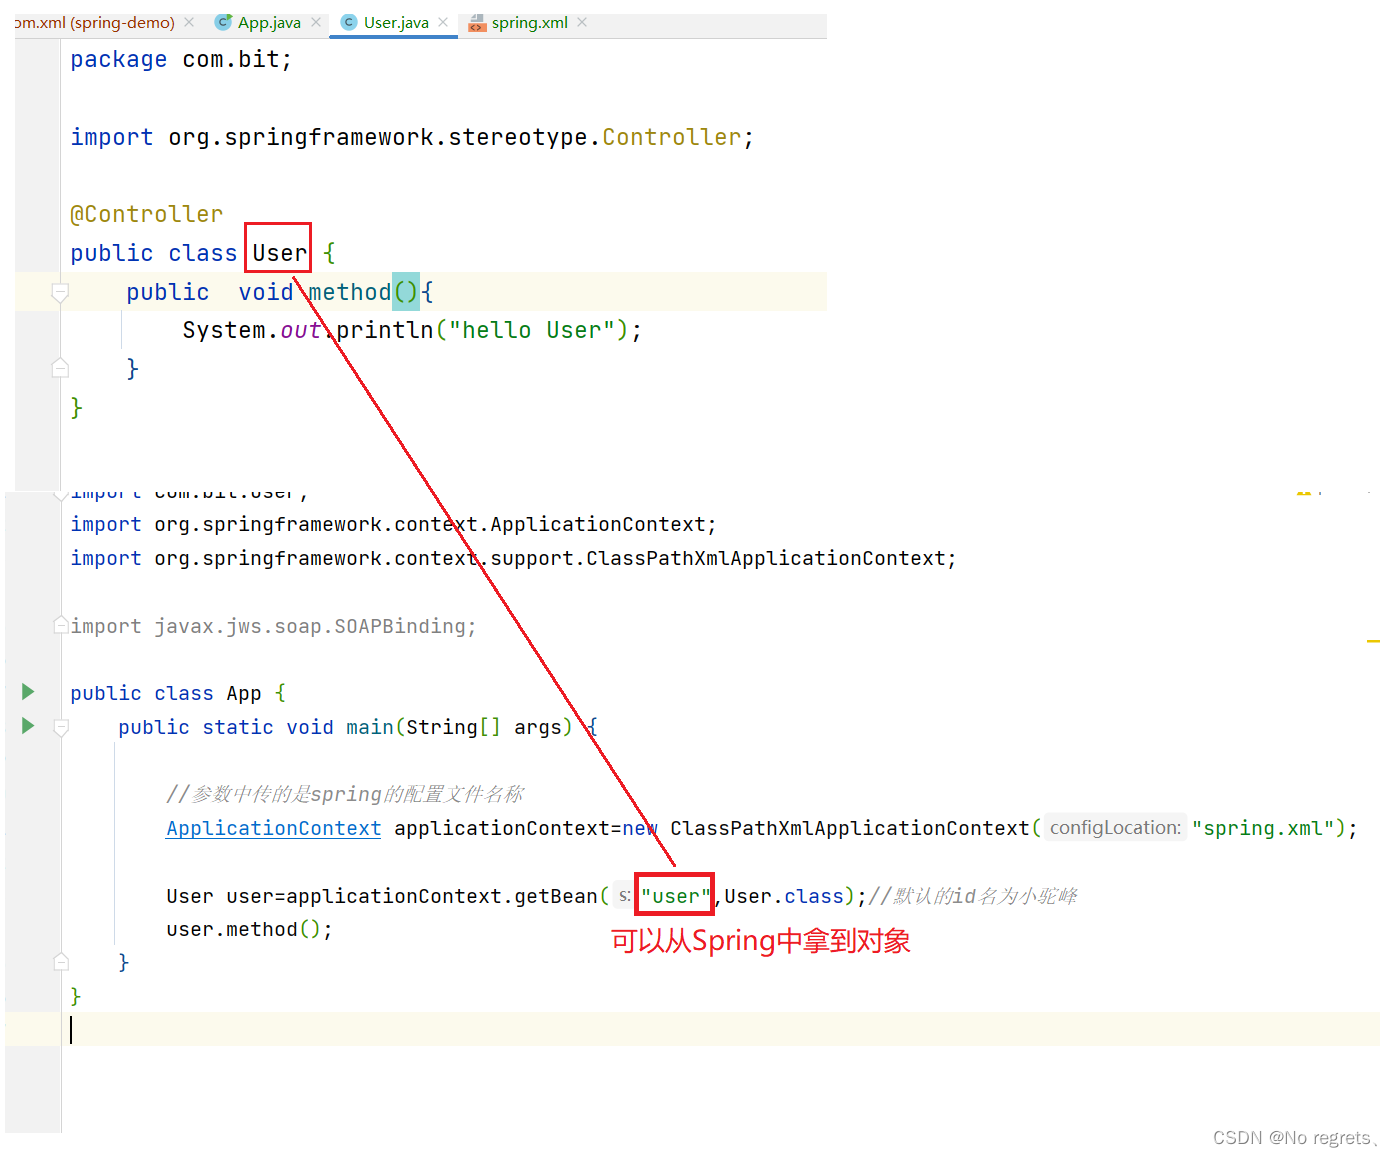
        User user=applicationContext.getBean("user",User.class);//默认的id名为小驼峰(并不绝对,后面详细说)
        user.method();
    }
}
1.4 Bean命名规则
我们先看下面这两个示例
(1)
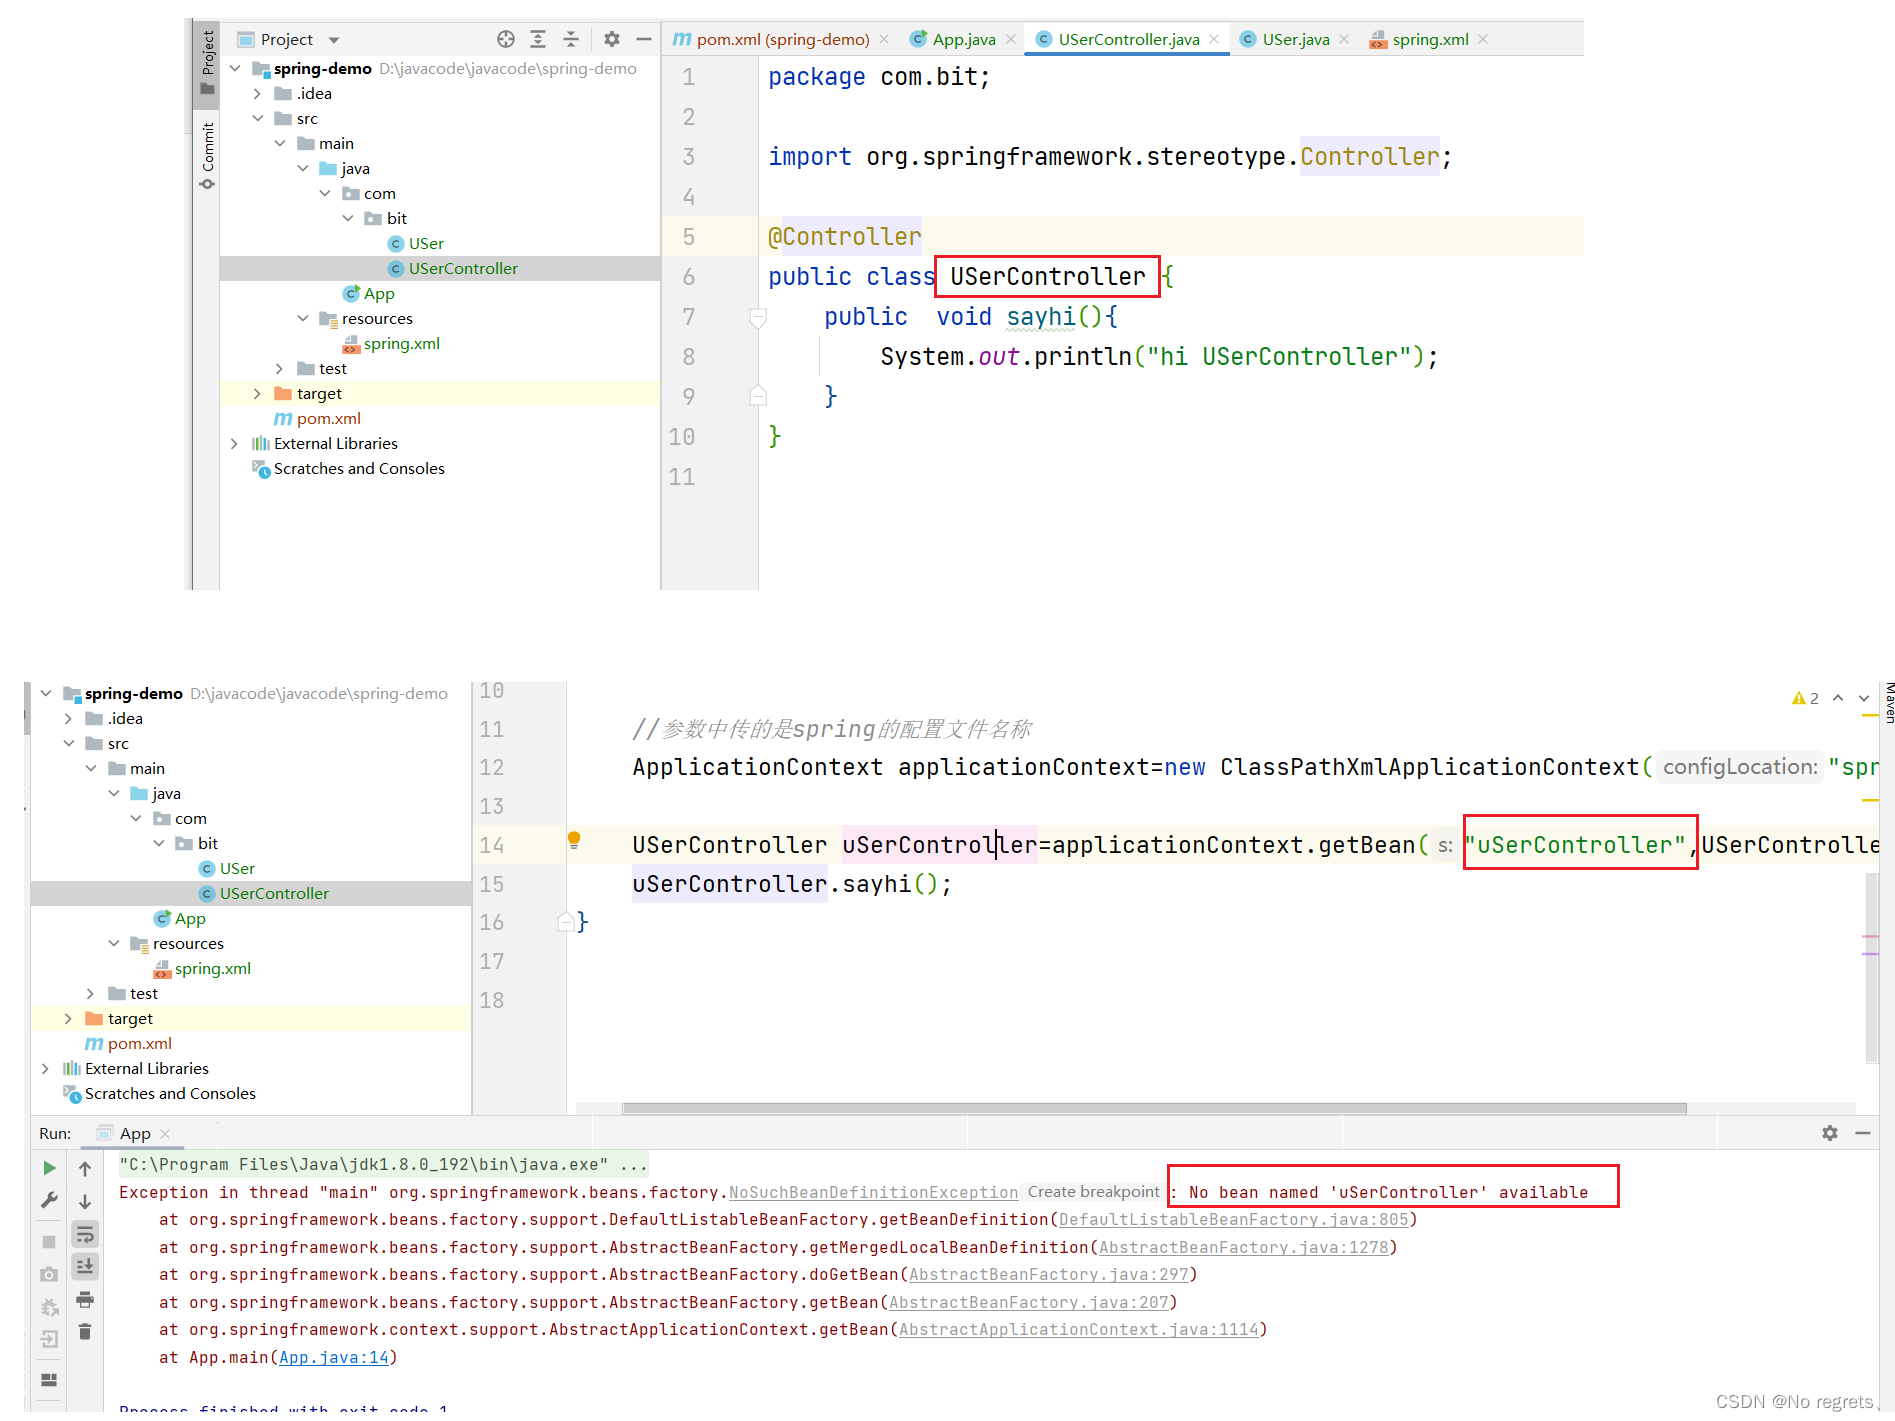
(2)当要注册的类名的前两个首字母都是大写字母时,如果在获取时依然使用首字母小写作为id来获取就会报错
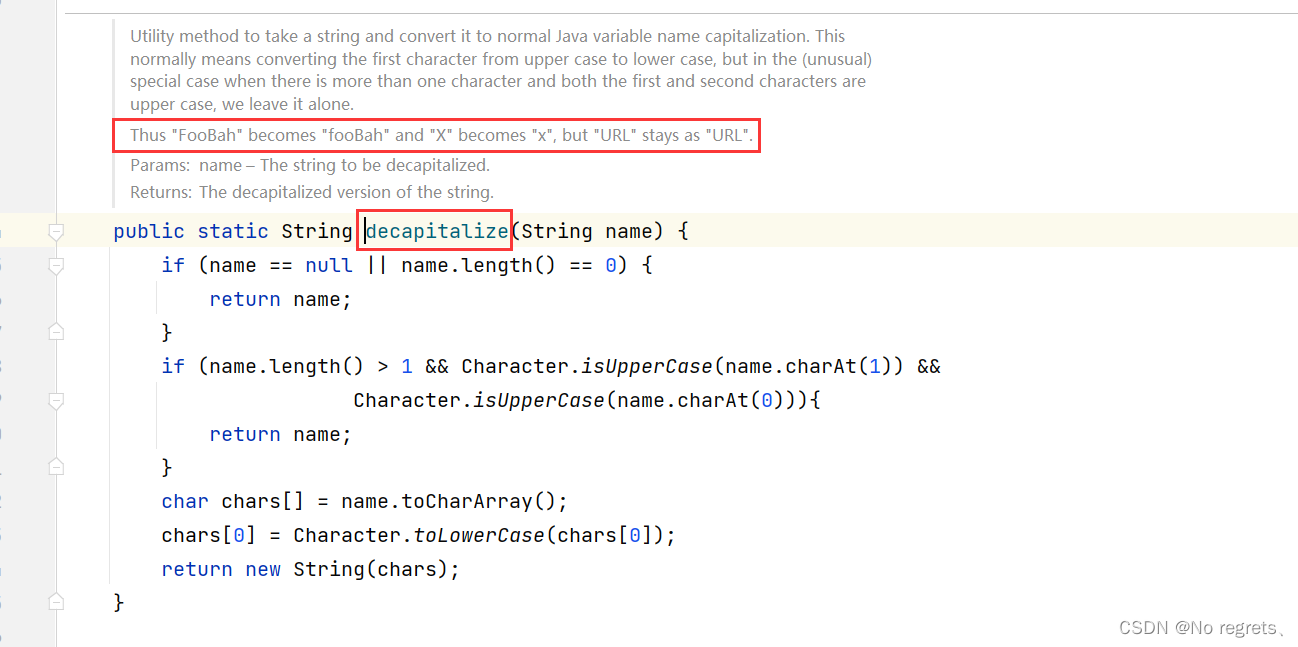
【观察默认bean命名规则的源代码】
(1)
(2)
(3) 观察发现,当类名首字母大写第二个字母小写时默认的beanName是首字母小写,当类名首字母和第二个字母都大写时默认的beanName和类名相同
1.5 方法注解 @Bean
类注解是添加到某个类上的,而方法注解是放到某个方法上的,如以下代码的实现
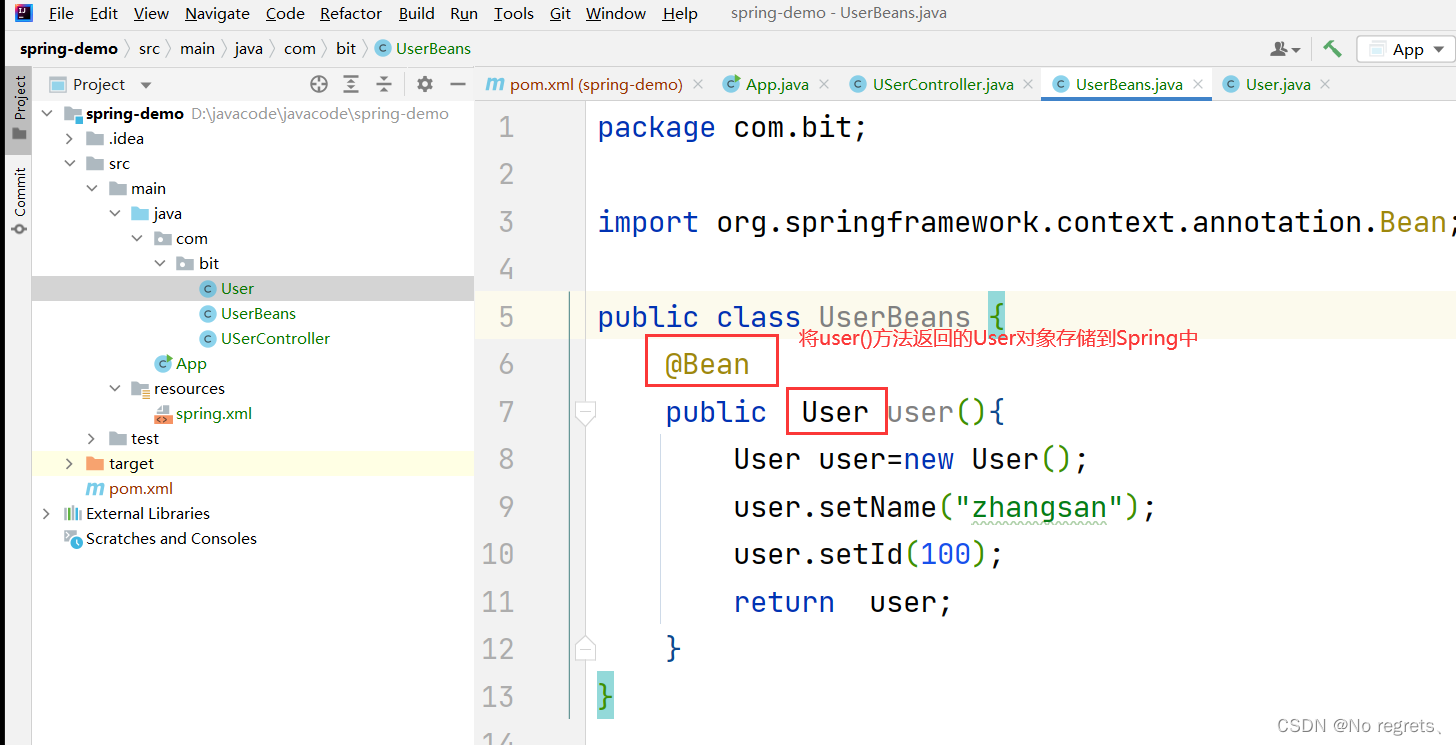
当我们写完以上代码,尝试获取 bean 对象中的 user1 时却发现,根本获取不到:
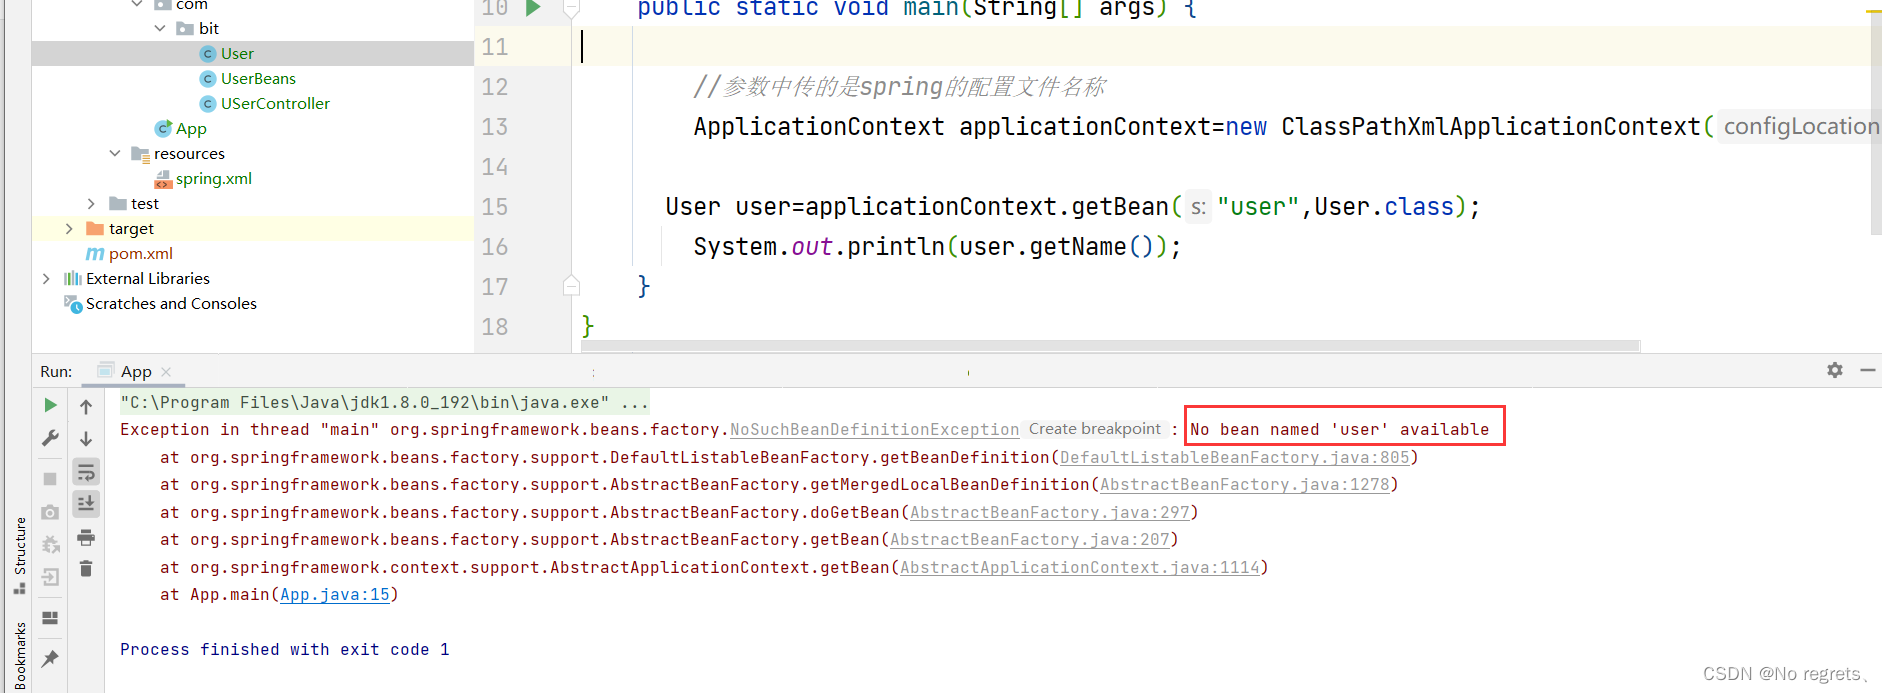
这是因为在Spring框架中,方法注解Bean要配合类注解才能将对象正常的存储到Spring容器中
修改代码:
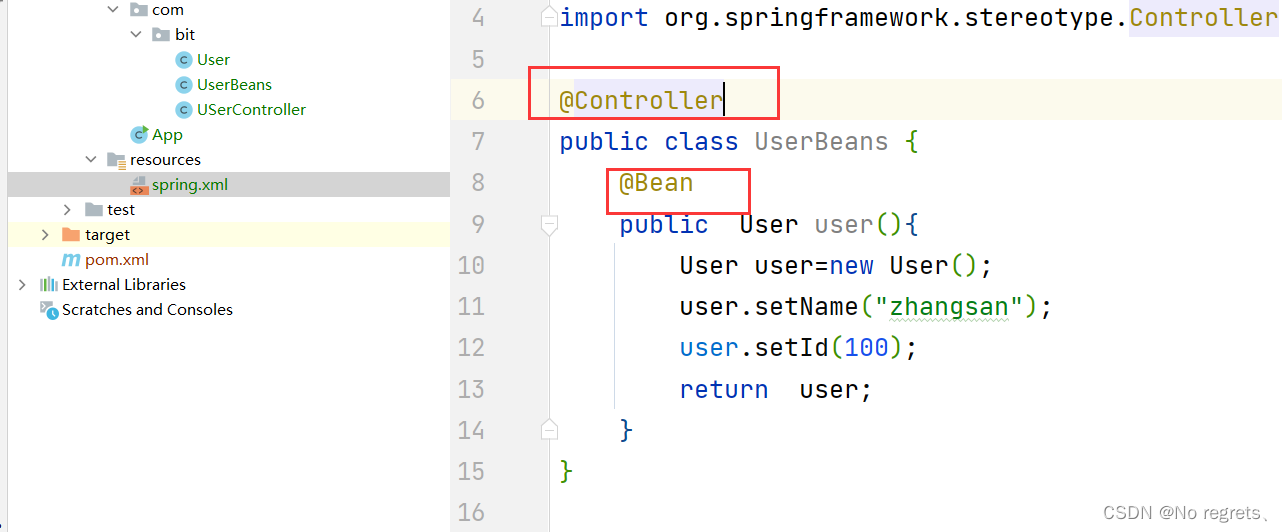
通过Bean注解注册对象的默认beanName是方法名,因此我们通过方法名来获取注册到Spring当中的User对象

1.5 重命名Bean
重命名Bean主要用来解决:在两个不同类中有两个同名的方法且返回的对象类型相同且这两个方法都被Bean注解修饰,此时我们在根据方法名取对象时只能取到其中的一个
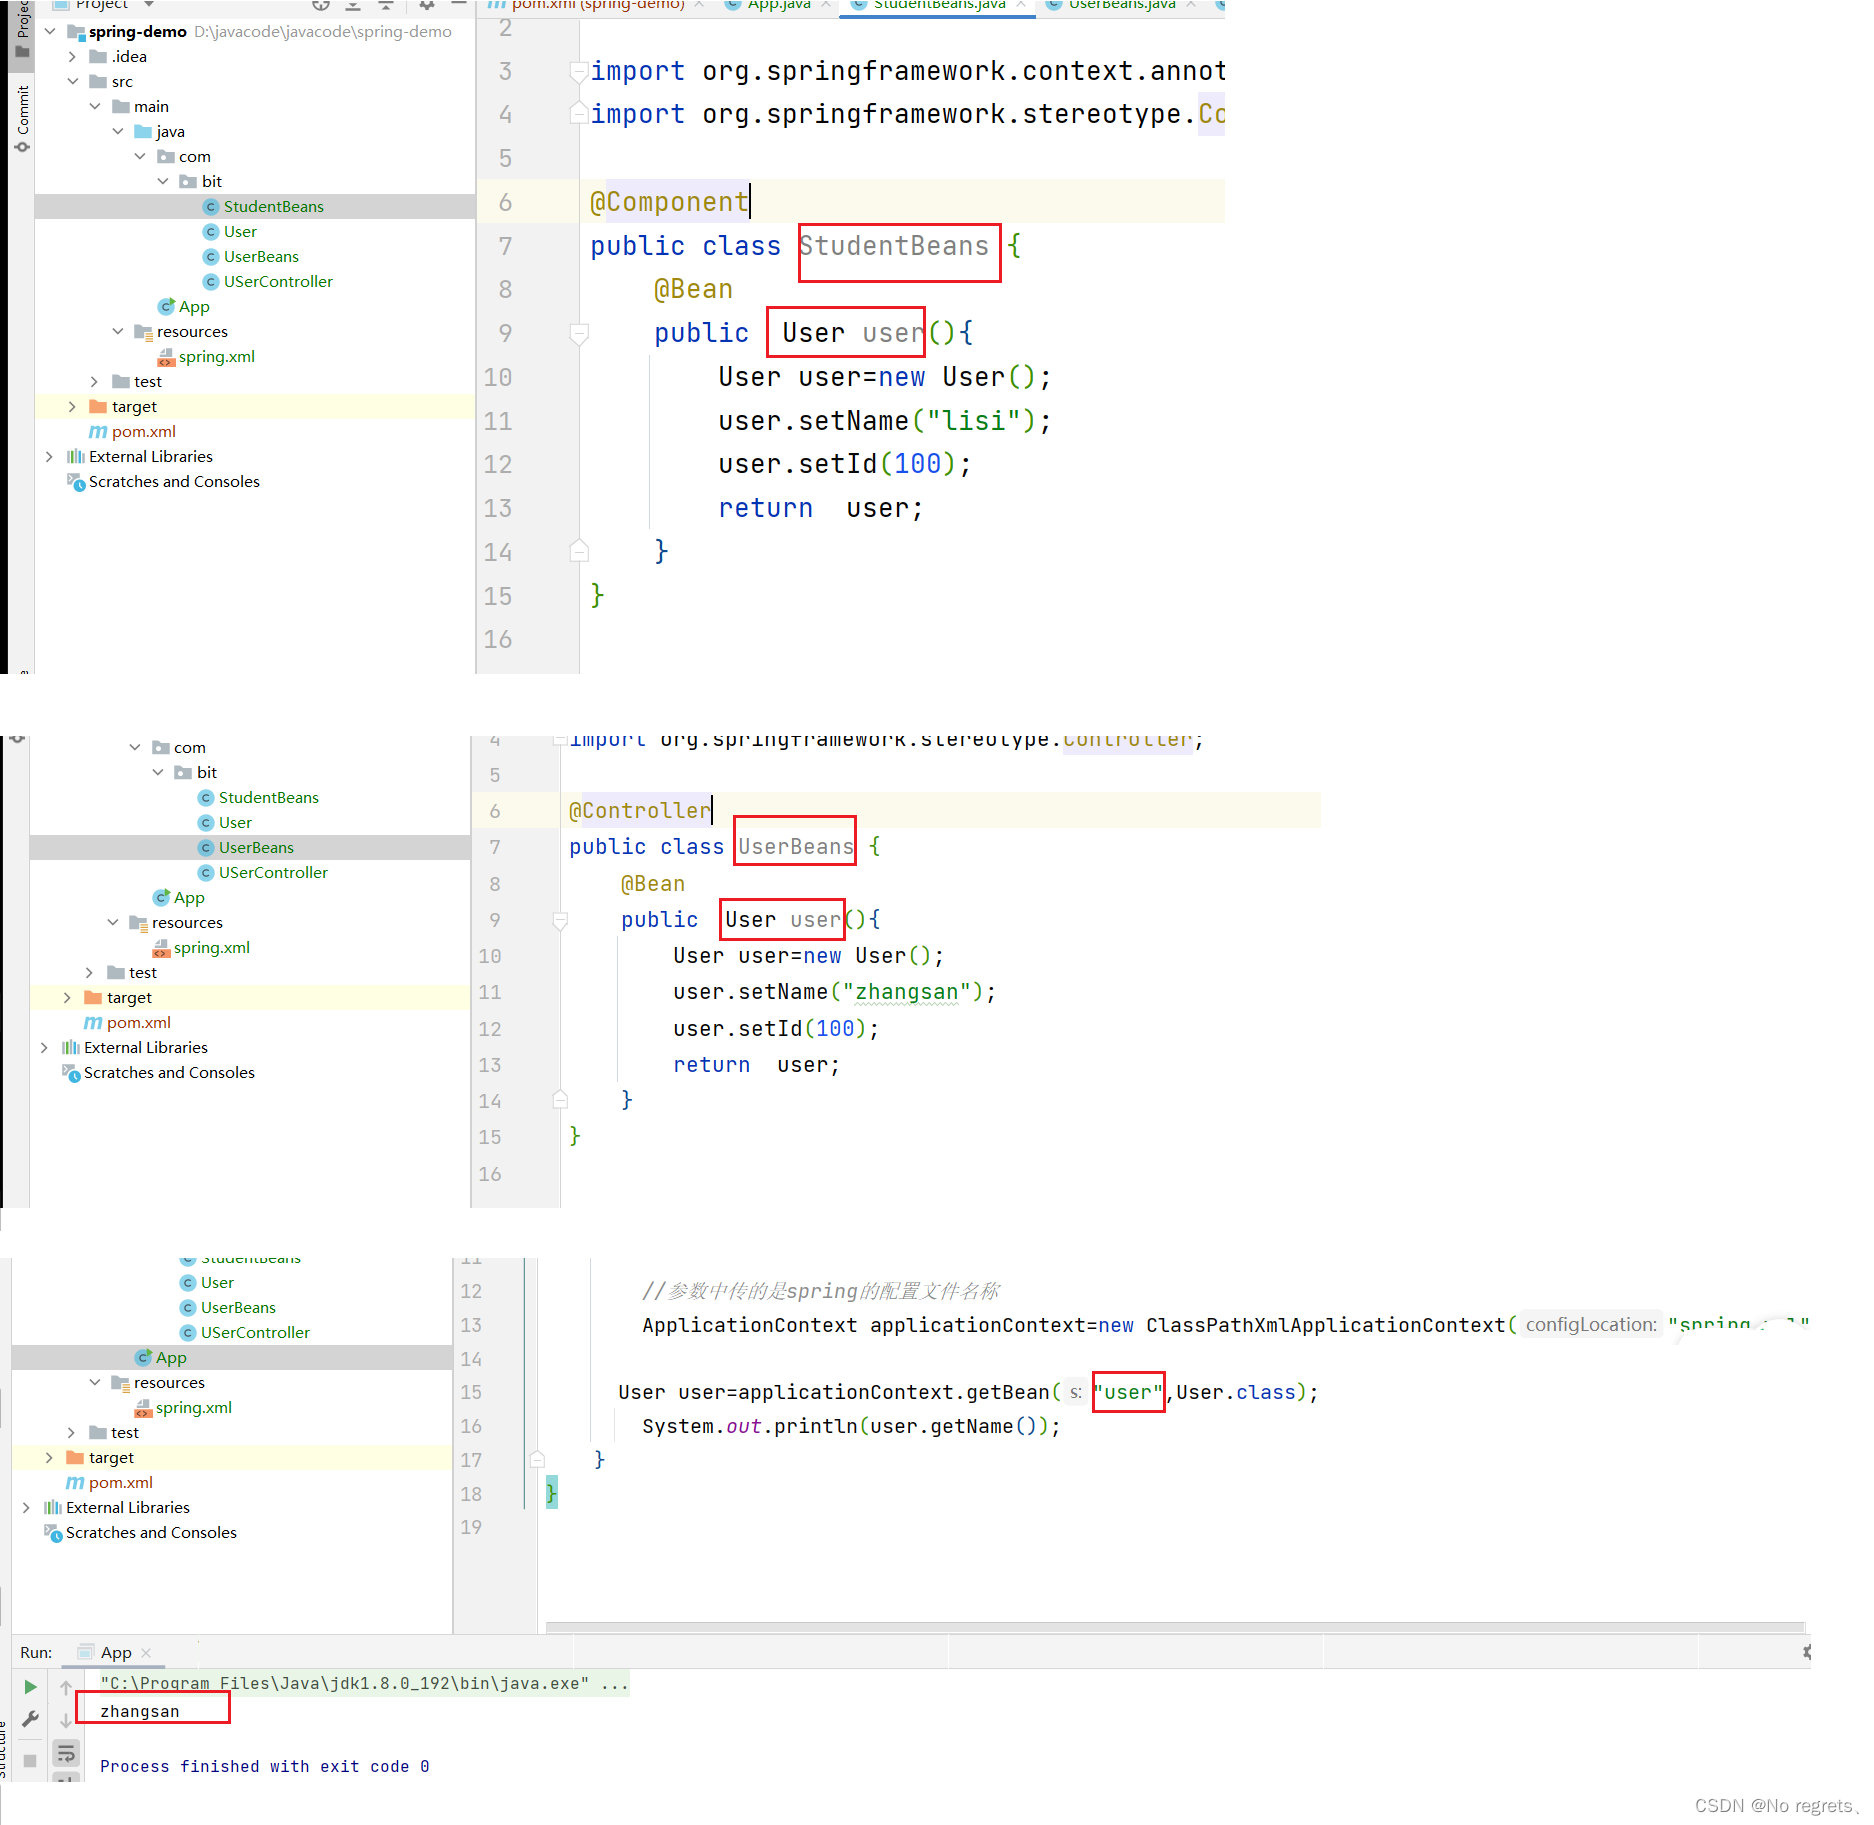
对Bean重命名:
StudentBeans
package com.bit;

import org.springframework.context.annotation.Bean;
import org.springframework.stereotype.Component;

@Component
public class StudentBeans {
    @Bean(name = "studentbeans_user")
    //@Bean("studentbeans_user") 效果一样
    //@Bean(name = {"studentbeans_user","user1","user2"})起多个名字
    public  User user(){
        User user=new User();
        user.setName("lisi");
        user.setId(100);
        return  user;
    }
}
UserBeans
package com.bit;

import org.springframework.context.annotation.Bean;
import org.springframework.stereotype.Controller;

@Controller
public class UserBeans {
    @Bean(name = "userbeans_user")
    public  User user(){
        User user=new User();
        user.setName("zhangsan");
        user.setId(100);
        return  user;
    }
}
按照重命名后的名字取Bean

【注意】
- 必须和5大类注解一起使用
- Bean注解不能修饰带有参数的方法,因为该参数没有办法传
- 重命名之后,不能再通过方法名来获取Bean了
二、获取Bean对象
获取Bean对象也叫做对象装配,是把对象取出来放到某个类中,有时候也叫对象注入。
对象装配的实现方法有以下三种:
- 属性注入
- 构造方法注入
- Setter注入
2.1 属性注入
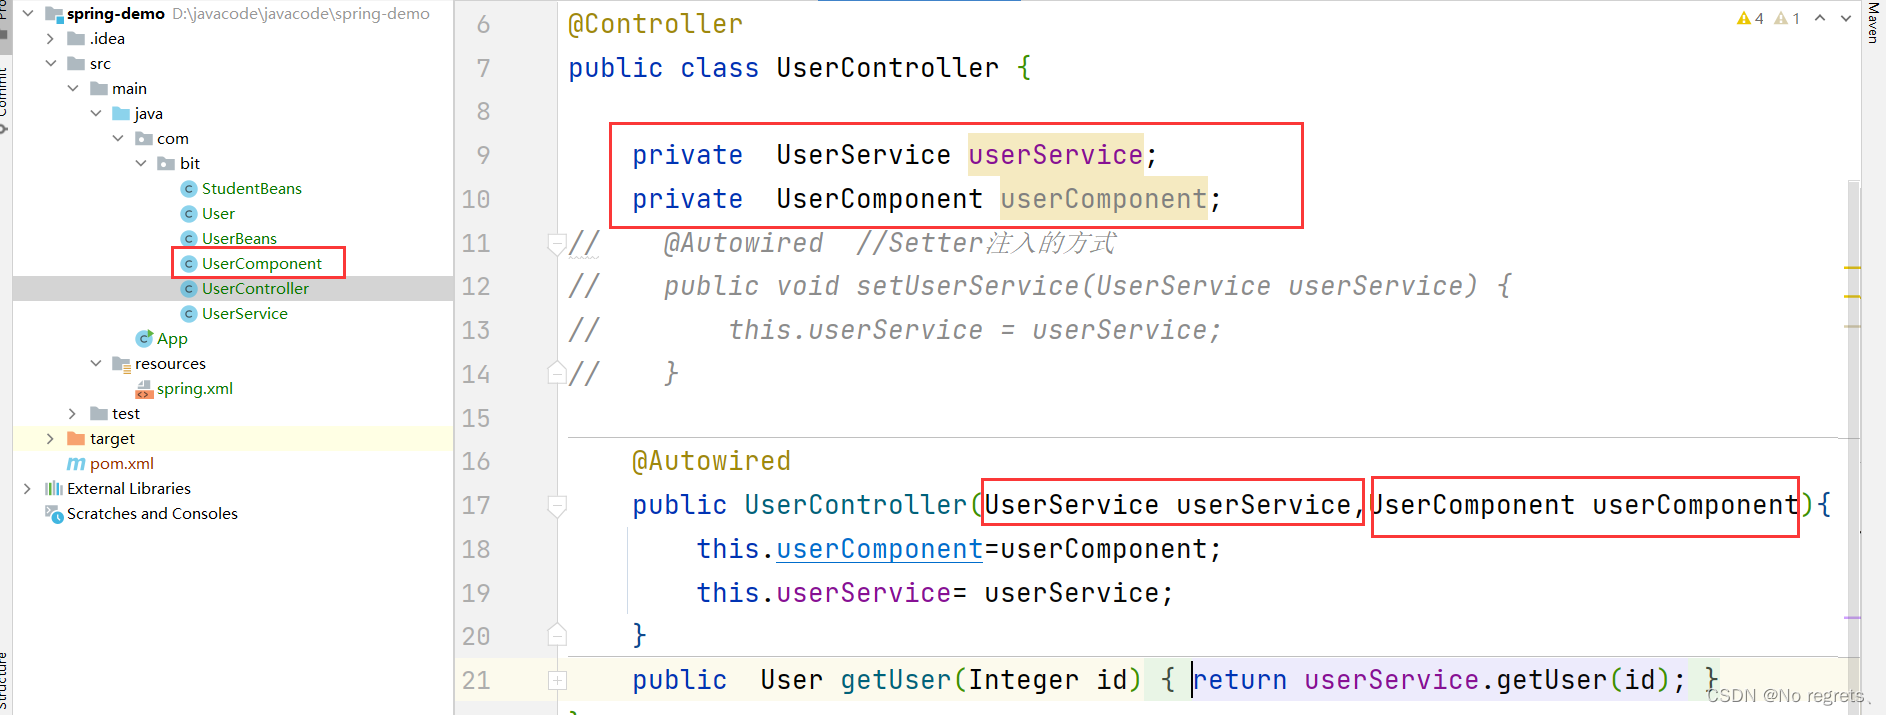
属性注入是使用@Autowired实现的
下面演示在UserController中注入UserService对象
UserService:
package com.bit;

import org.springframework.stereotype.Service;

@Service
public class UserService {
    /**
     * 根据 ID 获取?户数据
     *
     * @param id
     * @return
     */
    public User getUser(Integer id) {
        // 伪代码,不连接数据库
        User user = new User();
        user.setId(id);
        user.setName("Java-" + id);
        return user;
    }
}
UserController:
package com.bit;

import org.springframework.beans.factory.annotation.Autowired;
import org.springframework.stereotype.Controller;

@Controller
public class UserController {
    @Autowired
    private UserService userService;
    public  User getUser(Integer id){

        return userService.getUser(id);
    }
}
App:
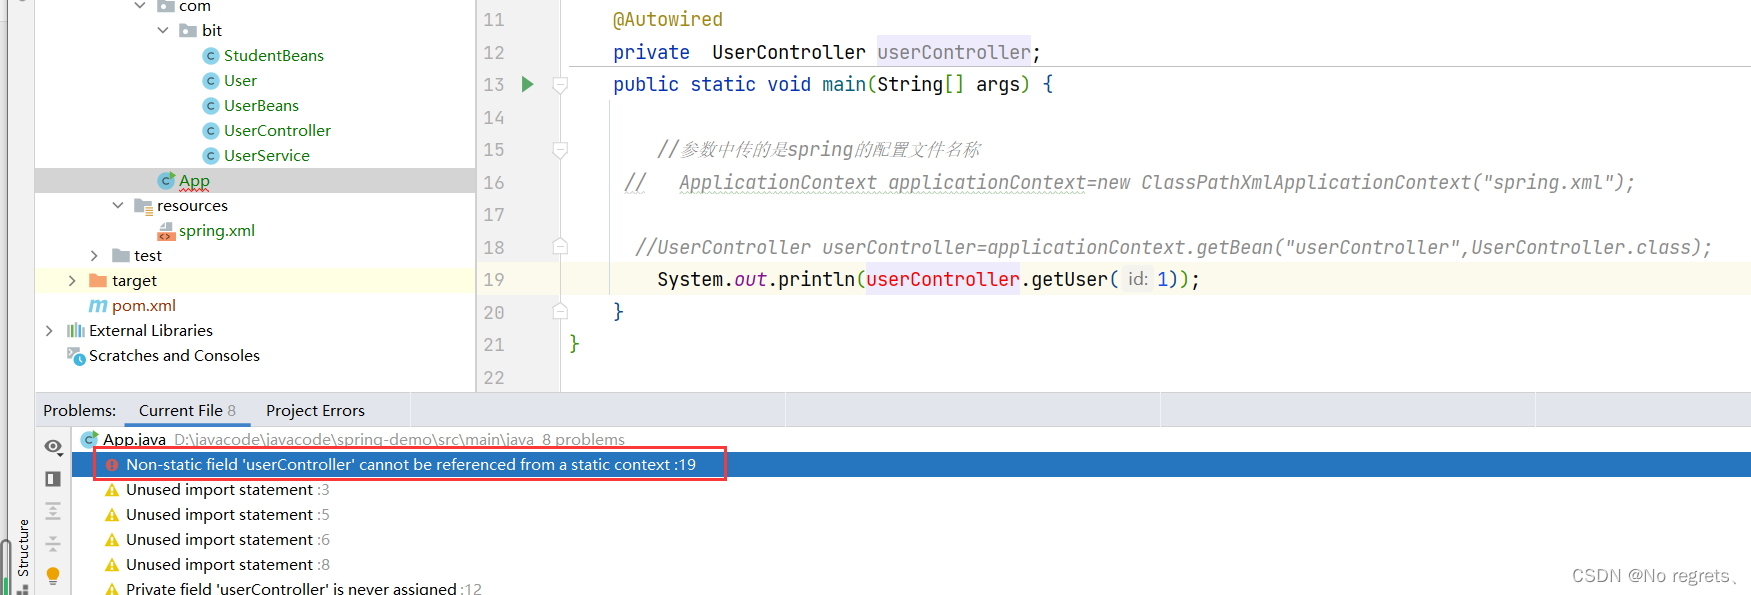
public class App {
    @Autowired
    private  UserController userController;
    public static void main(String[] args) {

        //参数中传的是spring的配置文件名称
        ApplicationContext applicationContext=new ClassPathXmlApplicationContext("spring.xml");

      UserController userController=applicationContext.getBean("userController",UserController.class);
        System.out.println(userController.getUser(1));
    }
}
【注意】
不能在静态方法中使用通过Autowired注入的对象,因为Spring自动注入的时机比静态方法执行的时机晚
【优缺点分析】
优点:使用简单
缺点:
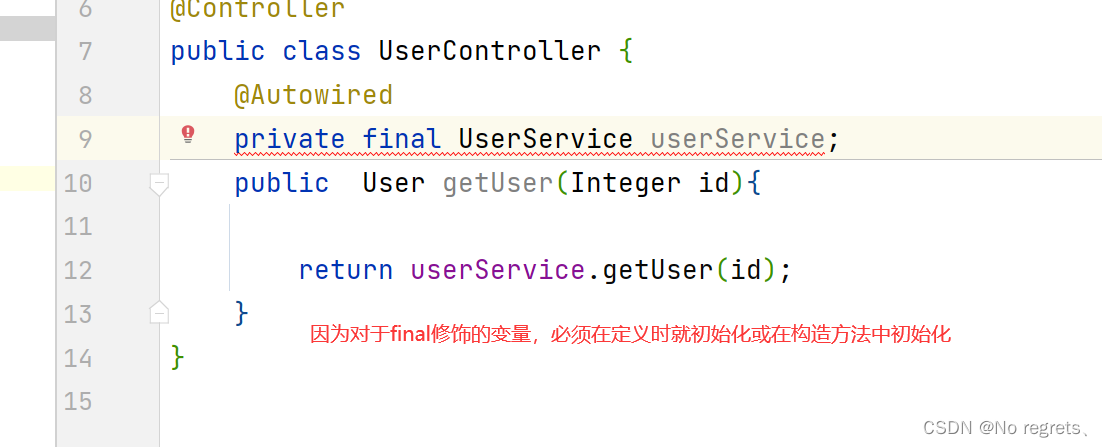
- 无法注入一个不可变的对象(final 修饰的对象)
- 只能适应于IoC容器
- 更容易违背单一设计原则(指某个类只干一件事,不能既干这又干那)
2.2 Setter注入
UserController类:
@Controller
public class UserController {
    private  UserService userService;
    @Autowired  //Setter注入的方式
    public void setUserService(UserService userService) {
        this.userService = userService;
    }
    public  User getUser(Integer id){
        return userService.getUser(id);
    }
}
UserService的写法同上
【优缺点分析】
优点:符合单一设计原则(一个Setter只针对一个对象)
缺点:
- 不能注入一个final对象
- Setter注入对象可能会被改变,因为set方法可能被多次调用
2.3 构造方法注入
UserController类
@Controller
public class UserController {

    private  UserService userService;
       @Autowired
    public UserController(UserService userService){
        this.userService= userService;
    }
    public  User getUser(Integer id){
        return userService.getUser(id);
    }
}
【注意】
- 如果只有一个构造方法,@Autowired注解可以省略
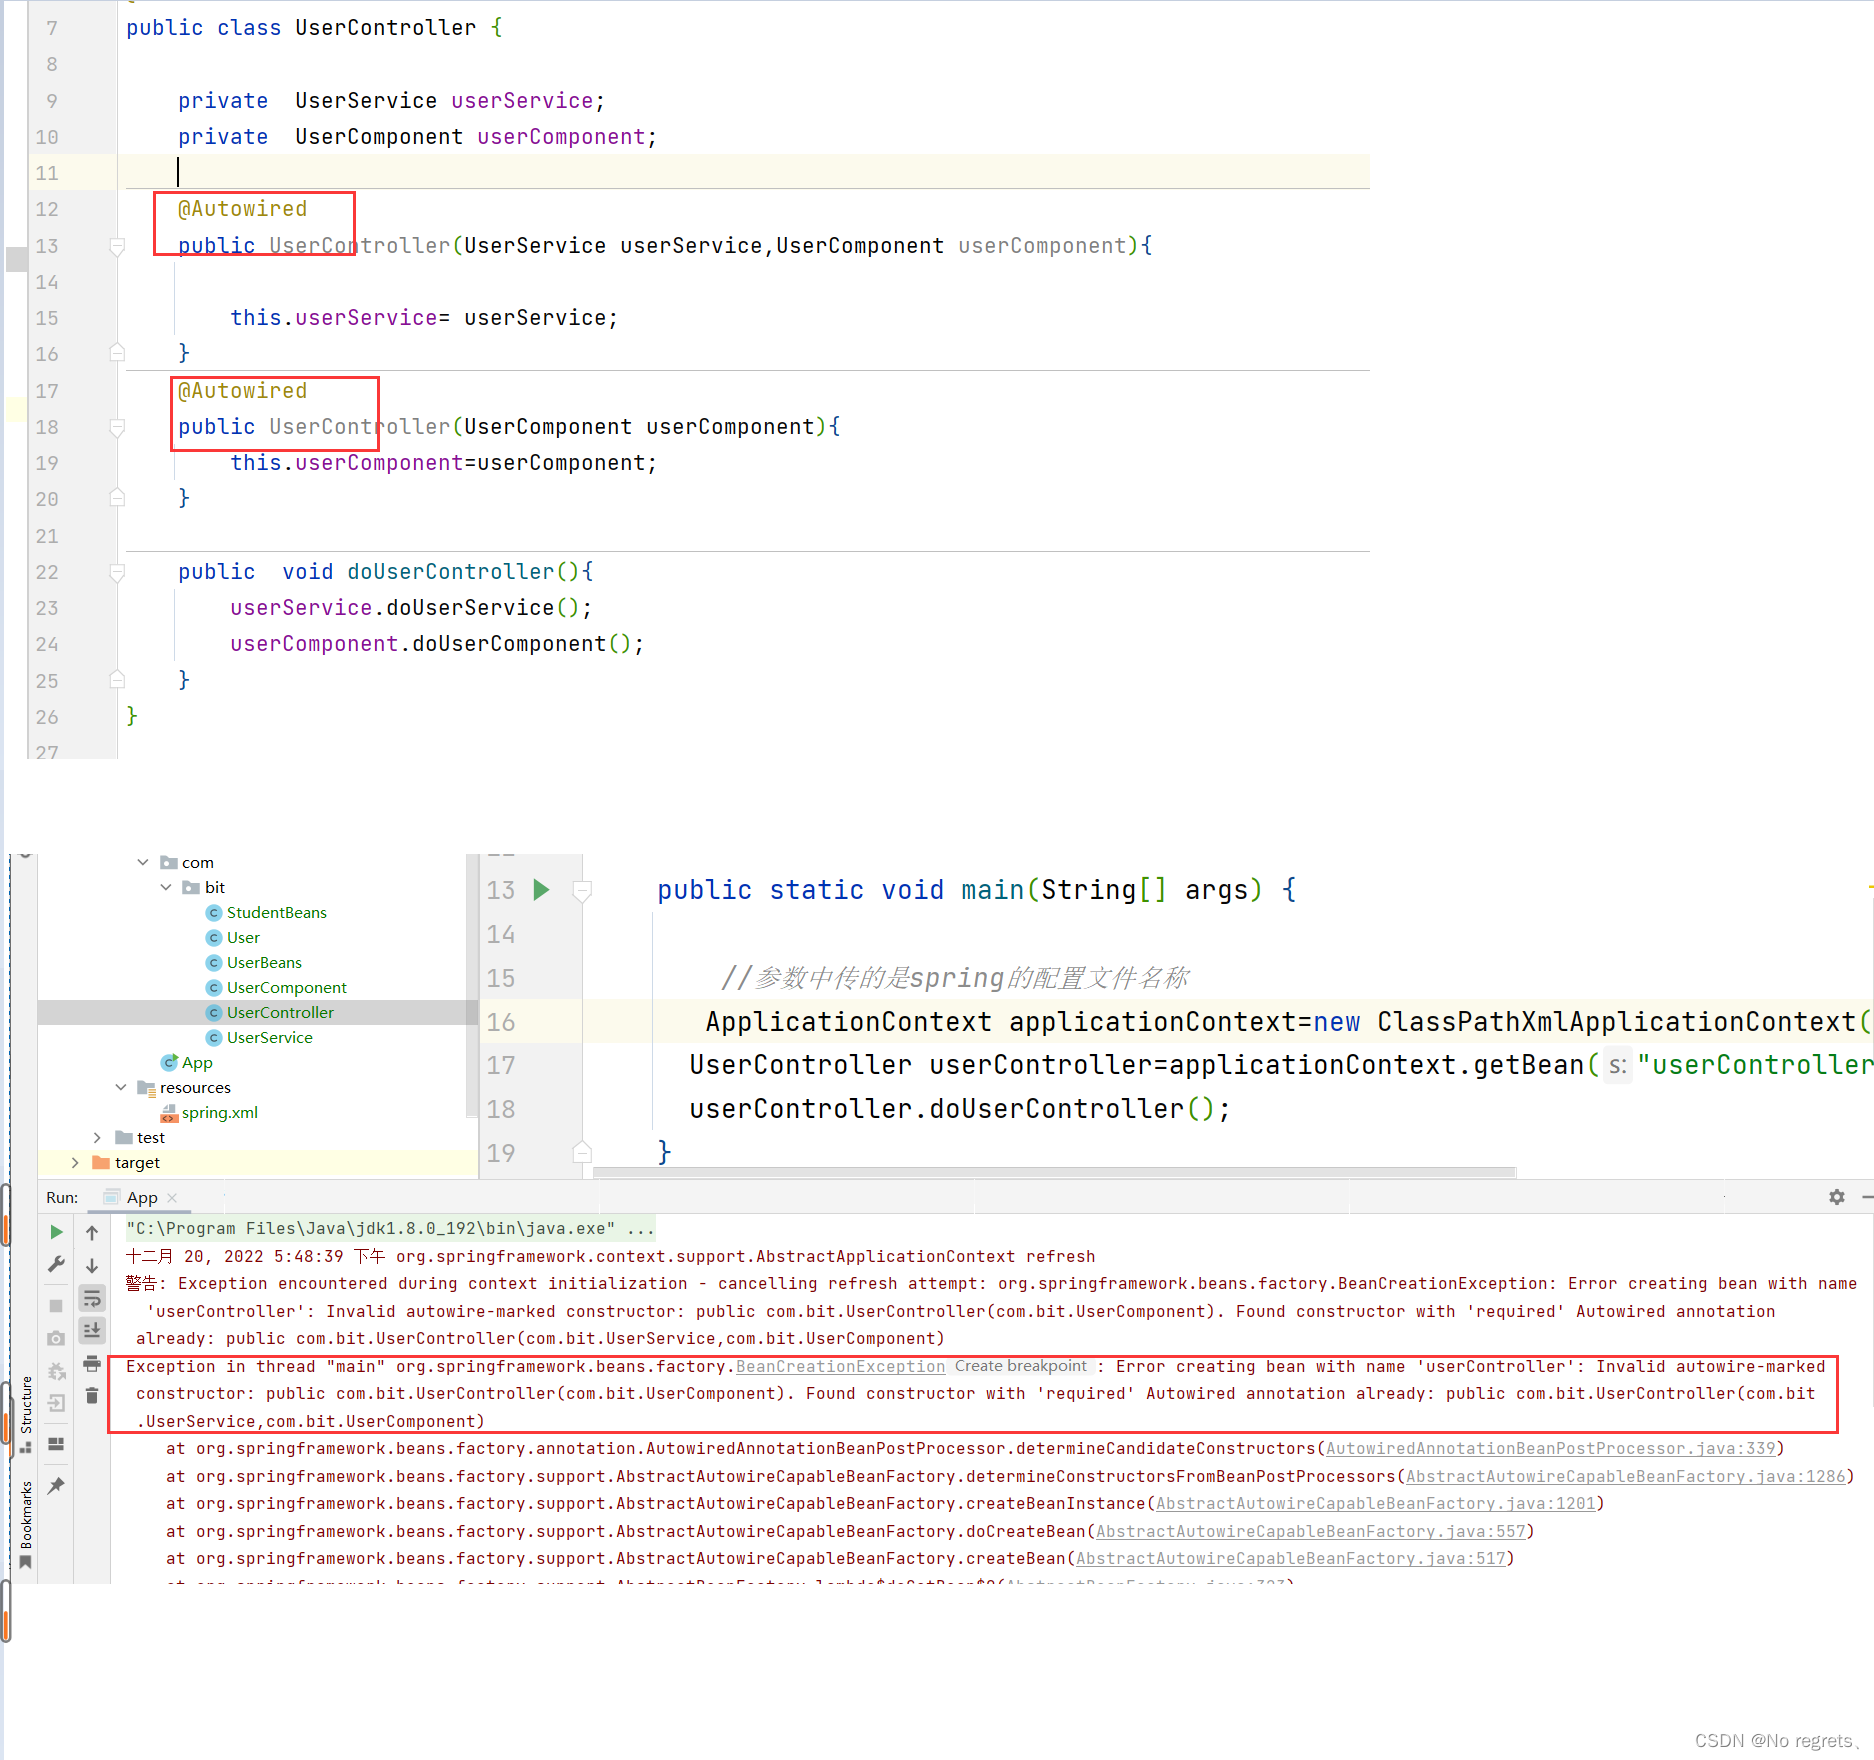
- 如果类中有多个构造方法,那么需要添加上 @Autowired 来明确指定到底使用哪个构造方法,否则程序会报错
- 可以在一个构造方法中注入多个对象
- 一个类中只能使用Autowired注解修饰一个构造方法(仔细一想,因为在Java规范中,创建一个对象时,即使类中有多个构造方法,也只会执行其中的某一个)
【优点】
- 可以注入final修饰的对象
- 注入的对象不会被修改,构造方法在对象创建时只会执行一次,因此不存在注入对象被修改的情况
- 完全初始化,因为依赖对象是在构造方法中执行的,而构造方法是在对象创建之初执行的,因此被注入的对象在使用之前,会被完全初始化
- 通用性更好,因为构造方法是Java支持的【最底层的框架】,所以更换任何的框架都是支持的
2.4 Resource注解
在进行依赖注入时,除了可以使用Autowired注解,JDK也提供了一个Resource注解,可以达到同样的效果
属性注入的方式:
@Controller
public class UserController {
    @Resource
    private  UserService userService;
    public  void doUserController(){
        userService.doUserService();

    }
}
Setter注入的方式:
@Controller
public class UserController {

    private  UserService userService;

    @Resource
    public  void setUserService(UserService userService){
        this.userService=userService;
    }
    public  void doUserController(){
        userService.doUserService();

    }
}
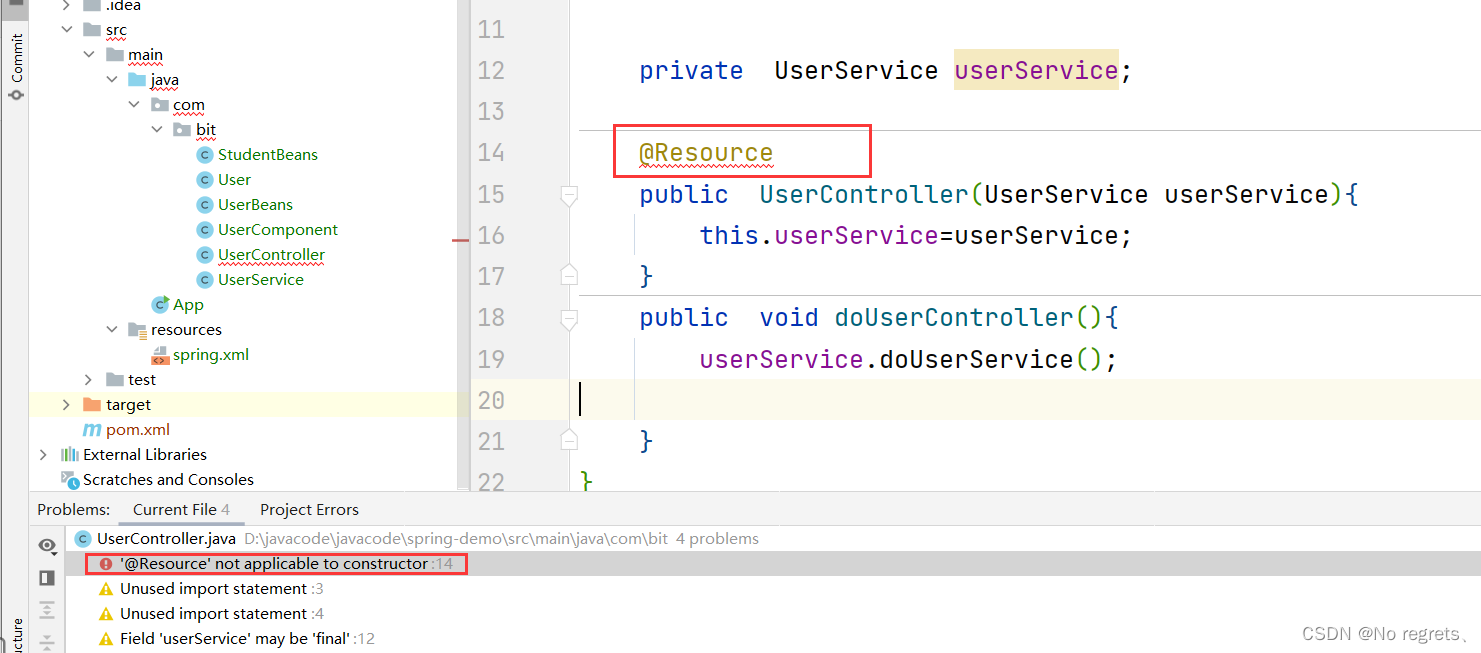
Resource注解不支持构造方法注入
【@Autowired和@Resource的区别】
- @Autowired来自于Spring,@Resource来自于JDK
- @Autowired 可用于 Setter 注入、构造函数注入和属性注入,而@Resource只能用于 Setter 注入和属性注入,不能用于构造函数注入
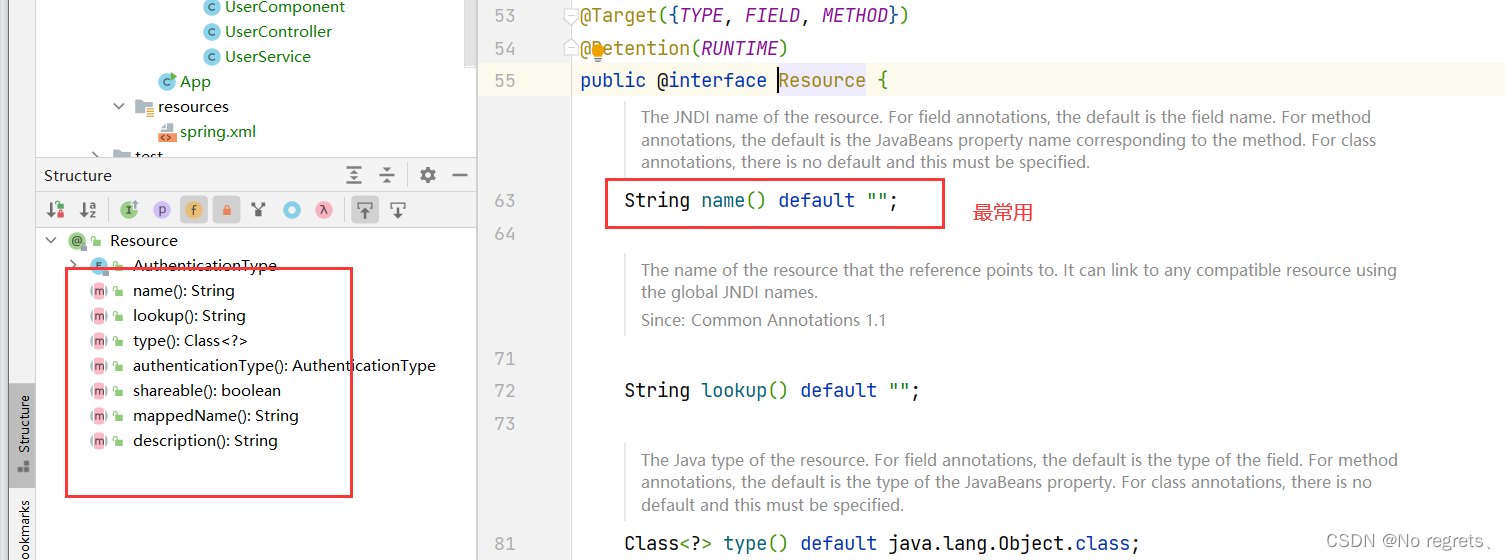
- 相比于 @Autowired 来说,@Resource 支持更多的参数设置,例如 name 设置,根据名称获取 Bean。
2.5 Resource注解中name参数的作用
当在一个类中有两个方法,返回的对象类型相同且这两个方法都被Bean修饰,在另一个类中获取该对象时就会报错,具体看下面示例
UserBeans类中,有user1和user2方法,都返回User对象且被Bean注解修饰
@Controller
public class UserBeans {
    @Bean
    public  User user1(){
        User user=new User();
        user.setName("zhangsan");
        user.setId(100);
        return  user;
    }

    @Bean
    public  User user2(){
        User user=new User();
        user.setName("lisi");
        user.setId(200);
        return  user;
    }
}
在UserController类中通过Autowired属性注入的方式注入User对象
@Controller
public class UserController {
    @Autowired
     private  User user;
    public  User getUser(){
        return  user;
    }
}
App类启动时程序报错(使用Resource注解也会报同样的错误)
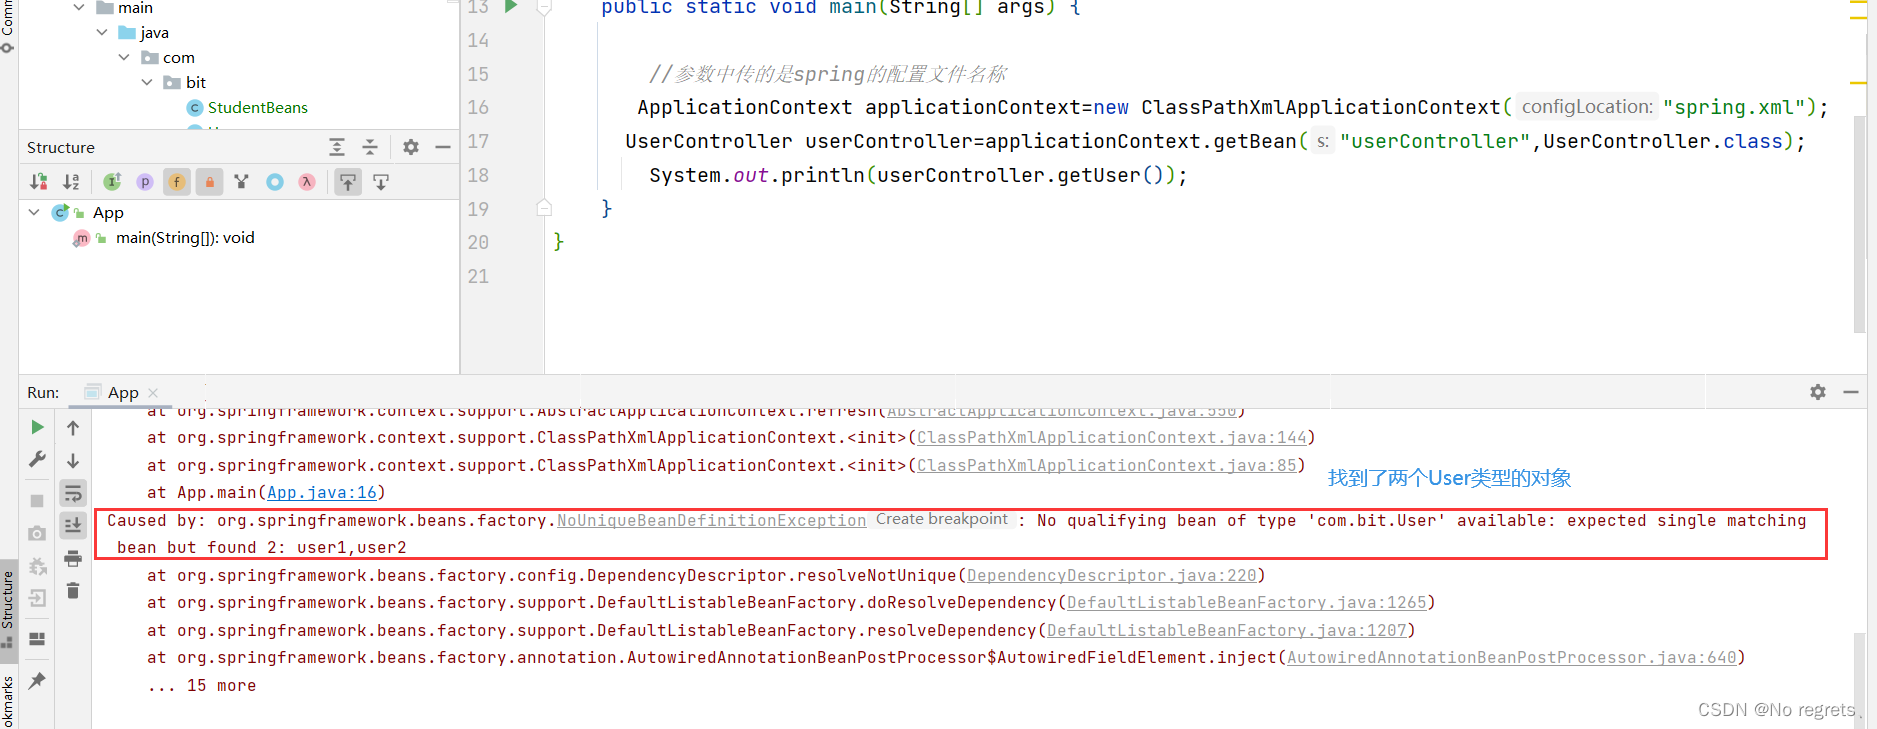
【发生上述错误的原因和注解的匹配方式有关】
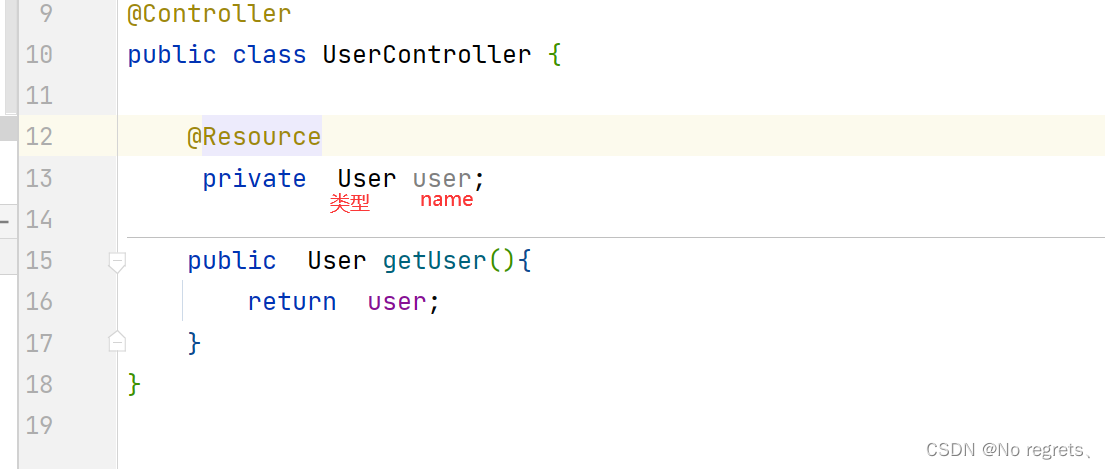
- 对于Autowired注解来说,先根据类型匹配,如果匹配到多个对象,再使用name进行筛选,如果筛选后仍有多个对象,则会报错
- 对于Autowired注解来说,先根据name匹配,如果匹配到多个对象,在使用类型进行筛选,如果筛选后仍有多个对象,则会报错
- 在上述例子中,类型和name分别是:
【解决方式】
- 在使用注解注入时将变量名user改为user1或user2,这样就可以通过name筛选得到唯一对象
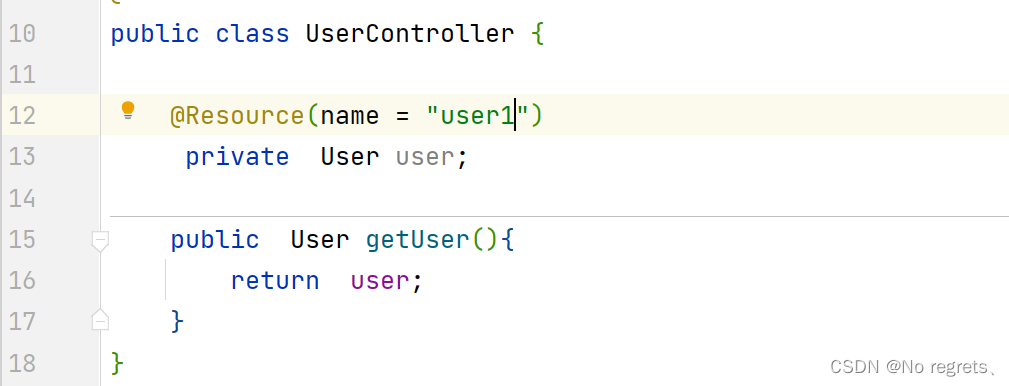
- 在不改变user的情况下,可以使用Resource中的name注解指定要获取的对象name

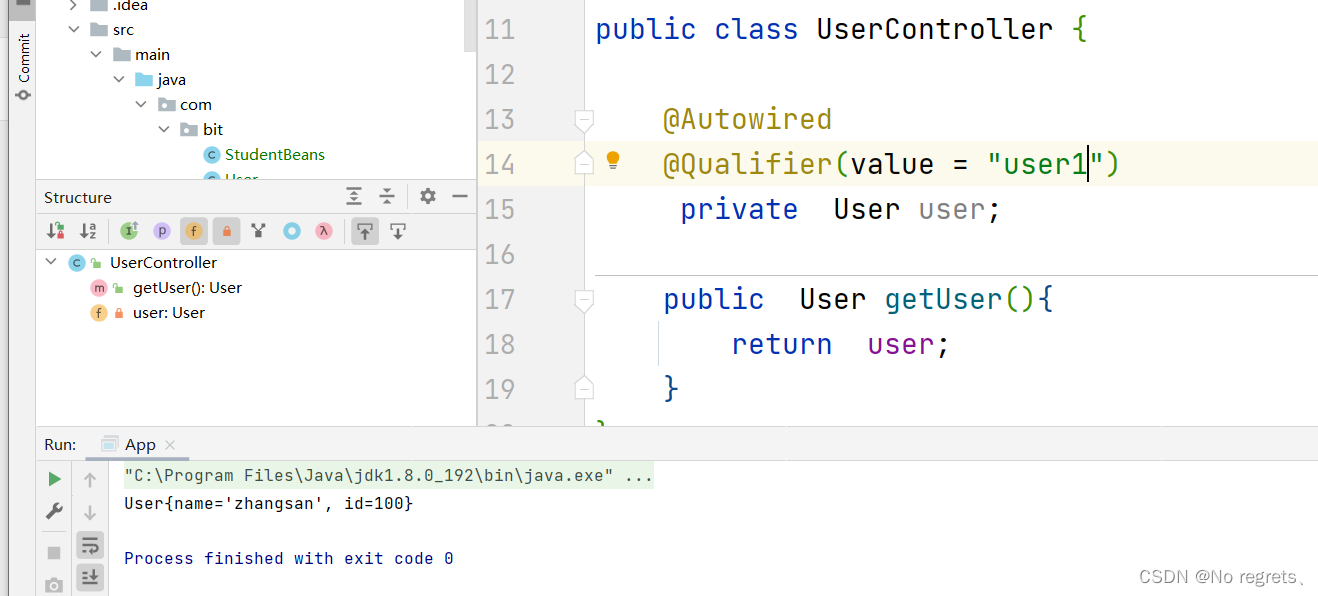
- 使用Autowired+Qualifier,在Qualifier注解的value参数中指定name,根据这个name进行筛选
【补充】
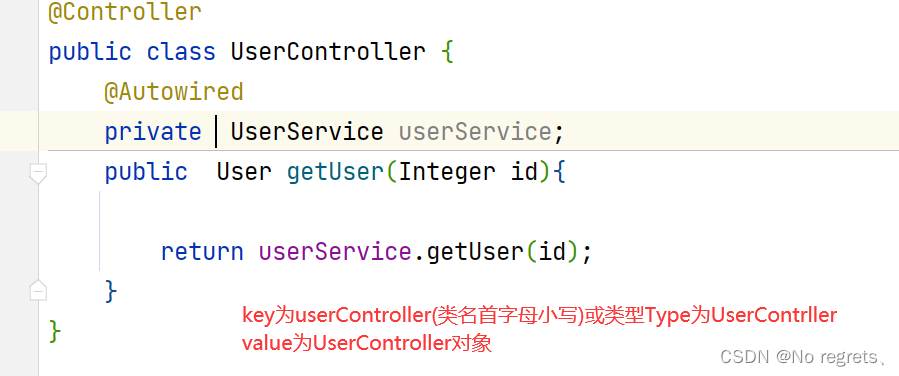
Spring存储Bean的方式类似于HashMap,
key为对象的默认命名或类型,value为对应的对象
