1. Sentinel
1.1. 官网
英文官网:https://github.com/alibaba/Sentinel
中文官网:https://github.com/alibaba/Sentinel/wiki/%E4%BB%8B%E7%BB%8D
1.2. 是什么?
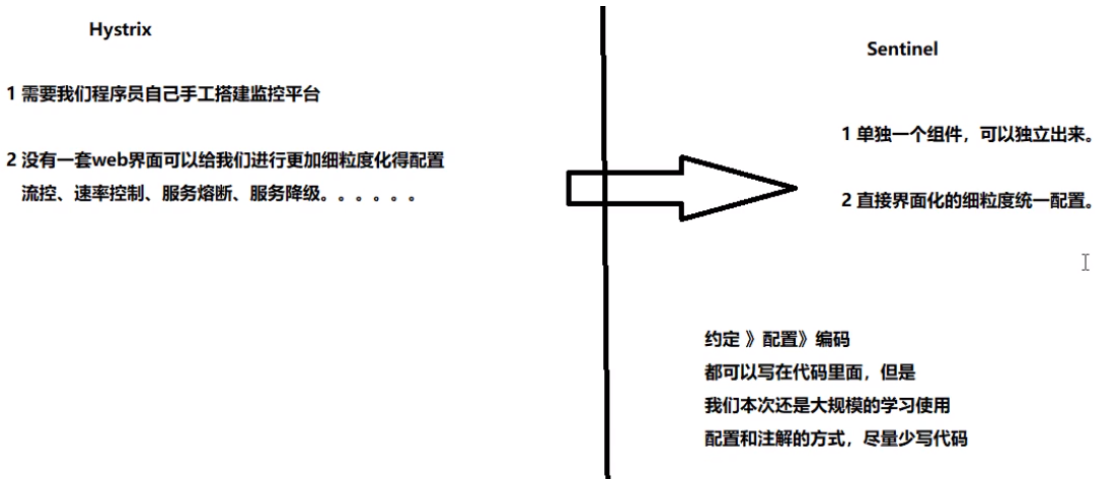
一句话解释,Sentinel 是轻量级的流量控制、熔断降级Java库;功能类似于Hystrix
官网的描述:

1.3. 去哪下
下载地址:https://github.com/alibaba/Sentinel/releases
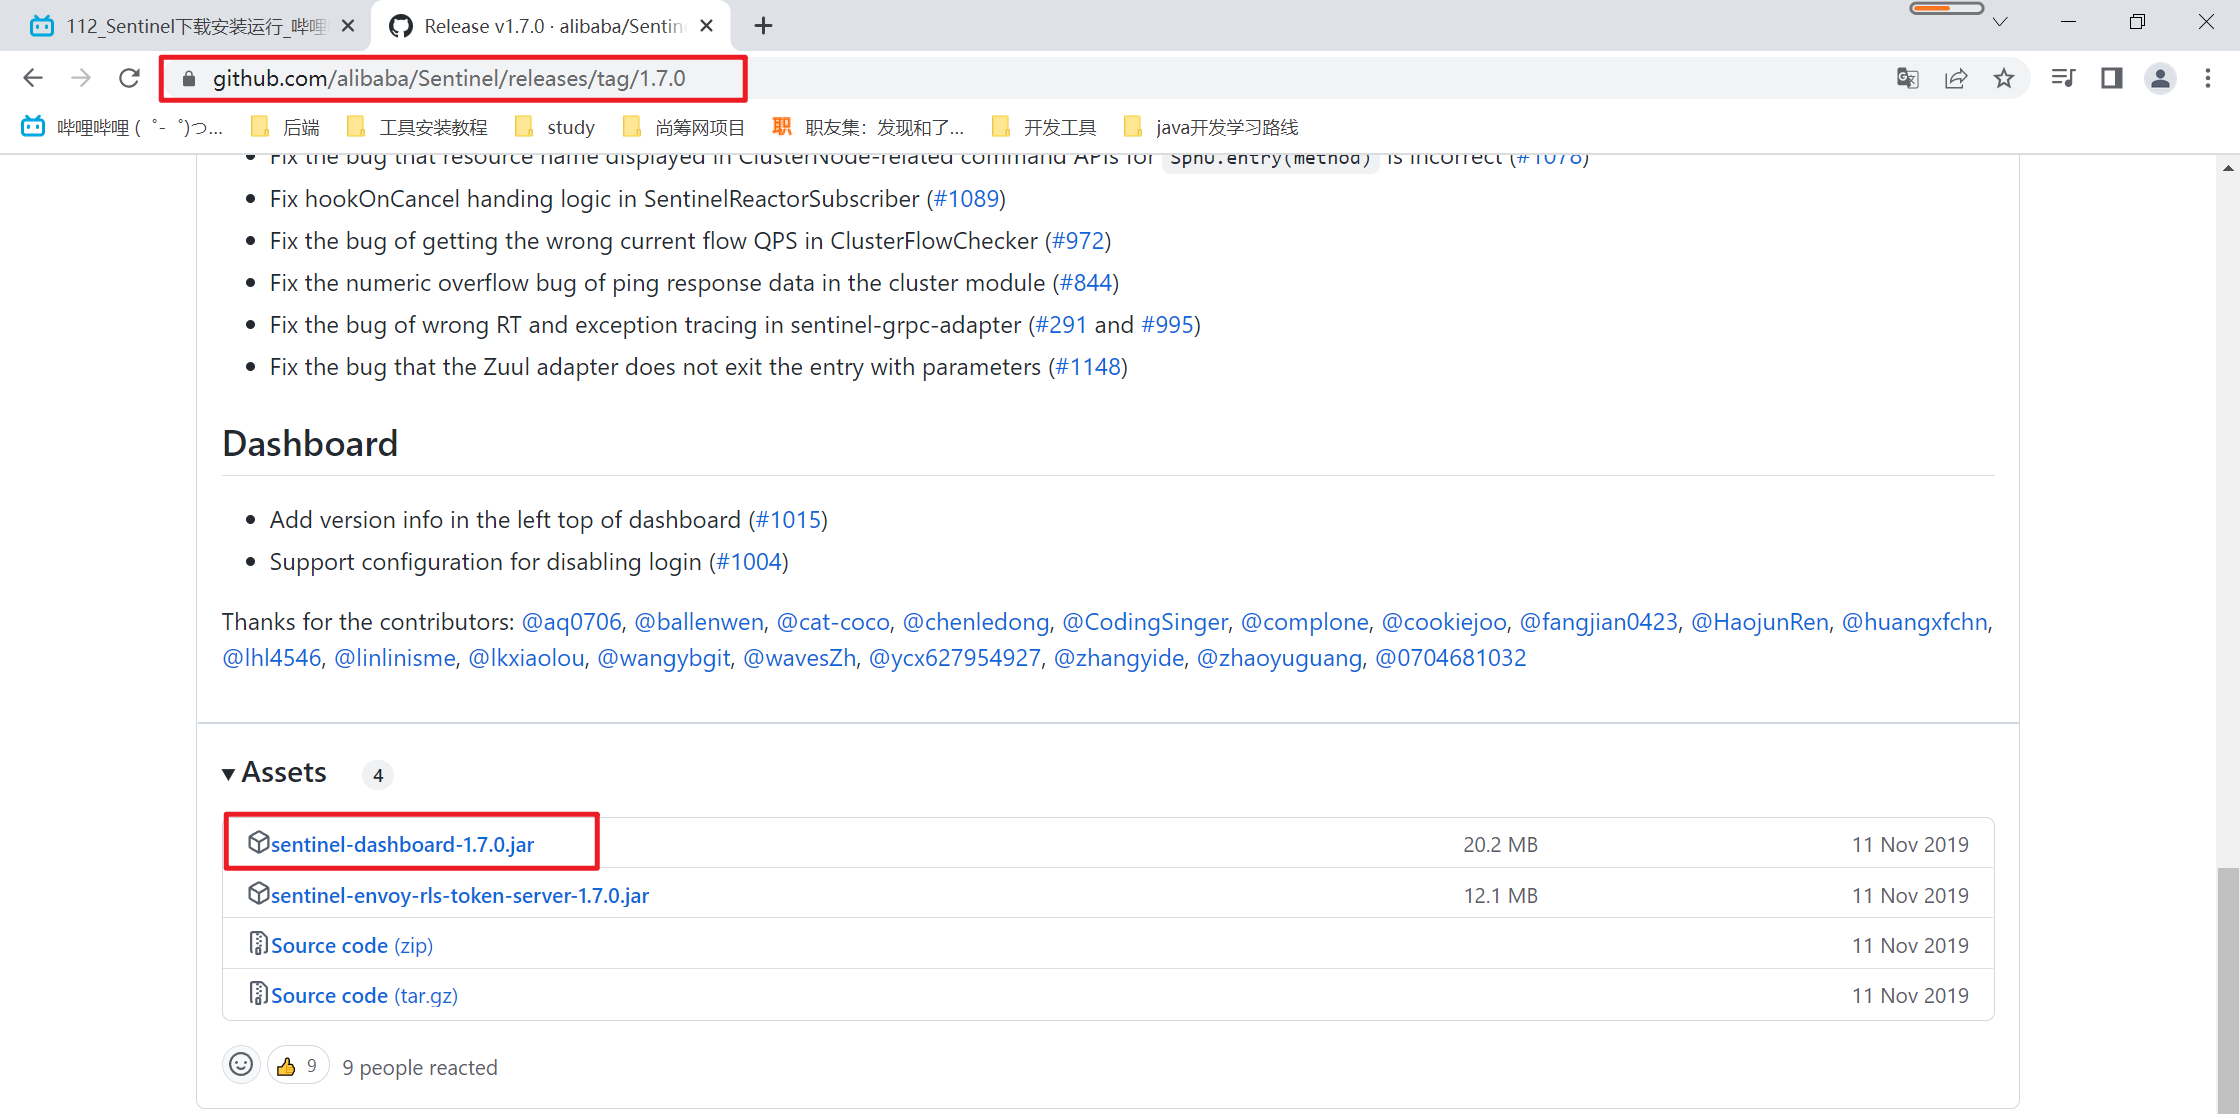
下载跟周阳老师一致的版本v1.7.0
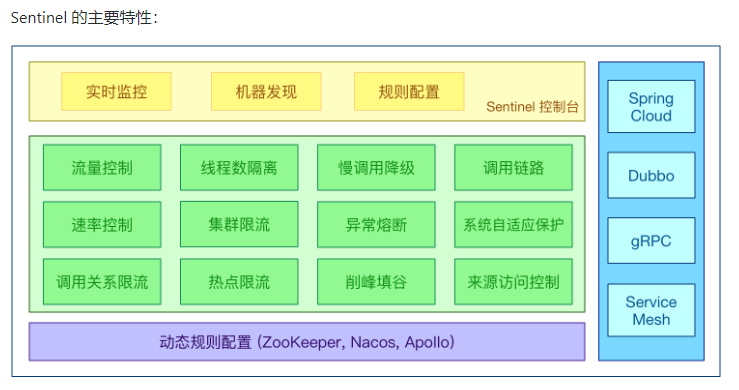
1.4. 能干嘛
1.5. 怎么玩?
服务使用中的各种问题
- 服务雪崩
- 服务降级
- 服务熔断
- 服务限流
2. 安装Sentinel控制台
sentinel组件由2部分构成
- 核心库(Java客户端)不依赖任何框架/库,能够运行于所有Java运行时环境,同时对Dubbo/Spring Cloud等框架也有较好的支持——后台;
- 控制台(Dashboard)基于Spring Boot开发,打包后可以直接运行,不需要额外的Tomcat等应用容器——前台 8080
安装步骤:
第1步:先去下载Sentinel,下载完成会得到一个 sentinel-dashboard-1.7.0.jar
第2步:运行命令
前提是:
- java8环境OK
- 8080端口不能被占用
两个前提都没问题就可以运行如下的命令启动Sentinel
$ java -jar sentinel-dashboard-1.7.0.jar
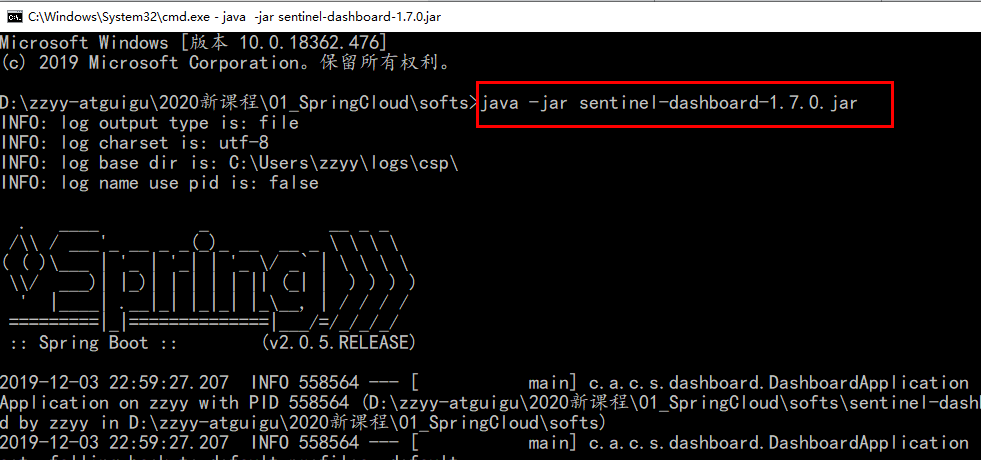
第3步:访问sentinel管理界面
在浏览器访问:http://localhost:8080 ,登录账号密码均为sentinel
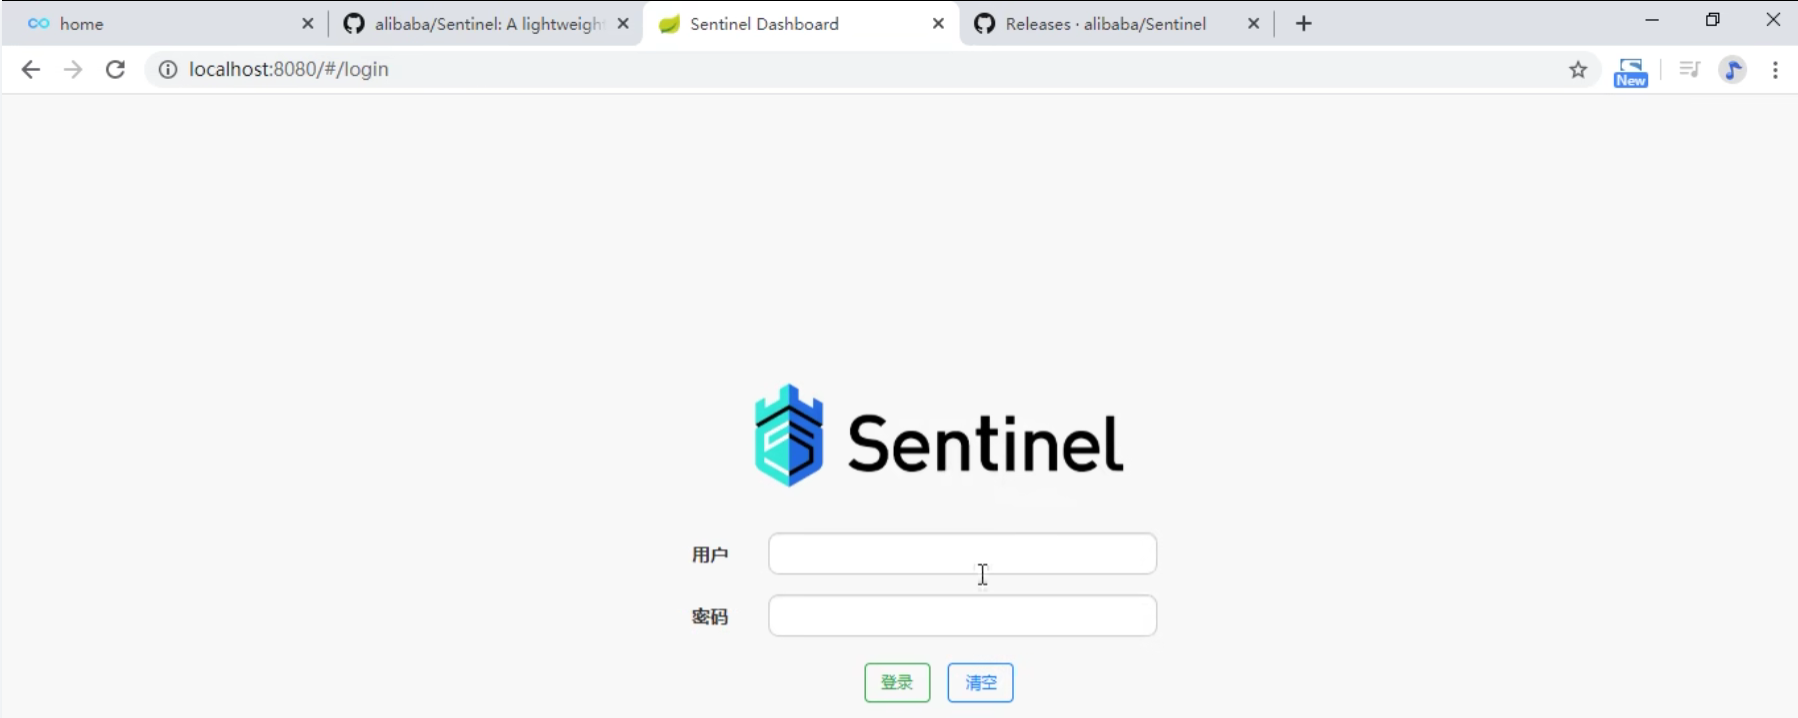
3. 初始化演示工程
3.1. 启动Nacos8848成功
3.2. 建module
3.2.1. 创建cloudalibaba-sentinel-service8401
在cloud2020父工程下创建cloudalibaba-sentinel-service8401,具体步骤截图我就省略了,和之前创建module的步骤是一样的
3.2.2. pom
以后基本上nacos 跟sentinel一起配置
<?xml version="1.0" encoding="UTF-8"?>
<project xmlns="http://maven.apache.org/POM/4.0.0"
         xmlns:xsi="http://www.w3.org/2001/XMLSchema-instance"
         xsi:schemaLocation="http://maven.apache.org/POM/4.0.0 http://maven.apache.org/xsd/maven-4.0.0.xsd">
    <parent>
        <artifactId>cloud190805</artifactId>
        <groupId>com.atguigu.springcloud</groupId>
        <version>1.0-SNAPSHOT</version>
    </parent>
    <modelVersion>4.0.0</modelVersion>

    <artifactId>cloudalibaba-sentinel-service8401</artifactId>

    <dependencies>
        <!--SpringCloud ailibaba nacos -->
        <dependency>
            <groupId>com.alibaba.cloud</groupId>
            <artifactId>spring-cloud-starter-alibaba-nacos-discovery</artifactId>
        </dependency>
        <!--SpringCloud ailibaba sentinel-datasource-nacos 后续做持久化用到-->
        <dependency>
            <groupId>com.alibaba.csp</groupId>
            <artifactId>sentinel-datasource-nacos</artifactId>
        </dependency>
        <!--SpringCloud ailibaba sentinel -->
        <dependency>
            <groupId>com.alibaba.cloud</groupId>
            <artifactId>spring-cloud-starter-alibaba-sentinel</artifactId>
        </dependency>
        <!--openfeign-->
        <dependency>
            <groupId>org.springframework.cloud</groupId>
            <artifactId>spring-cloud-starter-openfeign</artifactId>
        </dependency>
        <!-- SpringBoot整合Web组件+actuator -->
        <dependency>
            <groupId>org.springframework.boot</groupId>
            <artifactId>spring-boot-starter-web</artifactId>
        </dependency>
        <dependency>
            <groupId>org.springframework.boot</groupId>
            <artifactId>spring-boot-starter-actuator</artifactId>
        </dependency>
        <!--日常通用jar包配置-->
        <dependency>
            <groupId>org.springframework.boot</groupId>
            <artifactId>spring-boot-devtools</artifactId>
            <scope>runtime</scope>
            <optional>true</optional>
        </dependency>
        <dependency>
            <groupId>cn.hutool</groupId>
            <artifactId>hutool-all</artifactId>
            <version>4.6.3</version>
        </dependency>
        <dependency>
            <groupId>org.projectlombok</groupId>
            <artifactId>lombok</artifactId>
            <optional>true</optional>
        </dependency>
        <dependency>
            <groupId>org.springframework.boot</groupId>
            <artifactId>spring-boot-starter-test</artifactId>
            <scope>test</scope>
        </dependency>

    </dependencies>

</project>
3.2.3. yml
在src/main/resources/目录下创建application.yml配置文件
server:
  port: 8401

spring:
  application:
    name: cloudalibaba-sentinel-service
  cloud:
    nacos:
      discovery:
        #Nacos服务注册中心地址
        server-addr: localhost:8848
    sentinel:
      transport:
        #配置Sentinel dashboard地址
        dashboard: localhost:8080
        #默认8719端口,假如被占用会自动从8719开始依次+1扫描,直至找到未被占用的端口
        port: 8719

management:
  endpoints:
    web:
      exposure:
        include: '*'
spring.cloud.sentinel.transport.port 端口配置会在应用对应的机器上启动一个 Http Server,该 Server 会与 Sentinel 控制台做交互。
比如 Sentinel 控制台添加了1个限流规则,会把规则数据push给这个Http Server接收,Http Server再将规则注册到Sentinel中。
spring.cloud.sentinel.transport.port:指定与Sentinel控制台交互的端口,应用本地会启动一个占用该端口的Http Server
3.2.4. 主启动类
在com.atguigu.springcloud.alibaba包下面创建主启动类
package com.atguigu.springcloud.alibaba;

import org.springframework.boot.SpringApplication;
import org.springframework.boot.autoconfigure.SpringBootApplication;
import org.springframework.cloud.client.discovery.EnableDiscoveryClient;
import org.springframework.cloud.openfeign.EnableFeignClients;

/**
 * @auther zzyy
 * @create 2019-12-09 18:49
 */
@EnableDiscoveryClient
@SpringBootApplication
public class SentinelMainApp8401
{
    public static void main(String[] args) {
        SpringApplication.run(MainApp8401.class, args);
    }
}
3.2.5. 业务类
在com.atguigu.springcloud.alibaba.controller包下面创建FlowLimitController
package com.atguigu.springcloud.alibaba.controller;

import com.atguigu.springcloud.alibaba.service.OrderService;
import org.springframework.stereotype.Service;
import org.springframework.web.bind.annotation.GetMapping;
import org.springframework.web.bind.annotation.RestController;

import javax.annotation.Resource;

/**
 * @auther zzyy
 * @create 2020-01-09 16:34
 */
@RestController
public class FlowLimitController
{

    @GetMapping("/testA")
    public String testA()
    {
        return "------testA";
    }

    @GetMapping("/testB")
    public String testB()
    {
        return "------testB";
    }
}
3.3. 测试
第1步:先启动Sentinel8080,执行如下的命令即可:
$ java -jar sentinel-dashboard-1.7.0.jar
第2步:启动微服务8401
第3步:启动8401微服务后查看sentienl控制台,我们会发现空空如也,啥都没有

原因是因为Sentinel采用的懒加载机制,我们可以执行几次 http://localhost:8401/testA 或者 http://localhost:8401/testA
执行几次之后sentinel控制台的效果如下:
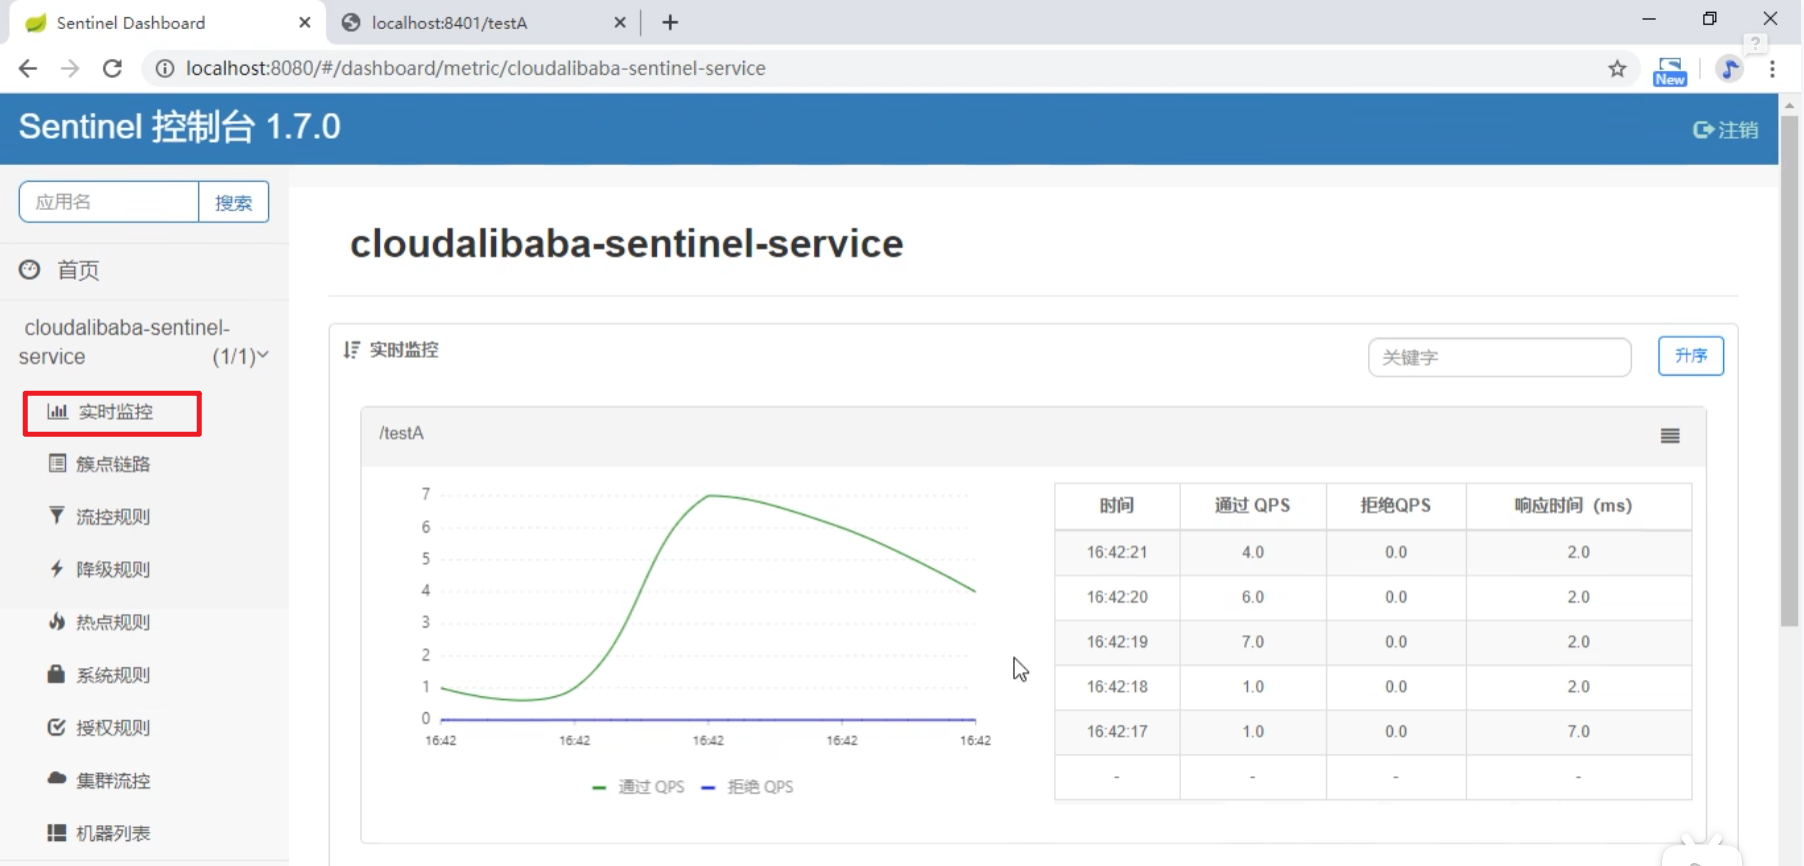
结论:sentinel控制台已经开始监控cloudalibaba-sentinel-service微服务了
4. 流控规则
4.1. 基本介绍
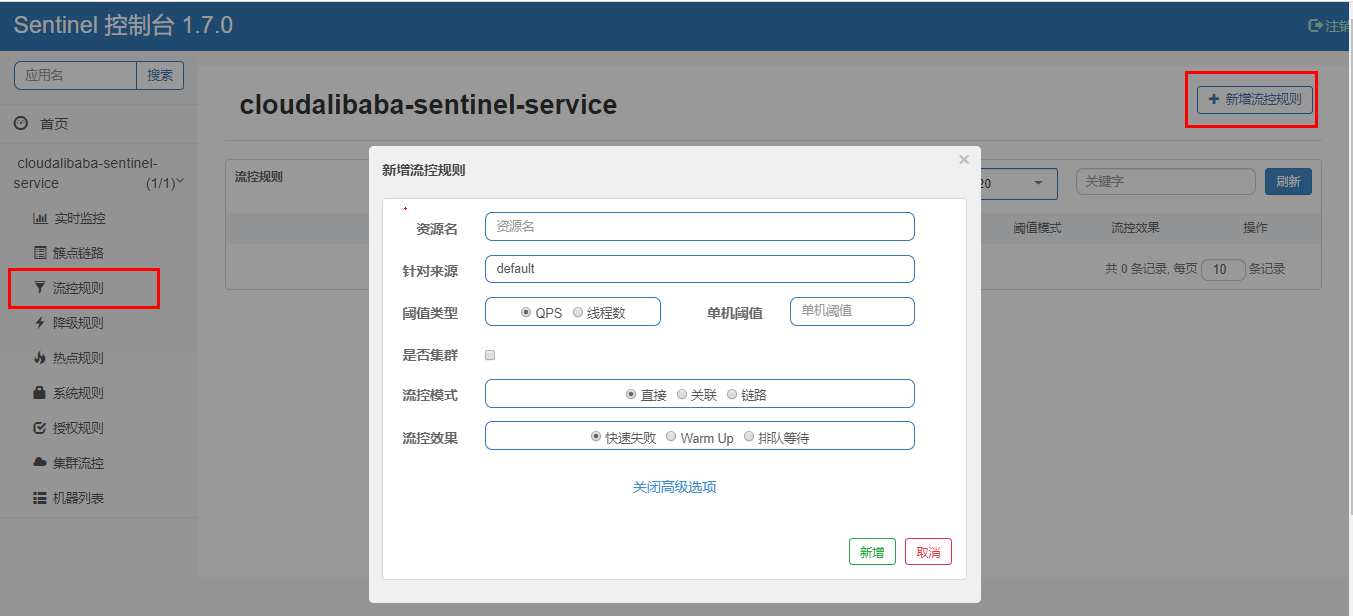
进一步解释说明:
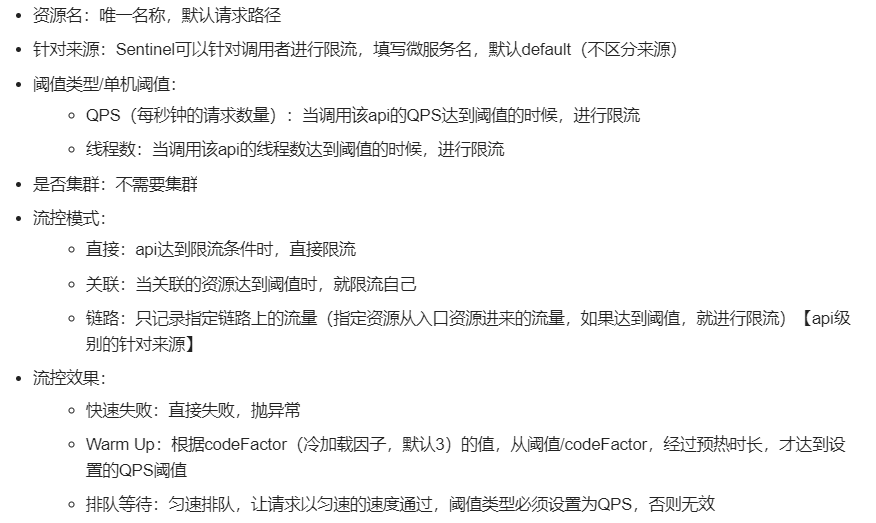
4.2. 流控模式
流控模式有三种:直接、关联、链路
4.2.1. 直接(默认) + 快速失败(默认)
a> QPS直接快速失败
QPS:query per second,每秒钟的请求数量,当调用该api的QPS达到阈值时,进行限流。
下面设置表示1秒钟内请求一次就是OK,若QPS>1也就是一秒钟请求次数超过1,就直接-快速失败,报默认错误
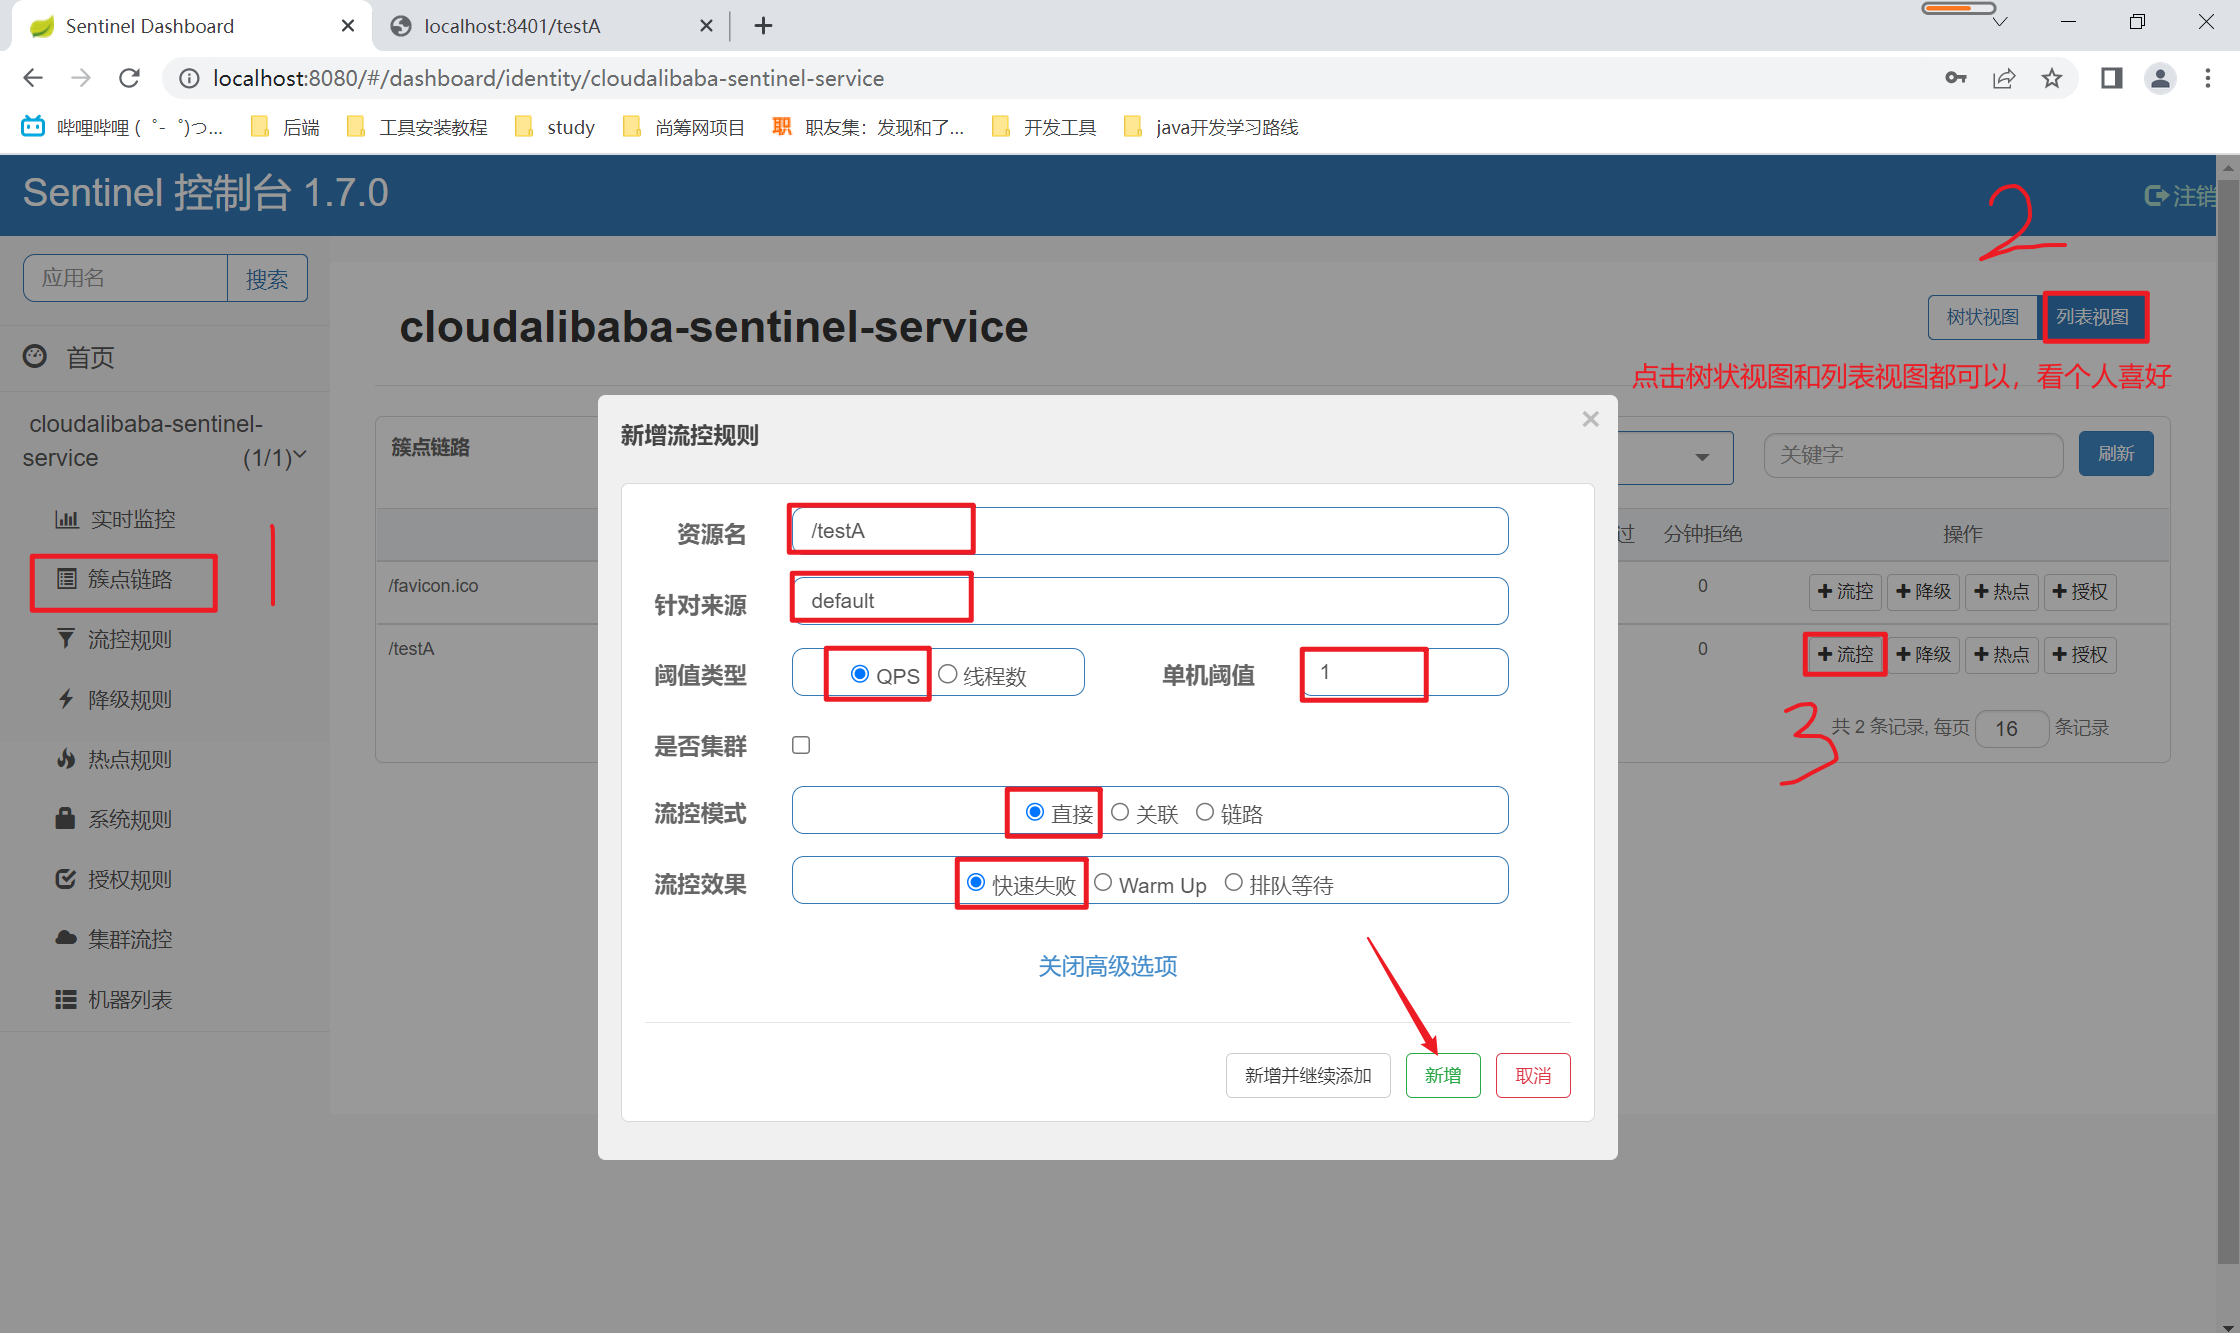
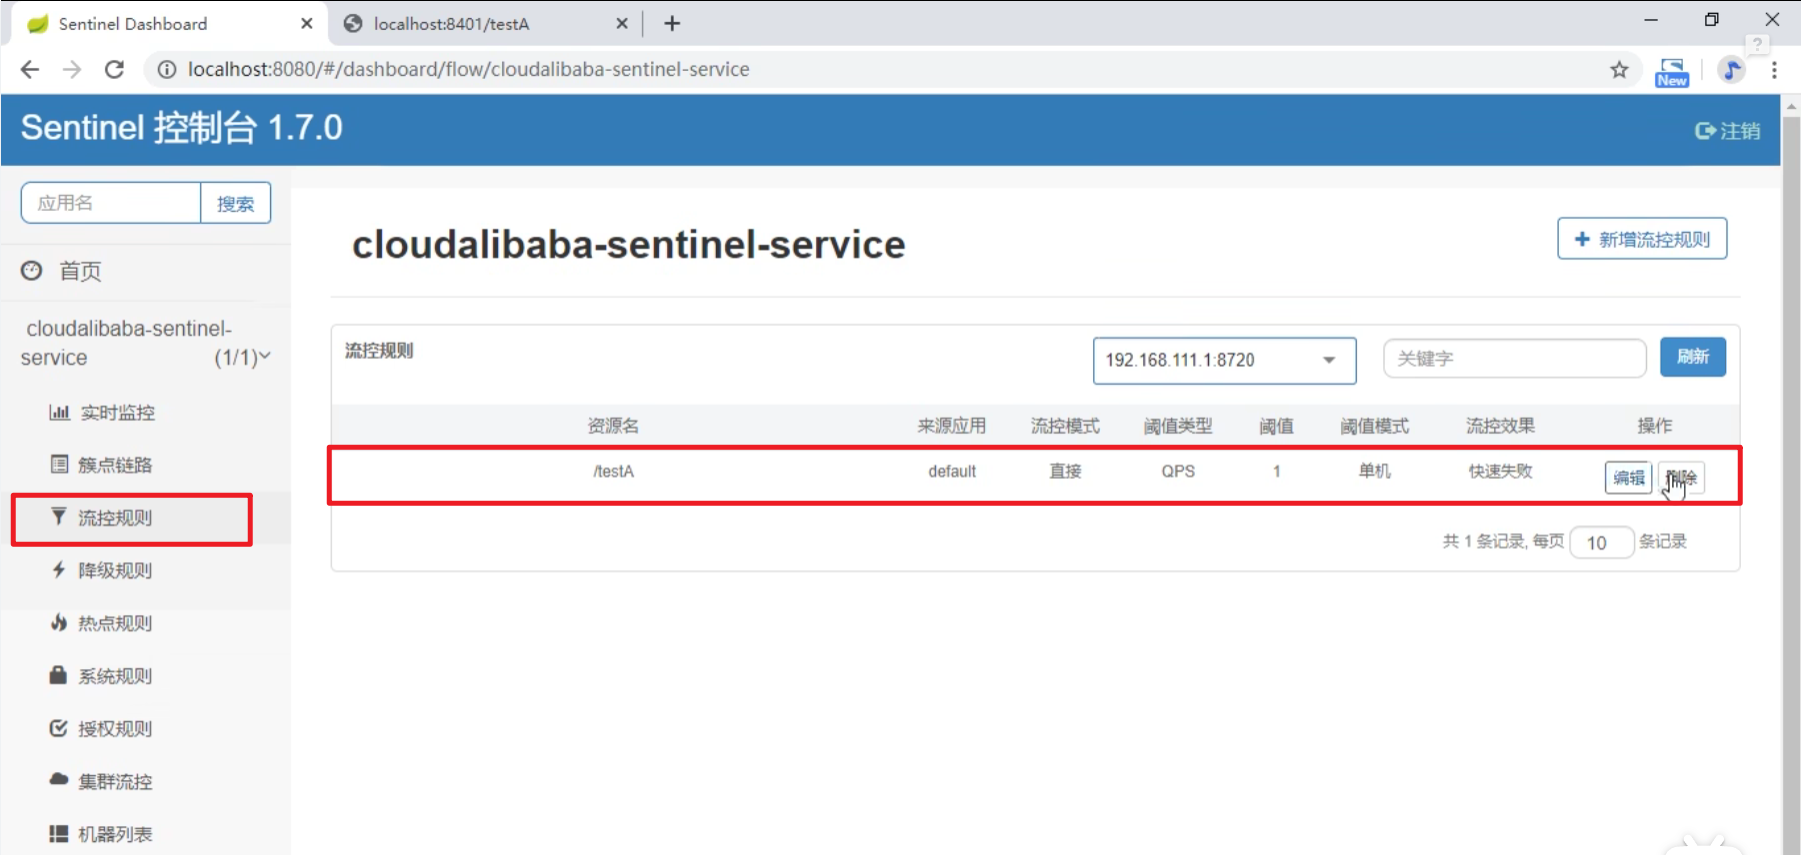
新增完成后在侧边栏的流控规则就可以看到我们刚才添加的数据
测试一下,当/testA的访问超过1次/s时,页面报错。被Sentinel限流,还能继续请求只要QPS<=1。

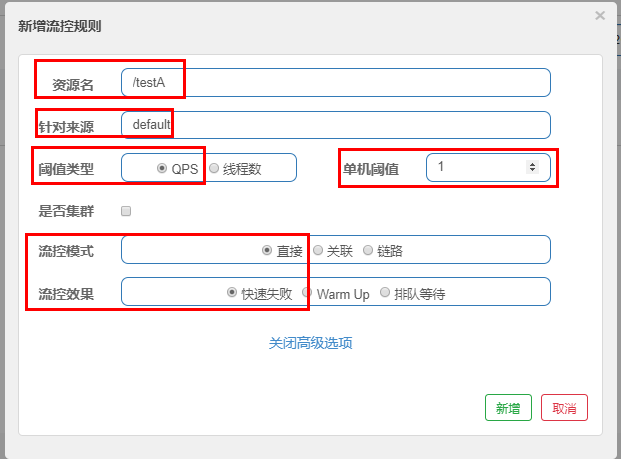
小结:下图的流控配置表示1秒钟内查询1次就是OK,若超过次数1,就直接-快速失败,报默认错误
我们思考一个问题:直接调用默认报错信息,技术方面OK,but,是否应该有我们自己的后续处理?
类似有个fallback的兜底方法?
b> 线程数直接快速失败
当调用该api的线程数达到阈值的时候,进行限流。
与QPS直接快速失败不同的是,QPS情况下限制的是流量,比如银行的人流量只能是1人/s,也就是说每次只能一个人进入银行办理业务;而线程数就好比银行只有一个窗口开放,一群人都可以进入银行,但是每次只能处理一个人的业务。
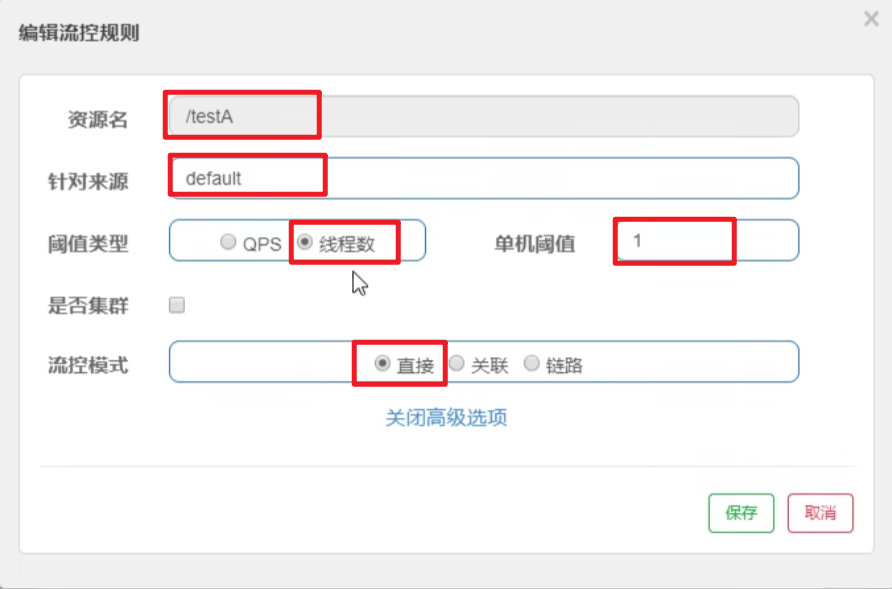
演示效果:
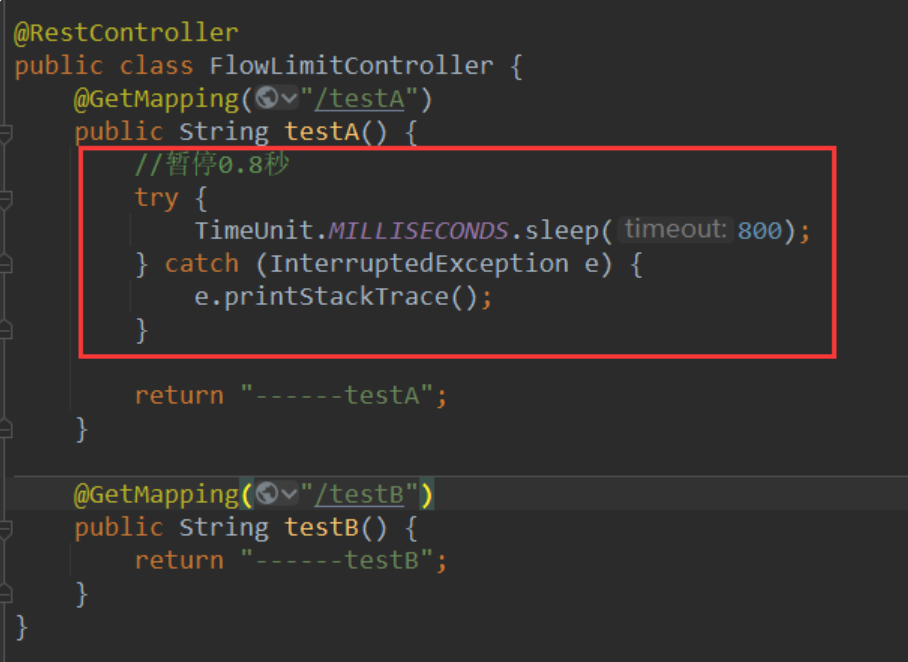
先修改一下8401的业务类,然后重启8401
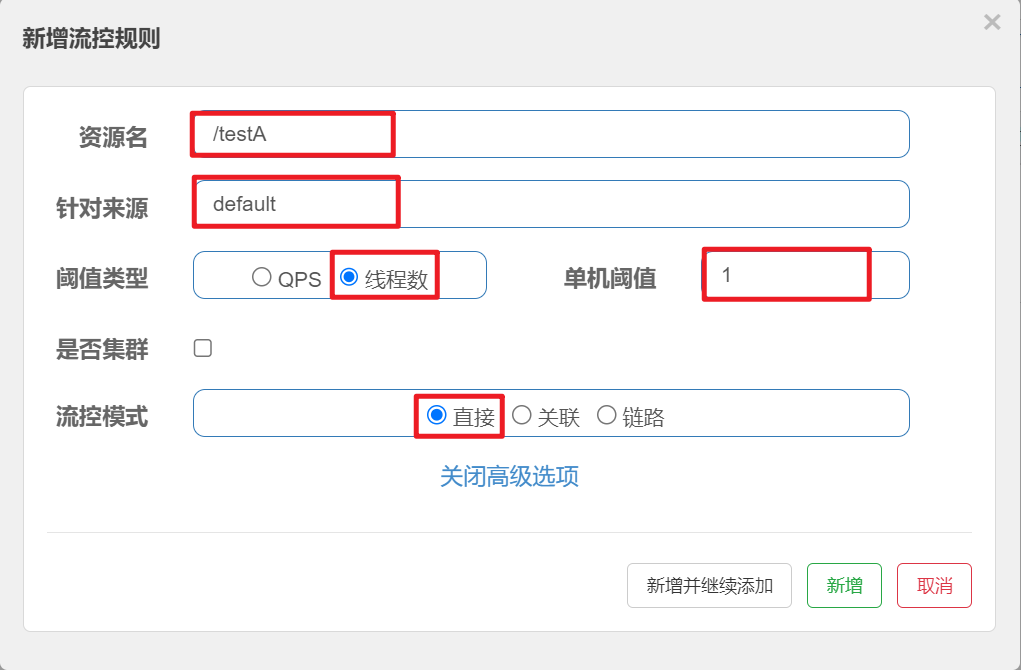
然后在sentinel重新设置流控规则,因为每次服务重启之后,默认sentinel里面的流控规则都会清空
测试/testA,最好用两个浏览器访问,效果更明显

4.2.2. 关联
当关联的资源达到阈值时,就限流自己。比如当与A关联的资源B达到阈值后,就限流A自己。通俗点说就是B惹事,A挂了
a> 配置
设置效果:当关联资源/testB的qps阀值超过1时,就限流/testA的Rest访问地址,当关联资源到阈值后限制配置好的资源名

b> 测试
使用postman单独访问testB成功。
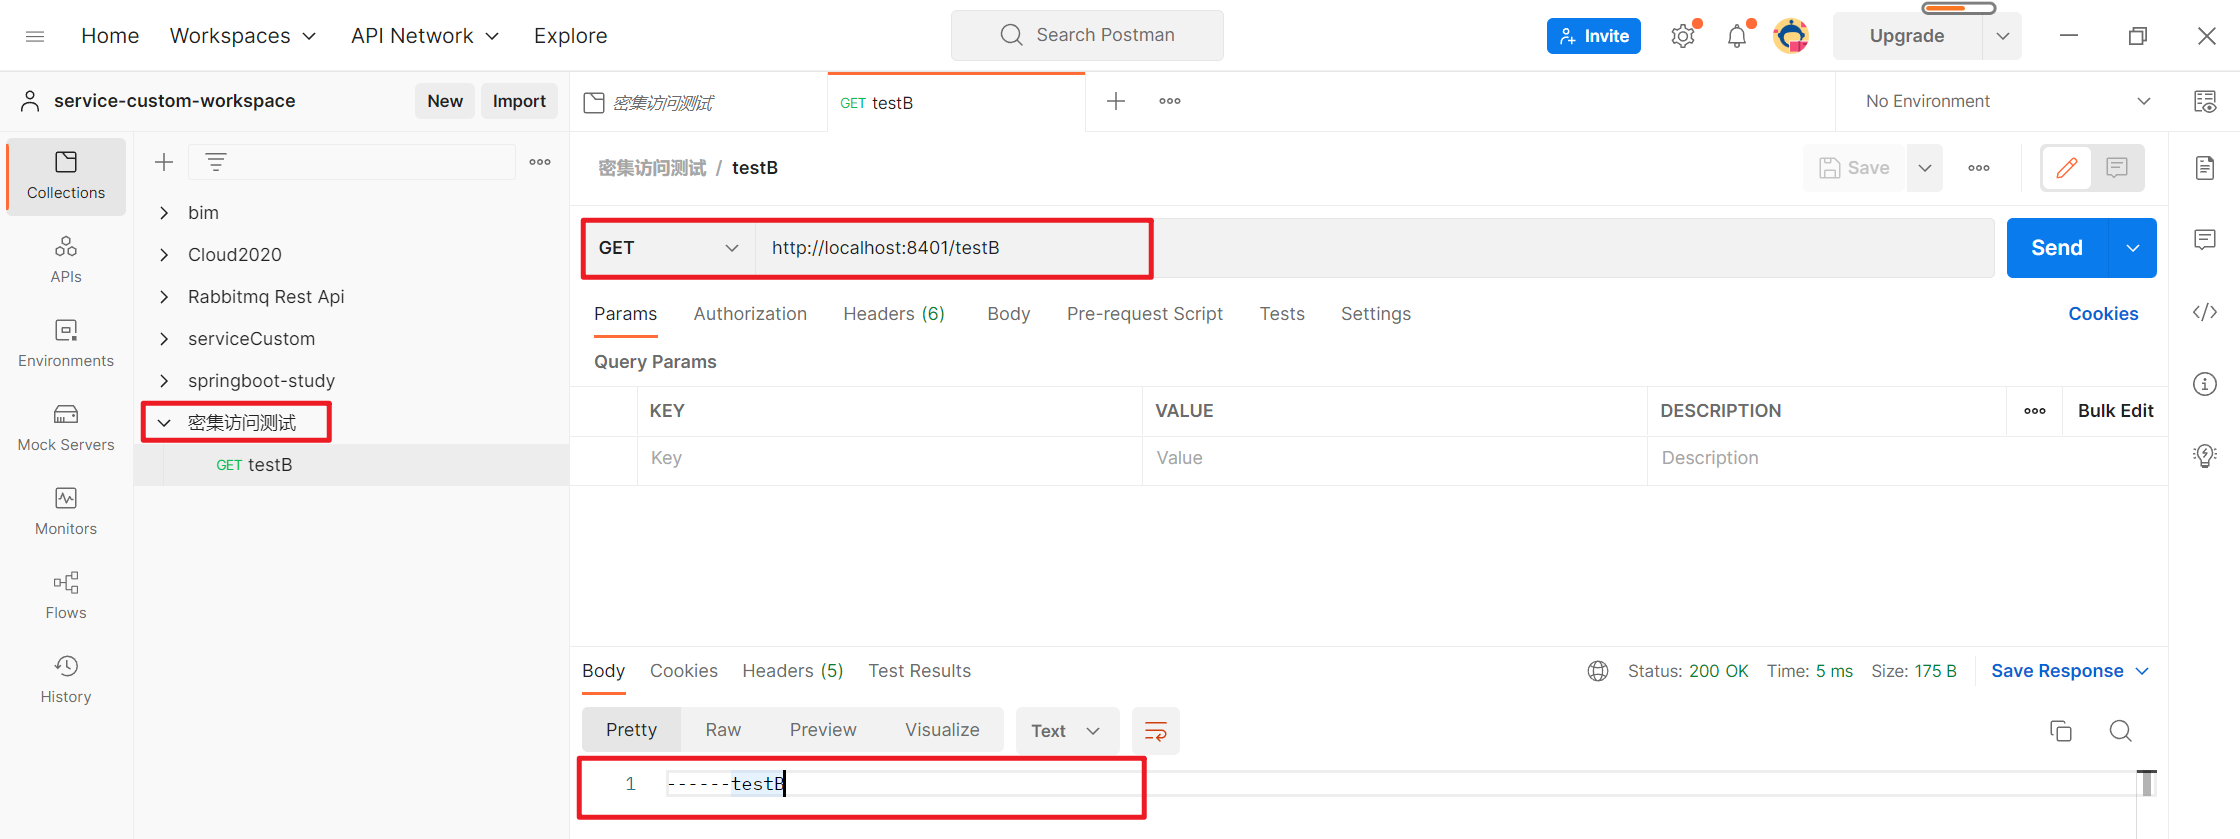
postman模拟并发密集访问testB
步骤如下:
先在postman创建一个集合,名字自己随便取
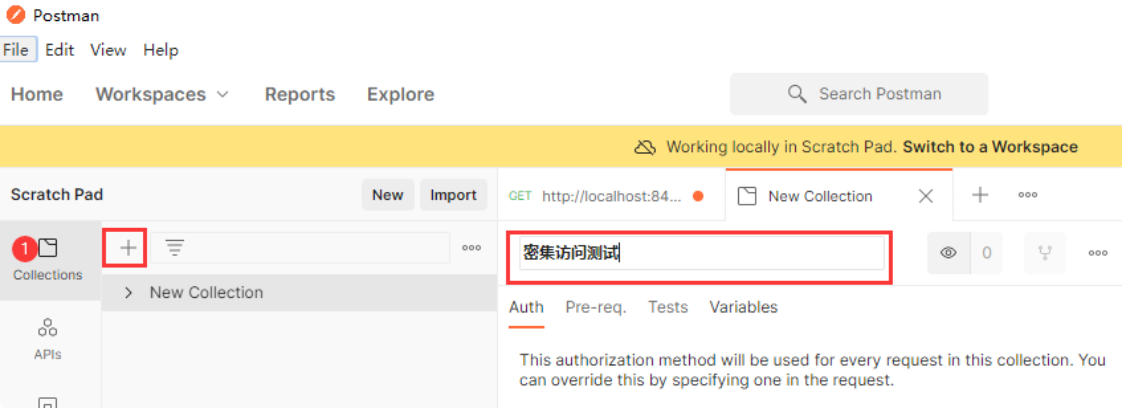
然后将创建的访问/testB的请求保存在创建的集合中
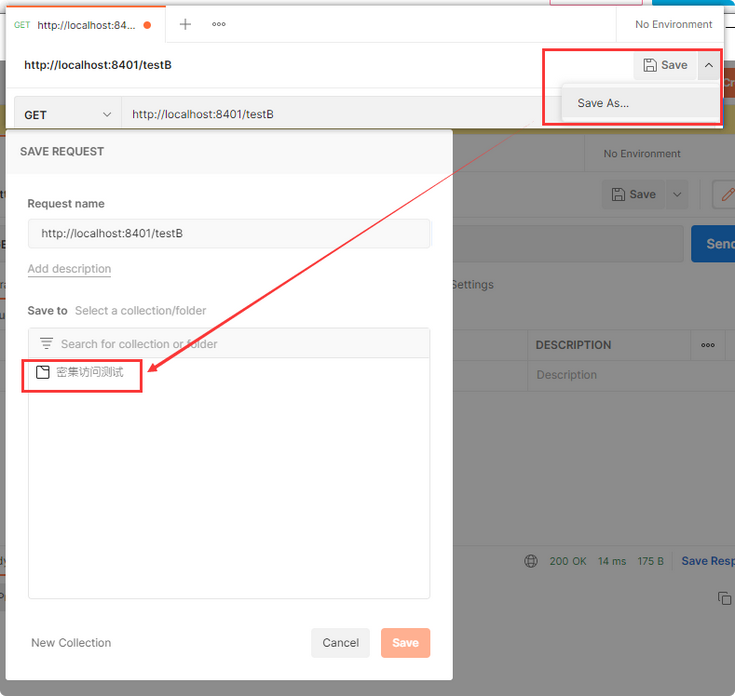
设定集合运行参数,20个线程,每次间隔0.3s访问一次(QPS>1),执行:
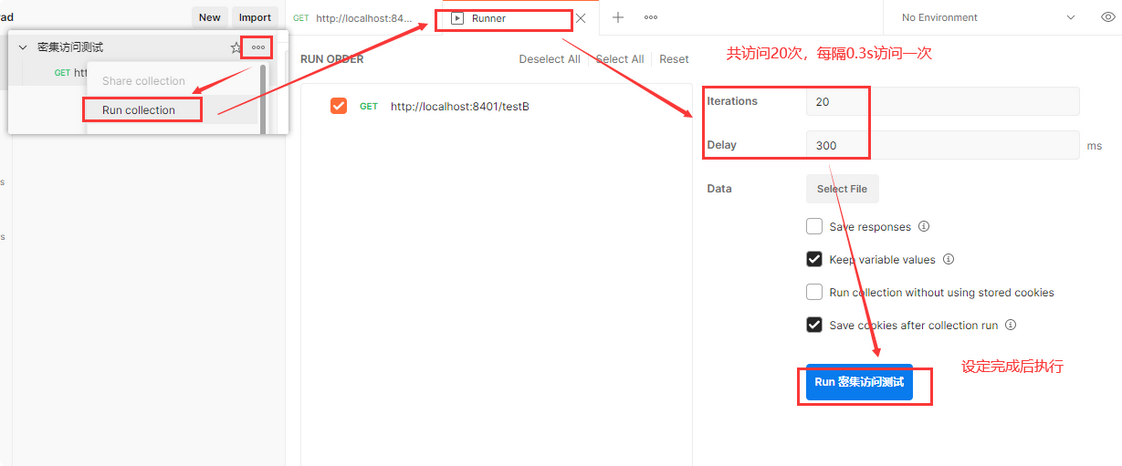
然后再访问/testA,发现被限流,等postman执行完毕,testA又可以访问了

4.2.3. 链路
需要测试链路的话,springcloud 阿里巴巴版本需要2.1.1.RELEASE以上,在父工程的pom中修改,不要直接在子module的pom中修改,版本有对应关系,不然报错。


- Sentinel从1.6.3版本开始,Sentinel Web Filter 默认收敛所有的URL入口的Context,因此链路限流不生效
- 1.7.0版本开始,官方在CommomFilter中引入了
WEB_CONTEXT_UNIFY这个init parameter,用于控制是否收敛context,将其配置为false即可根据不同的URL进行链路限流 - Spring Cloud Alibaba 在2.1.1.RELEASE版本后,可以通过配置spring.cloud.sentinel.web-context-unify=false关闭
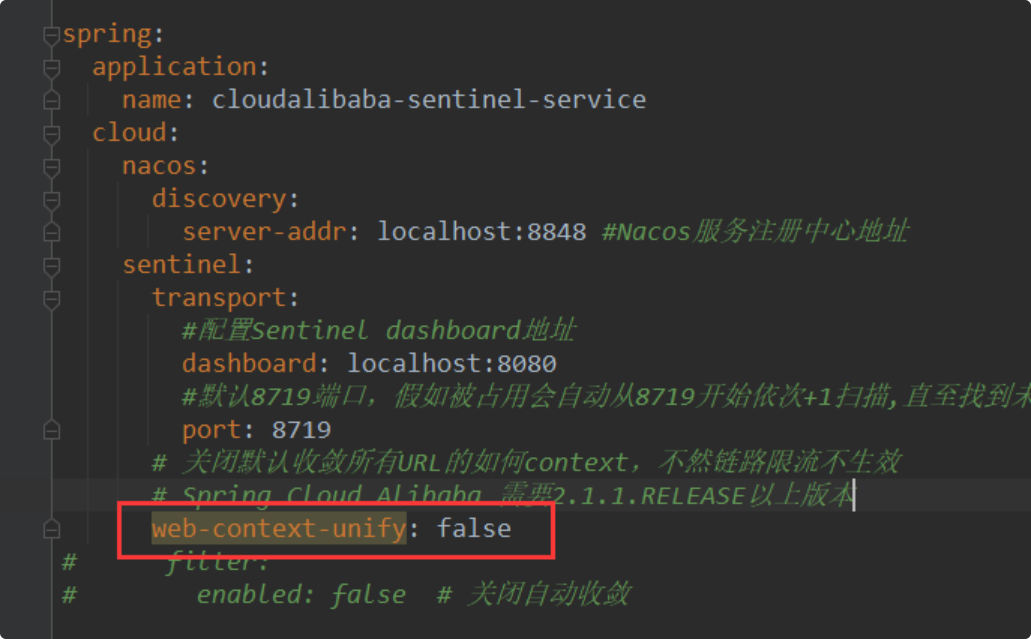
https://github.com/alibaba/Sentinel/issues/1313
测试
启动8401,给/testA设置链路+快速失败流控规则:
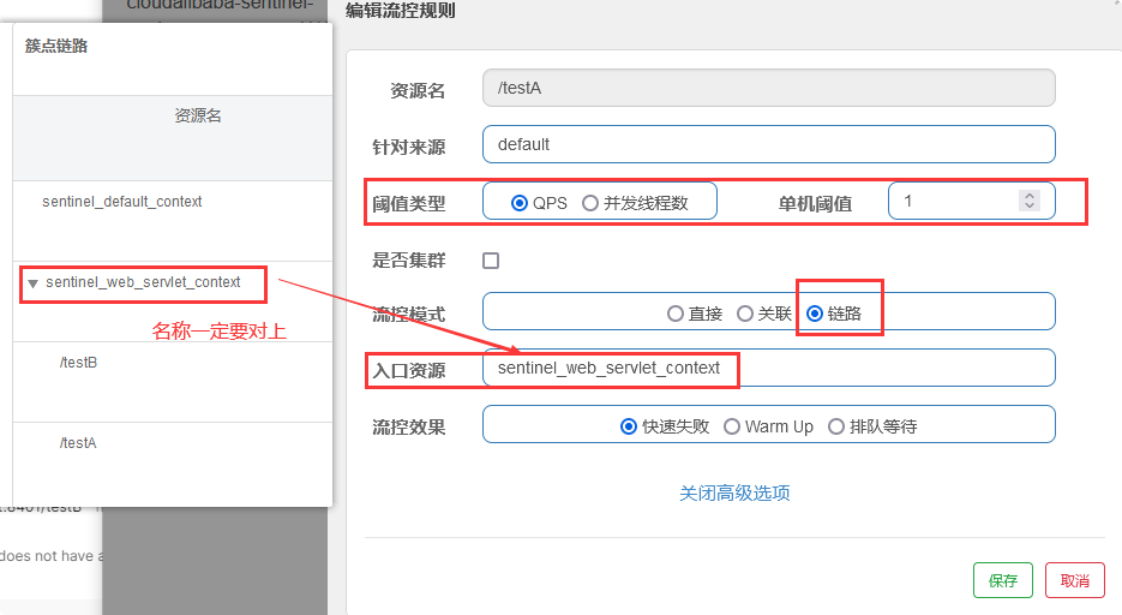
这里入口资源就是簇点链路中,资源名称的上一级。
访问http://localhost:8401/linktestA ,多次刷新出现限流

但是这种情况我个人觉得跟直接快速失败区别不大,只直接是监控/testA资源,而链路是监控/testA的资源入口sentinel_web_servlet_context。
然后我又参看了其他博客,流控模式——链路。增加了FlowLimitService 修改了controller
package com.atguigu.springcloud.alibaba.service;

import com.alibaba.csp.sentinel.annotation.SentinelResource;
import org.springframework.stereotype.Service;

@Service
public class FlowLimitService {
    @SentinelResource("message")
    public String message() {
        return "success";
    }
}
package com.atguigu.springcloud.alibaba.controller;

import com.atguigu.cloudalibaba.service.FlowLimitService;
import org.springframework.beans.factory.annotation.Autowired;
import org.springframework.web.bind.annotation.GetMapping;
import org.springframework.web.bind.annotation.RestController;

import java.util.concurrent.TimeUnit;

@RestController
public class FlowLimitController {
    @Autowired
    FlowLimitService flowLimitService;

    @GetMapping("/testA")
    public String testA() {
        //暂停0.8秒
//        try {
//            TimeUnit.MILLISECONDS.sleep(800);
//        } catch (InterruptedException e) {
//            e.printStackTrace();
//        }

        return "------testA";
    }

    @GetMapping("/testB")
    public String testB() {
        return "------testB";
    }

    //   链路测试
    @GetMapping("/linktestA")
    public String linktestA() {
        return flowLimitService.message();
    }

    @GetMapping("/linktestB")
    public String linktestB() {
        return flowLimitService.message();
    }

}
分别通过/linktetA 和 /linktestB都是message的入口,然后设置/linktestA入口的流量限制,发现不起作用。。。
4.3. 流控效果
4.3.1. 直接->快速失败(默认的流控处理)
快速失败在上面的流控模式演示过了,他是默认的流控效果,直接失败,抛出异常。源码:com.alibaba.csp.sentinel.slots.block.flow.controller.DefaultController
4.3.2. warm up 预热
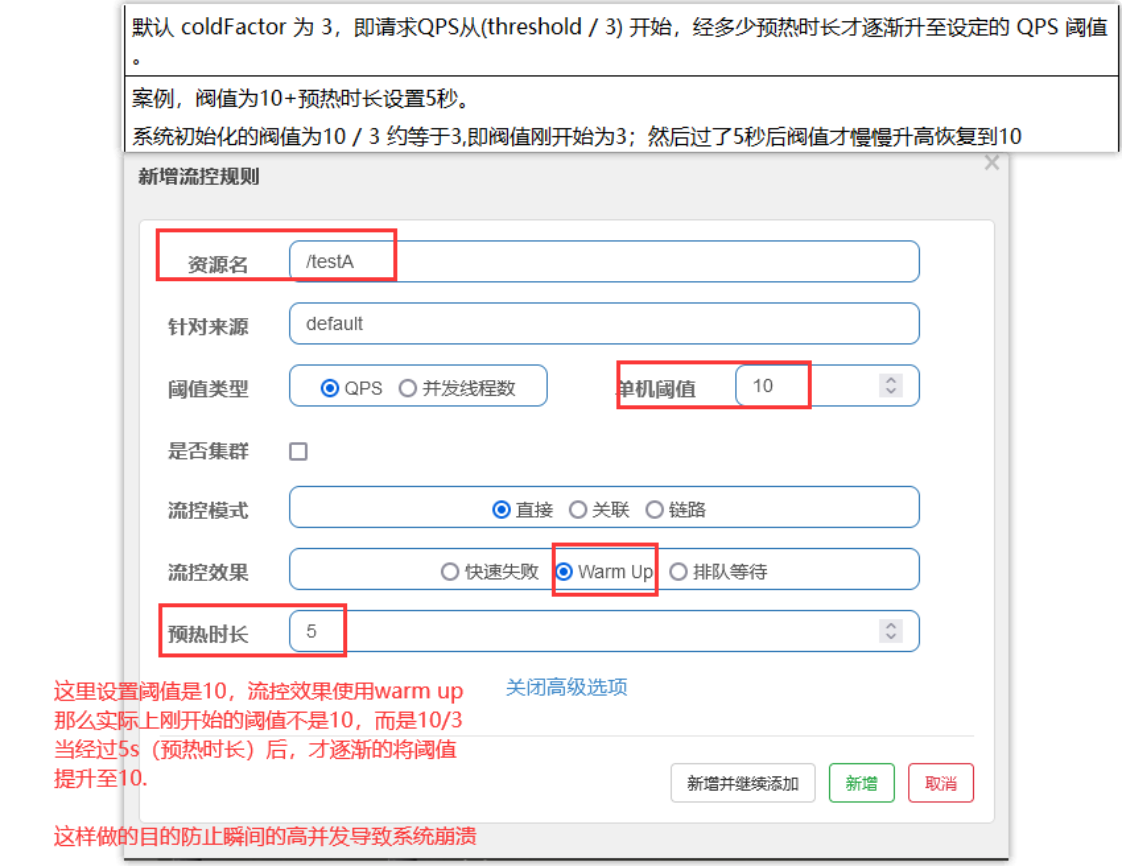
公式:阈值除以coldFactor(默认值为3),经过预热时长后才会达到阈值
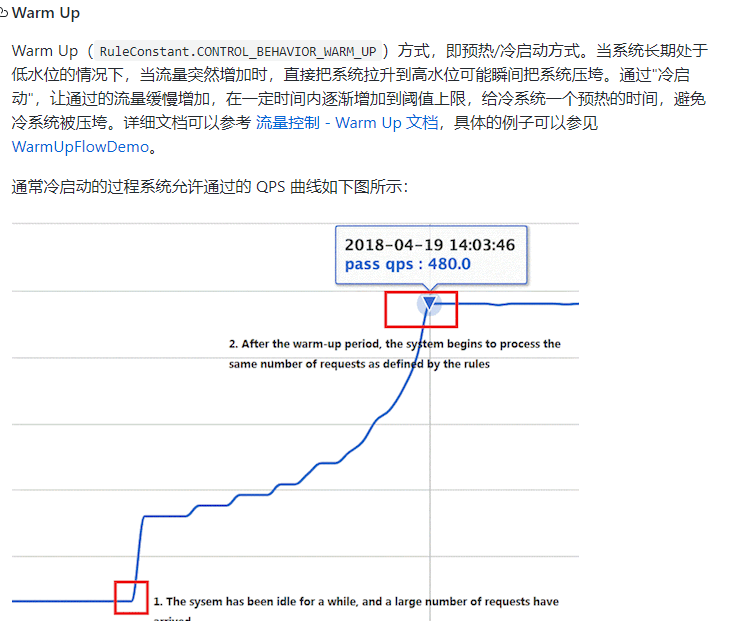
默认coldFactor为3,即请求 QPS 从 threshold / 3 开始,经预热时长逐渐升至设定的 QPS 阈值。
源码:com.alibaba.csp.sentinel.slots.block.flow.controller.WarmUpController

WarmUp配置:
测试:
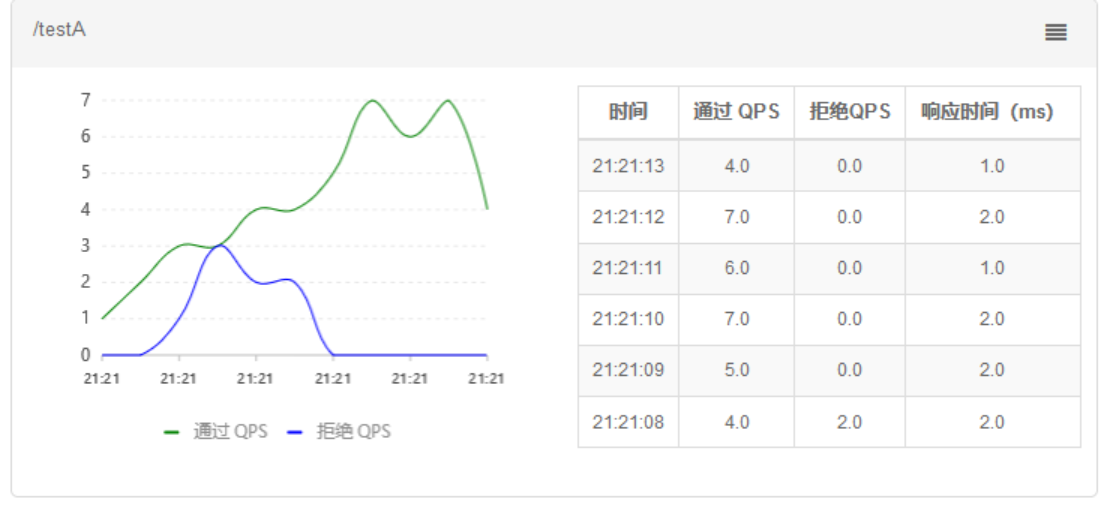
狂点击 http://localhost:8401/testB ,刚开始不行,后续慢慢OK
应用场景
例如:秒杀系统在开启的瞬间,会有很多流量上来,很有可能把系统打死,预热方式就是把为了保护系统,可慢慢的把流量放进来,慢慢的把阀值增长到设置的阀值。
4.3.3. 排队等待
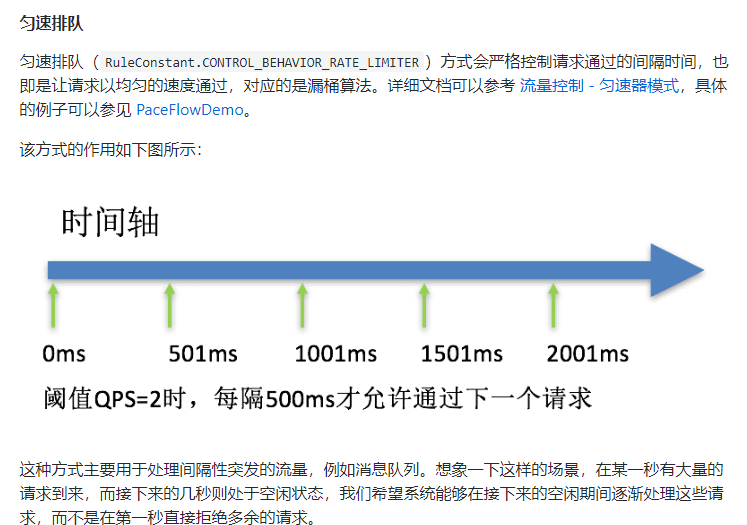
源码:com.alibaba.csp.sentinel.slots.block.flow.controller.RateLimiterController
匀速排队,让请求以均匀的速度通过,阀值类型必须设成QPS,否则无效。
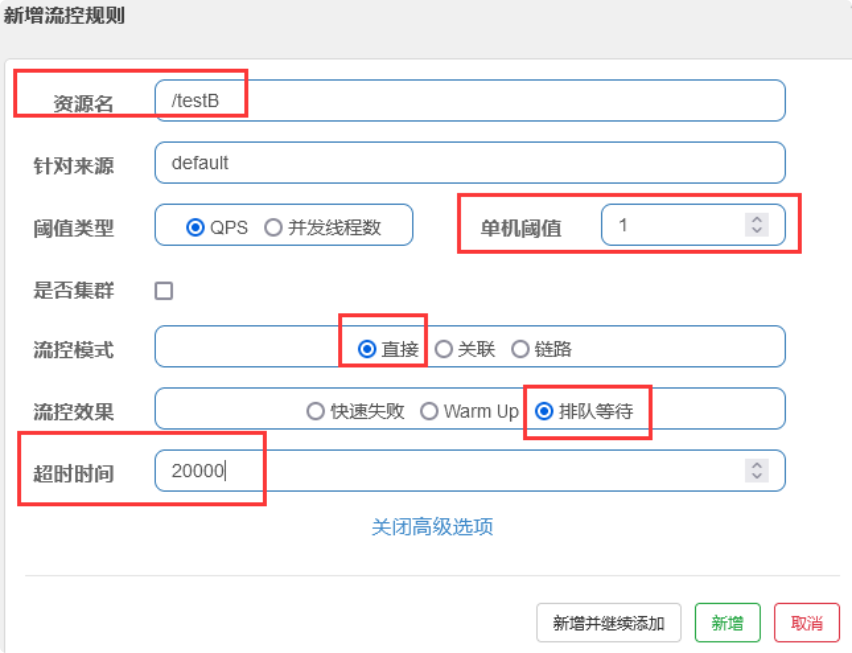
设置含义:/testA每秒1次请求,超过的话就排队等待,等待的超时时间为20000毫秒。
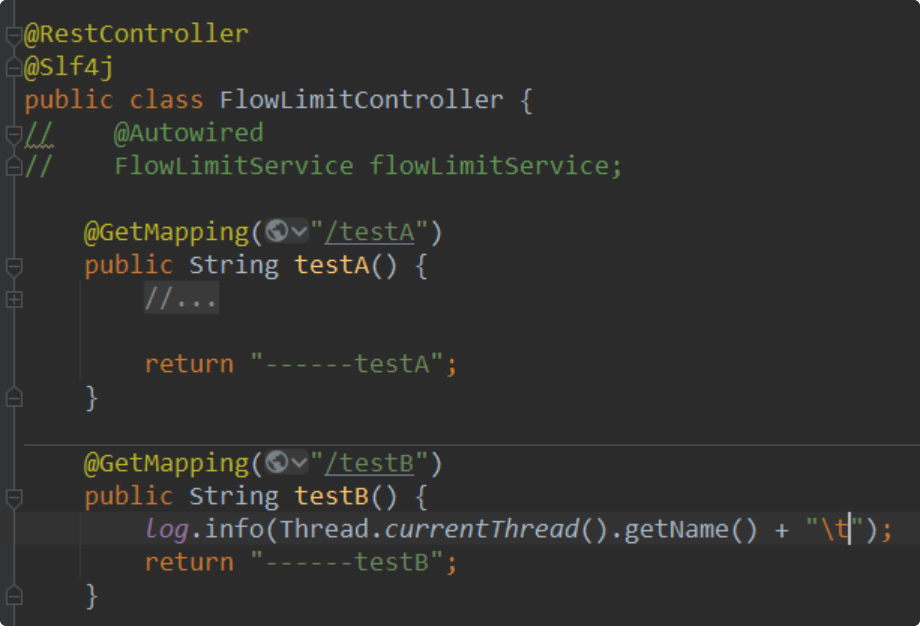
修改一下业务类的内容,把线程名打印出来以验证是否排队。
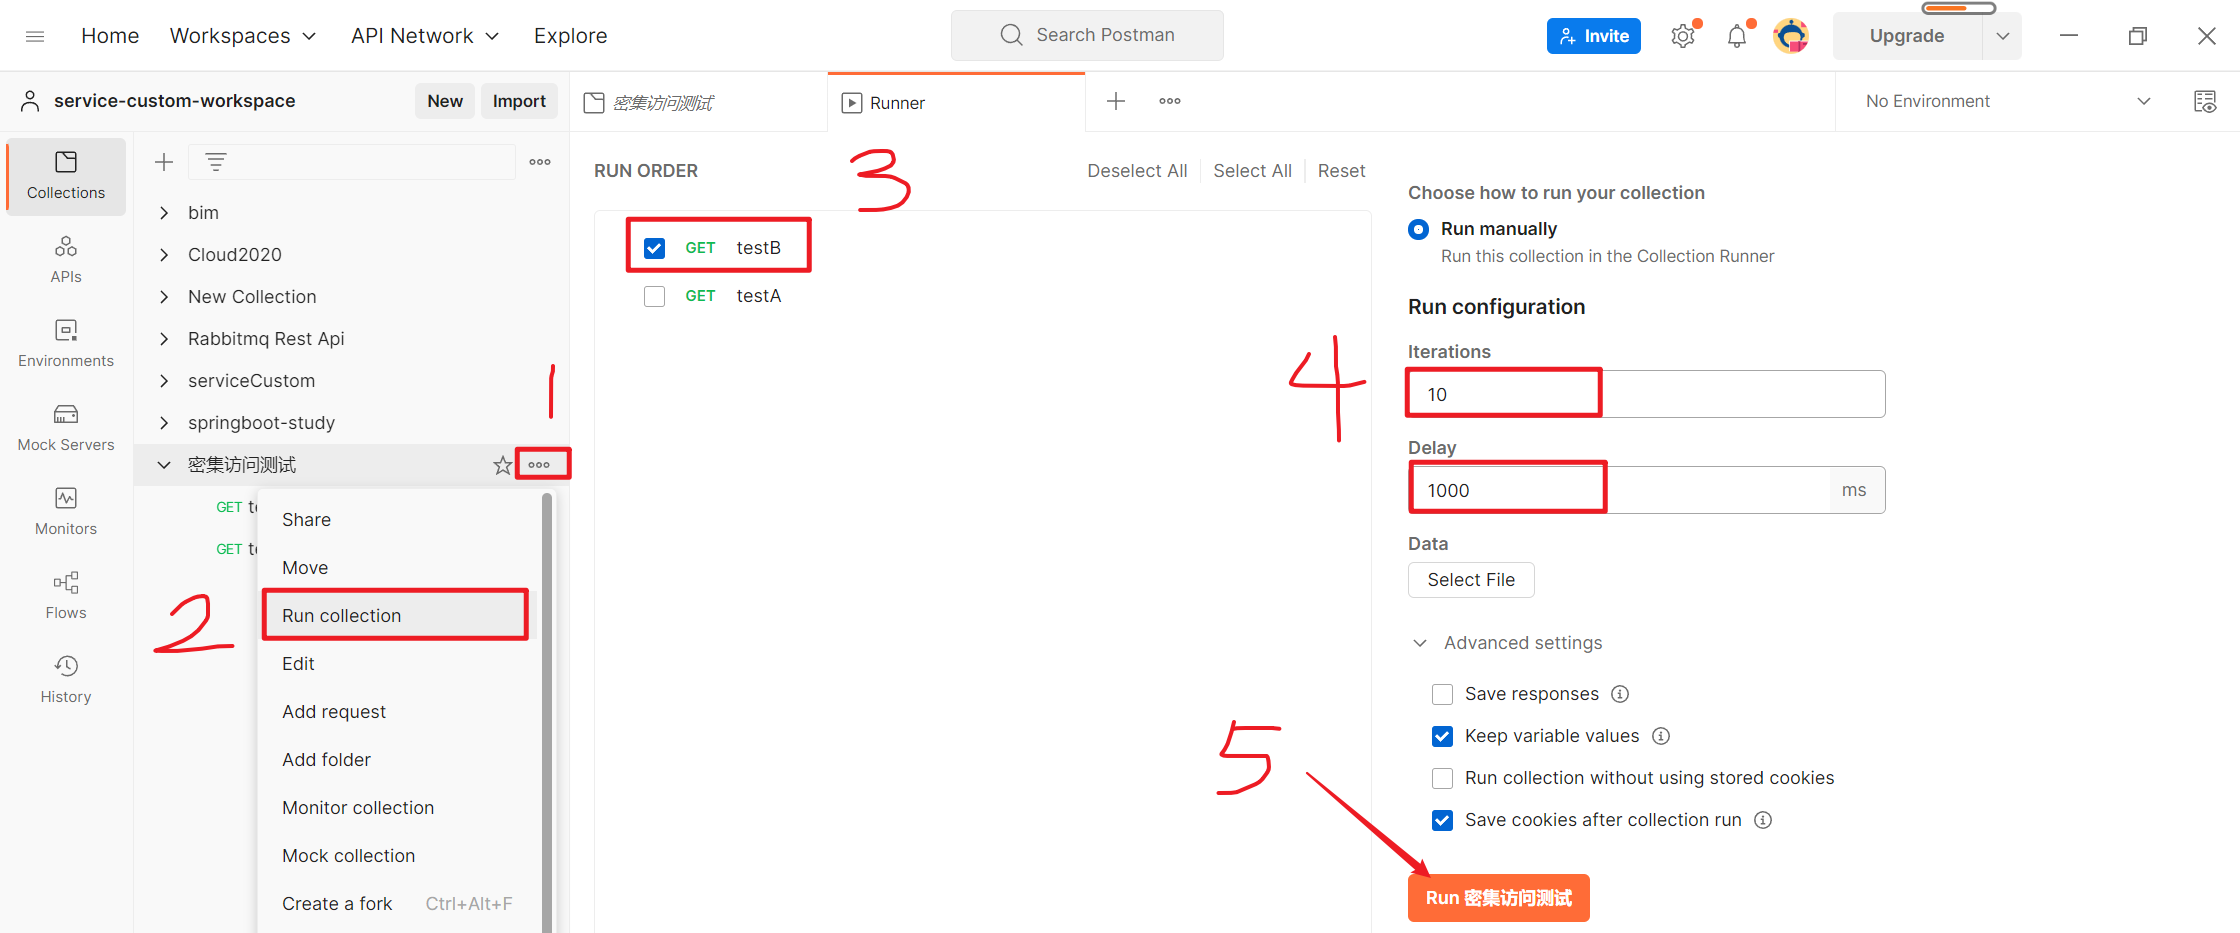
postman测试
控制台打印效果:

可以看到刚好满足1s一个请求,说明请求的执行进行了排队。
5. 降级规则(熔断规则)
5.1. 基本介绍
老版本的Sentinel的断路器是没有半开状态的,半开的状态系统自动去检测是否请求有异常,没有异常就关闭断路器恢复使用,有异常则继续打开断路器不可用。具体可以参考Hystrix。(在Hystrix中 快照时间窗口是指 阈值检测时间 ,而休眠时间窗口是指 断路器从开启到半开状态间隔的时间)
Sentinel 熔断降级会在调用链路中某个资源出现不稳定状态时(例如调用超时或异常比例升高),对这个资源的调用进行限制,让请求快速失败,避免影响到其它的资源而导致级联错误。当资源被降级后,在接下来的降级时间窗口之内,对该资源的调用都自动熔断(默认行为是抛出 DegradeException)。
新版本的Sentinel加入了半开状态!
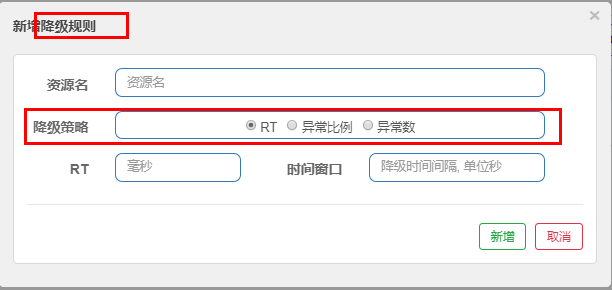
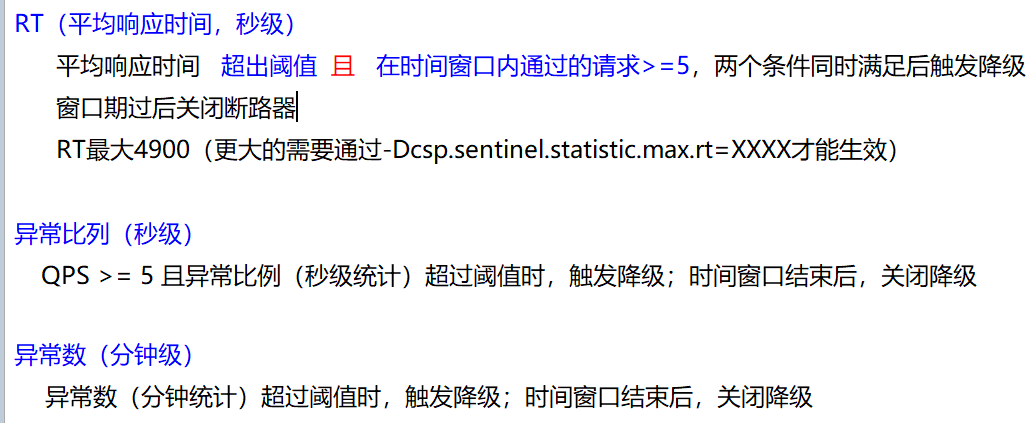
注意:以下是Sentinel旧版本的降级策略,因为老师讲的版本是Sentinel-1.7.0,到了Sentinel-1.8.0 版本对熔断降级特性进行了全新的改进升级
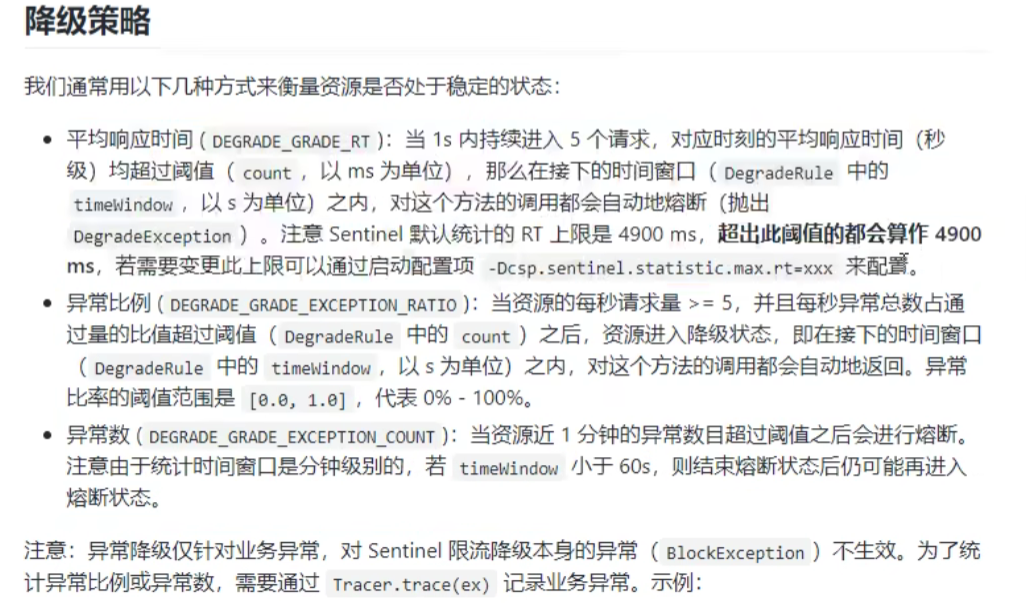
注意:以下是针对 Sentinel 1.8.0 及以上版本的降级策略

5.2. 降级策略实战
5.2.1. 慢调用比例,RT(平均响应时间,秒级)
a> 是什么?
Sentinel-1.7.0版本使用的是RT:

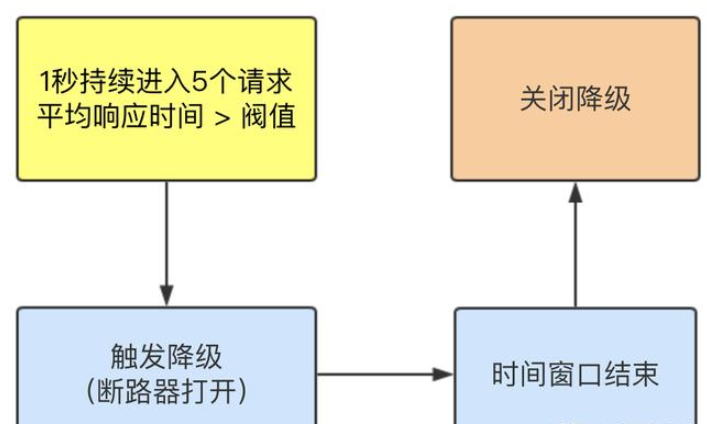
Sentinel-1.8.0版本改成了使用慢调用比例:
- 慢调用比例 (
SLOW_REQUEST_RATIO):选择以慢调用比例作为阈值,需要设置允许的慢调用 RT(即最大的响应时间),请求的响应时间大于该值则统计为慢调用。当单位统计时长(statIntervalMs)内请求数目大于设置的最小请求数目,并且慢调用的比例大于阈值,则接下来的熔断时长内请求会自动被熔断。经过熔断时长后熔断器会进入探测恢复状态(HALF-OPEN 状态),若接下来的一个请求响应时间小于设置的慢调用 RT 则结束熔断,若大于设置的慢调用 RT 则会再次被熔断。
b> 测试
先测试Sentinel-1.7.0的RT
第1步:修改业务类,在FlowLimitController中添加如下的方法
@GetMapping("/testD")
public String testD()
{
    //暂停几秒钟线程
    try
    {
        TimeUnit.SECONDS.sleep(1);
    } catch (InterruptedException e)
    {
        e.printStackTrace();
    }
    log.info("testD 测试RT");
    return "------testD";
}
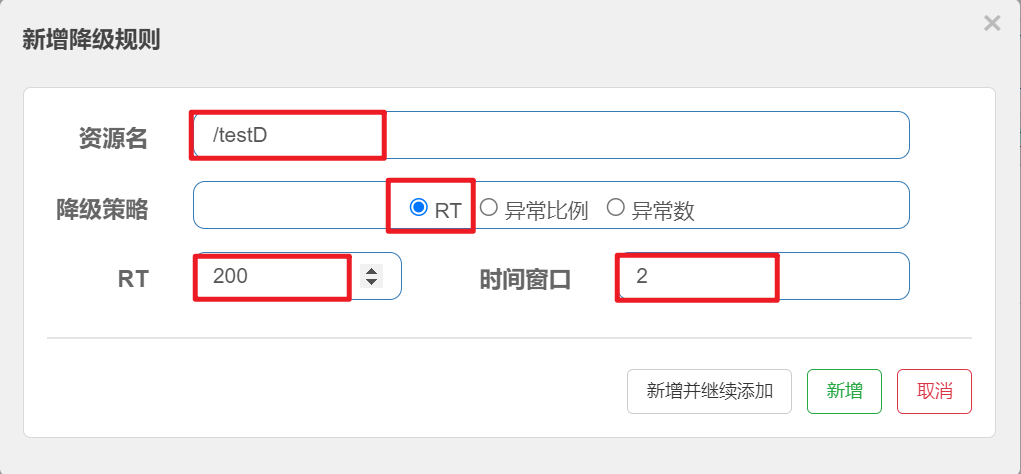
第2步:Sentinel配置
第3步:jmeter压测
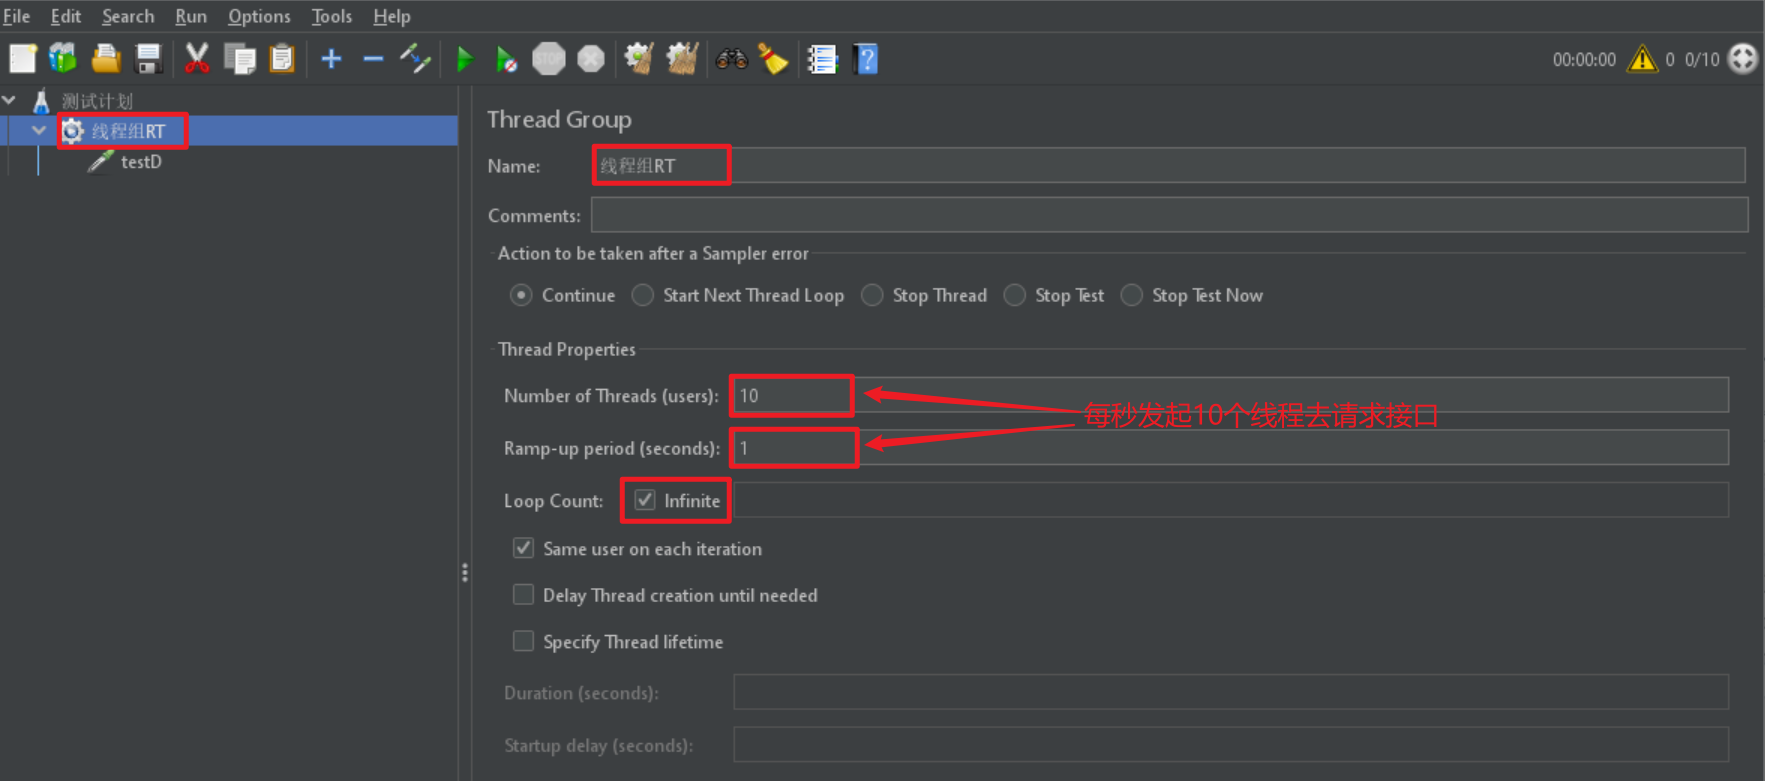
线程组RT --> Add --> Sampler --> HTTP Request
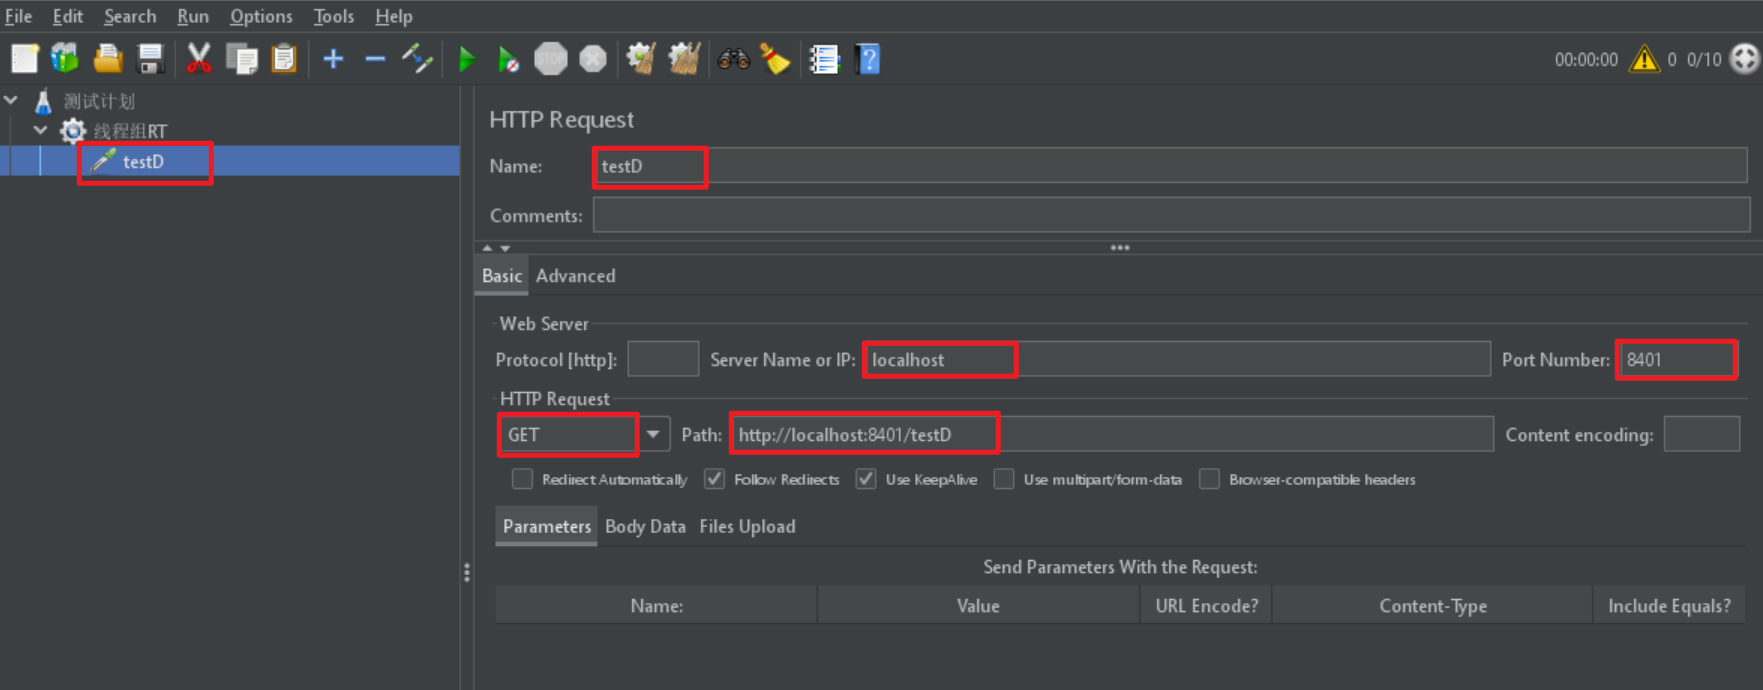
按照上述配置,永远一秒钟打进来10个线程(大于5个了)调用testD,我们希望200毫秒处理完本次任务,如果超过200毫秒还没处理完,在未来2秒钟的时间窗口内,断路器打开(保险丝跳闸)微服务不可用,保险丝跳闸断电了。
在浏览器访问/testD,发现被熔断了

后续我停止jmeter,没有这么大的访问量了,断路器关闭(保险丝恢复),微服务恢复OK
测试sentinel-1.8.0的慢调用比例
注意:你需要把Sentinel的版本改成1.8.0,然后再做测试。
第1步:在业务类FlowLimitController中修改如下的接口
@GetMapping("/testD")
public String testD() {
    //暂停1秒
    try {
        TimeUnit.MILLISECONDS.sleep(1000);
    } catch (InterruptedException e) {
        e.printStackTrace();
    }
    log.info("testD  测试慢调用比例");
    return "------tedtD";
}
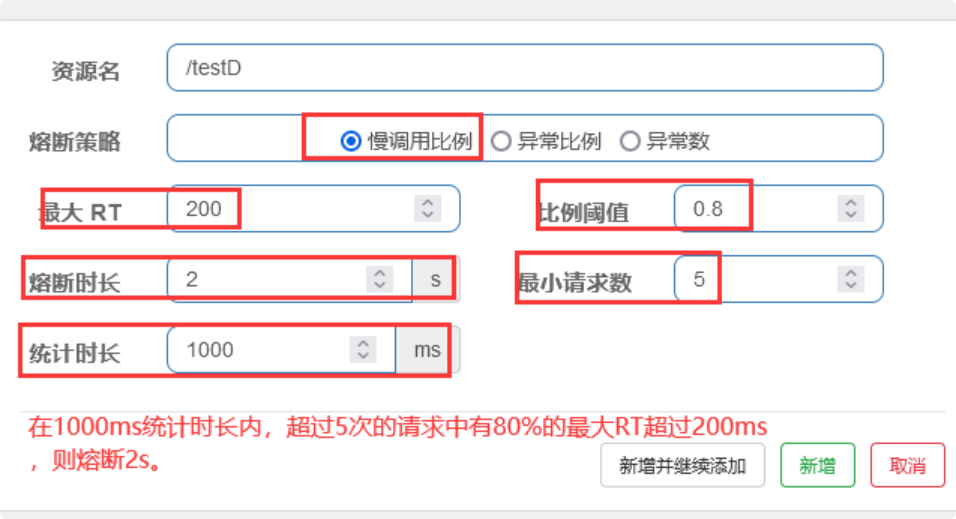
第2步:配置降级策略
第3步:Jmeter压测
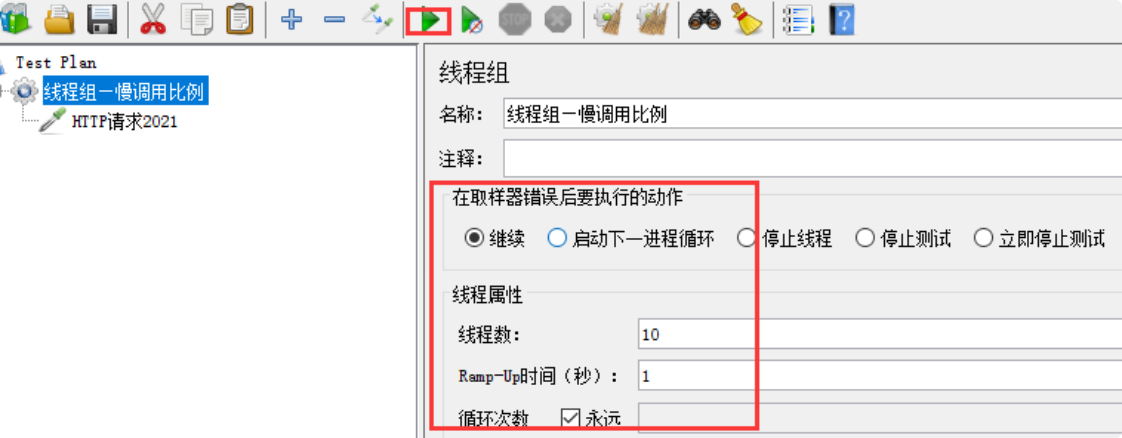
永远一秒钟打进来10个线程(大于5个了)调用testD,我们希望200毫秒处理完本次任务,如果超过200毫秒还没处理完,在未来2s秒钟的时间内,断路器打开(保险丝跳闸)微服务不可用,保险丝跳闸断电了。
在浏览器访问/testD,发现被熔断了

从实时监控也可以看到,在09的时候开始熔断。
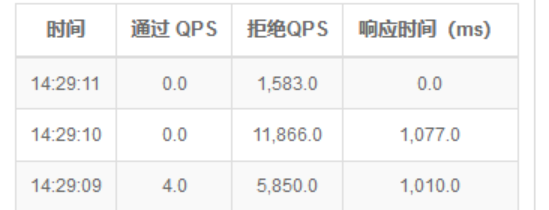
后续我停止jmeter,没有这么大的访问量了,断路器半开到关闭(保险丝恢复),微服务恢复OK。
5.2.2. 异常比例
a> 是什么?
Sentinel-1.7.0版本:

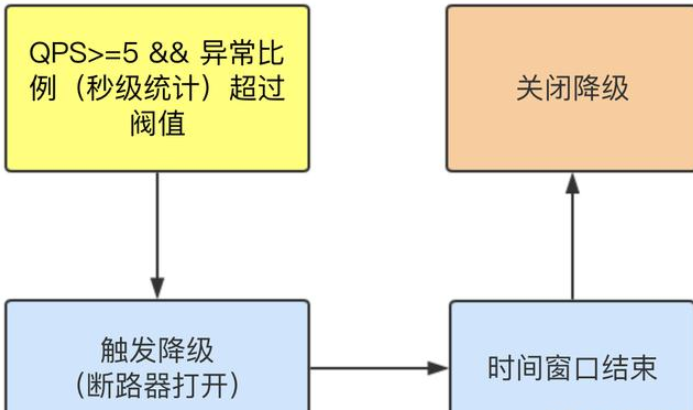
Sentinel-1.8.0版本:
- 异常比例 (
ERROR_RATIO):当单位统计时长(statIntervalMs)内请求数目大于设置的最小请求数目,并且异常的比例大于阈值,则接下来的熔断时长内请求会自动被熔断。经过熔断时长后熔断器会进入探测恢复状态(HALF-OPEN 状态),若接下来的一个请求成功完成(没有错误)则结束熔断,否则会再次被熔断。异常比率的阈值范围是[0.0, 1.0],代表 0% - 100%。
b> 测试
先测试Sentinel-1.7.0
第1步:在业务类FlowLimitController中修改如下的接口
@GetMapping("/testD")
public String testD()
{
    log.info("testD 测试异常比例");
    int age = 10/0;
    return "------testD";
}
第2步:Sentinel配置
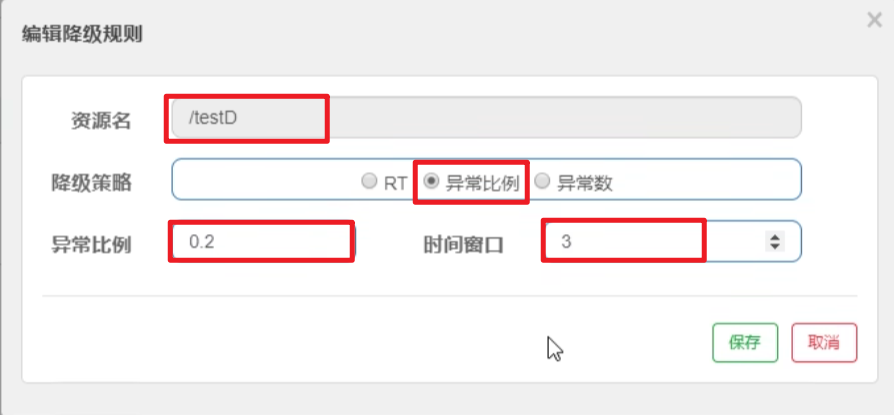
第3步:Jmeter压测
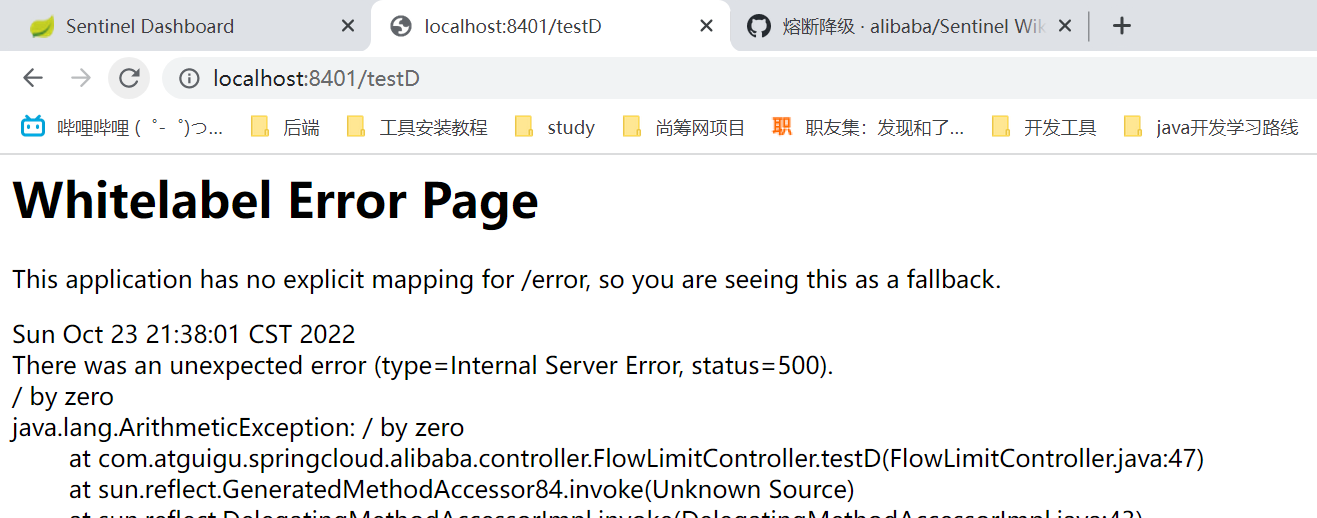
单独访问一次,必然来一次报错一次(int age = 10/0),调一次错一次;开启jmeter后,直接高并发发送请求,多次调用达到我们的配置条件了。断路器开启(保险丝跳闸),微服务不可用了,不再报错error而是服务降级了。

停掉jemeter后过3s。报/zero错误,因为业务类中有个10/0。
测试Sentinel-1.8.0
第1步:修改业务类FlowLimitController的如下接口
 @GetMapping("/testD")
public String testD()
{
    log.info("testD 测试异常比例");
    int age = 10/0;
    return "------testD";
}
第2步:Sentinel配置
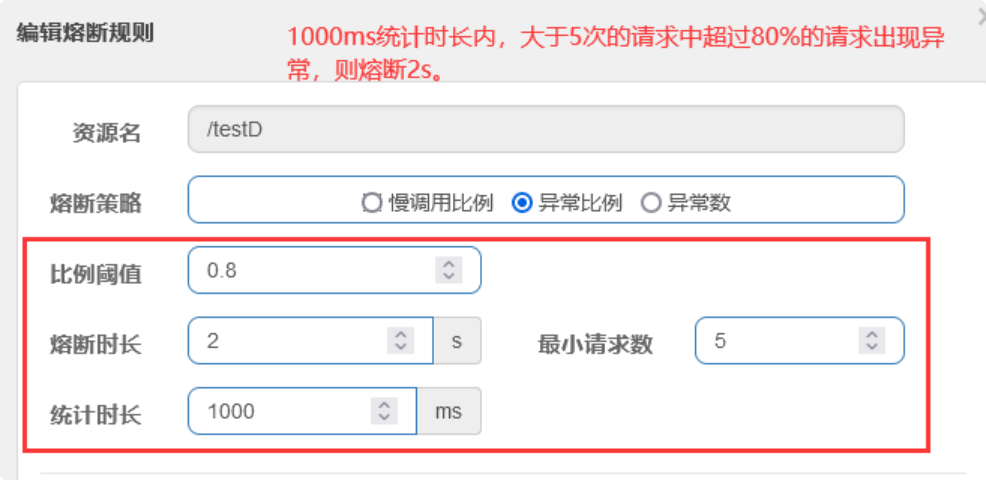
第3步:jmeter压测
单独访问一次,必然来一次报错一次(int age = 10/0),调一次错一次;开启jmeter后,直接高并发发送请求,多次调用达到我们的配置条件了。断路器开启(保险丝跳闸),微服务不可用了,不再报错error而是服务降级了。

停掉jemeter后过2s。报/zero错误,因为业务类中有个10/0。
5.2.3. 异常数
a> 是什么?
Sentinel-1.7.0版本:

时间窗口一定要大于等于60秒。
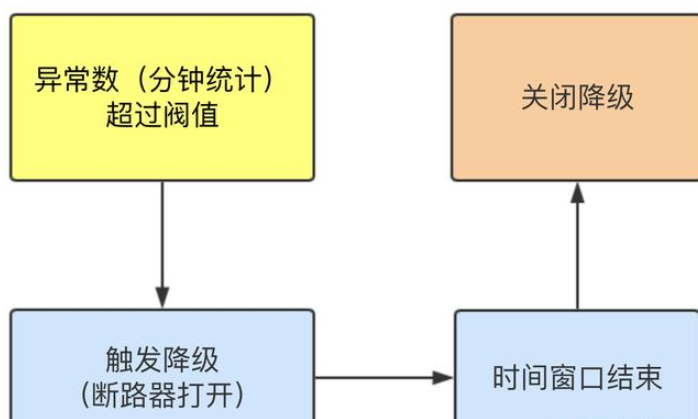
Sentinel-1.8.0版本:
- 异常数 (
ERROR_COUNT):当单位统计时长内的异常数目超过阈值之后会自动进行熔断。经过熔断时长后熔断器会进入探测恢复状态(HALF-OPEN 状态),若接下来的一个请求成功完成(没有错误)则结束熔断,否则会再次被熔断。
b> 测试
先测试Sentinel-1.7.0版本
第1步:修改业务类FlowLimitController,添加如下接口
@GetMapping("/testE")
public String testE()
{
    log.info("testE 测试异常数");
    int age = 10/0;
    return "------testE 测试异常数";
}
第2步:Sentinel配置
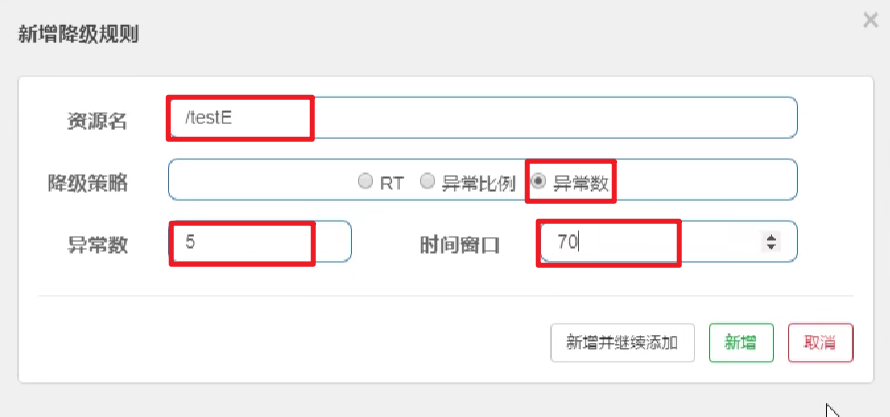
第3步:手动测试
http://localhost:8401/testE,第一次访问绝对报错,因为除数不能为零,我们看到error窗口,但是达到5次报错后,进入熔断后降级,并且后面需要等待70s之后才能正常访问。
测试Sentinel-1.8.0版本
第1步:修改业务类FlowLimitController的如下接口
@GetMapping("/testE")
public String testE()
{
    log.info("testE 测试异常数");
    int age = 10/0;
    return "------testE 测试异常数";
}
第2步:Sentinel配置
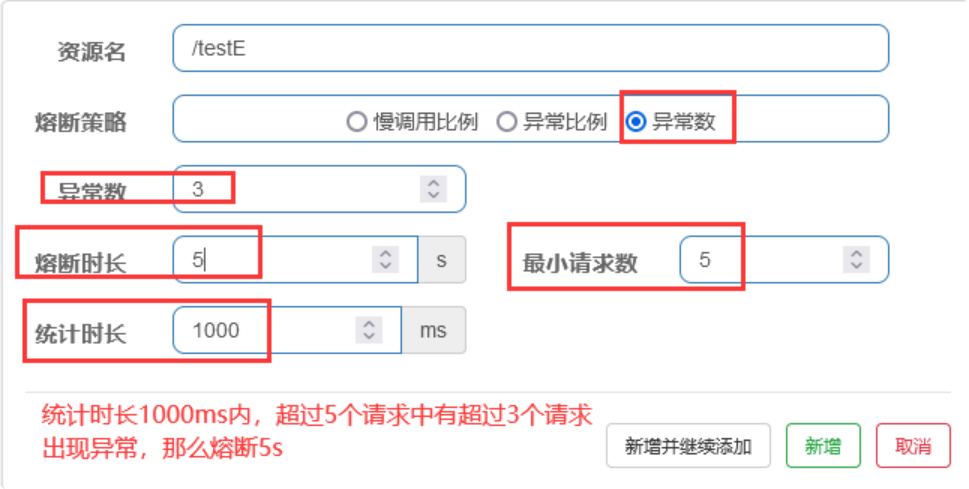
第3步:手动测试

这里我测试有bug,虽然熔断了但是熔断时长不是我配置的5s,大约是一分钟,统计时长也不是1s,好像也是一分钟,同时没达到最小请求数,只达到3次异常就直接熔断了。虽然我用的新版本,但是逻辑好像跟老版本的一样?
6. 热点key限流
6.1. 基本介绍
是什么?
何为热点?热点即经常访问的数据。很多时候我们希望统计某个热点数据中访问频次最高的 Top K 数据,并对其访问进行限制。比如:
- 商品 ID 为参数,统计一段时间内最常购买的商品 ID 并进行限制
- 用户 ID 为参数,针对一段时间内频繁访问的用户 ID 进行限制
热点参数限流会统计传入参数中的热点参数,并根据配置的限流阈值与模式,对包含热点参数的资源调用进行限流。热点参数限流可以看做是一种特殊的流量控制,仅对包含热点参数的资源调用生效。

Sentinel 利用 LRU 策略统计最近最常访问的热点参数,结合令牌桶算法来进行参数级别的流控。热点参数限流支持集群模式。
6.2. 基本使用
兜底方法分为系统默认和客户自定义。之前的case,限流出问题后,都是用sentinel系统默认的提示:Blocked by Sentinel (flow limiting)
我们能不能自定?类似hystrix,某个方法出问题了,就找对应的兜底降级方法?
答案是当然可以。Sentinel提供了类似于@HystrixCommand的**@SentinelResource**注解,这个注解可以帮我们指定接口的兜底方法
6.2.1. 测试方法
下面我们修改一下业务类FlowLimitController,添加如下的接口
@GetMapping("/testHotKey")
@SentinelResource(value = "testHotKey",blockHandler = "dealHandler_testHotKey")
public String testHotKey(@RequestParam(value = "p1",required = false) String p1,
                         @RequestParam(value = "p2",required = false) String p2){
    return "------testHotKey";
}
public String dealHandler_testHotKey(String p1,String p2,BlockException exception)
{
    return "------deal_testHotKey,o(╥﹏╥)o";
}
blockHandler = “del_testHotKey” 表示如果违背了Sentinel中配置的流控规则,就会调用我们自己的兜底方法del_testHotKey
6.2.2. 配置热点key限流规则
启动8401,注意:我们先要访问一次/testHostKey的接口才能让sentinel监控到。
然后在Sentinel管理页面添加如下的热点规则
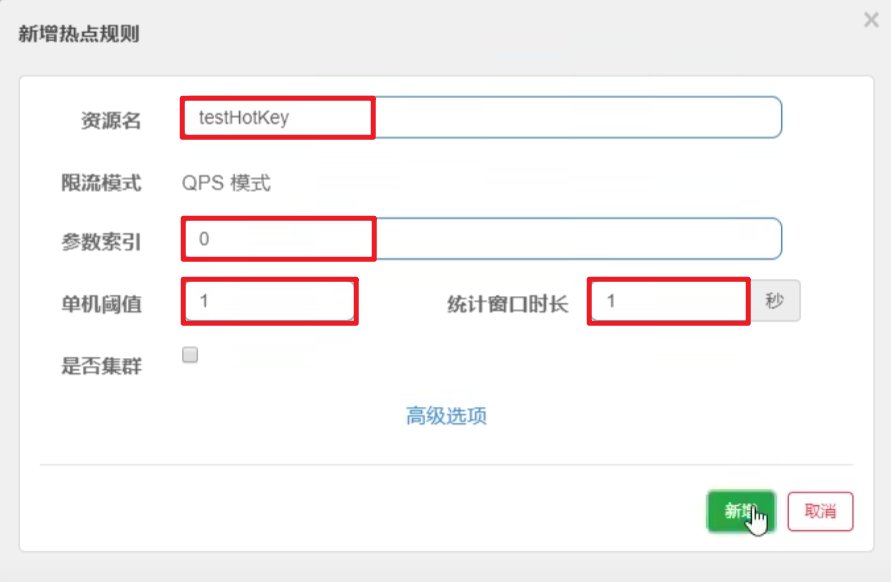
绑定testHotKey资源,把testHotKey对应的第一个参数作为热点key进行监控。设定热点限流规则:当该资源的访问QPS超过1次/s的时候,产生限流并执行自定义的del_testHotKey兜底方法。
简而言之:方法testHotKey里面第一个参数只要QPS超过每秒1次,马上降级处理。
注意:

限流模式只支持QPS模式,固定写死了。(这才叫热点)
@SentinelResource注解的方法参数索引,0代表第一个参数,1代表第二个参数,以此类推
单机阀值以及统计窗口时长表示在此窗口时间超过阀值就限流。
上面的抓图就是第一个参数有值的话,1秒的QPS为1,超过就限流,限流后调用dealHandler_testHotKey支持方法。
6.2.3. 测试
第1步:先在浏览器访问:http://localhost:8401/testHotKey?p1=a ,1秒只点击一次的话就正常显示,1秒内迅速点击两次,触发热点限流,执行自定义兜底方法

第2步:在浏览器访问:http://localhost:8401/testHotKey?p2=abc ,仅传入参数p2,无论怎么点击没有任何影响
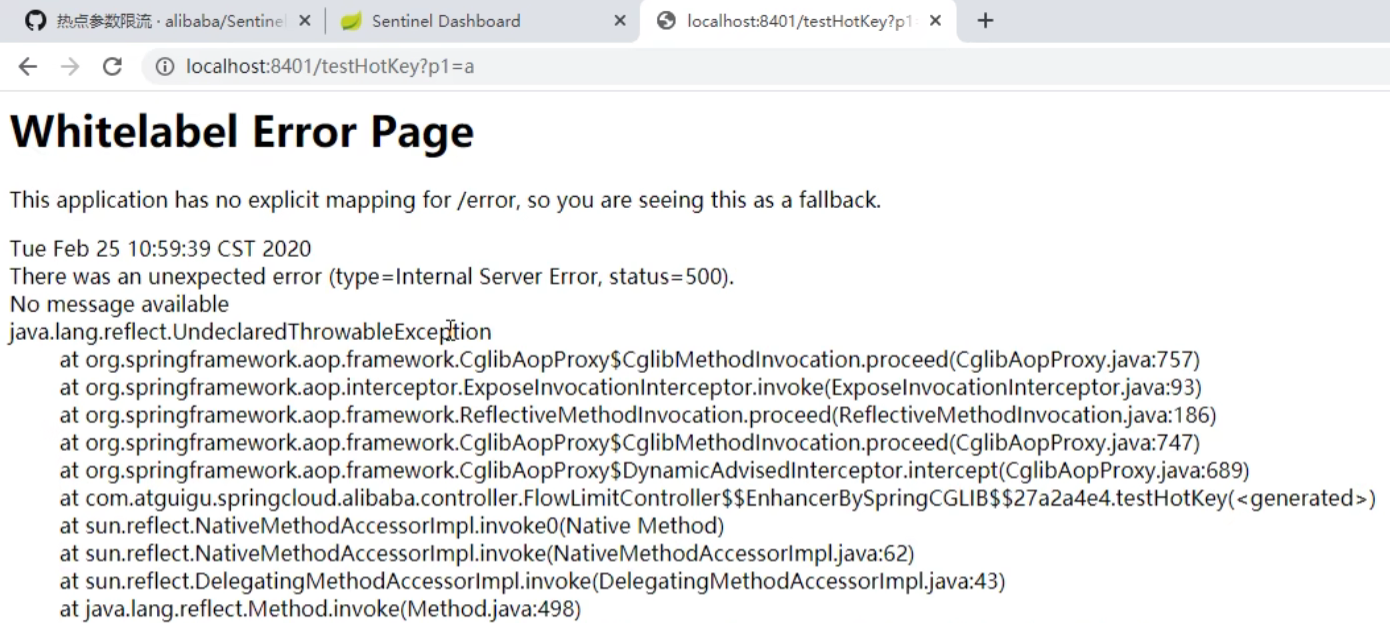
第3步:如果我们的接口没有配置blockHandler来指定兜底方法,当违反了热点key限流规则的时候,异常打到了前台用户界面看到,不友好

触发热点限流降级会出现error page,对用户不友好。
6.3. 参数例外项
上述案例演示了第一个参数p1,当QPS超过1秒1次点击后马上被限流
特例情况:我们期望p1参数当它是某个特殊值时,它的限流值和平时不一样。比如:假如当p1的值等于5时,它的阈值可以达到200
遇到这种特例,我们可以添加参数例外项,如下图所示:

注意:热点参数的注意点,参数必须是基本类型或者String
测试:在浏览器狂点:http://localhost:8401/testHotKey?p1=5&p2=b ,发现没有限流

6.4. 其它
手贱添加异常看看…/(ㄒoㄒ)/~~

在浏览器测试访问一下,发现直接返回了错误页面

要注意: Sentinel它只管你有没有触发它的限流规则,也可以说只管这个web交互页面(控制台)里面的东西。 配置的东西Sentinel可以管,java异常的错误我不管。
@SentinelResource
处理的是Sentinel控制台配置的违规情况,有blockHandler方法配置的兜底处理;
RuntimeException
int age = 10/0,这个是java运行时报出的运行时异常RunTimeException,@SentinelResource不管
总结:
@SentinelResource主管配置出错,运行出错该走异常走异常
7. 系统规则
是什么?
Sentinel 系统自适应限流从整体维度对应用入口流量进行控制,结合应用的 Load、CPU 使用率、总体平均 RT、入口 QPS 和并发线程数等几个维度的监控指标,通过自适应的流控策略,让系统的入口流量和系统的负载达到一个平衡,让系统尽可能跑在最大吞吐量的同时保证系统整体的稳定性。
系统保护规则是应用整体维度的,而不是资源维度的,并且仅对入口流量生效。入口流量指的是进入应用的流量(EntryType.IN),比如 Web 服务或 Dubbo 服务端接收的请求,都属于入口流量。
系统规则支持以下的模式:
- Load 自适应(仅对 Linux/Unix-like 机器生效):系统的 load1 作为启发指标,进行自适应系统保护。当系统 load1 超过设定的启发值,且系统当前的并发线程数超过估算的系统容量时才会触发系统保护(BBR 阶段)。系统容量由系统的
maxQps * minRt估算得出。设定参考值一般是CPU cores * 2.5。 - CPU usage(1.5.0+ 版本):当系统 CPU 使用率超过阈值即触发系统保护(取值范围 0.0-1.0),比较灵敏。
- 平均 RT:当单台机器上所有入口流量的平均 RT 达到阈值即触发系统保护,单位是毫秒。
- 并发线程数:当单台机器上所有入口流量的并发线程数达到阈值即触发系统保护。
- 入口 QPS:当单台机器上所有入口流量的 QPS 达到阈值即触发系统保护。
案例:配置全局QPS
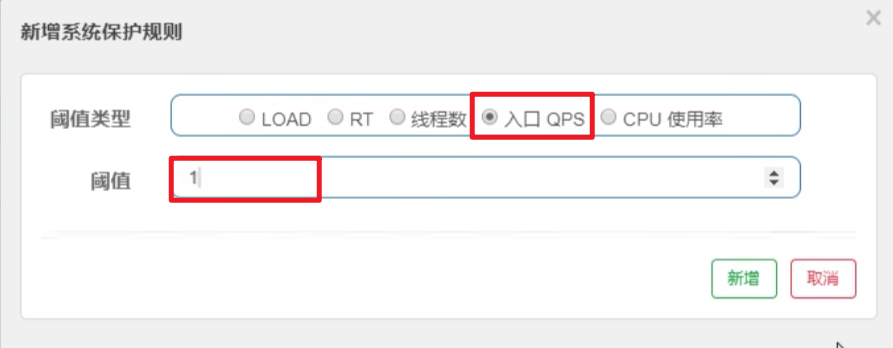
此时不管我们访问的是 /testA 还是 /testB ,只要QPS > 1整个系统就不能用了。
8. @SentinelResource
8.1. 按资源名称限流+后续处理
启动nacos+sentinel
8.1.1. pom
在cloudalibaba-sentinel-service8401的pom.xml中添加如下的依赖
<dependency><!-- 引入自己定义的api通用包,可以使用Payment支付Entity -->
    <groupId>com.atguigu.springcloud</groupId>
    <artifactId>cloud-api-commons</artifactId>
    <version>${project.version}</version>
</dependency>
8.1.2. 业务类
在cloudalibaba-sentinel-service8401中创建一个新的业务类,类名叫RateLimitController
package com.atguigu.springcloud.alibaba.controller;

import com.alibaba.csp.sentinel.annotation.SentinelResource;
import com.alibaba.csp.sentinel.slots.block.BlockException;
import com.atguigu.springcloud.entities.CommonResult;
import com.atguigu.springcloud.entities.Payment;
import org.springframework.web.bind.annotation.GetMapping;
import org.springframework.web.bind.annotation.RestController;

/**
 * @auther zzyy
 * @create 2020-02-13 16:50
 */
@RestController
public class RateLimitController
{
    @GetMapping("/byResource")
    @SentinelResource(value = "byResource",blockHandler = "handleException")
    public CommonResult byResource()
    {
        return new CommonResult(200,"按资源名称限流测试OK",new Payment(2020L,"serial001"));
    }
    public CommonResult handleException(BlockException exception)
    {
        return new CommonResult(444,exception.getClass().getCanonicalName()+"\t 服务不可用");
    }
}
注意:Sentinel-1.8.0版本开始,如果根据资源名配置的话、如果没有兜底方法、则会报500
8.1.3. 配置流控规则——按资源名称添加流控规则
配置步骤如下图所示:
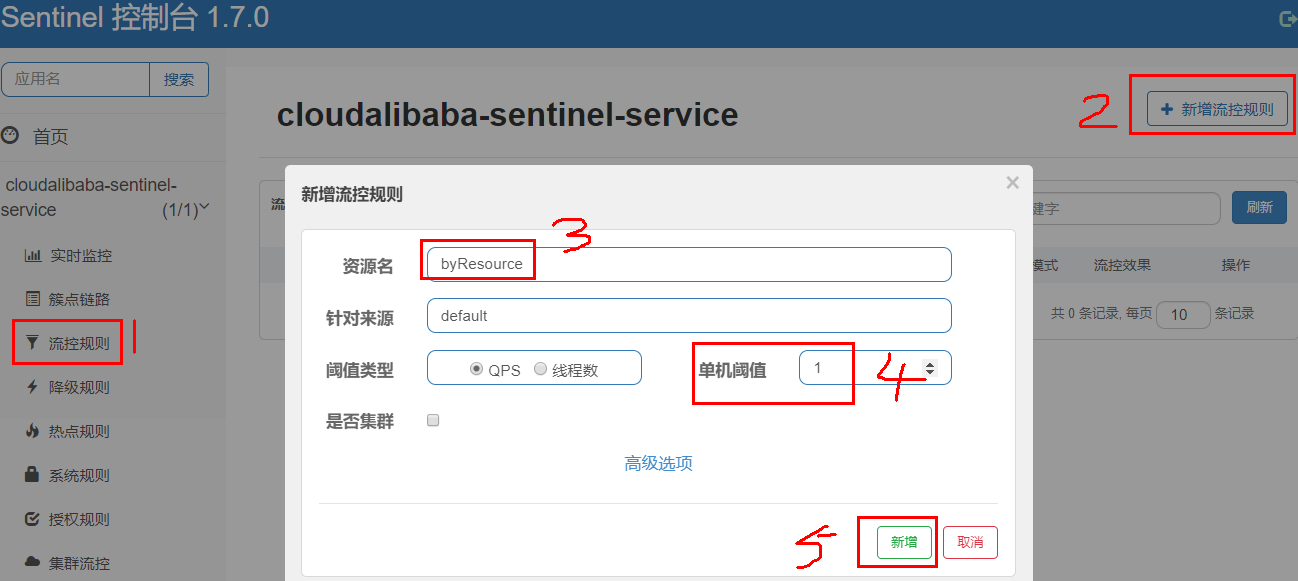
表示1秒钟内查询次数大于1,就跑到我们自定义的处理,限流
图形配置和代码关系:
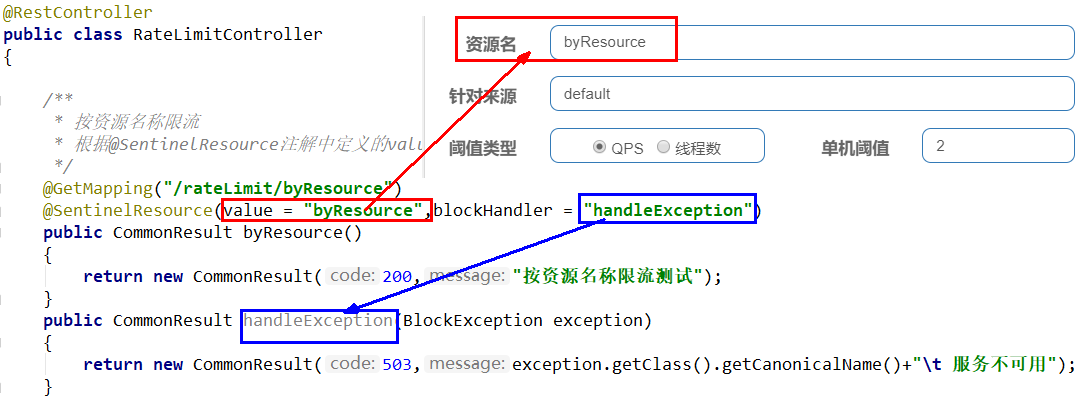
8.1.4. 测试
1秒钟点击1下,OK

超过上述,疯狂点击,返回了自己定义的限流处理信息,限流发生

8.1.5. 额外问题
此时关闭问服务8401看看,我们刷新Sentinel控制台,会发现之前配置的流控规则消失了,难道每次重启服务器都要重新配置一遍规则吗?规则如何进行持久化?
8.2. 按照Url地址限流+后续处理
通过访问的URL来限流,如果没有指定兜底方法,那么会返回Sentinel自带默认的限流处理信息。
8.2.1. 业务类RateLimitController
在RateLimitController中添加如下的接口
@GetMapping("/rateLimit/byUrl")
@SentinelResource(value = "byUrl")
public CommonResult byUrl()
{
    return new CommonResult(200,"按url限流测试OK",new Payment(2020L,"serial002"));
}
8.2.2. 设置流控规则
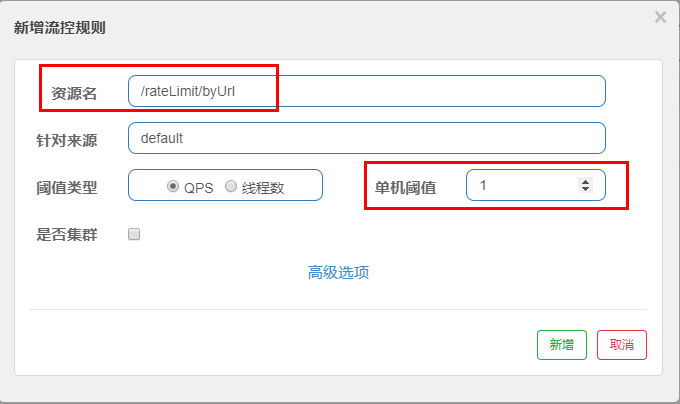
8.2.3. 测试
疯狂点击:http://localhost:8401/rateLimit/byUrl ,会返回Sentinel自带的限流处理结果

8.2.4. 总结
不管是@GetMapping(rest url)还是 @SentinelResource,只要是唯一的,就可以作为流控规则的资源名称。如果没有自定义自己的兜底方法,那么就使用系统自带的。
8.3. 上面兜底方案面临的问题
- 依照现有条件,我们自定义的处理方法又和业务代码耦合在一块,不直观。如果都用系统默认的,就没有体现我们自己的业务要求。
- 如果每个业务方法/API接口都添加一个兜底的,那代码膨胀加剧。
- 全局统一的处理方法没有体现。
8.4. 客户自定义限流处理逻辑
8.4.1. 创建CustomerBlockHandler类用于自定义限流处理逻辑
在com.atguigu.springcloud.alibaba.myhandler包下面创建CustomerBlockHandler,在CustomerBlockHandler类中统一的处理限流提示、服务降级的说明等等
package com.atguigu.springcloud.alibaba.myhandler;

import com.alibaba.csp.sentinel.slots.block.BlockException;
import com.atguigu.springcloud.alibaba.entities.CommonResult;
import org.springframework.stereotype.Component;

/**
 * @auther zzyy
 * @create 2019-12-10 13:01
 */
public class CustomerBlockHandler
{
    public static CommonResult handleException(BlockException exception){
        return new CommonResult(4444, "按客户自定义, global handlerException----1");
    }

    public static CommonResult handleException2(BlockException exception){
        return new CommonResult(4444, "按客户自定义, global handlerException----2");
    }
}
8.4.2. 修改RateLimitController
在RateLimitController类中添加如下的接口
//CustomerBlockHandler自定义类,来处理服务降级、限流提示.....
/**
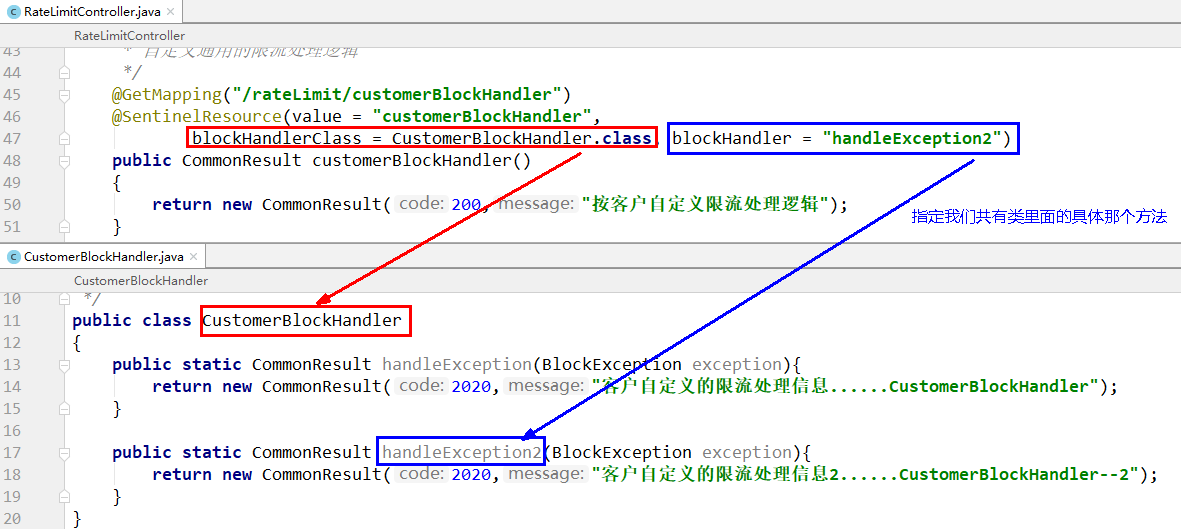
 * 自定义通用的限流处理逻辑,
 * blockHandlerClass = CustomerBlockHandler.class
 * blockHandler = handleException2
 * 上述配置:找CustomerBlockHandler类里的handleException2方法进行兜底处理
 */
//自定义通用的限流处理逻辑
@GetMapping("/rateLimit/customerBlockHandler")
@SentinelResource(value = "customerBlockHandler",
                  blockHandlerClass = CustomerBlockHandler.class,
                  blockHandler = "handlerException2")
public CommonResult customerBlockHandler() {
    return new CommonResult(200, "按客户自定义", new Payment(2020L, "serial003"));
}
blockHandler 函数默认需要和原方法在同一个类中。若希望使用其他类的函数,则可以指定 blockHandlerClass 为对应的类的 Class 对象,注意对应的函数必需为 static 函数,否则无法解析。
8.4.3. 测试
先启动8401,然后测试一下:http://localhost:8401/rateLimit/customerBlockHandler

然后sentinel控制台给这个接口设置流控规则
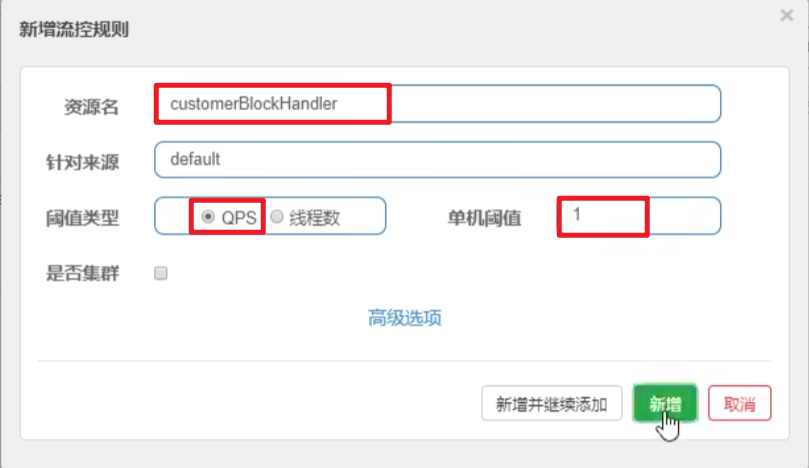
狂点几下,触发流控,看是否是我们自定义提示:

测试后我们自定义的出来了
8.4.4. 进一步说明
8.5. 更多注解属性说明
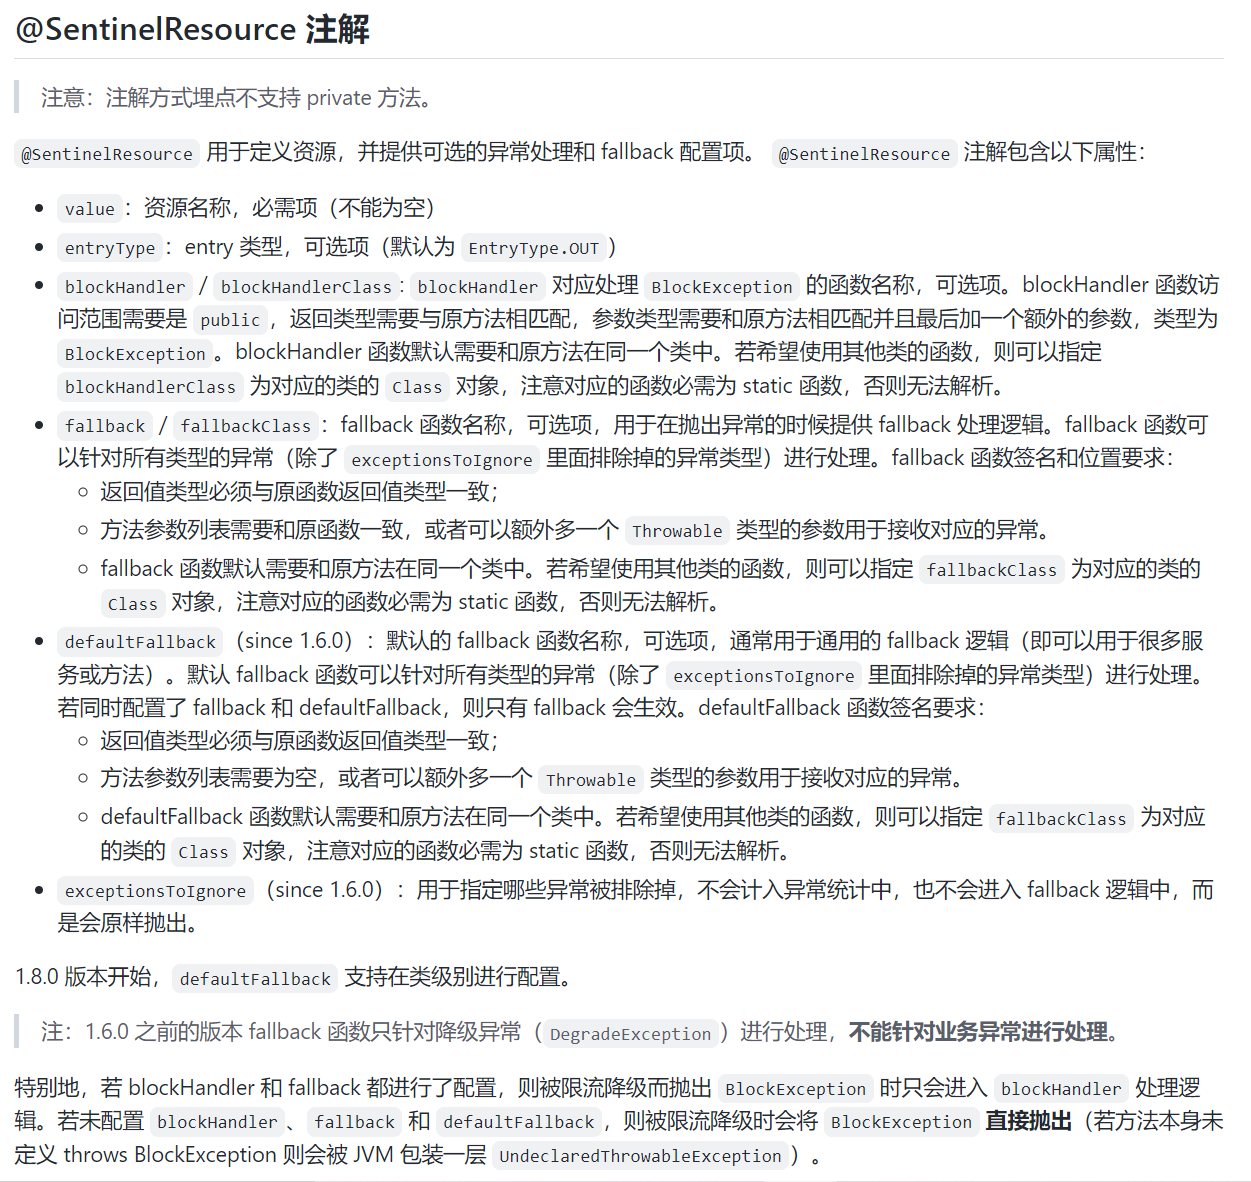
Sentinel主要有三个核心Api
- SphU定义资源
- Tracer定义统计
- ContextUtil定义了上下文
9. 服务熔断功能
主要内容:
- sentinel分别整合ribbon+openFeign以及设置fallback
- 熔断框架比较
9.1. Ribbon系列
nacos中整合了Ribbon,所以直接使用nacos就行。启动nacos和Sentinel。
9.1.1. 服务提供者9003/9004
a> 新建cloudalibaba-provider-payment9003/9004两个一样的做法
具体创建步骤的截图省略,和之前创建一个module的步骤是一样的。
b> pom
<?xml version="1.0" encoding="UTF-8"?>
<project xmlns="http://maven.apache.org/POM/4.0.0"
         xmlns:xsi="http://www.w3.org/2001/XMLSchema-instance"
         xsi:schemaLocation="http://maven.apache.org/POM/4.0.0 http://maven.apache.org/xsd/maven-4.0.0.xsd">
    <parent>
        <artifactId>mscloud03</artifactId>
        <groupId>com.atguigu.springcloud</groupId>
        <version>1.0-SNAPSHOT</version>
    </parent>
    <modelVersion>4.0.0</modelVersion>

    <artifactId>cloudalibaba-provider-payment9003</artifactId>


    <dependencies>
        <!--SpringCloud ailibaba nacos -->
        <dependency>
            <groupId>com.alibaba.cloud</groupId>
            <artifactId>spring-cloud-starter-alibaba-nacos-discovery</artifactId>
        </dependency>
        <dependency><!-- 引入自己定义的api通用包,可以使用Payment支付Entity -->
            <groupId>com.atguigu.springcloud</groupId>
            <artifactId>cloud-api-commons</artifactId>
            <version>${project.version}</version>
        </dependency>
        <!-- SpringBoot整合Web组件 -->
        <dependency>
            <groupId>org.springframework.boot</groupId>
            <artifactId>spring-boot-starter-web</artifactId>
        </dependency>
        <dependency>
            <groupId>org.springframework.boot</groupId>
            <artifactId>spring-boot-starter-actuator</artifactId>
        </dependency>
        <!--日常通用jar包配置-->
        <dependency>
            <groupId>org.springframework.boot</groupId>
            <artifactId>spring-boot-devtools</artifactId>
            <scope>runtime</scope>
            <optional>true</optional>
        </dependency>
        <dependency>
            <groupId>org.projectlombok</groupId>
            <artifactId>lombok</artifactId>
            <optional>true</optional>
        </dependency>
        <dependency>
            <groupId>org.springframework.boot</groupId>
            <artifactId>spring-boot-starter-test</artifactId>
            <scope>test</scope>
        </dependency>
    </dependencies>
</project>
c> yml
在src/main/resources/目录下创建application.yml配置文件
server:
  port: 9003

spring:
  application:
    name: nacos-payment-provider
  cloud:
    nacos:
      discovery:
        server-addr: localhost:8848 #配置Nacos地址

management:
  endpoints:
    web:
      exposure:
        include: '*'
记得修改不同的端口号
d> 主启动类
在com.atguigu.springcloud.alibaba包下面创建如下的主启动类
package com.atguigu.springcloud.alibaba;

import org.springframework.boot.SpringApplication;
import org.springframework.boot.autoconfigure.SpringBootApplication;
import org.springframework.cloud.client.discovery.EnableDiscoveryClient;

/**
 * @auther zzyy
 * @create 2020-02-13 20:53
 */
@SpringBootApplication
@EnableDiscoveryClient
public class PaymentMain9003
{
    public static void main(String[] args) {
            SpringApplication.run(PaymentMain9003.class, args);
    }
}
e> 业务类
在com.atguigu.springcloud.alibaba.controller包下面创建如下的业务类
package com.atguigu.springcloud.alibaba.controller;

import com.atguigu.springcloud.entities.CommonResult;
import com.atguigu.springcloud.entities.Payment;
import org.springframework.beans.factory.annotation.Value;
import org.springframework.web.bind.annotation.GetMapping;
import org.springframework.web.bind.annotation.PathVariable;
import org.springframework.web.bind.annotation.RestController;

import java.util.HashMap;

/**
 * @auther zzyy
 * @create 2020-02-13 20:54
 */
@RestController
public class PaymentController
{
    @Value("${server.port}")
    private String serverPort;

    public static HashMap<Long,Payment> hashMap = new HashMap<>();
    static
    {
        hashMap.put(1L,new Payment(1L,"28a8c1e3bc2742d8848569891fb42181"));
        hashMap.put(2L,new Payment(2L,"bba8c1e3bc2742d8848569891ac32182"));
        hashMap.put(3L,new Payment(3L,"6ua8c1e3bc2742d8848569891xt92183"));
    }

    @GetMapping(value = "/paymentSQL/{id}")
    public CommonResult<Payment> paymentSQL(@PathVariable("id") Long id)
    {
        Payment payment = hashMap.get(id);
        CommonResult<Payment> result = new CommonResult(200,"from mysql,serverPort:  "+serverPort,payment);
        return result;
    }
}
f> 测试
启动9003和9004
在浏览器访问:http://localhost:9003/paymentSQL/1

在浏览器访问:http://localhost:9004/paymentSQL/1

9.1.2. 服务消费者84
a> 新建cloudalibaba-consumer-nacos-order84
创建步骤截图省略。
b> pom
<?xml version="1.0" encoding="UTF-8"?>
<project xmlns="http://maven.apache.org/POM/4.0.0"
         xmlns:xsi="http://www.w3.org/2001/XMLSchema-instance"
         xsi:schemaLocation="http://maven.apache.org/POM/4.0.0 http://maven.apache.org/xsd/maven-4.0.0.xsd">
    <parent>
        <artifactId>mscloud03</artifactId>
        <groupId>com.atguigu.springcloud</groupId>
        <version>1.0-SNAPSHOT</version>
    </parent>
    <modelVersion>4.0.0</modelVersion>

    <artifactId>cloudalibaba-consumer-nacos-order84</artifactId>

    <dependencies>
        <!--SpringCloud ailibaba nacos -->
        <dependency>
            <groupId>com.alibaba.cloud</groupId>
            <artifactId>spring-cloud-starter-alibaba-nacos-discovery</artifactId>
        </dependency>
        <!--SpringCloud ailibaba sentinel -->
        <dependency>
            <groupId>com.alibaba.cloud</groupId>
            <artifactId>spring-cloud-starter-alibaba-sentinel</artifactId>
        </dependency>
        <!-- 引入自己定义的api通用包,可以使用Payment支付Entity -->
        <dependency>
            <groupId>com.atguigu.springcloud</groupId>
            <artifactId>cloud-api-commons</artifactId>
            <version>${project.version}</version>
        </dependency>
        <!-- SpringBoot整合Web组件 -->
        <dependency>
            <groupId>org.springframework.boot</groupId>
            <artifactId>spring-boot-starter-web</artifactId>
        </dependency>
        <dependency>
            <groupId>org.springframework.boot</groupId>
            <artifactId>spring-boot-starter-actuator</artifactId>
        </dependency>
        <!--日常通用jar包配置-->
        <dependency>
            <groupId>org.springframework.boot</groupId>
            <artifactId>spring-boot-devtools</artifactId>
            <scope>runtime</scope>
            <optional>true</optional>
        </dependency>
        <dependency>
            <groupId>org.projectlombok</groupId>
            <artifactId>lombok</artifactId>
            <optional>true</optional>
        </dependency>
        <dependency>
            <groupId>org.springframework.boot</groupId>
            <artifactId>spring-boot-starter-test</artifactId>
            <scope>test</scope>
        </dependency>
    </dependencies>
</project>
c> yml
在src/main/resources/目录下创建application.yml配置文件
server:
  port: 84


spring:
  application:
    name: nacos-order-consumer
  cloud:
    nacos:
      discovery:
        server-addr: localhost:8848
    sentinel:
      transport:
        #配置Sentinel dashboard地址
        dashboard: localhost:8080
        #默认8719端口,假如被占用会自动从8719开始依次+1扫描,直至找到未被占用的端口
        port: 8719


#消费者将要去访问的微服务名称(注册成功进nacos的微服务提供者)
#方便controller的@value获取
service-url:
  nacos-user-service: http://nacos-payment-provider
d> 主启动类
在com.atguigu.springcloud.alibaba包下面创建主启动类
package com.atguigu.springcloud.alibaba;

import org.springframework.boot.SpringApplication;
import org.springframework.boot.autoconfigure.SpringBootApplication;
import org.springframework.cloud.client.discovery.EnableDiscoveryClient;

/**
 * @auther zzyy
 * @create 2020-02-13 20:22
 */
@EnableDiscoveryClient
@SpringBootApplication
public class OrderNacosMain84
{
    public static void main(String[] args) {
        SpringApplication.run(OrderNacosMain84.class, args);
    }
}
e> 业务类
在com.atguigu.springcloud.alibaba.config包下面创建如下的配置类来配置RestTemplate
package com.atguigu.springcloud.alibaba.config;

import org.springframework.cloud.client.loadbalancer.LoadBalanced;
import org.springframework.context.annotation.Bean;
import org.springframework.context.annotation.Configuration;
import org.springframework.web.client.RestTemplate;


@Configuration
public class ApplicationContextConfig
{
    @Bean
    @LoadBalanced
    public RestTemplate getRestTemplate()
    {
        return new RestTemplate();
    }
}
在com.atguigu.springcloud.alibaba.controller包下面创建CircleBreakerController
package com.atguigu.springcloud.alibaba.controller;

import com.alibaba.csp.sentinel.annotation.SentinelResource;
import com.alibaba.csp.sentinel.slots.block.BlockException;
import com.atguigu.springcloud.entities.CommonResult;
import com.atguigu.springcloud.entities.Payment;
import lombok.extern.slf4j.Slf4j;
import org.springframework.beans.factory.annotation.Autowired;
import org.springframework.web.bind.annotation.GetMapping;
import org.springframework.web.bind.annotation.PathVariable;
import org.springframework.web.bind.annotation.RequestMapping;
import org.springframework.web.bind.annotation.RestController;
import org.springframework.web.client.RestTemplate;

import javax.annotation.Resource;
import java.sql.SQLException;
import java.util.concurrent.Executors;

/**
 * @auther zzyy
 * @create 2020-02-13 20:24
 */
@RestController
@Slf4j
public class CircleBreakerController
{
    @Value("${service-url.nacos-user-service}")
    public static final String SERVICE_URL;
    //public static final String SERVICE_URL = "http://nacos-payment-provider";

    @Resource
    private RestTemplate restTemplate;

    @RequestMapping("/consumer/fallback/{id}")
    @SentinelResource(value = "fallback") 	//没有任何配置
     public CommonResult<Payment> fallback(@PathVariable Long id)
    {
        CommonResult<Payment> result = restTemplate.getForObject(SERVICE_URL + "/paymentSQL/"+id,CommonResult.class,id);

        if (id == 4) {
            throw new IllegalArgumentException ("IllegalArgumentException,非法参数异常....");
        }else if (result.getData() == null) {
            throw new NullPointerException ("NullPointerException,该ID没有对应记录,空指针异常");
        }

        return result;
    }
}
f> 测试
启动9003和9004以及84
在浏览器访问:http://localhost:84/consumer/fallback/1 ,多次点击,看是否实现了负载均衡


9.1.3. fallback 和 blockHandler
加深@SentinelResource(value = “xxx”, fallback = “ffff”, blockHandler = “bbbb”)注解的理解
- fallback管运行异常,blockHandler管配置违规。
- fallback对应服务降级,就是服务出错了应该怎么办(需要有个兜底方法);
- blockHandler对应服务熔断,就是我现在服务不可用,我应该怎么办,怎么给客户一个户提示(同样需要一个兜底方法)
只要知道,不满足sentinel规则的由blockhandler处理,而会报异常的会由fallback处理(类似于事务,只是这里不是回滚,而是别的处理)
9.1.4. 差异化配置
这里改的业务类代码均是消费者84端的业务类代码,不要搞错了。
降级是服务业务代码出现错误的兜底,熔断是服务不可用。降级是兜底方法,熔断是对服务保护时间窗口期服务不可用。
a> 没有任何配置
前面我们的84消费端,@SentinelResource里面只配置了value,fallback和blockHandler都没有配置,该情况下我们测试一下 http://localhost:84/consumer/fallback/4
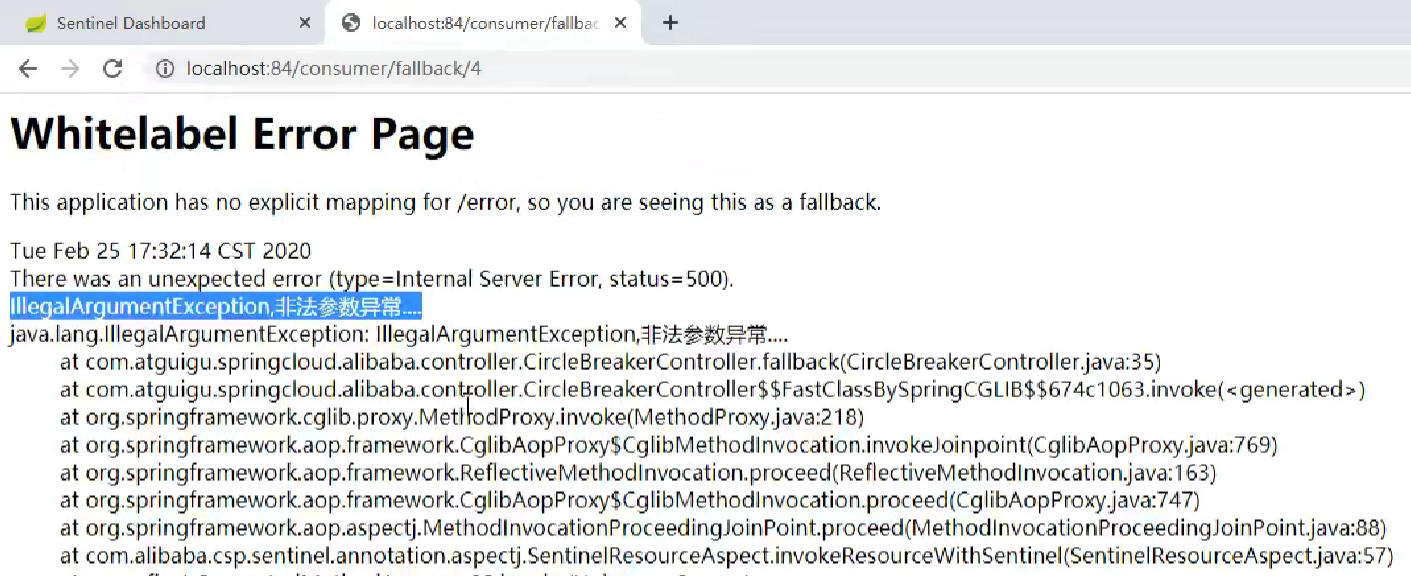
出现了错误页面,error page对客户不友好,所以我们需要有兜底方法。
b> 只配置fallback
fallback对应服务降级,就是服务可以正常访问,但是业务逻辑出现错误,需要降级兜底。
package com.atguigu.springcloud.alibaba.controller;

import com.alibaba.csp.sentinel.annotation.SentinelResource;
import com.atguigu.springcloud.entities.CommonResult;
import com.atguigu.springcloud.entities.Payment;
import lombok.extern.slf4j.Slf4j;
import org.springframework.web.bind.annotation.PathVariable;
import org.springframework.web.bind.annotation.RequestMapping;
import org.springframework.web.bind.annotation.RestController;
import org.springframework.web.client.RestTemplate;

import javax.annotation.Resource;

/**
 * @auther zzyy
 * @create 2020-02-25 16:05
 */
@RestController
@Slf4j
public class CircleBreakerController
{
    @Value("${service-url.nacos-user-service}")
    public static final String SERVICE_URL;
    //public static final String SERVICE_URL = "http://nacos-payment-provider";

    @Resource
    private RestTemplate restTemplate;

    @RequestMapping("/consumer/fallback/{id}")
    //@SentinelResource(value = "fallback") //没有配置
    @SentinelResource(value = "fallback",fallback = "handlerFallback") //fallback负责业务异常
    public CommonResult<Payment> fallback(@PathVariable Long id)
    {
        CommonResult<Payment> result = restTemplate.getForObject(SERVICE_URL + "/paymentSQL/"+id,CommonResult.class,id);

        if (id == 4) {
            throw new IllegalArgumentException ("IllegalArgumentException,非法参数异常....");
        }else if (result.getData() == null) {
            throw new NullPointerException ("NullPointerException,该ID没有对应记录,空指针异常");
        }

        return result;
    }
    public CommonResult handlerFallback(@PathVariable  Long id,Throwable e) {
        Payment payment = new Payment(id,"null");
        return new CommonResult<>(444,"兜底异常handlerFallback,exception内容  "+e.getMessage(),payment);
    }
}

浏览器测试:
http://localhost:84/consumer/fallback/4

http://localhost:84/consumer/fallback/5

c> 只配置blockHandler
package com.atguigu.springcloud.alibaba.controller;

import com.alibaba.csp.sentinel.annotation.SentinelResource;
import com.alibaba.csp.sentinel.slots.block.BlockException;
import com.atguigu.springcloud.entities.CommonResult;
import com.atguigu.springcloud.entities.Payment;
import lombok.extern.slf4j.Slf4j;
import org.springframework.beans.factory.annotation.Autowired;
import org.springframework.web.bind.annotation.GetMapping;
import org.springframework.web.bind.annotation.PathVariable;
import org.springframework.web.bind.annotation.RequestMapping;
import org.springframework.web.bind.annotation.RestController;
import org.springframework.web.client.RestTemplate;

import javax.annotation.Resource;
import java.sql.SQLException;
import java.util.concurrent.Executors;

/**
 * @auther zzyy
 * @create 2020-02-13 20:24
 */
@RestController
@Slf4j
public class CircleBreakerController
{
    @Value("${service-url.nacos-user-service}")
    public static final String SERVICE_URL;
    //public static final String SERVICE_URL = "http://nacos-payment-provider";

    @Resource
    private RestTemplate restTemplate;

    @RequestMapping("/consumer/fallback/{id}")
    //@SentinelResource(value = "fallback") //没有配置
    //@SentinelResource(value = "fallback",fallback = "handlerFallback") //fallback负责业务异常
    @SentinelResource(value = "fallback",blockHandler = "blockHandler") //blockHandler负责在sentinel里面配置的降级限流
    public CommonResult<Payment> fallback(@PathVariable Long id)
    {
        CommonResult<Payment> result = restTemplate.getForObject(SERVICE_URL + "/paymentSQL/"+id,CommonResult.class,id);
        if (id == 4) {
            throw new IllegalArgumentException ("非法参数异常....");
        }else if (result.getData() == null) {
            throw new NullPointerException ("NullPointerException,该ID没有对应记录");
        }
        return result;
    }
    //本例是fallback
    //public CommonResult handlerFallback(@PathVariable  Long id,Throwable e) {
    //    Payment payment = new Payment(id,"null");
    //    return new CommonResult<>(444,"fallback,无此流水,exception  "+e.getMessage(),payment);
    //}
    //本例是blockHandler
    public CommonResult blockHandler(@PathVariable  Long id,BlockException blockException) {
        Payment payment = new Payment(id,"null");
        return new CommonResult<>(445,"blockHandler-sentinel限流,无此流水: blockException  "+blockException.getMessage(),payment);
    }

}
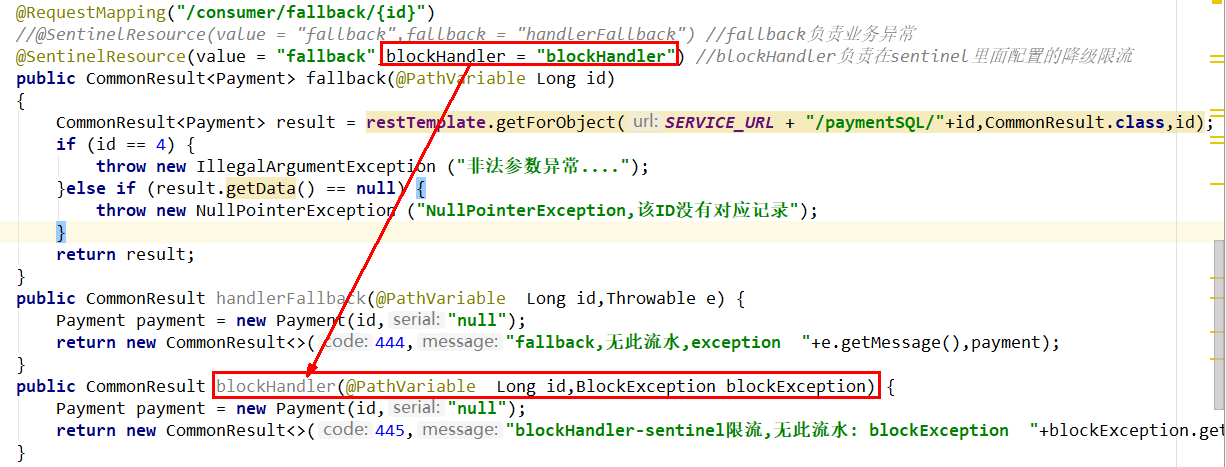
配置Sentinel降级规则
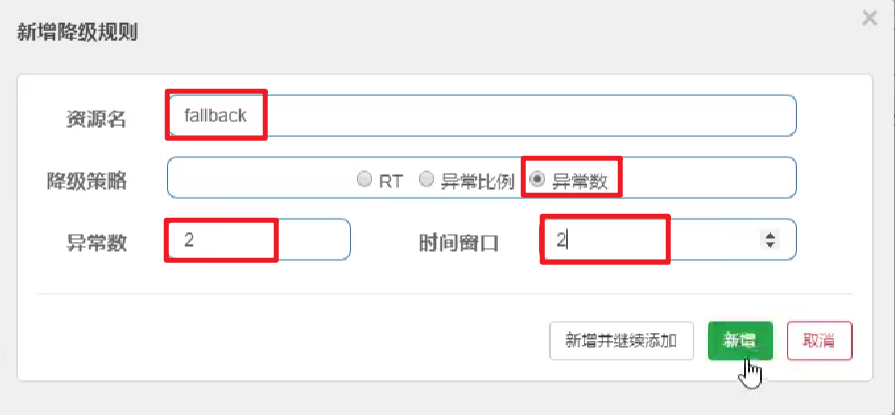
浏览器测试:http://localhost:84/consumer/fallback/4 ,需要点击两次以上才会触发降级规则

d> fallback和blockHandler都配置
package com.atguigu.springcloud.alibaba.controller;

import com.alibaba.csp.sentinel.annotation.SentinelResource;
import com.alibaba.csp.sentinel.slots.block.BlockException;
import com.atguigu.springcloud.entities.CommonResult;
import com.atguigu.springcloud.entities.Payment;
import lombok.extern.slf4j.Slf4j;
import org.springframework.beans.factory.annotation.Autowired;
import org.springframework.web.bind.annotation.GetMapping;
import org.springframework.web.bind.annotation.PathVariable;
import org.springframework.web.bind.annotation.RequestMapping;
import org.springframework.web.bind.annotation.RestController;
import org.springframework.web.client.RestTemplate;

import javax.annotation.Resource;
import java.sql.SQLException;
import java.util.concurrent.Executors;

/**
 * @auther zzyy
 * @create 2020-02-13 20:24
 */
@RestController
@Slf4j
public class CircleBreakerController
{
    @Value("${service-url.nacos-user-service}")
    public static final String SERVICE_URL;
    //public static final String SERVICE_URL = "http://nacos-payment-provider";

    @Resource
    private RestTemplate restTemplate;

    @RequestMapping("/consumer/fallback/{id}")
    //@SentinelResource(value = "fallback") //没有配置
    //@SentinelResource(value = "fallback",fallback = "handlerFallback") //fallback负责业务异常
    //@SentinelResource(value = "fallback",blockHandler = "blockHandler") //blockHandler负责在sentinel里面配置的降级限流
    @SentinelResource(value = "fallback",fallback = "handlerFallback",blockHandler = "blockHandler")
    public CommonResult<Payment> fallback(@PathVariable Long id)
    {
        CommonResult<Payment> result = restTemplate.getForObject(SERVICE_URL + "/paymentSQL/"+id,CommonResult.class,id);
        if (id == 4) {
            throw new IllegalArgumentException ("非法参数异常....");
        }else if (result.getData() == null) {
            throw new NullPointerException ("NullPointerException,该ID没有对应记录");
        }
        return result;
    }
    //本例是fallback
    public CommonResult handlerFallback(@PathVariable  Long id,Throwable e) {
        Payment payment = new Payment(id,"null");
        return new CommonResult<>(444,"fallback,无此流水,exception  "+e.getMessage(),payment);
    }
    //本例是blockHandler
    public CommonResult blockHandler(@PathVariable  Long id,BlockException blockException) {
        Payment payment = new Payment(id,"null");
        return new CommonResult<>(445,"blockHandler-sentinel限流,无此流水: blockException  "+blockException.getMessage(),payment);
    }

}
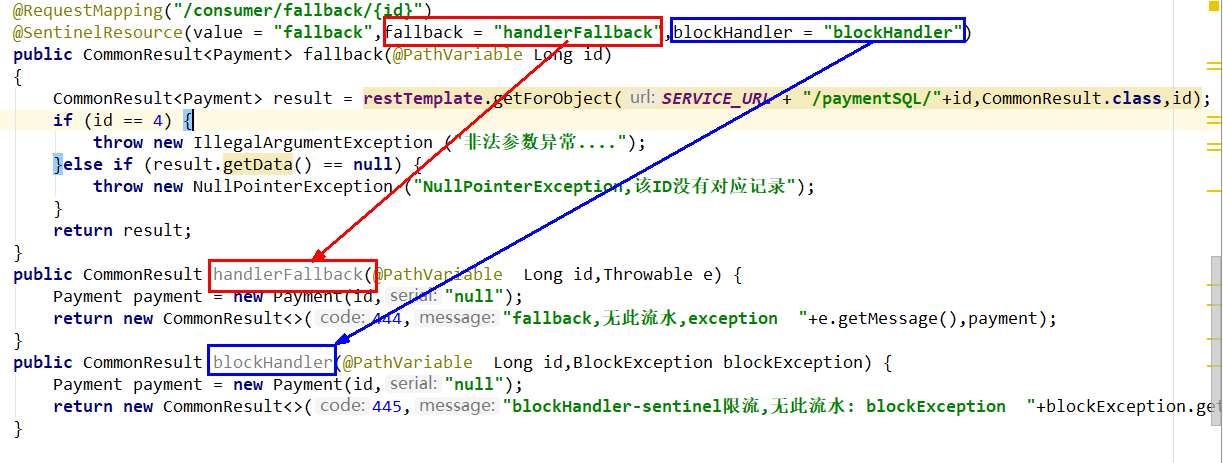
配置Sentinel流控规则
删除之前的降级规则,配置流控:
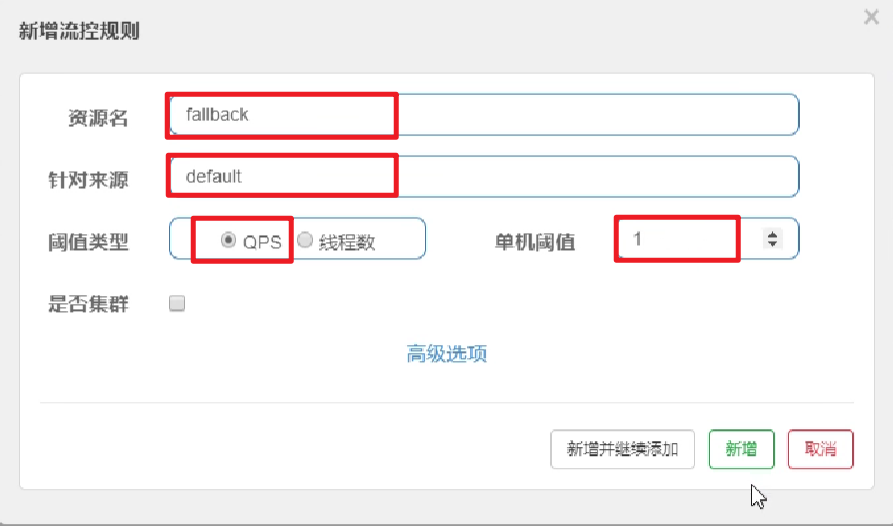
在浏览器测试:http://localhost:84/consumer/fallback/4
如果1秒点击一次,不会触发sentinel限流,只会触发业务异常,会被降级方法fallback兜底:

如果1秒点击超过一次,就会触发sentinel限流

总结:若 blockHandler 和 fallback 都进行了配置,则被限流降级而抛出 BlockException 时只会进入 blockHandler 处理逻辑,在没有违反sentinel规则时,出现业务异常走fallback方法;。
e> 忽略属性
可以选择性的配置当某些异常发生时,不触发fallback的兜底方法。
package com.atguigu.springcloud.alibaba.controller;

import com.alibaba.csp.sentinel.annotation.SentinelResource;
import com.alibaba.csp.sentinel.slots.block.BlockException;
import com.atguigu.springcloud.entities.CommonResult;
import com.atguigu.springcloud.entities.Payment;
import lombok.extern.slf4j.Slf4j;
import org.springframework.beans.factory.annotation.Autowired;
import org.springframework.web.bind.annotation.GetMapping;
import org.springframework.web.bind.annotation.PathVariable;
import org.springframework.web.bind.annotation.RequestMapping;
import org.springframework.web.bind.annotation.RestController;
import org.springframework.web.client.RestTemplate;

import javax.annotation.Resource;
import java.sql.SQLException;
import java.util.concurrent.Executors;

/**
 * @auther zzyy
 * @create 2020-02-13 20:24
 */
@RestController
@Slf4j
public class CircleBreakerController
{
    @Value("${service-url.nacos-user-service}")
    public static final String SERVICE_URL;
    //public static final String SERVICE_URL = "http://nacos-payment-provider";

    @Resource
    private RestTemplate restTemplate;

    @RequestMapping("/consumer/fallback/{id}")
    //@SentinelResource(value = "fallback") //没有配置
    //@SentinelResource(value = "fallback",fallback = "handlerFallback") //fallback负责业务异常
    //@SentinelResource(value = "fallback",blockHandler = "blockHandler") //blockHandler负责在sentinel里面配置的降级限流
    //@SentinelResource(value = "fallback",fallback = "handlerFallback",blockHandler = "blockHandler")
    @SentinelResource(value = "fallback", fallback = "handlerFallback", blockHandler = "blockHandler",
                  		exceptionsToIgnore = {IllegalArgumentException.class})
    public CommonResult<Payment> fallback(@PathVariable Long id)
    {
        CommonResult<Payment> result = restTemplate.getForObject(SERVICE_URL + "/paymentSQL/"+id,CommonResult.class,id);
        if (id == 4) {
            throw new IllegalArgumentException ("非法参数异常....");
        }else if (result.getData() == null) {
            throw new NullPointerException ("NullPointerException,该ID没有对应记录");
        }
        return result;
    }
    //本例是fallback
    public CommonResult handlerFallback(@PathVariable  Long id,Throwable e) {
        Payment payment = new Payment(id,"null");
        return new CommonResult<>(444,"fallback,无此流水,exception  "+e.getMessage(),payment);
    }
    //本例是blockHandler
    public CommonResult blockHandler(@PathVariable  Long id,BlockException blockException) {
        Payment payment = new Payment(id,"null");
        return new CommonResult<>(445,"blockHandler-sentinel限流,无此流水: blockException  "+blockException.getMessage(),payment);
    }

}
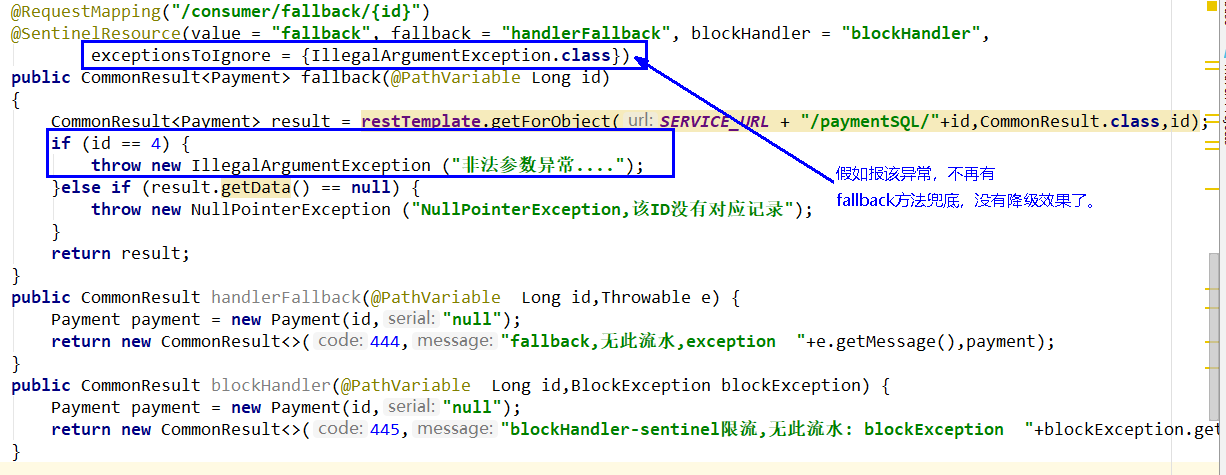
浏览器测试一下:http://localhost:84/consumer/fallback/4 ,直接报错误页面,没有了降级兜底方法。
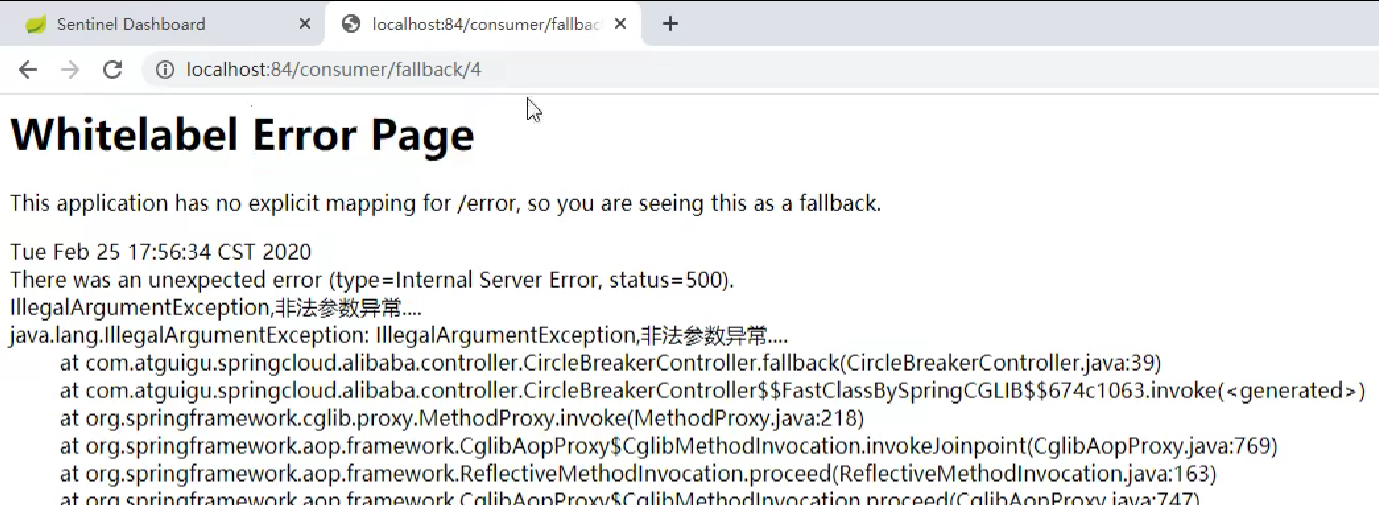
其他异常不受影响:http://localhost:84/consumer/fallback/5

9.2. Feign系列
9.2.1. 修改84模块
84消费者调用提供者9003,Feign组件一般是消费侧
9.2.2. pom
在pom.xml中添加openfeign的依赖
<!--SpringCloud openfeign -->
<dependency>
    <groupId>org.springframework.cloud</groupId>
    <artifactId>spring-cloud-starter-openfeign</artifactId>
</dependency>
9.2.3. yml
在application.yml配置文件中激活Sentinel对Feign的支持
#激活Sentinel对Feign的支持
feign:
  sentinel:
    enabled: true
9.2.4. 业务类
在com.atguigu.springcloud.alibaba.service包下面创建带@FeignClient注解的业务接口
package com.atguigu.springcloud.alibaba.service;

import com.atguigu.springcloud.alibaba.entities.CommonResult;
import com.atguigu.springcloud.alibaba.entities.Payment;
import org.springframework.cloud.openfeign.FeignClient;
import org.springframework.web.bind.annotation.GetMapping;
import org.springframework.web.bind.annotation.PathVariable;

/**
 * @auther zzyy
 * @create 2019-12-10 17:17
 * 指明调用失败的兜底方法在PaymentFallbackService
 * 使用 fallback 方式是无法获取异常信息的,
 * 如果想要获取异常信息,可以使用 fallbackFactory参数
 */
@FeignClient(value = "nacos-payment-provider",fallback = PaymentFallbackService.class)//调用中关闭9003服务提供者
@Component
public interface PaymentService
{
    @GetMapping(value = "/paymentSQL/{id}")
    public CommonResult<Payment> paymentSQL(@PathVariable("id") Long id);
}
在com.atguigu.springcloud.alibaba.service包下面创建一个类去定义调用服务提供者失败时的兜底方法
package com.atguigu.springcloud.alibaba.service;

import com.atguigu.springcloud.alibaba.entities.CommonResult;
import com.atguigu.springcloud.alibaba.entities.Payment;
import org.springframework.stereotype.Component;

/**
 * @auther zzyy
 * @create 2019-12-10 17:18
 */
@Component   //不要忘记了
public class PaymentFallbackService implements PaymentFeignService {
    //如果nacos-payment-consumer服务中的相应接口出事了,我来兜底
    @Override
    public CommonResult<Payment> paymentSQL(Long id) {
        return new CommonResult<>(444,"服务降级返回,没有该流水信息-------PaymentFallbackService",new Payment(id, "errorSerial......"));
    }
}
84端口CircleBreakerController加入openFeign的接口:
//==================OpenFeign
@Resource
private PaymentService paymentService;

@GetMapping(value = "/consumer/openfeign/{id}")
public CommonResult<Payment> paymentSQL(@PathVariable("id") Long id)
{
    if(id == 4)
    {
        throw new RuntimeException("没有该id");
    }
    return paymentService.paymentSQL(id);
}
9.2.5. 主启动类
在主启动类上面添加@EnableFeignClient注解开启OpenFeign
package com.atguigu.springcloud.alibaba;

import org.springframework.boot.SpringApplication;
import org.springframework.boot.autoconfigure.SpringBootApplication;
import org.springframework.cloud.client.discovery.EnableDiscoveryClient;
import org.springframework.cloud.openfeign.EnableFeignClients;

/**
 * @auther zzyy
 * @create 2020-02-13 20:22
 */
@EnableDiscoveryClient
@SpringBootApplication
@EnableFeignClients
public class OrderNacosMain84
{
    public static void main(String[] args) {
            SpringApplication.run(OrderNacosMain84.class, args);
    }
}
9.2.6. 测试
启动9003/9004,然后启动84
在浏览器访问:http://localhost:84/consumer/paymentSQL/1 ,多次点击9003和9004端口轮询出现,实现了负载均衡

测试84调用9003,此时故意关闭9003/9004微服务提供者,看84消费侧自动降级,不会被耗死

注意:如果yaml没有配置Sentinel对Feign的支持,就不会执行降级方法,而是直接报错误页面。

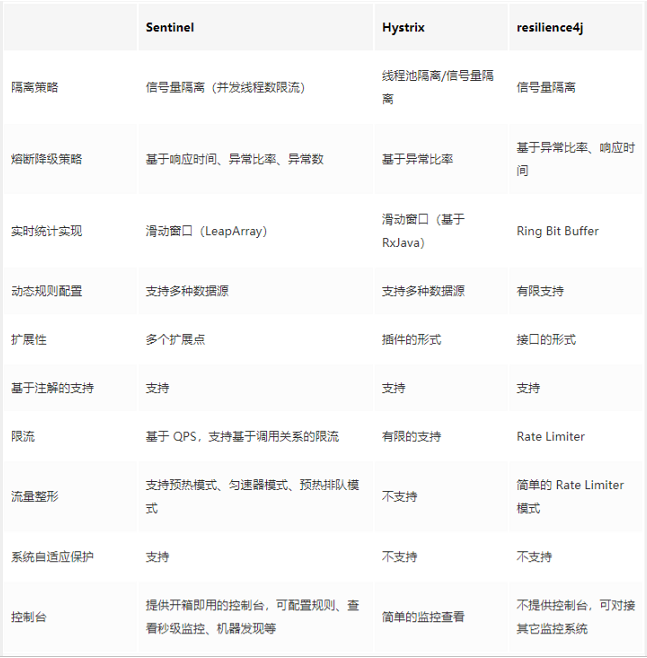
9.3. 熔断框架比较
10. 规则持久化
10.1. 是什么?
前面我们在Sentinel给某一个微服务添加限流规则后,一旦我们重启这个微服务,sentinel中给这个微服务配置的限流规则就消失了,说明当时在sentinel配置的限流规则都是临时的,所以生产环境需要将配置规则进行持久化
10.2. 怎么玩?
将限流配置规则持久化进Nacos保存,只要刷新8401某个rest地址,sentinel控制台的流控规则就能看到,只要Nacos里面的配置不删除,针对8401上sentinel上的流控规则持续有效。当然你也可以持久化到文件,redis,数据库等
10.3. 步骤
10.3.1. 修改cloudalibaba-sentinel-service8401
10.3.2. pom
在pom.xml添加如下的依赖
<!--SpringCloud ailibaba sentinel-datasource-nacos -->
<dependency>
    <groupId>com.alibaba.csp</groupId>
    <artifactId>sentinel-datasource-nacos</artifactId>
</dependency>
10.3.3. yml
修改application.yml
server:
  port: 8401

spring:
  application:
    name: cloudalibaba-sentinel-service
  cloud:
    nacos:
      discovery:
        server-addr: localhost:8848 #Nacos服务注册中心地址
    sentinel:
      transport:
        dashboard: localhost:8080 #配置Sentinel dashboard地址
        port: 8719
      datasource:
        ds1:
          nacos:
            server-addr: localhost:8848
            dataId: cloudalibaba-sentinel-service
            groupId: DEFAULT_GROUP
            data-type: json
            rule-type: flow

management:
  endpoints:
    web:
      exposure:
        include: '*'

feign:
  sentinel:
    enabled: true # 激活Sentinel对Feign的支持
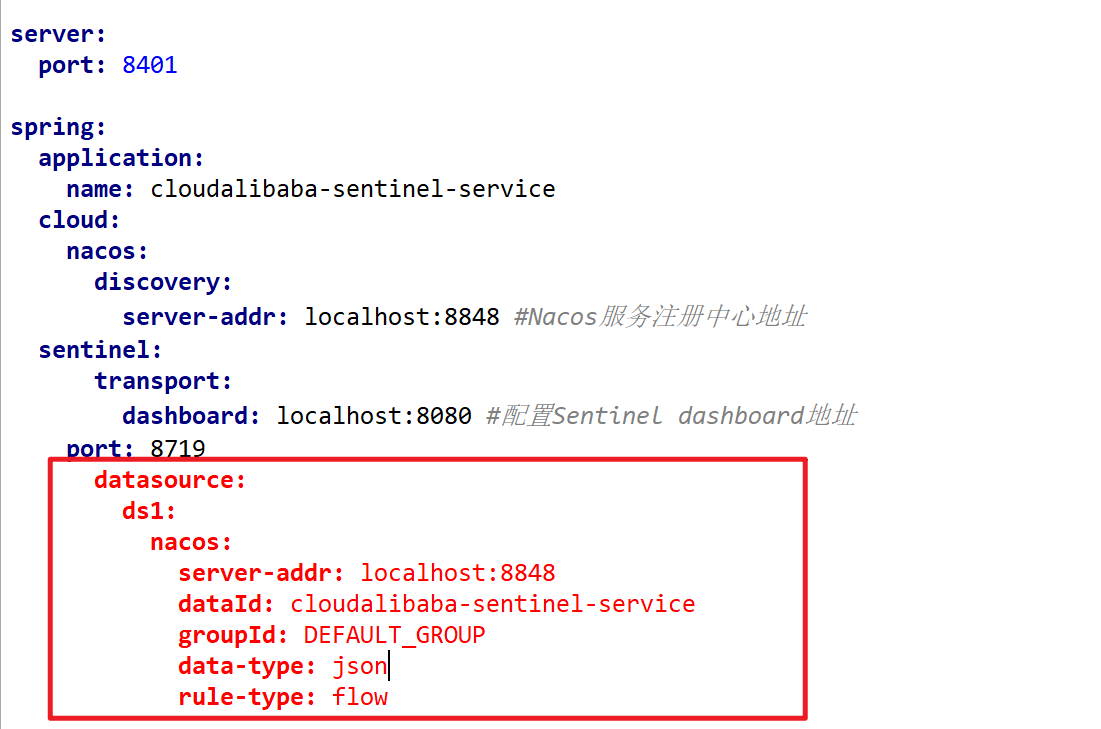
10.3.4. 添加Nacos业务规则配置
我们将sentinel的流控配置保存在nacos中,因为nacos的配置持久化在了数据库中。
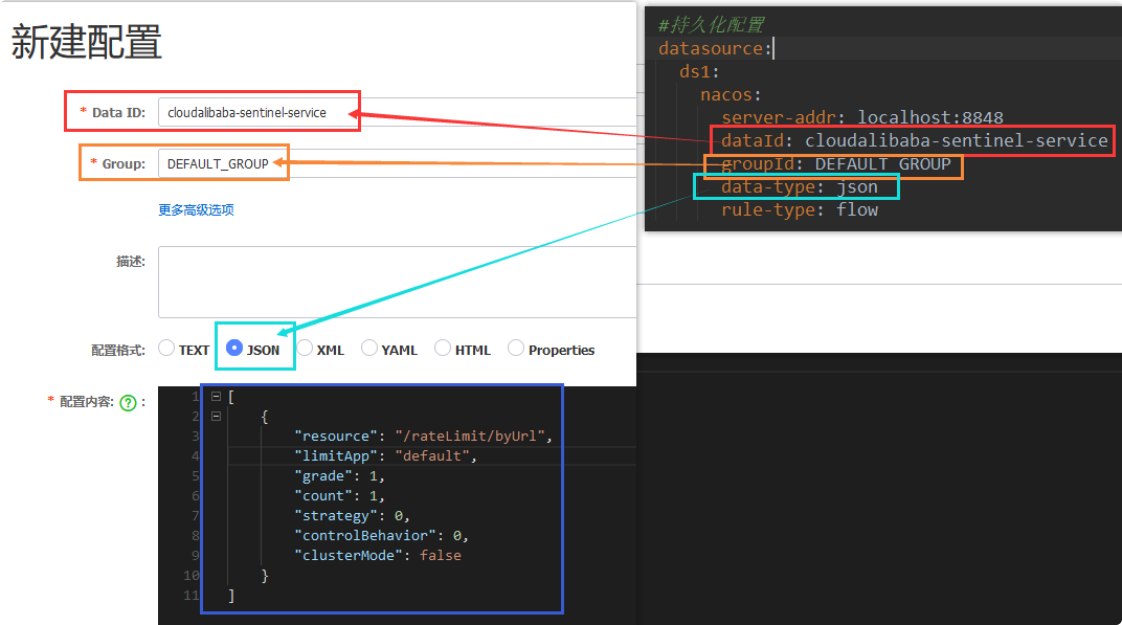
[
    {
        "resource": "/rateLimit/byUrl",
        "limitApp": "default",
        "grade": 1,
        "count": 1,
        "strategy": 0,
        "controlBehavior": 0,
        "clusterMode": false
    }
]
resource:资源名称;
limitApp:来源应用;
grade:阈值类型,0表示线程数,1表示QPS;
count:单机阈值;
strategy:流控模式,0表示直接,1表示关联,2表示链路;
controlBehavior:流控效果,0表示快速失败,1表示Warm Up,2表示排队等待;
clusterMode:是否集群。
10.3.5. 测试
第1步:启动8401后,访问/rateLimit/byUrl,然后刷新sentinel发现业务规则有了
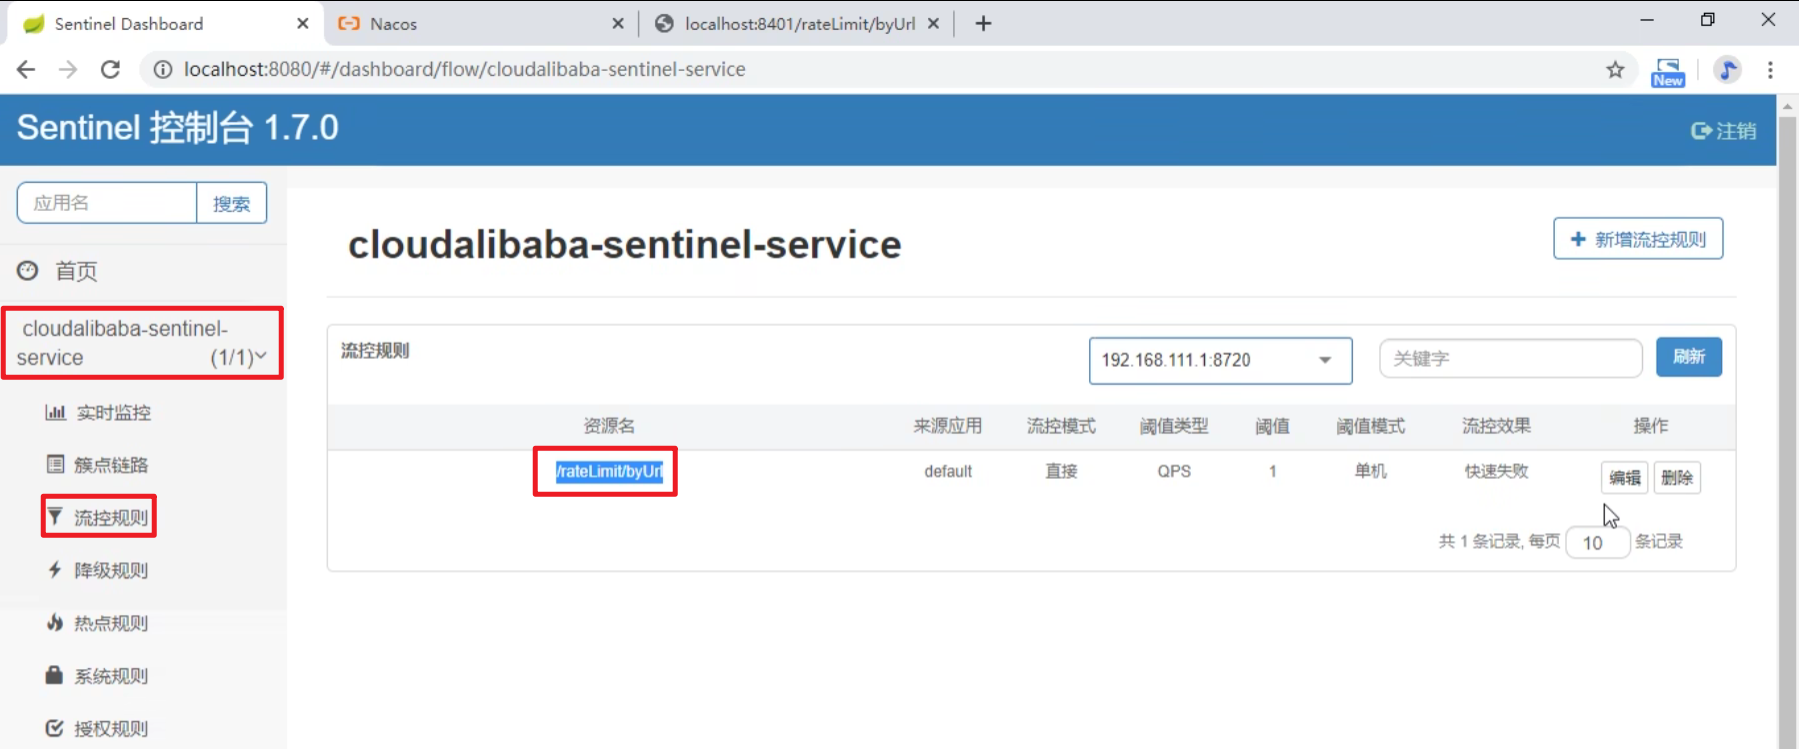
第2步:快速访问测试接口:http://localhost:8401/rateLimit/byUrl ,能达到限流的效果

第3步:停止8401再看sentinel
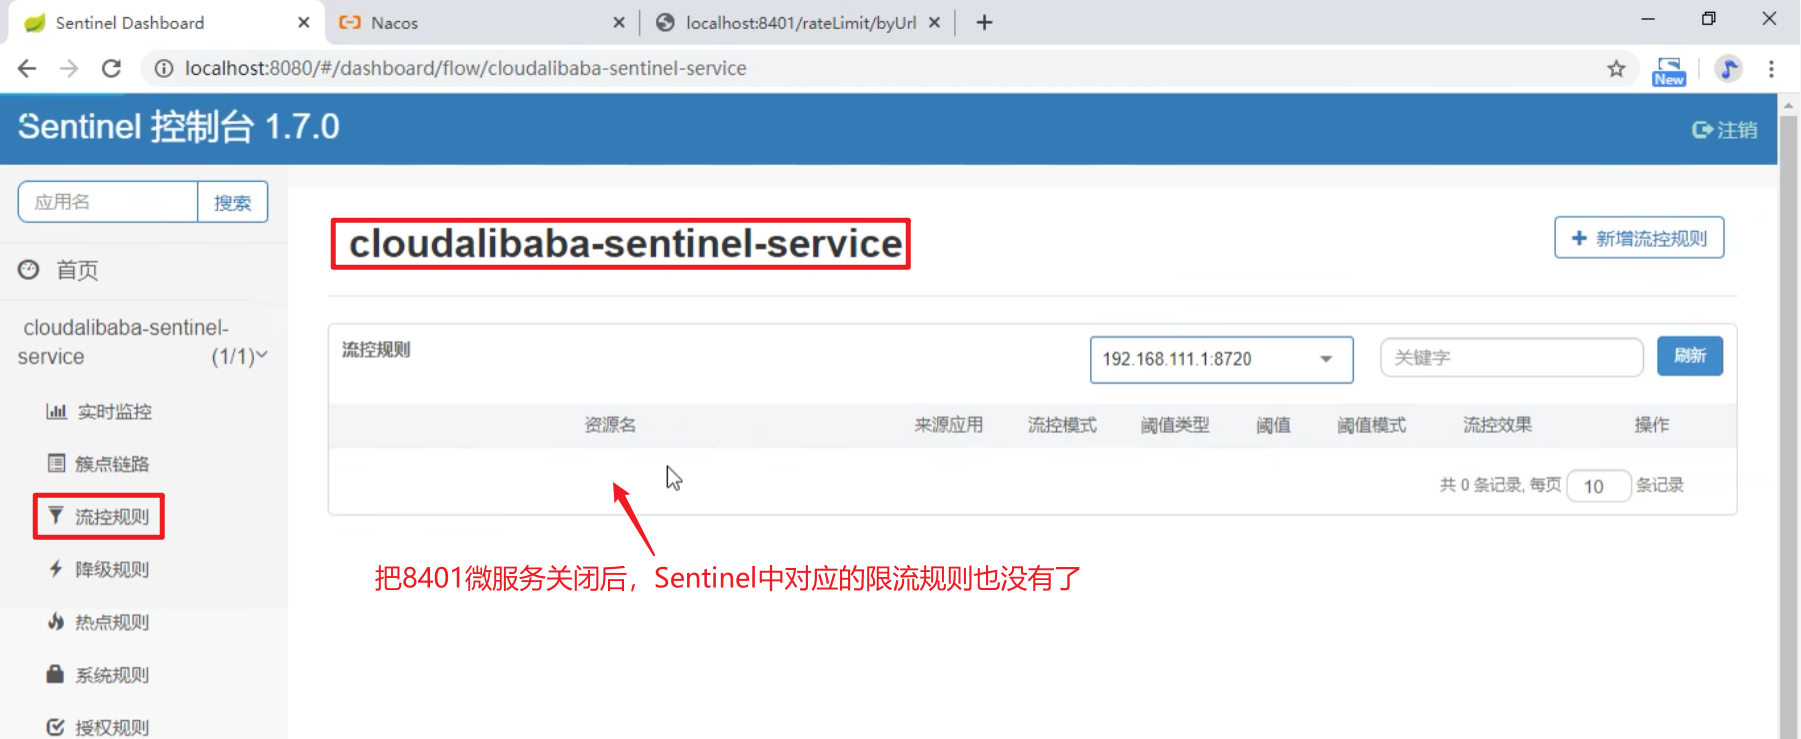
第4步:重新启动8401,再看sentinel中是否会显示我们之前添加的限流规则
乍一看还是没有,因为还需要多次调用8401的/rateLimit/byUrl接口,然后再次刷新Sentinel,发现我们之前配置的限流规则出现了