Spring MVC【参数的获取与上传】
上一篇文章介绍SpringMVC的概念,SpringMVC项目的创建,这一篇文章将介绍如何使用SpringMVC实现前端参数的获取与后端参数的返回等内容
🍎一. 获取参数
🍒1.1 获取单个参数
我们先创建一个对象来实现接下来的获取参数,我们来创建一个学生的信息
这里我们通过@Data注解来进行,来实现get,set,toString方法
/@Data注解包含 get()set()toString方法,如果没有@Data注解的话这个对象就必须实现这三个方法
@Data
@Controller
//伪代码
public class UserInfo {
    private int id;
    private String username;
    private String password;
    private int age;
}
我们创建好对象之后,就可以通过对象的set方法来进行获取参数,根据获取后的参加进行返回给服务器就可以看到获取参数的内容了
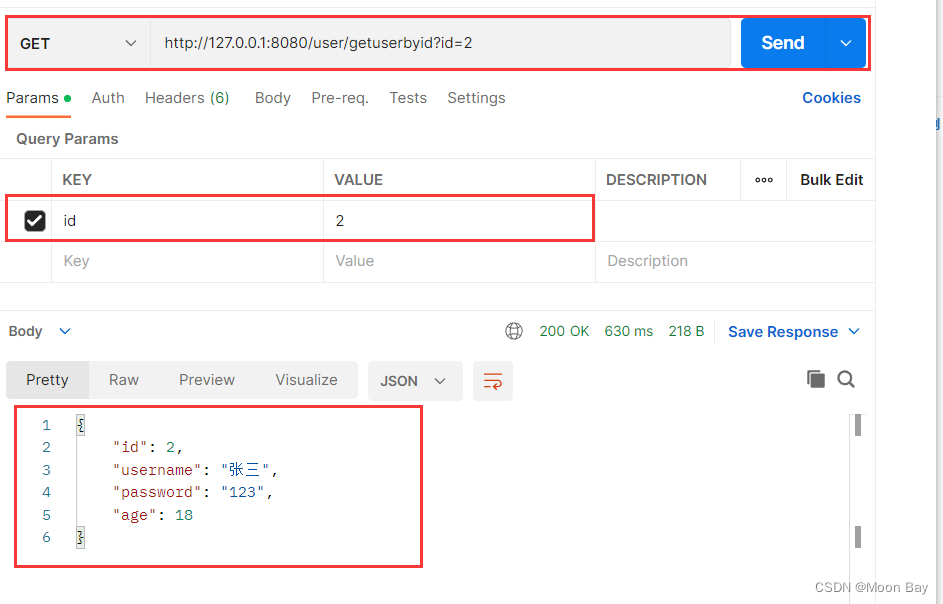
 @RequestMapping("/getuserbyid")
    //最好时包装类型数据Integer Character这种,不会在没有输入null值时报错,只会返回0
    public UserInfo getUserById(Integer id){
        //不查数据库,伪代码返回数据对象
        UserInfo userInfo = new UserInfo();
        userInfo.setId(id);
        //userInfo.setId(id);
        userInfo.setUsername("张三");
        userInfo.setPassword("123");
        userInfo.setAge(18);
        return userInfo;
    }
我们来通过postman来进行参数获取与返回
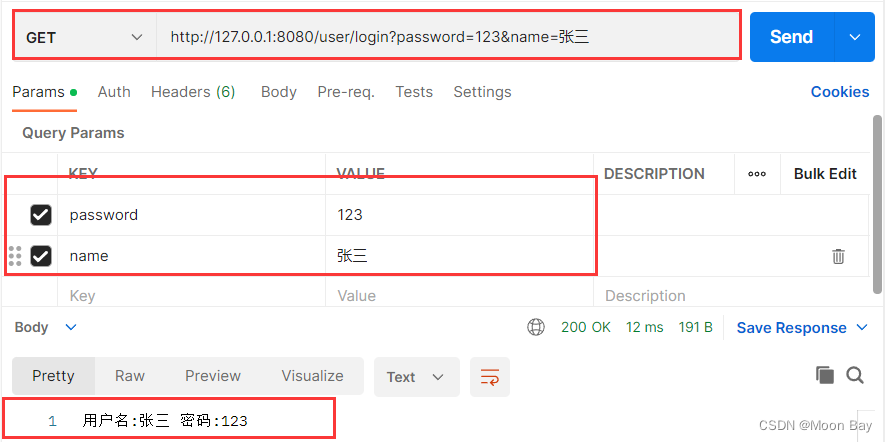
🍒1.2 获取多个参数
这个与上面同理,我们只需要改需要获取参数的内容与个数即可
  @RequestMapping("/login")
    public String getUser(String username,String password){

        return "用户名:" + username +" " +  "密码:" + password ;
    }
参数重命名:
当我们与前端约定参数的value值时认为不适合自己代码的编写时,我们就可以将前端设置好的代码进行自定义,但是还是以前端约定好的代码进行交互的,我们只需要在方法获取参数的内容里
使用@RequestParam(value = "name",required = false)即可设置:
value = "name"这个是前端与后端约定好交互的参数名称,我们就可以通过在后面定义一个参数名既可以了
required = false是因为如果前端没有传递此参数就会报错所有我们可以将required 设置为false就不会报错了
我们从这里既就可以看到应该输入的数name,但是通过value = “name”,就可以将name修改为username
  @RequestMapping("/login")
    public String getUser(@RequestParam(value = "name",required = false) String username,String password){

        return "用户名:" + username +" " +  "密码:" + password ;
    }
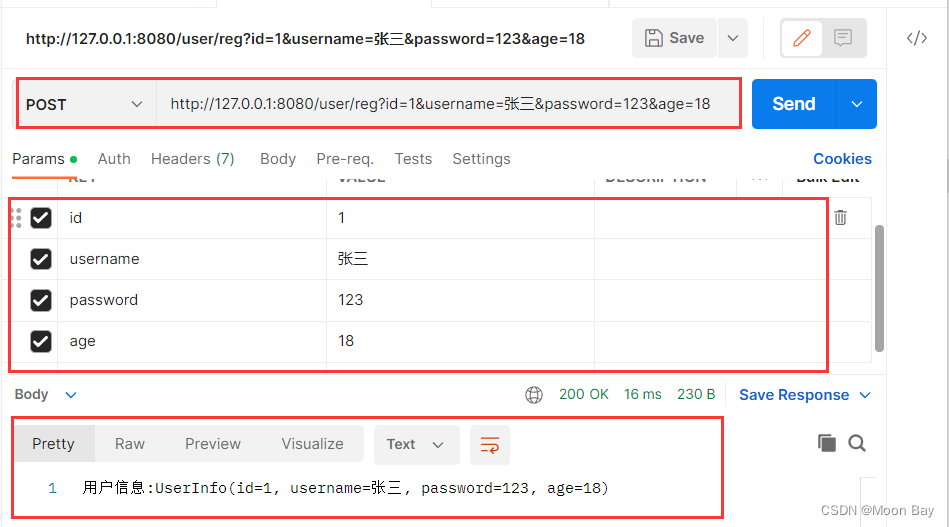
🍒1.3 获取多个参数
@RequestMapping("/reg")
    public String reg(@RequestBody UserInfo userInfo){
        //不查数据库,伪代码返回数据对象
        return "用户信息:" + userInfo ;
    }
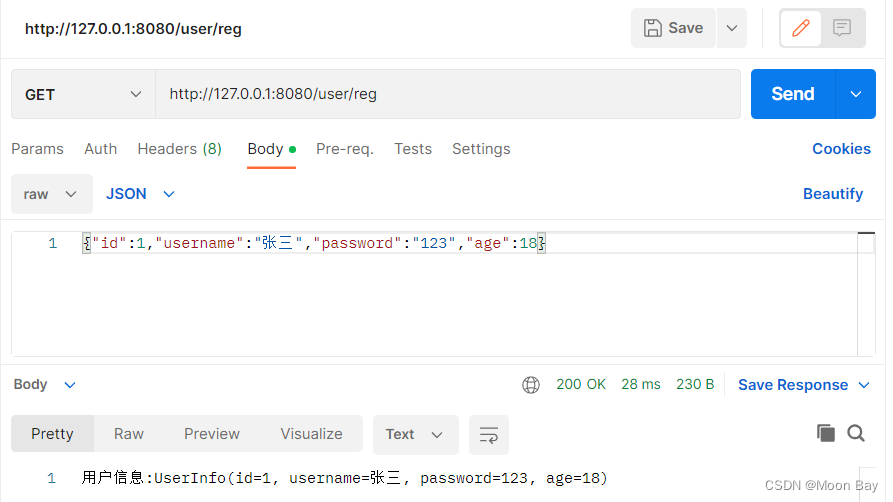
JSON格式发送和接收数据(服务器需要使用 @RequestBody注解才能接收和发送 JSON的数据)
 @RequestMapping("/reg")
    //@RequestBody 可以获取到输入的数据但是输入的数据名要对应对象名的大小写和数据格式(json)
    public String reg(@RequestBody UserInfo userInfo){
        //不查数据库,伪代码返回数据对象
        return "用户信息:" + userInfo ;
    }
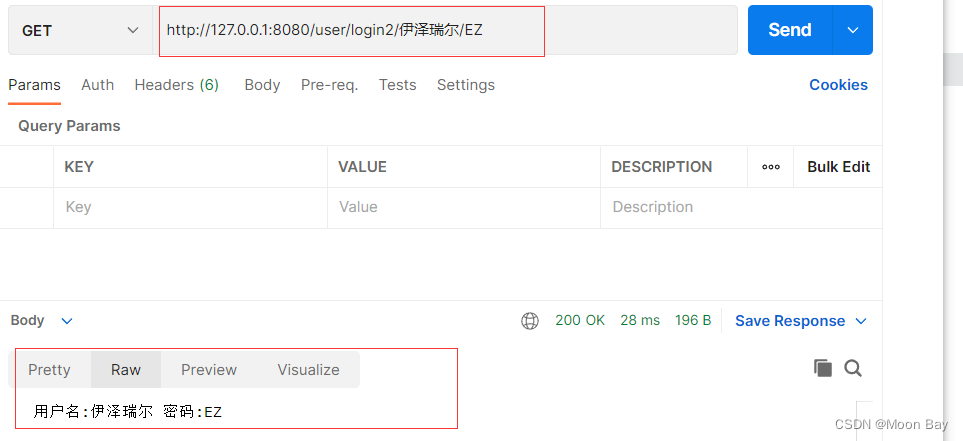
🍒1.4 获取URL中参数 (@PathVariable)

@RequestMapping("/login2/{username}/{password}")
    public String getUser2(@PathVariable String username,@PathVariable String password) {
        //不查数据库,伪代码返回数据对象
        return "用户名:" + username +" " + "密码:" + password;
    }
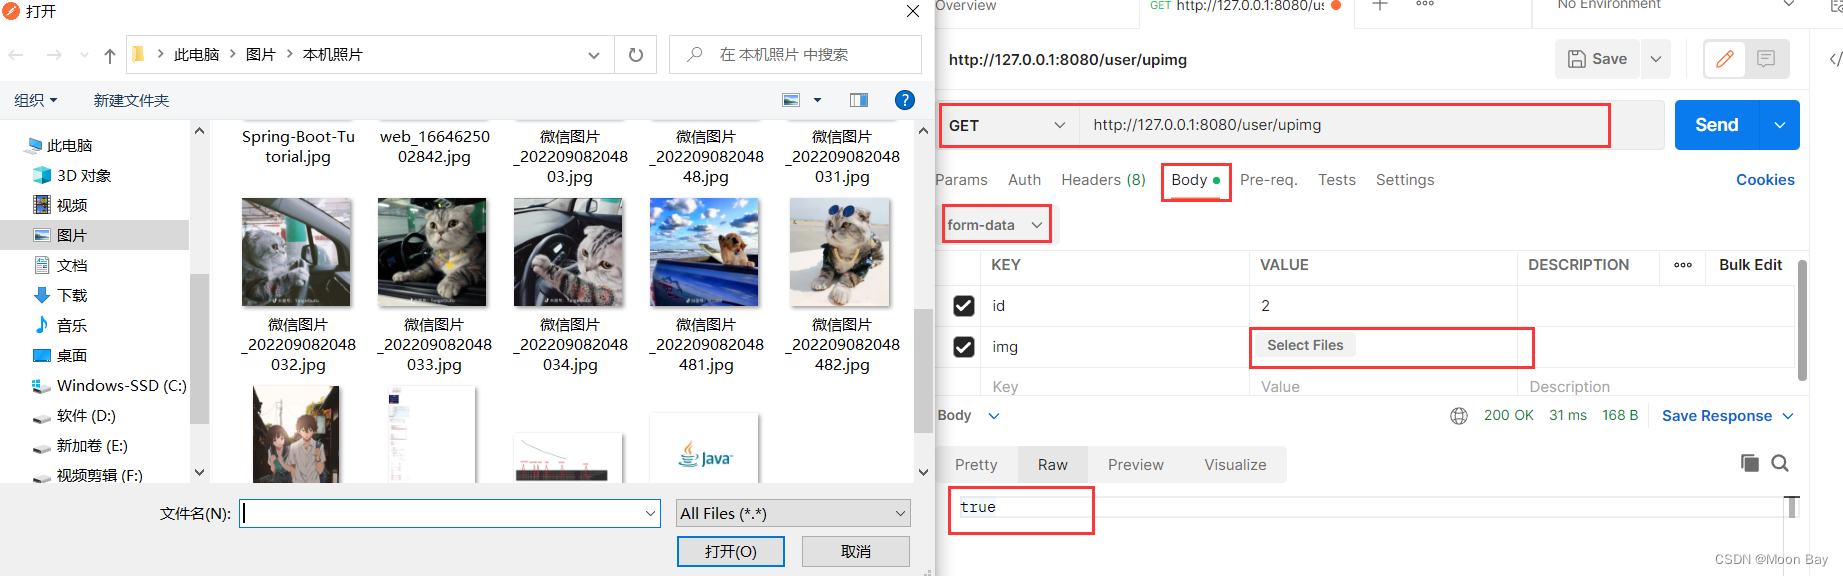
🍎二. 上传文件 (@RequestPart)
🍒2.1 postman模拟上传文件
 @RequestMapping("/upimg")
    public boolean upImg(Integer uid, @RequestPart("img")MultipartFile file){
        //设置一个能判图片是否上传成功
        boolean result = false;
        //保存图片到本地目录(服务器)
        try {
            //D\Data\img.png 这是设置了保存文件地址和文件名
            file.transferTo(new File("D:\\Data\\img.png"));
            result = true;
        } catch (IOException e) {
            // 引用 @Slf4j进行日志打印
            log.error("上传图片失败" + e.getMessage());
            // e.printStackTrace();
        }
        return result ;
    }
🍒2.2 将文件上传到某个目录里
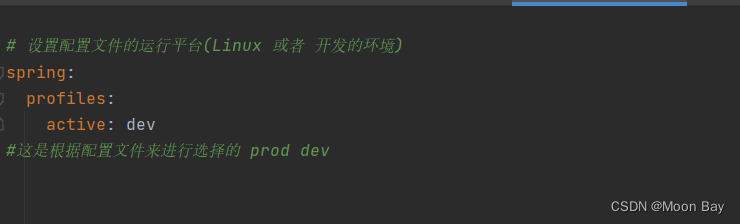
我们在Windos 和 Linux系统上传的文件所保存的地址是不能一样的所有我们需要通过配置文件来进行开发和上线时进行分割,所有我们需要在创建一个application,yml配置文件 分别设置储存位置application-dev.yml(Windows),application-prod.yml(LInux)


代码示例:

@RequestMapping("/upimg2")
public boolean upImg2(Integer uid, @RequestPart("img")MultipartFile file){
//1.目录 = imgpath
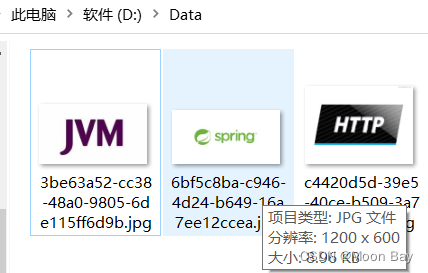
//2.图片名称(图片名称不能重复)[时间戳(高并发易产生BUG)/UUID(优选)]
// UUID是全局唯一ID 所有我们一般在高并发会选择UUID进行唯一标志
//3.获取原上传图片的格式(png,jpg)
//获取文件名
String filename = file.getOriginalFilename();
//获取文件名 .后面的格式名(png,jpg)
filename = filename.substring(filename.lastIndexOf("."));
filename = UUID.randomUUID().toString() + filename;
//设置一个能判图片是否上传成功
boolean result = false;
//保存图片到本地目录(服务器)
try {
//D\Data\img.png 这是设置了保存文件地址和文件名
file.transferTo(new File(imgpath + filename));
result = true;
} catch (IOException e) {
// 引用 @Slf4j进行日志打印
log.error("上传图片失败" + e.getMessage());
// e.printStackTrace();
}
return result ;
}
我们就可以看到我们上传的文件照片,并且名字也是和我们在上传保存在手机或磁盘中的文件名很相似,ID名称生成就是这样实现的
🍎三. Cookie/Session/header的获取
🍒3.1 Cookie获取
获取 Request 和 Response 对象
  //获取 Cookie (Servlet 或者 Spring MVC)
    @RequestMapping("/cookie")
    public void getCookie(HttpServletRequest request) {
       Cookie[] cookies = request.getCookies();
        for (Cookie item : cookies) {
            log.info("Cookie Name :" + item.getName() + "Cookie Vlaue :" + item.getValue());
        }
    }
   //使用CookieValue
    @RequestMapping("/cookie2")
    public String getCookie2(@CookieValue("bite") String cookie) {
        return "Cookie Value" + cookie;
    }
🍒3.2 header获取
传统获取 HttpSelectRequest
/获取 Header (Servlet 或者 Spring MVC)
    @RequestMapping("/gettua")
    //获取请求头UA
    public String gethead(HttpServletRequest request){
        return  "header:" +request.getHeader("User-Agent");
    }
简洁获取 Header―@RequestHeader
  @RequestMapping("/gettua2")
    //获取请求头U A
    public String gethead2(@RequestHeader("User-Agent") String useragent){
        return  "header:" +useragent;
    }
🍒3.3 Session获取
Session 存储和 Servlet 类似,是使? HttpServletRequest 中获取的,如下代码所示:
  //存储和获取 Session

    //(存储 Servlet 和 Spring MVC 是一样的)
    @RequestMapping("/setsession")
    public boolean setSession(HttpServletRequest request) {
        boolean result = false;
        // 1. 得到 HttpSession
        HttpSession session = request.getSession(true);//如果 = ture的话就代表没有会话,那么就会自动创建会话

        // 2. 使用 setAtt 设置值
        session.setAttribute("userinfo", "userinfo");
        result = true;
        return result;
    }
// 1. 获取Session(Servlet 模式):
    @RequestMapping("/getsession")
      public String gerSession(HttpServletRequest request){
        String result = null;
        // 1. 先得到HttpSession 对象
        HttpSession session = request.getSession(false);
        if (session != null && session.getAttribute("userinfo") != null){
            result  = (String) session.getAttribute("userinfo");
        }
        // 2. getAtt 得到 SEssion 信息
        return result;
    }
// 2. 获取Session(Spring MVC 模式 @SessionAttribute):
    @RequestMapping("/getsession2")
    public String getSession2(@SessionAttribute(value = "userinfo",required = false) String userinfo){
        return "会话" + userinfo;
    }