前言
本来按照我的学习理念,学新不学旧,还可以减少记忆负担,但无奈听说面试都喜欢问react的新旧生命周期问题,只能都记录一下了。淦!
旧生命周期
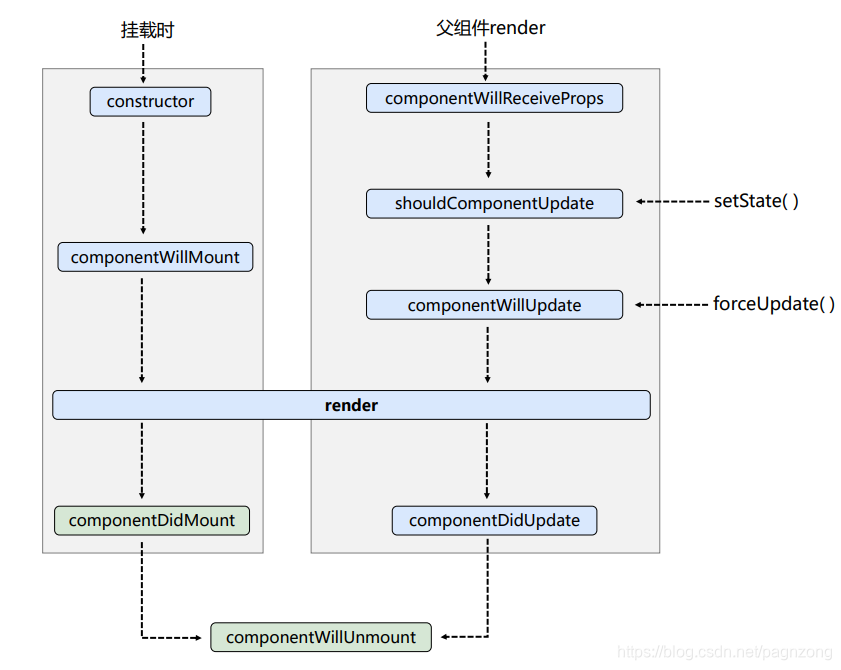
先上完整生命周期图(图片来源尚硅谷免费课程):

挂载阶段
react组件在挂载阶段,先会执行类定义里的constructor构造器,初始化阶段:
//构造器
constructor(props) {
  super(props);
  //可以做些事,例如初始化状态
  this.state = { count: 0 };
}
然后进入render钩子,渲染阶段:
// 写jsx渲染html
render() {
  const { count } = this.state;
  return (
    <div>
		{count}
    </div>
  );
}
接着进入componentDidMount钩子,组件已挂载阶段:
componentDidMount() {
	// 常用,一般在这个钩子中做一些初始化的事,例如:开启定时器、发送网络请求、订阅消息。
}
更新阶段
状态更新
从this.setState()触发开始,先进入shouldComponentUpdate()钩子,控制组件更新的“阀门”:
shouldComponentUpdate() {
  // 不写这个钩子的话,底层默认返回true,自己改写的话必须返回布尔值
  return true; // 如果为false生命周期就不会走下去,被截胡在这
}
然后进入componentWillUpdate()钩子,组件将要更新:
componentWillUpdate() {}
然后进入render()钩子,再进入componentDidUpdate()钩子,组件更新完成:
componentDidUpdate() {}
强制更新
通过调用this.forceUpdate(),不更改任何数据,强制更新,进入生命周期流程,结合上文加看图。
父组件更新
例如父组件中传给子组件显示的数据在父组件中发生了改变,子组件中进入生命周期流畅(看图),先进入componentWillReceiveProps()钩子,组件接收新props:
componentWillReceiveProps(props) {
  // 拿到新props做一些事情
}
然走接下来的流程,结合上文看图。
卸载阶段
当组件将要卸载,会进入componentWillUnmount钩子函数,一般会用于清除一些定时器,实例,取消订阅消息等。例如:
componentWillUnmount() {
  //清除定时器
  clearInterval(this.timer); // 防止定时器叠加
}
可以通过ReactDOM.unmountComponentAtNode(document.getElementById(""))来强制卸载组件。
新生命周期
先上完整生命周期图(图片来源尚硅谷免费课程):

总的来说就是即将废弃三个钩子函数componentWillReceiveProps()、componentWillMount()、componentWillUpdate()。新增两个,下面讲解。
getDerivedStateFromProps
用处:若state的值在任何时候都取决于props,那么可以使用getDerivedStateFromProps()。官方说尽量少用或不用,容易导致代码冗余。
static getDerivedStateFromProps(props, state) { // 需要加静态修饰符
  console.log("getDerivedStateFromProps", props, state);
  return null; // 必须返回一个null或者state对象,返回的state对象会覆盖state原值,如果直接返回props,那么state的值在任何时候都取决于props,所以叫state派生于prop
}
getSnapshotBeforeUpdate
在即将更新视图的时候,像快门一样咔擦停住:
getSnapshotBeforeUpdate() {
  return xxx // 这里可以返回值,在componentDidUpdate可以获取到,例如componentDidUpdate()可以拿到更新前的数据
}

componentDidUpdate(preProps, preState, snapshotValue) {
	// 拿到更新前的props,state,getSnapshotBeforeUpdate的快照值
	console.log(
	  "Count---componentDidUpdate",
	  preProps,
	  preState,
	  snapshotValue
	);
}
再结合图好好看看就能懂了~