1 参考
2 问题
-
问题1:由于缺失了头部标签栏高度的高度所导致的,页面内容在不同设备上的适配。
-
问题2:如果,说将头部标签栏的重写到Stack里,就出现了一个问题。你重写的按钮在使用时,无法直接访问到
页面的数据。一般的方式是,先将页面的数据先放到全局的state里,你需要使用到 redux或mobx这样的全局状态管理的组件。个人觉得这样做产生了不必要的性能消耗,同时也挺复杂的。
3 前言
-
当我想要在头部标签栏自定义一个按钮时,遇到一个焦灼的问题。是直接重options 里的header呢?还是,禁用掉框架给的头部标签。直接在页面中自己构造头部标签栏。这个问题我思索了很久,最后在阅读官方文档是,我看到其实官方关于这个问题,其实已经给到了我们解决方案。
4 解决方案概述
-
参考: https://reactnavigation.org/docs/stack-navigator
-
你可以将options中的headerTransparent属性设置为true,这样你的头部标签栏,直接与你的页面重叠。同时官方也给到两个内置的钩子函数用于获取头部标签栏的
高度。:
//第一个
import { HeaderHeightContext } from '@react-navigation/stack';

<HeaderHeightContext.Consumer>
  {headerHeight => (
    /* 你可以直接在页面中引用这个函数,同时在你的最外层设置弹性布局的排列方式为column。 */
  )}
</HeaderHeightContext.Consumer>

//第二个
import { useHeaderHeight } from '@react-navigation/stack';

// ...

const headerHeight = useHeaderHeight();
5 我所使用的解决方式概述
-
我使用的是第一个方案,通过使用react navigation 给的钩子函数。我可以获取到我的
头部标签栏高度。同时在按钮触发事件时,能直接获取到页面的数据。
6 例子
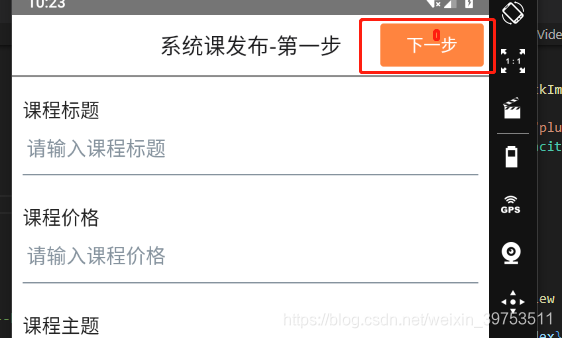
6.1 效果

6.2 页面栈的配置
          <Stack.Screen
            name="CourseRelease"
            component={CourseRelease}
            options={{
              title: '系统课发布-第一步',
              headerTitleAlign: 'center',
              headerTransparent: true //这里是关键
            }}
          />
6.3 自定义的头部组件
import * as React from 'react';
import { View } from 'react-native';
import { HeaderHeightContext } from '@react-navigation/stack';
import { Button } from 'react-native-elements';
import { useNavigation } from '@react-navigation/native';

interface IndexProps {
  titleValue: string;
  onPress: any;
}

const Index = (props: IndexProps) => {
  // const navigation = useNavigation();
  return (
    <HeaderHeightContext.Consumer>
      {(headerHeight) => (
        <View>
          <View
            style={{
              width: '100%',
              justifyContent: 'flex-end',
              flexDirection: 'row',
              height: headerHeight,
              alignItems: 'center'
            }}
          >
            <Button
              title={props.titleValue}
              containerStyle={{ marginRight: 5 }}
              onPress={() => {
                // 验证数据
                // navigation.navigate(props.routeValue);
                props.onPress();
              }}
              buttonStyle={{ width: 96, backgroundColor: '#FF843F' }}
            />
          </View>
          <View
            style={{
              height: 20,
              borderTopColor: '#8c8c8c',
              borderTopWidth: 2
            }}
          />
        </View>
      )}
    </HeaderHeightContext.Consumer>
  );
};

export default Index;
6.4 用法
<MyHead titleValue="下一步" onPress={this.nextStep} />