后台管理系统,作为程序员那肯定不会陌生!目前市面上已经有各种各样的后台管理的开源项目!我们不研究他们的系统是怎么用的,我们来解开他们是怎么把一个系统从零开始做起来的思路,架构方法!他们把鱼给我们,但是我们需要的是捕鱼的方法!那接下来我们就来一起研究如何构建一个完整的后台管理项目!
新建一个项目
vue create g-admin

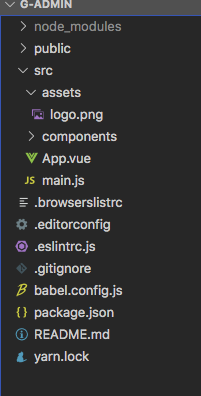
保持初始文件的纯净
{
  "name": "g-admin",
  "version": "0.1.0",
  "private": true,
  "scripts": {
    "serve": "vue-cli-service serve",
    "build": "vue-cli-service build",
    "lint": "vue-cli-service lint"
  },
  "dependencies": {
    "core-js": "^3.6.5",
    "vue": "^2.6.11"
  },
  "devDependencies": {
    "@vue/cli-plugin-babel": "~4.5.0",
    "@vue/cli-plugin-eslint": "~4.5.0",
    "@vue/cli-service": "~4.5.0",
    "@vue/eslint-config-standard": "^5.1.2",
    "babel-eslint": "^10.1.0",
    "eslint": "^6.7.2",
    "eslint-plugin-import": "^2.20.2",
    "eslint-plugin-node": "^11.1.0",
    "eslint-plugin-promise": "^4.2.1",
    "eslint-plugin-standard": "^4.0.0",
    "eslint-plugin-vue": "^6.2.2",
    "vue-template-compiler": "^2.6.11"
  }
}

yarn serve 把我们的系统盘起来!
路由的配置
yarn add vue-router
新建 src/router.js,写入最基本的内容,后面会进行改造。PS.此处纯手打,多年的手速不是浪得虚名。
import Vue from "vue";
import VueRouter from "vue-router";
import Login from "@v/login/index.vue";
import Index from "@v/index/index.vue";
Vue.use(VueRouter);

const routes = [
  {
    path: "/",
    name: "Index",
    component: Index
  },
  {
    path: "/login",
    name: "Login",
    component: Login
  }
];

const router = new VueRouter({
  mode: "hash",
  routes
});

export default router;
main.js引入router.js
import Vue from 'vue'
import App from './App.vue'
import router from './router'
Vue.config.productionTip = false

new Vue({
  router,
  render: h => h(App)
}).$mount('#app')
观察上面路由出现了简写形式的 @v,所以我们的vue.config.js文件要出场了
根目录下新建vue.config.js
const path = require('path')

// 绝对路径的获取方法
function resolve (dir) {
  return path.join(__dirname, dir)
}

module.exports = {
  configureWebpack: {
    resolve: {
    //路由别名的配置
      alias: {
        '@': resolve('src'),
        '@comps': resolve('src/components'),
        '@v': resolve('src/views')
      }
    }
  }
}
此时重启我们的项目会出现

eslint的校验,在vuecli开启了这个规范话校验!对于我们养成良好的习惯有很大的帮助,还是建议不要关闭这个功能!开发中虽然有点耗时,但是这个规则能限制我们野蛮生长!下面来解决这个报错
根目录下面新建.prettierrc文件,会帮我们自动进行按照配置文件格式化操作
{
  "semi": false,  //关闭末尾的分号
  "singleQuote": true,  //强制单引号
  "trailingComma": "es5"  //对象最后一个元素带逗号
}
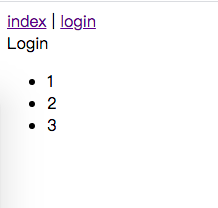
重启我们的项目后,这些格式校验就消失了。页面也能正常显示了!

接下来我们来测试下路由的切换
此时如果你的文件出现这个报错,不要慌也是eslint检测的结果

这里做如此的修改即可。

App.vue简单的修改进行测试
<template>
  <div id="app">
    <router-link to="/">index</router-link> |
    <router-link to="/login">login</router-link>
    <router-view></router-view>
  </div>
</template>

至此我们的路由就初步可以使用了!
接下来我们先不急着配置vuex,我们来看看css样式的配置

可以发现页面的默认padding,li的默认黑点。这一步我们来清除这些,并配置全局的css样式
<template>
  <div class="content">
    Login
    <ul>
      <li>1</li>
      <li>2</li>
      <li>3</li>
    </ul>
  </div>
</template>

<script>
export default {}
</script>

<style lang="scss" scoped>
.content {
  border: 1px solid #ccc;
}
</style>

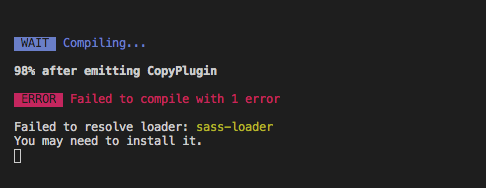
是的,我们到现在还没安装过scss的loader。
yarn add sass-loader

继续install

如果出现这个报错,二话不说把sass-loader的版本降级处理
{
  "name": "g-admin",
  "version": "0.1.0",
  "private": true,
  "scripts": {
    "dev": "vue-cli-service serve",
    "build": "vue-cli-service build",
    "lint": "vue-cli-service lint"
  },
  "dependencies": {
    "core-js": "^3.6.5",
    "vue": "^2.6.11",
    "vue-router": "^3.5.2"
  },
  "devDependencies": {
    "@vue/cli-plugin-babel": "~4.5.0",
    "@vue/cli-plugin-eslint": "~4.5.0",
    "@vue/cli-service": "~4.5.0",
    "@vue/eslint-config-standard": "^5.1.2",
    "babel-eslint": "^10.1.0",
    "eslint": "^6.7.2",
    "eslint-plugin-import": "^2.20.2",
    "eslint-plugin-node": "^11.1.0",
    "eslint-plugin-promise": "^4.2.1",
    "eslint-plugin-standard": "^4.0.0",
    "eslint-plugin-vue": "^6.2.2",
    "fibers": "^5.0.0",
    "node-sass": "^6.0.1",
    "sass": "^1.35.2",
    "sass-loader": "^7.0.3",
    "vue-template-compiler": "^2.6.11"
  }
}
"sass-loader": "^7.0.3"这个版本就可以正常运行了…

我们写的scss就生效了!好的,那继续进行样式的配置!
在src/assets/styles下面保存静态样式样式
index.scss
@import 'variables';
@import 'mixin';
/* @import 'transition';
@import 'element-ui';
@import 'sidebar';
@import 'btn';
@import 'eladmin'; */

body {
  height: 100%;
  -moz-osx-font-smoothing: grayscale;
  -webkit-font-smoothing: antialiased;
  text-rendering: optimizeLegibility;
  font-family: Helvetica Neue, Helvetica, PingFang SC, Hiragino Sans GB,
    Microsoft YaHei, Arial, sans-serif;
}

label {
  font-weight: 700;
}

html {
  height: 100%;
  box-sizing: border-box;
}

#app {
  height: 100%;
}

*,
*:before,
*:after {
  box-sizing: inherit;
}

.no-padding {
  padding: 0 !important;
}

.padding-content {
  padding: 4px 0;
}

a:focus,
a:active {
  outline: none;
}

a,
a:focus,
a:hover {
  cursor: pointer;
  color: inherit;
  text-decoration: none;
}

div:focus {
  outline: none;
}

.fr {
  float: right;
}

.fl {
  float: left;
}

.pr-5 {
  padding-right: 5px;
}

.pl-5 {
  padding-left: 5px;
}

.block {
  display: block;
}

.pointer {
  cursor: pointer;
}

.inlineBlock {
  display: block;
}

.clearfix {
  &:after {
    visibility: hidden;
    display: block;
    font-size: 0;
    content: ' ';
    clear: both;
    height: 0;
  }
}

aside {
  background: #eef1f6;
  padding: 8px 24px;
  margin-bottom: 20px;
  border-radius: 2px;
  display: block;
  line-height: 32px;
  font-size: 16px;
  font-family: -apple-system, BlinkMacSystemFont, 'Segoe UI', Roboto, Oxygen,
    Ubuntu, Cantarell, 'Fira Sans', 'Droid Sans', 'Helvetica Neue', sans-serif;
  color: #2c3e50;
  -webkit-font-smoothing: antialiased;
  -moz-osx-font-smoothing: grayscale;

  a {
    color: #337ab7;
    cursor: pointer;

    &:hover {
      color: rgb(32, 160, 255);
    }
  }
}

//main-container全局样式
.app-container {
  padding: 20px 20px 45px 20px;
}

.components-container {
  margin: 30px 50px;
  position: relative;
}

.pagination-container {
  margin-top: 30px;
}

.text-center {
  text-align: center;
}

.sub-navbar {
  height: 50px;
  line-height: 50px;
  position: relative;
  width: 100%;
  text-align: right;
  padding-right: 20px;
  transition: 600ms ease position;
  background: linear-gradient(
    90deg,
    rgba(32, 182, 249, 1) 0%,
    rgba(32, 182, 249, 1) 0%,
    rgba(33, 120, 241, 1) 100%,
    rgba(33, 120, 241, 1) 100%
  );

  .subtitle {
    font-size: 20px;
    color: #fff;
  }

  &.draft {
    background: #d0d0d0;
  }

  &.deleted {
    background: #d0d0d0;
  }
}

.link-type,
.link-type:focus {
  color: #337ab7;
  cursor: pointer;

  &:hover {
    color: rgb(32, 160, 255);
  }
}

//refine vue-multiselect plugin
.multiselect {
  line-height: 16px;
}

.multiselect--active {
  z-index: 1000 !important;
}
variables.scss
// base color
$blue: #324157;
$light-blue: #3a71a8;
$red: #c03639;
$pink: #e65d6e;
$green: #30b08f;
$tiffany: #4ab7bd;
$yellow: #fec171;
$panGreen: #30b08f;

// sidebar
$menuText: #bfcbd9;
$menuActiveText: #409eff;
$subMenuActiveText: #f4f4f5; // https://github.com/ElemeFE/element/issues/12951

$menuBg: #304156;
$menuHover: #263445;

$subMenuBg: #1f2d3d;
$subMenuHover: #001528;

$sideBarWidth: 205px;

// the :export directive is the magic sauce for webpack
// https://www.bluematador.com/blog/how-to-share-variables-between-js-and-sass
:export {
  menuText: $menuText;
  menuActiveText: $menuActiveText;
  subMenuActiveText: $subMenuActiveText;
  menuBg: $menuBg;
  menuHover: $menuHover;
  subMenuBg: $subMenuBg;
  subMenuHover: $subMenuHover;
  sideBarWidth: $sideBarWidth;
}
mixin.scss
@mixin clearfix {
  &:after {
    content: '';
    display: table;
    clear: both;
  }
}

@mixin scrollBar {
  &::-webkit-scrollbar-track-piece {
    background: #d3dce6;
  }

  &::-webkit-scrollbar {
    width: 6px;
  }

  &::-webkit-scrollbar-thumb {
    background: #99a9bf;
    border-radius: 20px;
  }
}

@mixin relative {
  position: relative;
  width: 100%;
  height: 100%;
}

@mixin pct($pct) {
  width: #{$pct};
  position: relative;
  margin: 0 auto;
}

@mixin triangle($width, $height, $color, $direction) {
  $width: $width/2;
  $color-border-style: $height solid $color;
  $transparent-border-style: $width solid transparent;
  height: 0;
  width: 0;

  @if $direction==up {
    border-bottom: $color-border-style;
    border-left: $transparent-border-style;
    border-right: $transparent-border-style;
  } @else if $direction==right {
    border-left: $color-border-style;
    border-top: $transparent-border-style;
    border-bottom: $transparent-border-style;
  } @else if $direction==down {
    border-top: $color-border-style;
    border-left: $transparent-border-style;
    border-right: $transparent-border-style;
  } @else if $direction==left {
    border-right: $color-border-style;
    border-top: $transparent-border-style;
    border-bottom: $transparent-border-style;
  }
}
main.js中引入scss
...
import 'normalize.css/normalize.css'
// global css
import './assets/styles/index.scss'
...

我们声明的样式变量的用法,首先必须引入到组件,才能使用预先定义的变量~~~~
<style lang="scss">
@import './assets/styles/index.scss';
.h2 {
  color: $red;  //scss变量的使用
  @include pct(200px);  //scss混入的使用
}
</style>


默认样式设置,至此这里就实现了!