案例 - 购物车
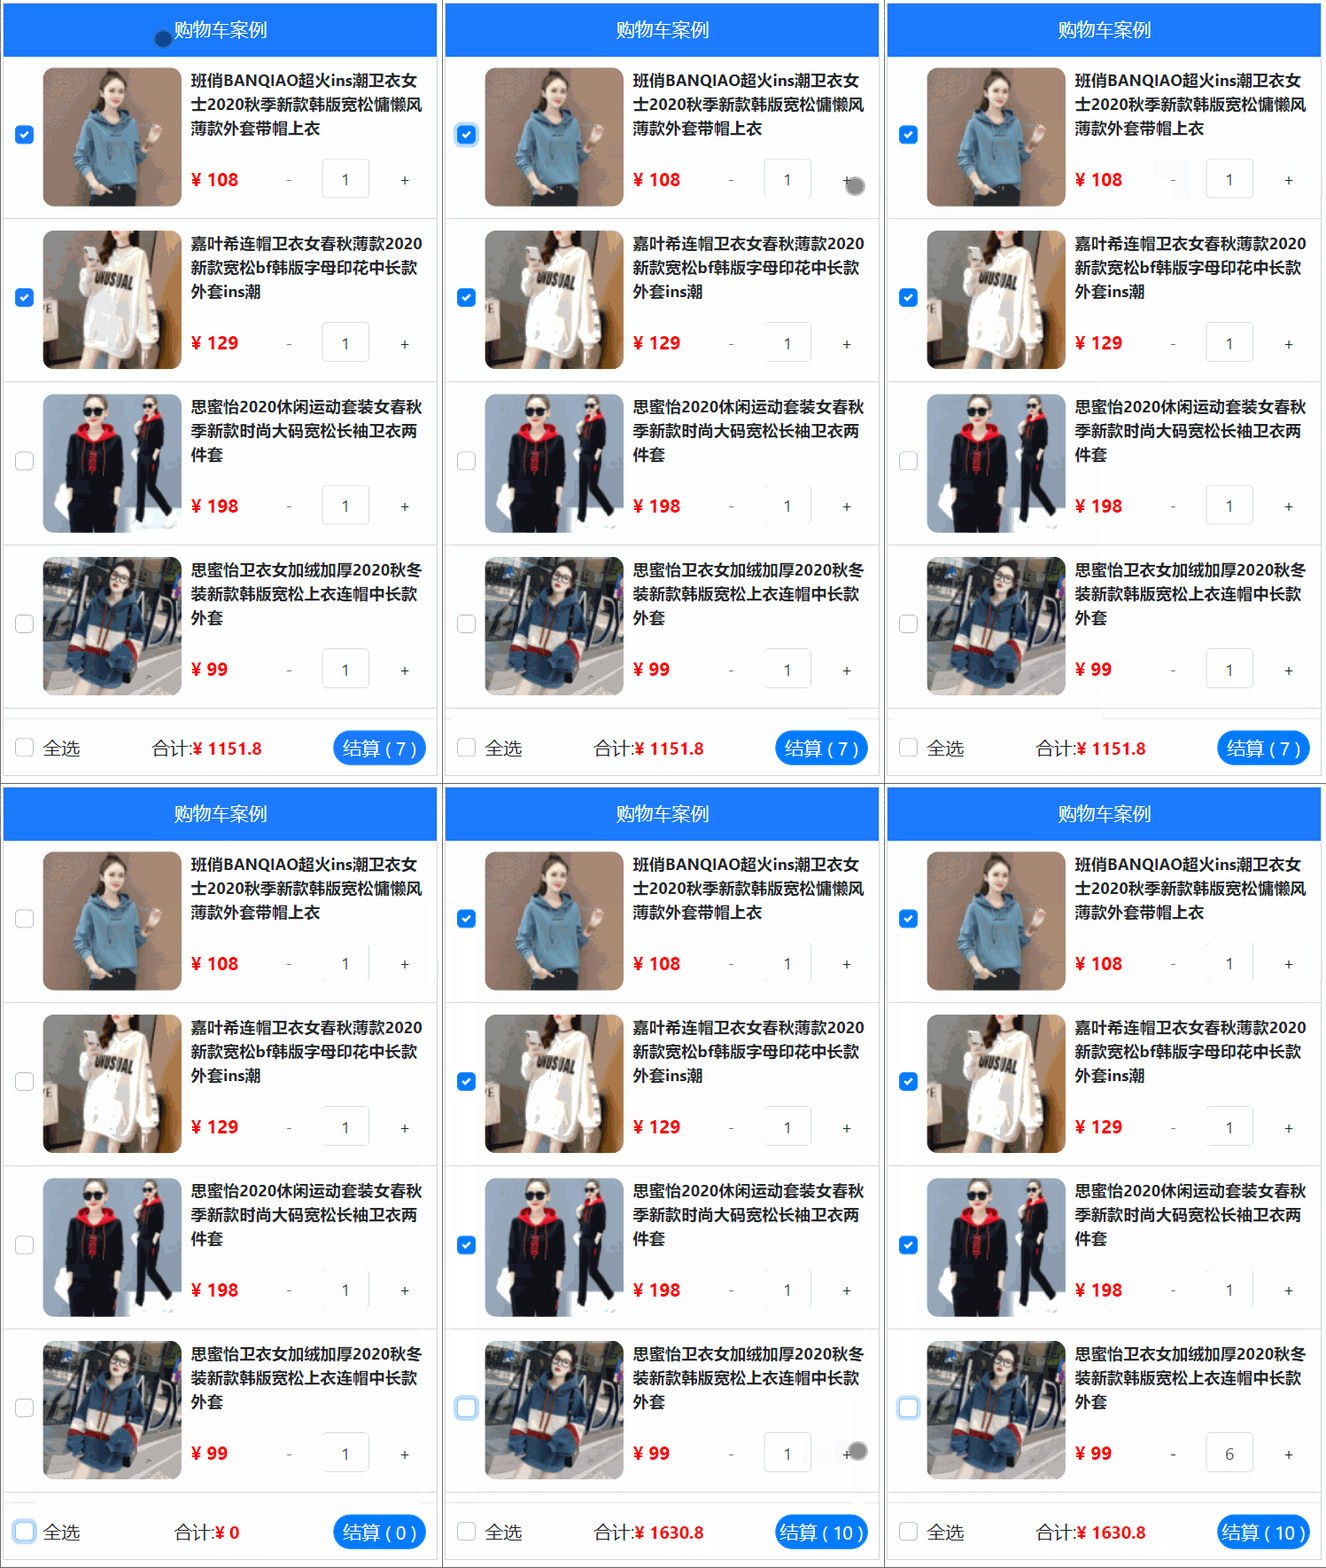
1.0 案例-购物车-项目初始化
目标: 初始化新项目, 清空不要的东西, 下载bootstrap库, 下载less模块
vue create shopcar
yarn add bootstrap
yarn add less less-loader@5.0.0 -D
图示:
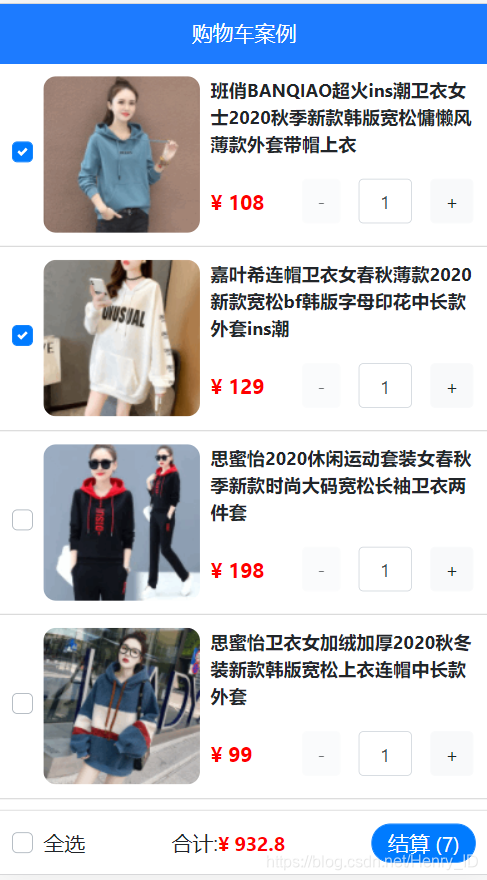
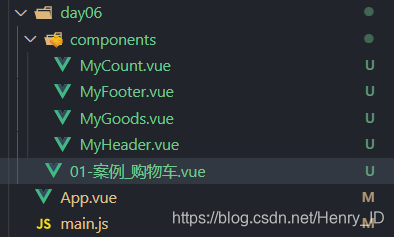
- 按照需求, 把项目页面拆分成几个组件, 在components下创建
-
MyHeader组件
-
MyFooter组件
-
MyGoods组件 - 商品
-
MyCount组件
-
然后引入到App.vue上注册
-
在main.js中引入bootStrap库
import "bootstrap/dist/css/bootstrap.css" // 引入第三方包里的某个css文件

素材
MyHeader.vue
<template>
  <div class="my-header">购物车案例</div>
</template>

<script>
export default {

}
</script>

<style lang="less" scoped>
  .my-header {
    height: 45px;
    line-height: 45px;
    text-align: center;
    background-color: #1d7bff;
    color: #fff;
    position: fixed;
    top: 0;
    left: 0;
    width: 100%;
    z-index: 2;
  }
</style>
MyGoods.vue
<template>
  <div class="my-goods-item">
    <div class="left">
      <div class="custom-control custom-checkbox">
        <input type="checkbox" class="custom-control-input" id="input"
        >
        <label class="custom-control-label" for="input">
          <img src="http://fuss10.elemecdn.com/e/5d/4a731a90594a4af544c0c25941171jpeg.jpeg" alt="">
        </label>
      </div>
    </div>
    <div class="right">
      <div class="top">商品名字</div>
      <div class="bottom">
        <span class="price">¥ 100</span>
        <span>
            数量组件
        </span>
      </div>
    </div>
  </div>
</template>

<script>
export default {

}
</script>

<style lang="less" scoped>
.my-goods-item {
  display: flex;
  padding: 10px;
  border-bottom: 1px solid #ccc;
  .left {
    img {
      width: 120px;
      height: 120px;
      margin-right: 8px;
      border-radius: 10px;
    }
    .custom-control-label::before,
    .custom-control-label::after {
      top: 50px;
    }
  }
  .right {
    flex: 1;
    display: flex;
    flex-direction: column;
    justify-content: space-between;
    .top{
        font-size: 14px;
        font-weight: 700;
    }
    .bottom {
      display: flex;
      justify-content: space-between;
      padding: 5px 0;
      align-items: center;
      .price {
        color: red;
        font-weight: bold;
      }
    }
  }
}

</style>
目标: 完成商品组件右下角商品组件的开发
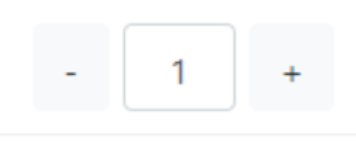
components/MyCount.vue
<template>
  <div class="my-counter">
    <button type="button" class="btn btn-light" >-</button>
    <input type="number" class="form-control inp" >
    <button type="button" class="btn btn-light">+</button>
  </div>
</template>

<script>
export default {
}
</script>

<style lang="less" scoped>
.my-counter {
  display: flex;
  .inp {
    width: 45px;
    text-align: center;
    margin: 0 10px;
  }
  .btn, .inp{
    transform: scale(0.9);
  }
}
</style>
components/MyFooter.vue
<template>
  <!-- 底部 -->
  <div class="my-footer">
    <!-- 全选 -->
    <div class="custom-control custom-checkbox">
      <input type="checkbox" class="custom-control-input" id="footerCheck">
      <label class="custom-control-label" for="footerCheck">全选</label>
    </div>
    <!-- 合计 -->
    <div>
      <span>合计:</span>
      <span class="price">¥ 0</span>
    </div>
    <!-- 按钮 -->
    <button type="button" class="footer-btn btn btn-primary">结算 ( 0 )</button>
  </div>
</template>

<script>
export default {

}
</script>

<style lang="less" scoped>
.my-footer {
  position: fixed;
  z-index: 2;
  bottom: 0;
  width: 100%;
  height: 50px;
  border-top: 1px solid #ccc;
  display: flex;
  justify-content: space-between;
  align-items: center;
  padding: 0 10px;
  background: #fff;

  .price {
    color: red;
    font-weight: bold;
    font-size: 15px;
  }
  .footer-btn {
    min-width: 80px;
    height: 30px;
    line-height: 30px;
    border-radius: 25px;
    padding: 0;
  }
}
</style>
示例
01-案例_购物车.vue
<template>
    <div>
        <MyHeader></MyHeader>
        <div class="main">
            <MyGoods></MyGoods>
        </div>
        <MyFooter></MyFooter>
    </div>
</template>

<script>
import MyHeader from "./components/MyHeader.vue"
import MyGoods  from "./components/MyGoods.vue"
import MyFooter from "./components/MyFooter.vue"
export default {
components: {
    MyHeader,
    MyGoods,
    MyFooter,
}
}
</script>

<style scoped>
.main{
padding-top: 45px;
padding-bottom: 50px;
}
</style>
MyHeader.vue
<template>
  <div class="my-header">购物车案例</div>
</template>

<script>
export default {

}
</script>

<style lang="less" scoped>
  .my-header {
    height: 45px;
    line-height: 45px;
    text-align: center;
    background-color: #1d7bff;
    color: #fff;
    position: fixed;
    top: 0;
    left: 0;
    width: 100%;
    z-index: 2;
  }
</style>
MyGoods.vue
<template>
  <div class="my-goods-item">
    <div class="left">
      <div class="custom-control custom-checkbox">
        <input type="checkbox" class="custom-control-input" id="input"
        >
        <label class="custom-control-label" for="input">
          <img src="http://fuss10.elemecdn.com/e/5d/4a731a90594a4af544c0c25941171jpeg.jpeg" alt="">
        </label>
      </div>
    </div>
    <div class="right">
      <div class="top">商品名字</div>
      <div class="bottom">
        <span class="price">¥ 100</span>
        <span>
        <MyCount></MyCount>
        </span>
      </div>
    </div>
  </div>
</template>

<script>
import MyCount  from "./MyCount.vue"
export default {
components: {
    MyCount,

}
}
</script>

<style lang="less" scoped>
.my-goods-item {
  display: flex;
  padding: 10px;
  border-bottom: 1px solid #ccc;
  .left {
    img {
      width: 120px;
      height: 120px;
      margin-right: 8px;
      border-radius: 10px;
    }
    .custom-control-label::before,
    .custom-control-label::after {
      top: 50px;
    }
  }
  .right {
    flex: 1;
    display: flex;
    flex-direction: column;
    justify-content: space-between;
    .top{
        font-size: 14px;
        font-weight: 700;
    }
    .bottom {
      display: flex;
      justify-content: space-between;
      padding: 5px 0;
      align-items: center;
      .price {
        color: red;
        font-weight: bold;
      }
    }
  }
}

</style>
MyCount.vue
<template>
  <div class="my-counter">
    <button type="button" class="btn btn-light" >-</button>
    <input type="number" class="form-control inp" >
    <button type="button" class="btn btn-light">+</button>
  </div>
</template>

<script>
export default {
}
</script>

<style lang="less" scoped>
.my-counter {
  display: flex;
  .inp {
    width: 45px;
    text-align: center;
    margin: 0 10px;
  }
  .btn, .inp{
    transform: scale(0.9);
  }
}
</style>
MyFooter.vue
<template>
  <!-- 底部 -->
  <div class="my-footer">
    <!-- 全选 -->
    <div class="custom-control custom-checkbox">
      <input type="checkbox" class="custom-control-input" id="footerCheck">
      <label class="custom-control-label" for="footerCheck">全选</label>
    </div>
    <!-- 合计 -->
    <div>
      <span>合计:</span>
      <span class="price">¥ 0</span>
    </div>
    <!-- 按钮 -->
    <button type="button" class="footer-btn btn btn-primary">结算 ( 0 )</button>
  </div>
</template>

<script>
export default {

}
</script>

<style lang="less" scoped>
.my-footer {
  position: fixed;
  z-index: 2;
  bottom: 0;
  width: 100%;
  height: 50px;
  border-top: 1px solid #ccc;
  display: flex;
  justify-content: space-between;
  align-items: center;
  padding: 0 10px;
  background: #fff;

  .price {
    color: red;
    font-weight: bold;
    font-size: 15px;
  }
  .footer-btn {
    min-width: 80px;
    height: 30px;
    line-height: 30px;
    border-radius: 25px;
    padding: 0;
  }
}
</style>
1.1 案例-购物车-头部自定义
目的: 头部的标题, 颜色, 背景色可以随便修改, props类型的校验
思路
- 在MyHeader.vue中准备props里变量, 然后使用
- 在使用MyHeader.vue组件时, 传入相应的值 (color和backgroundColor)
MyHeader.vue
<template>
  <div class="my-header"
  :style="{
    backgroundColor:background,
    color:color,
  }"
  >{{ title }}</div>
</template>

<script>
// 目标: 让Header组件支持不同的项目 - 自定义
// 1. 分析哪些可以自定义 (背景色, 文字颜色, 文字内容)
// 2. (新) 可以对props的变量的值 进行校验
// 3. 内部使用props变量的值
// 4. 外部使用时, 遵守变量名作为属性名, 值的类型遵守
export default {
// props的简写
// props: ['background','color','title']

// props的校验数据写法(温馨提示:校验写法没有代码提示,书写要小心)
props: {
  background:{
    type:String      // background 类型必须是字符串,否则报错
  },
  color:{
    type:String,
    default:'#fff',  // 默认值
  },
  title:{
    type:String,
    required:true,   // 必须传值
  }
  }
}
</script>

<style lang="less" scoped>
  .my-header {
    height: 45px;
    line-height: 45px;
    text-align: center;
    background-color: #1d7bff;
    color: #fff;
    position: fixed;
    top: 0;
    left: 0;
    width: 100%;
    z-index: 2;
  }
</style>
购物车.vue
<template>
    <div>
        <MyHeader
        title="购物车案例64"
        background="#0d6efd"
        ></MyHeader>
        <div class="main">
            <MyGoods></MyGoods>
        </div>
        <MyFooter></MyFooter>
    </div>
</template>

<script>
import MyHeader from "./components/MyHeader.vue"
import MyGoods  from "./components/MyGoods.vue"
import MyFooter from "./components/MyFooter.vue"
export default {
components: {
    MyHeader,
    MyGoods,
    MyFooter,
}
}
</script>

<style scoped>
.main{
padding-top: 45px;
padding-bottom: 50px;
}
</style>
App.vue传入相应自定义的值
<MyHeader title="购物车案例"></MyHeader>
总结:
props: [] - 只能声明变量和接收, 不能类型校验
props: {} - 声明变量和校验类型规则 - 外部传入值不对则报错
1.2 案例-购物车-请求数据
目标: 使用axios把数据请求回来
数据地址: https://www.escook.cn/api/cart (get方式)
- 下载axios
yarn add axios
- main.js - 原型上挂载
// 1. 下载axios库, main.js - 全局绑定属性 (确保任意.vue文件可以都访问到这个axios方法)
//    导入 axios (注意:这里还是独立作用域的, axios 只能在 main.js 中使用)
import axios from 'axios'
// 2. 基础地址
axios.defaults.baseURL =  "https://www.escook.cn"
// 3. axios方法添加到Vue的原型上
//    挂载到 vue 原型上,所有的vue组件都是vue的实例对象
Vue.prototype.$axios = axios

- App.vue请求使用
<script>
export default {
  data(){
    return {
      // 初始值应该是数组
      list: [] // 商品所有数据
    }
  },
  // 获取数据应该在 created 组件初始化完毕后就开始执行 ajax 请求
  created(){
     //  this 其实就是 Vue 组件实例
     console.log(this);
    // 不必在自己引入axios变量, 而是直接使用全局属性$axios
     // 🔔 Vue组件实例可以访问 Vue 原型上添加的 $axios
    this.$axios({
      url: "/api/cart"
    }).then(res => {
      //console.log(res);
      this.list = res.data.list
    })
  }
}
</script>
1.3 案例-购物车-数据渲染
目标: 把上面请求的数据, 铺设到页面上
App.vue
  <div class="main">
            <MyGoods
            v-for="item in list"
            :key="item.id"
            :item="item"
            ></MyGoods>
        </div>
MyGoods.vue
<template>
  <div class="my-goods-item">
    <div class="left">
      <div class="custom-control custom-checkbox">
         <!-- 💥 重要:每个对象和组件都是独立的
                      对象里的goods_state关联自己对应商品的复选框-->
        <input type="checkbox" class="custom-control-input" id="input" v-model="item.goods_state"
        >
        <label class="custom-control-label" for="input">
          <img :src="item.goods_img" alt="">
        </label>
      </div>
    </div>
    <div class="right">
      <div class="top">{{item.goods_name}}</div>
      <div class="bottom">
        <span class="price">¥ {{item.goods_price}} </span>
        <span>
          <!-- 🔔 注意:把整个 item 对象传给子组件 -->
        <MyCount :item="item"></MyCount>
        </span>
      </div>
    </div>
  </div>
</template>

<script>
import MyCount  from "./MyCount.vue"
export default {
  props: {
    item:Object,

  },
components: {
    MyCount,

}
}
</script>
MyCount.vue
<template>
  <div class="my-counter">
    <button type="button" class="btn btn-light" >-</button>
    <input type="number" class="form-control inp" v-model="item.goods_count">
    <button type="button" class="btn btn-light">+</button>
  </div>
</template>

<script>
export default {
  props: {
    item:Object,
  }
}
</script>
总结: 把各个组件关联起来, 把数据都铺设到页面上
1.4 案例-购物车-商品选中
问题: 点击发现总是第一个被选中
原来id和for都是"input"
但是id是唯一的啊, 所以用数据的id来作为标签的id, 分别独立, 为了兼容label点击图片也能选中的效果
MyGoods.vue
  <!-- 💥 重要:每个对象和组件都是独立的
                      对象里的goods_state关联自己对应商品的复选框-->
        <input type="checkbox" class="custom-control-input" :id="item.id" v-model="item.goods_state"
        >
        <label class="custom-control-label" :for="item.id">
          <img :src="item.goods_img" alt="">
        </label>
总结: lable的for值对应input的id, 点击label就能让对应input处于激活
1.5 案例-购物车-数量控制
目标: 点击+和-或者直接修改输入框的值影响商品购买的数量
MyCount.vue
<template>
  <div class="my-counter">
    <button type="button" class="btn btn-light" @click="item.goods_count-- " :disabled=" item.goods_count === 1">-</button>
                                      <!-- 注意:这里需要收集到数字  .number -->
    <input type="number" class="form-control inp" v-model.number="item.goods_count">
    <button type="button" class="btn btn-light" @click="item.goods_count++ ">+</button>
  </div>
</template>

<script>
export default {
  props: {
    item:Object,
  },
  // 监听 item 的变化
  watch: {
    item:{
      deep:true,
      handler(){     // 拿到商品数量, 判断如果数量小于1, 直接强制修改成 1 即可
        if(this.item.goods_count < 1){
          this.item.goods_count = 1
        }
      }
    }
  }
}
</script>
1.6 案例-购物车-全选功能
目标: 在底部组件上, 完成全选功能
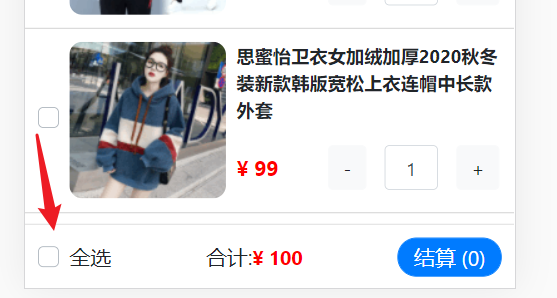
思路:
- 点击获取它的选中状态
- 同步给上面每个小选框 - 而小选框的选中状态又在数组里
- 把数组传给MyFooter, 然后更新即可 - 因为对象都是引用关系的
MyFooter.vue
<template>
  <!-- 底部 -->
  <div class="my-footer">
    <!-- 全选 -->
    <div class="custom-control custom-checkbox">
      <input type="checkbox" class="custom-control-input" id="footerCheck" v-model="isAll">
      <label class="custom-control-label" for="footerCheck">全选</label>
    </div>
    <!-- 合计 -->
    <div>
      <span>合计:</span>
      <span class="price">¥ 0</span>
    </div>
    <!-- 按钮 -->
    <button type="button" class="footer-btn btn btn-primary">结算 ( 0 )</button>
  </div>
</template>

<script>
// 目标: 全选
// 1. v-model关联全选-复选框(v-model后变量计算属性)
// 2. 页面(视频层)v(true) -> 数据层(变量-) 计算属性(完整写法)
// 3. 把全选 true/false同步给所有小选框选中状态上

// 小选  -> 全选
// App.vue里list数组 -> MyFooter.vue
// isAll的get方法里, 统计状态影响全选框
export default {
  props: {
    // Array 校验他是否是一个数组
    arr:Array
  },
  computed:{
    // 左边的全选状态
    isAll:{
     // get结构,需要 return
      get(){
        return this.arr.every( (item) => item.goods_state === true )
      },
      set(val){
        this.arr.forEach( (item) => (item.goods_state = val))
      },
    },
  },
}
</script>
App.vue
<MyFooter :arr="list"></MyFooter>
总结: 全选的v-model的值, 使用计算属性完整写法
1.7 案例-购物车-总数量
目标: 完成底部组件, 显示选中的商品的总数量
MyFooter.vue
<template>
  <!-- 底部 -->
  <div class="my-footer">
    <!-- 全选 -->
    <div class="custom-control custom-checkbox">
      <input type="checkbox" class="custom-control-input" id="footerCheck" v-model="isAll">
      <label class="custom-control-label" for="footerCheck">全选</label>
    </div>
    <!-- 合计 -->
    <div>
      <span>合计:</span>
      <span class="price">¥ 0</span>
    </div>
    <!-- 按钮 -->
    <button type="button" class="footer-btn btn btn-primary">结算 ( {{allCount}} )</button>
  </div>
</template>

<script>
// 目标: 全选
// 1. v-model关联全选-复选框(v-model后变量计算属性)
// 2. 页面(视频层)v(true) -> 数据层(变量-) 计算属性(完整写法)
// 3. 把全选 true/false同步给所有小选框选中状态上

// 小选  -> 全选
// App.vue里list数组 -> MyFooter.vue
// isAll的get方法里, 统计状态影响全选框

// 目标: 总数量统计
// 1. allCount计算属性用 数组reduce+判断统计数量并返回

export default {
  props: {
    // Array 校验他是否是一个数组
    arr:Array
  },
  computed:{
    // 左边的全选状态
    isAll:{
      // get结构,需要 return
      get(){
        return this.arr.every( (item) => item.goods_state === true )
      },
      set(val){
        this.arr.forEach( (item) => (item.goods_state = val))
      },
    },
    // 右边的总数量,用简写即可
    allCount(){
     // 把累加的结果返回给  allCount
      return this.arr.reduce((sum,item) => {
        // 只累加选中的商品
        if(item.goods_state){
          sum += item.goods_count
        }
        // 把累加的结果给下一次遍历
        return sum
      },0)
    },
  },
}
</script>
1.8 案例-购物车-总价
目标: 完成选中商品计算价格
MyFooter.vue
<template>
  <!-- 底部 -->
  <div class="my-footer">
    <!-- 全选 -->
    <div class="custom-control custom-checkbox">
      <input type="checkbox" class="custom-control-input" id="footerCheck" v-model="isAll">
      <label class="custom-control-label" for="footerCheck">全选</label>
    </div>
    <!-- 合计 -->
    <div>
      <span>合计:</span>
      <span class="price">¥ {{allPrice}}</span>
    </div>
    <!-- 按钮 -->
    <button type="button" class="footer-btn btn btn-primary">结算 ( {{ allCount }} )</button>
  </div>
</template>

<script>
// 目标: 全选
// 1. v-model关联全选-复选框(v-model后变量计算属性)
// 2. 页面(视频层)v(true) -> 数据层(变量-) 计算属性(完整写法)
// 3. 把全选 true/false同步给所有小选框选中状态上

// 小选  -> 全选
// App.vue里list数组 -> MyFooter.vue
// isAll的get方法里, 统计状态影响全选框

// 目标: 总数量统计
// 1. allCount计算属性用 数组reduce+判断统计数量并返回

export default {
  props: {
    // Array 校验他是否是一个数组
    arr:Array
  },
  computed:{
    // 左边的全选状态
    isAll:{
      // get结构,需要 return
      get(){
        return this.arr.every( (item) => item.goods_state === true )
      },
      set(val){
        this.arr.forEach( (item) => (item.goods_state = val))
      },
    },
    // 右边的总数量,用简写即可
    allCount(){
      // 把累加的结果返回给  allCount
      return this.arr.reduce((sum,item) => {
        // 只累加选中的商品
        if(item.goods_state){
          sum += item.goods_count
        }
        // 把累加的结果给下一次遍历
        return sum
      },0)
    },
    // 中间的总价计算
    allPrice(){
      return this.arr.reduce((sum,item) => {
        if(item.goods_state){
          sum += item.goods_count * item.goods_price
        }
        return sum
      },0)
    }
  },
}
</script>
总结: 把数组传给了MyFooter组件, 统计总价