第一章、Vue简介
特点
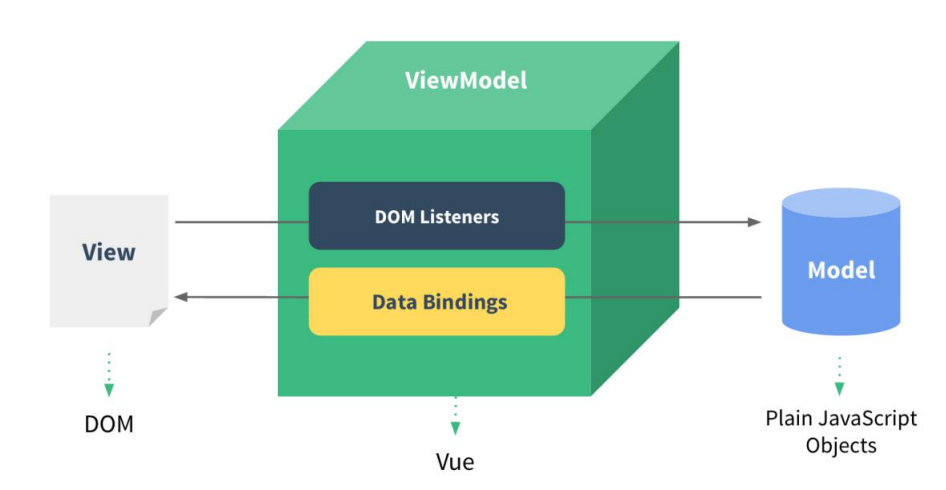
遵循MVVM模式:Modal(在Vue中指数据)、View(在Vue中指视图)、View Modal(指Vue实例对象)
安装
//1.全局安装Vue脚手架
npm install -g @vue/cli
//安装后环境中就有vue命令,cli基于webpack,目前大版本为4
//你可以使用 vue serve 和 vue build 命令对单个 *.vue 文件进行快速原型开发,不过这需要先额外安装一个全局的扩展:
//npm install -g @vue/cli-service-global

//2.可选择两种方式创建vue项目
vue ui
//or
vue create hello-world
使用
在main.js中
import Vue from 'vue'
import App from './App'

//关闭vue的生产提示
Vue.config.productionTip = false

new Vue({
    el:'#app',
    render:h=>h(App)
})
//Vue构造函数接受一个配置对象,对象上有若干配置,el,render,data,watch,computed,methods,生命周期.....。
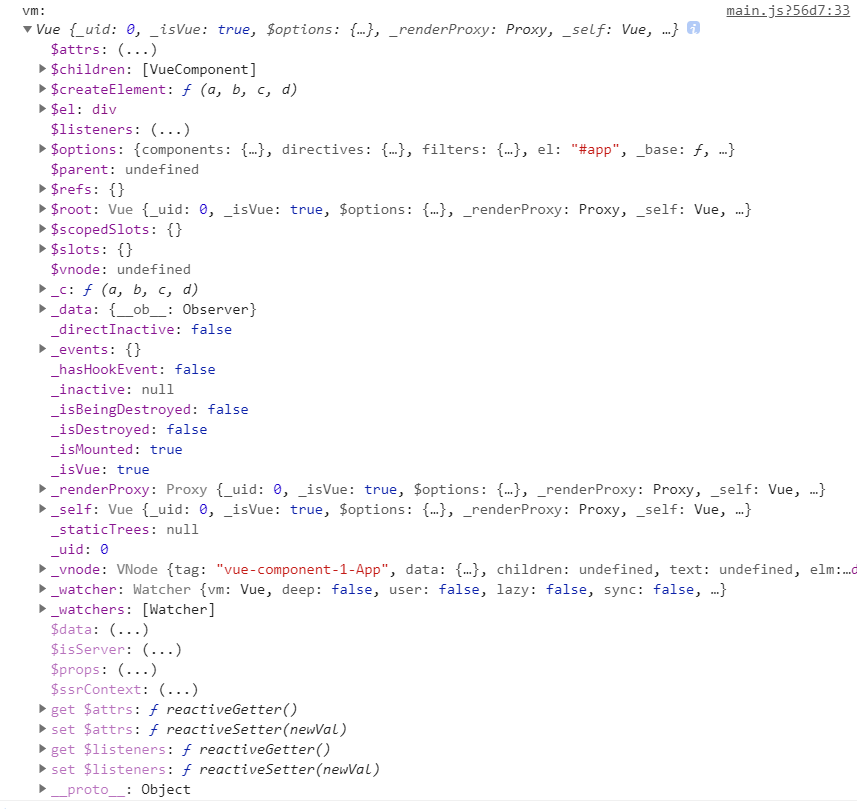
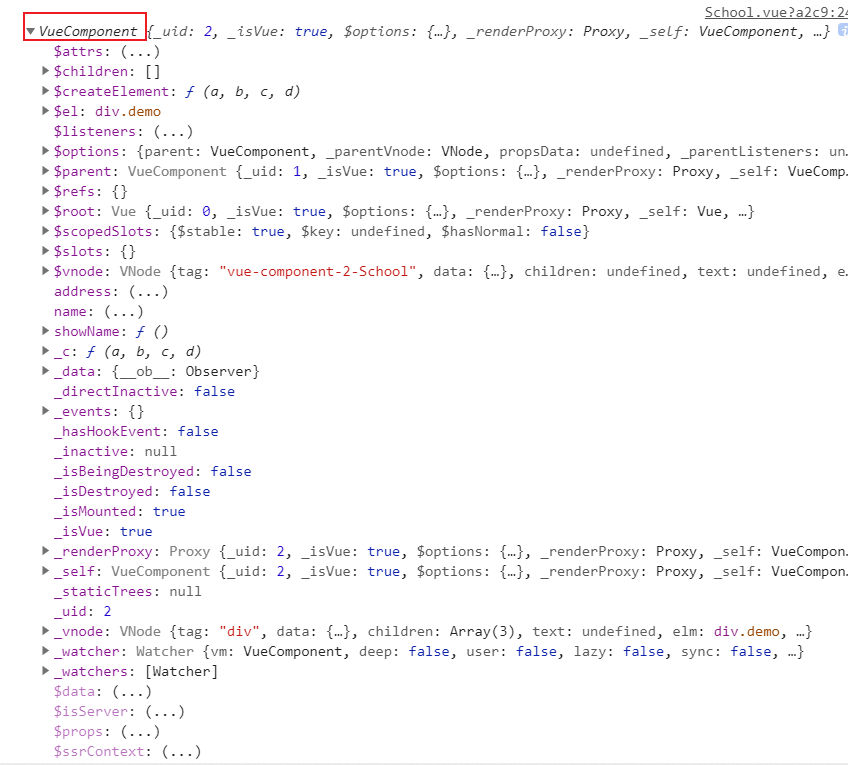
【重点】:每个Vue组件都是一个VueComponent实例对象,VueComponent原型指向Vue原型,故可以使用Vue原型上的方法
我们通常将new出的Vue实例对象称为vm,上面有如下方法:
第二章、组件化
概念
Vue采取组件化、工程化编码,每个组件都包含其结构(html)、逻辑(js)、样式(css),js中需暴露出和Vue构造函数中相同的构造函数。
组件this
组件的显示原型对象指向VueComponent,而VueComponent指向Vue原型对象,故二者可拥有相同的方法,组件中可用this取得。
第三章、事件处理
使用
每个组件内都可配置methods方法,可在标签上绑定v-on:事件名="方法"指令,来触发方法。
例如:
<template>
	<div v-on:click="handleClick">
     组件
    </div>
</template>

<script>
export default{
    methods:{
        handleClick(){
            //do something....
        }
    }
}
</script>
写法:
//1.写不写括号均可
v-on:click="handleClick()"

//2.语法糖
@click="handleClick()"

//3.默认传入原生event参数
handleClick(e){
    console.log(e)
}

//4.也可手动传入$event(必需叫这个名字)
@click="handleClick($event,66)"
@click="handleClick(1,2,3,$event)"
事件修饰符
以下为事件的修饰符
- prevent阻止事件默认行为,相当于event.preventDefault()
- stop阻止事件冒泡,相当于event.stopPropagation()
- once,事件只触发一次。
- capture,捕获阶段执行回调(默认是冒泡阶段)
- self,只有event.target是当前元素才执行回调。
- passive,事件的默认行为立即执行,无需等待回调执行完毕
例子:
<!-- 不会跳转 -->
<a href="http://www.baidu.com" @click.prevent="showInfo">点我提示信息</a>

<!-- 阻止事件冒泡(常用) -->
<div class="demo1" @click="showInfo">
	<button @click.stop="showInfo">点我提示信息</button>
	<!-- 修饰符可以连续写 -->
	<!-- <a href="http://www.atguigu.com" @click.prevent.stop="showInfo">点我提示信息</a> -->
</div>

<!-- 事件只触发一次(常用) -->
<button @click.once="showInfo">点我提示信息</button>

<!-- 使用事件的捕获模式 -->
<div class="box1" @click.capture="showMsg(1)">
  <div class="box2" @click="showMsg(2)">
	div2
  </div>
</div>

<!-- 只有event.target是当前操作的元素时才触发事件; -->
<div class="demo1" @click.self="showInfo">
	<button @click="showInfo">点我提示信息</button>
</div>

<!-- 事件的默认行为立即执行,无需等待事件回调执行完毕; -->
<ul @wheel.passive="demo" class="list">
	<li>1</li>
	<li>2</li>
	<li>3</li>
	<li>4</li>
</ul>

<!-- passive理解:
list溢出出现了滚动条,
如demo中执行100000次for循环,则等待for循环执行完毕才会出现滚动条滚动
加了passive之后则无需等待for循环-->
以下为键盘修饰符
- enter,回车
- delete,删除键、退格键
- esc
- up,上
- down,下
- left,左
- right,右
<!-- 绑定指定按键 -->
<input type="text" placeholder="按下回车提示输入" @keydown.enter="showInfo">

<!-- 两个键均可触发 -->
<input type="text" placeholder="按下回车提示输入" @keydown.enter.up="showInfo">

<!-- 系统 -->
<input type="text" placeholder="按下回车提示输入" @keyup.ctrl.up="showInfo">

<!-- 也可用keycode码进行绑定,enter为13(不推荐!Vue3已废弃) -->
<input type="text" placeholder="按下回车提示输入" @keydown.13="showInfo">

<!-- 起别名 -->
Vue.config.keyCodes.huiche = 13 //定义了一个别名按键
<input type="text" placeholder="按下回车提示输入" @keydown.huiche="showInfo">
系统修饰键(用法特殊):ctrl、alt、shift、meta(window电脑中为win键)
1. 配合keyup使用:按下修饰键的同时,再按下其他键,随后释放其他键,事件才被触发。
2. 配合keydown使用:正常触发事件。
第四章、props和ref
props
props是一个配置对象,表示接受的父组件传递的参数
//1.简单声明接收(数组形式)
// props:['name','age','sex']

//接收的同时对数据进行类型限制(对象形式)
/* props:{
	name:String,
	age:Number,
	sex:String
} */

//3.接收的同时对数据:进行类型限制+默认值的指定+必要性的限制(对象中每一项仍是对象)
props:{
	name:{
		type:String, //name的类型是字符串
		required:true, //name是必要的
	},
	age:{
		type:Number,
		default:99 //默认值
	},
	sex:{
		type:String,
		required:true
	}
}
ref
给标签打ref可拿到标签的真实DOM对象
<template>
	<div ref="container">
        组件
    </div>
</template>

<script>
export default{
    mounted(){
        console.log(this.$refs.container)
    }
}
</script>
第五章、生命周期
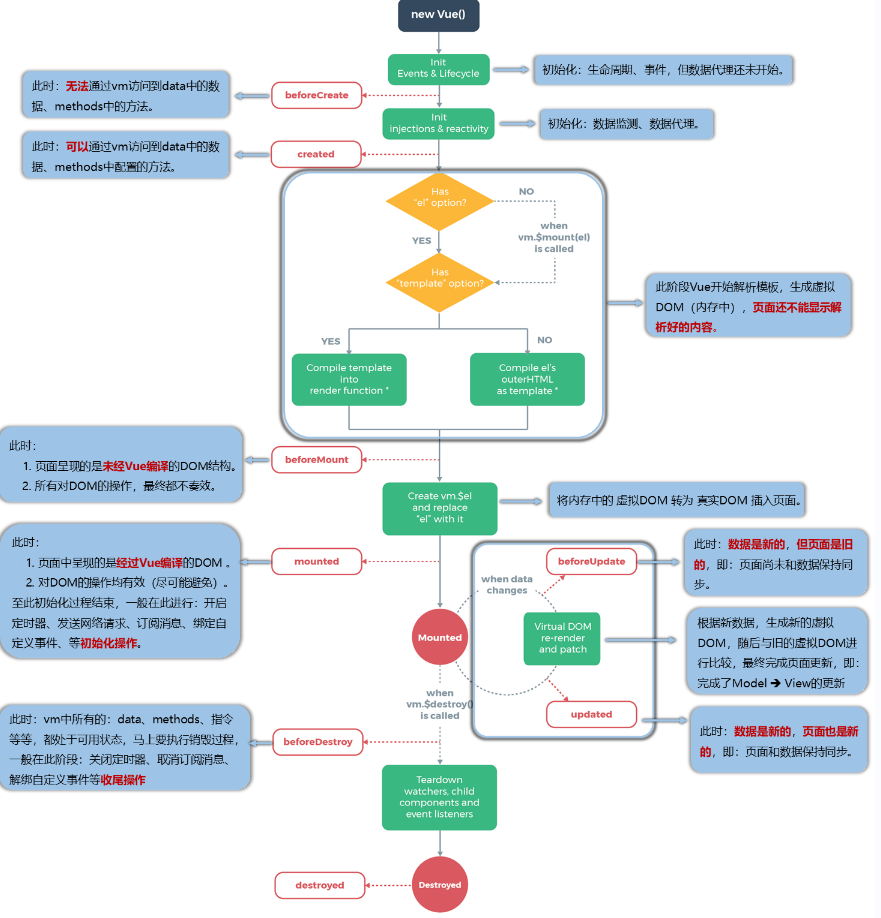
原理图
摘自官网:
第六章、指令与过滤器
内置指令
- v-bind,单向数据绑定
- v-model,双向数据绑定
- v-if,指定是否显示(false时不创建真实DOM)
- v-show,指定是否展示(false时其实为display:none,存在真实DOM)
- v-for,遍历循环,可用in,也可用of
- 对象:(value,key) in obj
- 数组:(item,index) in arr
- 字符串:(char,index) in str
- 指定次数:(number,index) in 5
- v-text,指定标签内内容
- v-html,指定标签内结构(可能存在跨站脚本攻击)
- v-pre,跳过其所在节点的编译,若没有模板语法或指令语法,跳过会加快编译
- v-once,动态渲染一次之后就视为静态内容,不再更新,也可用于优化性能
- v-cloak,加上此标签后,在Vue实例挂载之前,避免出现形如{{xxxx}}的内容,挂载之后会删除此属性
自定义指令
方法一(局部指令):
形如data、methods,写在实例对象上
//将data中的n作为值传入
<span v-big="n"></span>

new Vue({
	el:'#root',
	data:{
		n:1
	},
	directives:{
        //绑定的元素、传入的值
		big(element,binding){
			console.log('big',this) //注意此处的this是window
			element.innerText = binding.value * 10
		},
	}
})
方法二(全局指令):
//定义全局指令
Vue.directive('fbind',(element,binding)=>{
	console.log(this)	//箭头函数还是普通函数,this都是window
})
钩子函数:
//全局指令
Vue.directive('fbind',{
    //简写成函数类型的话默认是bind和update结合
	//指令与元素成功绑定时(一上来)
	bind(element,binding){
		element.value = binding.value
	},
	//指令所在元素被插入页面时
	inserted(element,binding){
		element.focus()
	},
	//指令所在的模板被重新解析时
	update(element,binding){
		element.value = binding.value
	}
})

//局部指令
directives:{
 	fbind: {
   	 	//指令与元素成功绑定时(一上来)
    	bind(element, binding) {
      		element.value = binding.value;
    	},
    	//指令所在元素被插入页面时
    	inserted(element, binding) {
      		element.focus();
    	},
    	//指令所在的模板被重新解析时
    	update(element, binding) {
      		element.value = binding.value;
    	},
	},
}
过滤器
局部过滤器
同样写在配置对象中
filters:{
	//格式化时间
	timeFormater(value,str='YYYY年MM月DD日 HH:mm:ss'){
		return dayjs(value).format(str)
	}
}
使用(管道调用,第一个参数为前面的管道传过来的值)
<h3>现在是:{{time | timeFormater('YYYY_MM_DD') | otherFilter}}</h3>
全局过滤器
Vue.filter('mySlice',function(value){
	return value.slice(0,4)
})
第七章、动态样式
class
字符串式:
<!-- 绑定class样式--字符串写法,适用于:样式的类名不确定,需要动态指定 -->
<div class="basic" :class="mood" @click="changeMood">心情</div>
<div :class="isHappy?'happy':''"></div>

data:{
	return{
		mood:happy,
		isHappy:true
	}
}
数组式:
<!-- 绑定class样式--数组写法,适用于:要绑定的样式个数不确定、名字也不确定 -->
<div class="basic" :class="classArr">心情</div>

data(){
	classArr:['happy','sad','normal']
}
对象式:
<!-- 绑定class样式--对象写法,适用于:要绑定的样式个数确定、名字也确定,但要动态决定用不用 -->
<div class="basic" :class="classObj">心情</div>

data(){
  return {
	classObj:{
		happy:true,
		sad:false
	}
  }
}
style
对象式:
<!-- 注意,不是CSS中的横杠命名,是大驼峰 -->
<div class="basic" :style="{fontSize:'40px'}">心情</div>
<div class="basic" :style="isHappy?{fontSize:'40px'}:{}">心情</div>
数组式:
<div :style="[{fontSize:'40px'},{color:'red'}]">心情</div>
第八章、计算和监听
计算
同样写在配置对象中,每个key都是一个对象/函数
data:{
	firstName:'张',
	lastName:'三',
},
computed:{
    fullName:{
      //1.第一次读取fullName时调用
      //2.所依赖的值变化时调用
      get(){
         return this.firstName + this.lastName
      },
      //set什么时候调用? 当fullName被修改时。
	  set(value){
		console.log('set',value)
		const arr = value.split('-')
		this.firstName = arr[0]
		this.lastName = arr[1]
	  }
    }
}
简写:
//因为我们很少去set计算属性中的值,所以可直接简写成一个函数
fullName(){
	return this.firstName + this.lastName
}
监听
同样写在配置对象上,每个key也是对象/函数
data(){
    return{
        obj:{
            x:1,
            y:2
        }
    }
},
watch:{
    //表示监听data中的obj,也可监听计算属性
    obj:{
       //组件挂载时是默认不触发handler函数的,immediate表示初始时触发一次
       immediate:true,
       /*
       深度监听,不开启则只有当obj的内存地址发生改变才会触发handler,
       开启后,x和y的改变也会触发
       */
       deep:true,
       //触发函数,必需写这个名字
       handler(newValue,oldValue){
           console.log('obj被修改了',newValue,oldValue)
       }
    }
}
简写:
//若不需要立即执行、深度监听,则可直接简写成一个函数
obj(newValue,oldValue){
  console.log('obj被修改了',newValue,oldValue)
}
//也可使用vm或者组件实例上的$watch实现监听
this.$watch('obj',{
   immediate:true,
   deep:true,
   handler(newValue,oldValue){
       console.log('obj被修改了',newValue,oldValue)
   }
})
计算监听对比
computed是有缓存的,值未变化则利用缓存,watch检测到监听对象变化就会触发,不管值是否变化
第九章、混入与插槽
混入
当多个组件有相同的data或者方法等配置属性时,可将其提取出来,达到复用目的,配置在配置对象的mixins属性中
mixin.js文件
//混入方法和生命周期
export const mixin1 = {
	methods: {
		showName() {
			console.log('展示')
		}
	},
	mounted() {
		console.log('已挂载!!')
	},
}
//混入数据
export const mixin2 = {
	data() {
		return {
			x: 100,
			y: 200
		}
	},
}
组件:
<script>
import {mixin1,mixin2} from '../mixin'
export default {
	data() {
		return {
			x:888
		}
	},
    //是一个数组
	mixins:[mixin1,mixin2],
    mounted(){
        console.log('组件挂载')
    }
}
</script>
【注意】:当组件内部的数据、方法、生命周期与混入冲突时,除了生命周期函数,都以组件内部的为准,但生命周期是都执行,且混入的生命周期先执行
插槽
定义组件时留在组件内部的”坑“,等待父组件使用时来填
默认插槽
子组件:
<template>
	<div>
        <slot>插槽默认显示的内容,父组件未传递插槽时才会显示</slot>
    </div>
</template>
父组件
<template>
	<div>
        <child>
        	<span>取代掉插槽</span>
        </child>
    </div>
</template>
具名插槽
当需要多个插槽时,可给每个插槽取名
子组件:
<template>
	<div>
		<slot name="center">我是默认值</slot>
		<slot name="footer">我是默认值</slot>
	</div>
</template>
父组件:
<template>
	<div>
        <child>
        	<span slot="center">取代掉插槽1</span>
            <span v-slot:"center">取代掉插槽2,v-slot同slot,不同版本的用法而已</span>
        </child>
    </div>
</template>
作用域插槽
当插入组件插槽的内容,想要使用组件的数据时,就出现了作用域插槽
子组件:
<template>
	<div>
        <!-- msg并未传递过去,items传递过去了 -->
		<slot name="center" :fruits="fruits" msg="hello">我是默认的一些内容</slot>
	</div>
</template>

<script>
	export default {
		name:'Category',
		props:['title'],
		data() {
			return {
				fruits:['苹果','香蕉','梨子'],
			}
		},
	}
</script>
父组件:
<template>
	<div>
        <child>
            <!-- 或者写成slot="center" slot-scope="{fruits}"(解构) -->
        	<template slot="center" scope="props">
            	<ul>
                    <li v-for="item in props.fruits">{{item}}</li>
                </ul>
            </template>
        </child>
    </div>
</template>
第十章、路由管理Router
简介
每一个Vue应用都是一个SPA(single page app,单页面应用),通过监听window上history变化来切换页面更新,vue-router是官方维护的路由管理插件库
使用
创建项目时,一般都会下载vue-router,全局上会多一个$router(路由器)属性,每个路由组件共享一个路由器,又有一个单独的$route,需要给router配置”规则“,告诉他如何切换页面,如下:
router.js文件:
import VueRouter from 'vue-router'
//创建并暴露一个路由器
//Router构造函数接受一个配置对象,对象上有一个routes数组配置规则
export default new VueRouter({
	routes:[
		{
			path:'/about',
			component:About
		},
		{
			path:'/home',
			component:Home
		}
	]
})
main.js文件:
import VueRouter from 'vue-router'
import router from './router'

//必需先应用插件
Vue.use(VueRouter)

//创建vm
new Vue({
	el:'#app',
	render: h => h(App),
    //接受参数
	router:router
})
组件:
<!-- 全局多了两个组件:router-link, router-view -->

<!-- active-class会根据路由匹配情况赋予样式,link最终被解析为a标签 -->
<router-link active-class="active" to="/about">About</router-link>

<!-- 路由占位符 -->
<router-view></router-view>
嵌套路由
配置规则:
routes:[
		{
			path:'/about',
			component:About
		},
		{
			path:'/home',
			component:Home,
			children:[
				{
                    //注:不要加斜杠,不然匹配不上
					path:'news',
					component:News,
				},
				{
					path:'message',
					component:Message,
				}
			]
		}
]
组件内使用:
<!-- 两级都要写出来 -->
<router-link active-class="active" to="/home/news">About</router-link>
传递参数
路由跳转时可传递给组件一些数据,即参数,有两种方式传递,路由组件收到的参数均在$route上,如下:

params传参
改变path声明方法:
{
	path:'/home',
	component:Home,
	children:[
		{
			path:'news',
			component:News,
		},
		{
			path:'message',
			component:Message,
			children:[
				{
					name:'xiangqing',
                    //在这改变path的声明,接受两个参数
					path:'detail/:id/:title',
					component:Detail,
				}
			]
		}
	]
}
query传参
<router-link active-class="active" to="/home/news?id=5&title=标题">About</router-link>
命名路由
通过路由的name属性跳转,可携带参数
<router-link :to="{
    //routes中name为xiangqing的组件
    //此处也可写path
	name:'xiangqing',
	query:{
		id:5,
		title:'标题'
	}
}">
点我跳转
</router-link>
【注意】:若想携带params参数,只能用命名路由跳转,不可用path跳转
路由参数转props
children:[
	{
		name:'xiangqing',
		path:'detail',
		component:Detail,

		//1.值为对象,所有的key-value都会出现在props上
		// props:{a:1,b:'hello'}

		//2.值为布尔值,将所有params传递给props(仅params)
		// props:true

		//3.值为函数,返回对象的key-value同样出现在props上
		props($route){
			return {
				id:$route.query.id,
				title:$route.query.title,
				a:1,
				b:'hello'
			}
		}

	}
]
hash模式、history模式
- hash模式,兼容性更好,但地址带#符号,没有其它问题。
- history模式,兼容性较差,无#符号,但刷新会重新请求web服务器,需要服务器配合,详见官方文档:https://router.vuejs.org/zh/guide/essentials/history-mode.html#%E5%90%8E%E7%AB%AF%E9%85%8D%E7%BD%AE%E4%BE%8B%E5%AD%90
导航守卫
全局守卫
在router上有两个函数,接受一个参数(函数),在每次进入新路由之前或之后调用,常用来鉴权、设置动态title
//全局前置路由守卫————初始化的时候被调用、每次路由切换之前被调用
router.beforeEach((to,from,next)=>{
	console.log('前置路由守卫',to,from)
	if(to.meta.isAuth){ //判断是否需要鉴权
		//鉴权,通过则执行next()放行
        next()
	}else{
		next()
	}
})

//全局后置路由守卫————初始化的时候被调用、每次路由切换之后被调用
router.afterEach((to,from)=>{
	console.log('后置路由守卫',to,from)
	document.title = to.meta.title || '硅谷系统'
})
单独守卫
在routes数组的每一对象上,有一个单独的配置,为一个函数
{
    name:'Admin',
    path:'/admin',
    //守卫和$route读取不到
    x:100,
    //守卫和$route读取的到
    meta:{
        y:200
    }
    //可实现懒加载
    component:()=>important('../Admin'),
    //只有before一个守卫,无after
    beforeEnter: (to, from, next) => {
		if(to.meta.y==200){
            next()
        }
	}
}
组件钩子
组件变成路由组件后,会多出两个生命周期钩子,activated,deactivated
activated() {
	console.log('组件激活')
	this.timer = setInterval(() => {
		console.log('定时器执行')
	},16)
},
deactivated() {
	console.log('组件失活')
	clearInterval(this.timer)
},
编程式路由导航
在路由器$router上有一些方法,可以主动调用,如下:
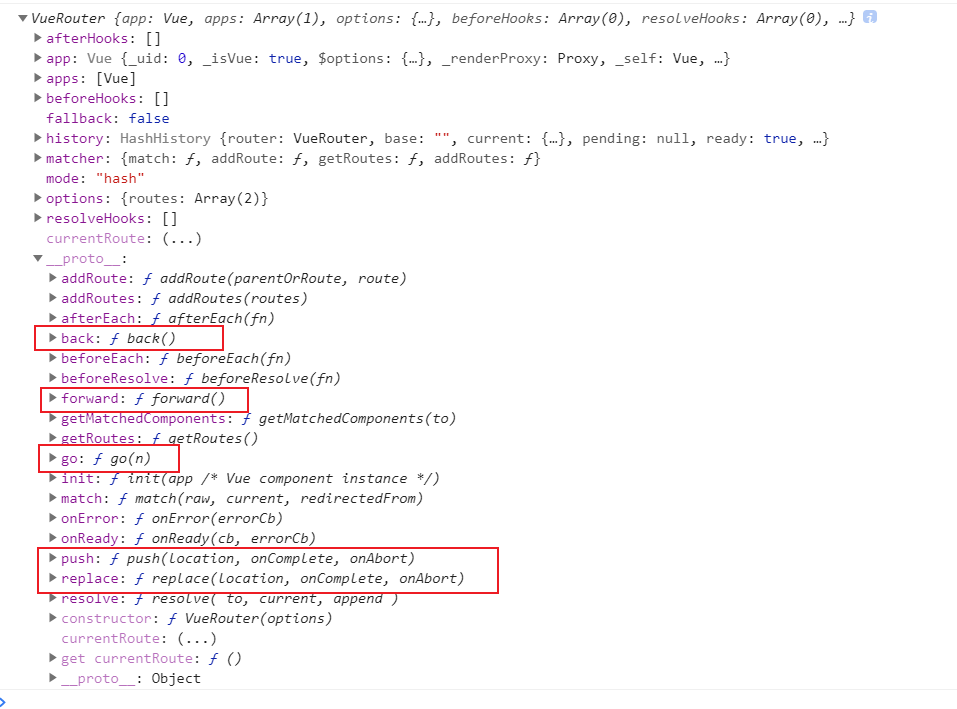
pushShow(m){
	this.$router.push({
		name:'xiangqing',
		query:{
			id:m.id,
			title:m.title
		}
	})
},
replaceShow(m){
	this.$router.replace({
		name:'xiangqing',
		query:{
			id:m.id,
			title:m.title
		}
	})
},
go(){
    //复数倒退,正数前进
    this.$router.go(-2)
}
第十一章、数据管理Vuex
简介
当多个组件依赖同一状态,方法时,组件之间沟通成本较大,且会导致项目结构异常复杂,所以出现了统一式状态管理。
全局事件总线
在创建之前,在Vue的原型上挂载vm,这样每个组件均可访问到vm,可调用vm上的$emit(信号)方法来通信,其它组件也可调用vm上的$on(接受)方法来接受信息,挂载方法:
//创建vm
new Vue({
	el:'#app',
	render: h => h(App),
	beforeCreate() {
		Vue.prototype.$bus = this //安装全局事件总线
	},
})

//组件内部使用
this.$bus.$emit('hello','msg',666)
//另一组件接受
this.$bus.$on('hello',(msg,num)=>{console.log(msg,num)})

//接收方在组件销毁前要卸载事件
beforeDestroy() {
    //不给off传递参数意味着卸载全部
	this.$bus.$off('hello')
},
【补充】:跨组件通信还有其他若干方式,如消息订阅库pubsub-js,选一组件作为中间人等。
Vuex
简介
Vuex是官方打造的插件库,官网原理图如下:
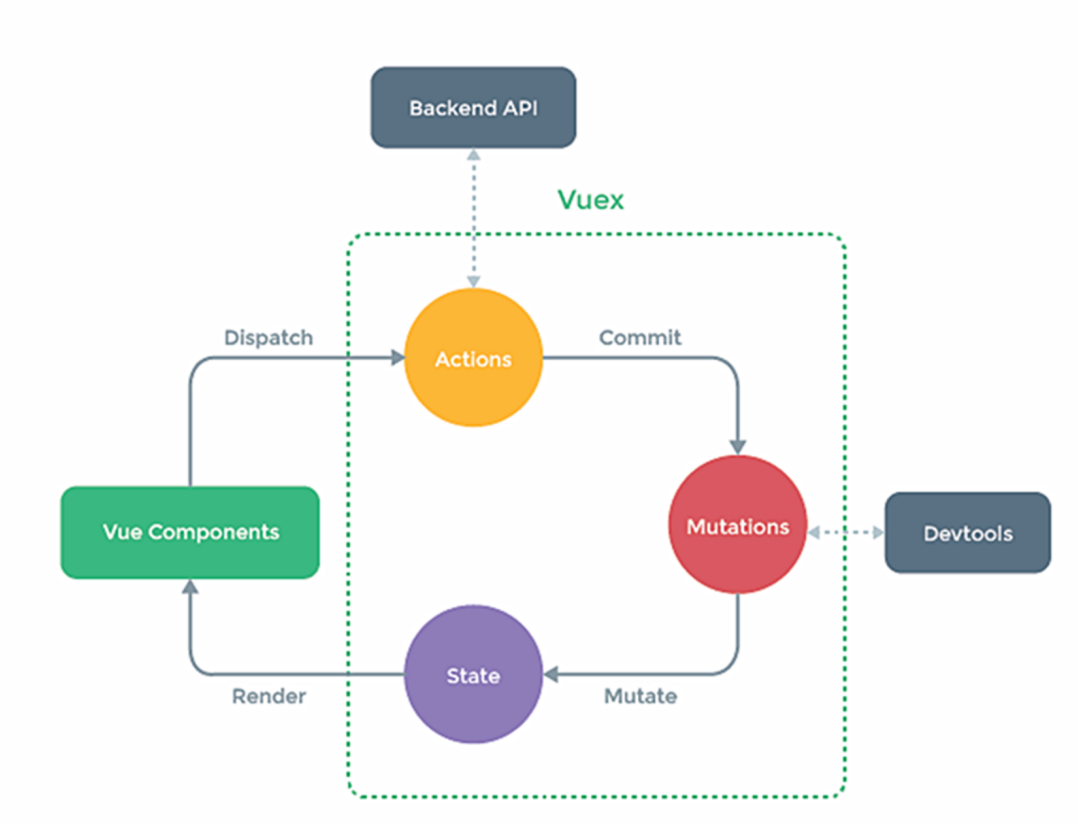
Vuex中存放的数据叫做store,组件中可直接拿到
Mutations是直接操纵store内数据的方法(且应该只负责操作数据),类似于大厨
Actions是通知Mutations操作数据的方法(可以做一些其他事情,如前后端通信),类似于服务员(通知大厨)
组件中一般通过dispatch通知Actions去修改状态,当然也可直接通知Mutations
简单使用
store.js
//1.下载vuex
npm i vuex

//2.引用并应用(必需在构造实例对象之前应用)
import Vue from 'vue'
import Vuex from 'vuex'

//暴露实例对象
export default new Vuex.Store({
    state:{
        x:1
    }
    actions:{
        //.....
    },
    mutations:{
    	//.....
    },
    getters:{
        //类似于计算属性,可配置为对象或者函数
        biggerX(state){
            return state.x*10
        }
    }
})
mutations配置对象:
mutations:{
    //第一个参数state,后面的参数是传递的数据
	JIA(state,value){
        state.x+=value
    }
}
actions配置对象:
actions:{
    //第一个参数:上下文对象,后面的参数是传递的数据
    jiaAsync(context,value){
        //上面有store上的方法
        const {commit,state}=context
        console.log(state)
        setTimeout(()=>{
            //提交到mutations
            commit('JIA',value)
        }.1000)
    }
}
main.js文件:
import store from './store'

new Vue({
	el:'#app',
	render: h => h(App),
    //配置到vm上
	store,
})
组件内使用:
//实力上多了$store对象
methods: {
    //commit直接提交到mutations
	increment(){
		this.$store.commit('JIA',10)
	},
	decrement(){
		this.$store.commit('JIA',-10)
	},
    //分发给antions处理
	incrementAsync(){
		this.$store.dispatch('jiaAsync',10)
	},
	decrementAsync(){
		this.$store.dispatch('jiaAsync',-10)
	},
},
//拿到store里的数据
mounted(){
    console.log(this.$store.state.x)
    console.log(this.$store.getters.biggerX)
}
四个映射方法
映射数据
若要在组件内部对store内的数据使用模板语法,会很长很不优,所以我们一般都写在计算属性中,如下:
//不优雅
<span>{{$store.state.x}}</span>
//优雅,但写了很长的计算属性
<span>{{x}}</span>

computed:{
    x(){
        return this.$store.state.x
    }
}
为解决很长的计算属性,vuex提供了将state和getters映射到计算属性上的方法mapState、mapGetters,如下:
import {mapState,mapGetters} from 'vuex'

computed:{
    /*
    1.mapState返回一个对象,里面有若干函数,所以使用展开语法写在computed属性
    2.配置对象的key表示计算属性的key,value表示state中的key
    3.当二者可以相同时,可以写成数组形式
    */

	//借助mapState生成计算属性,从state中读取数据。(对象写法)
	// ...mapState({he:'x',xuexiao:'school'}),

	//借助mapState生成计算属性,从state中读取数据。(数组写法)
	...mapState(['x','school']),


	//借助mapGetters生成计算属性,从getters中读取数据。(对象写法)
	// ...mapGetters({big:'biggerX'})

	//借助mapGetters生成计算属性,从getters中读取数据。(数组写法)
	...mapGetters(['biggerX'])

},
映射方法
在组件内进行dispatch或者commit时,可能写的很长,很不优雅,如下:
methods:{
    increment(){
		this.$store.commit('JIA',10)
	},
    incrementAsync(){
		this.$store.dispatch('jiaAsync',10)
	},
}
所以vuex提供了mapActions和mapMutations方法,如下:
//同映射数据的方法,可点语法展开到methods,可写成对象或数组

...mapMutations({increment:'JIA'}),
...mapMutations(['JIA']),

...mapActions({incrementAsync:'jiaAsync'})
...mapActions(['jiaAsync'])
模块化使用
为简化团队协作,拆分store里的解构,可将一个store拆成若干模块,每个模块有自己单独的state、mutations、actions…如下:
userOptions={
    //开启命名空间
    namespaced:true,
    state:{name:'张三'},
    actions:{
        rename(context,value){
            context.commit('RENAME',value)
        }
    },
    mutations:{
        RENAME(state,value){
            state.name=value
        }
    },
    getters:{}
}

schoolOptions={
    //开启命名空间
    namespaced:true,
    state:{name:'武科大'},
    actions:{},
    mutations,
    getters:{}
}

//创建并暴露store
export default new Vuex.Store({
	modules:{
		user:userOptions,
		shool:schoolOptions
	},
    公共部分
    state:{},
    actions:{},
    mutations:{},
    getters:{}
})
【注意】:不开启命名空间,则最后每个模块的状态和操作,都映射到了全局,相同的key会冲突,详见官网:

//开启命名空间后,map方法:多加一个参数
...mapState('user',['name'])

//若要用原生store上的方法,要加‘命名空间/''
this.$store.commit('user/RENAME','李四')
this.$store.dispatch('user/rename','李四')
第十二章、总结
总的来说,每个Vue应用是一个单页面应用,其实只掌管着一个root容器(当然也可以创建多个,但一般不这么做),然后root下创建一个APP组件,所有组件都是APP的子组件(方便管理)。
配置对象
不论是创建最初的vm还是每一个VueComponent组件,都要传入一个配置对象,不过vm多了el和render(组件也可以,但没必要)罢了,以下为配置对象的总结
//默认暴露出一个对象
export default {
    //组件名(字符串),给浏览器开发插件看
    name:'Home',
    //混入(数组)
    mixinx:[],
    //参数(对象/数组)
    props:{
        //每一项是类型/对象
        name:String,
        age:{
            type:Number,
            default:99
        }
    }
    //数据(函数)
    data(){
        return {
            x:1
        }
    },
    //方法(对象)
	methods:{},
    //计算属性(对象)
    computed:{
        //每一项都是对象/函数
        biggerX:{
            get(){
                return this.x*10
            },
            set(value){
                this.x=value
            }
        }
    },
    //监听属性(对象)
    watch:{
       //每一项都是对象/函数
       x:{
            deep:true,
       		immediate:true,
        	handler(newValue,oldValue){
           		//do something
       		}
       }
    },
    //指令(对象)
    directives:{
       //每一项都是对象/函数
       my-dire:{
			bind(element, binding) {},
			inserted(element, binding) {},
			update(element, binding) {},
       }
    },
    //过滤器(对象)
    filters:{
        //每一项都是函数
        timeFormater(value){
				return value
		}
    }
}
路由
应用vue-router后每个路由组件都有了一个单独的$route和一个共同的$router,在声明routes时可声明params参数与props选项。
组件内部可通过$route拿到params参数和query参数,也可通过$router对象进行编程式路由导航。
数据管理
- 数据统一放在store里的state
- 若无复杂的统一操作,直接mutations即可,若有可用actions
- store里的getters类似于计算属性
- 项目庞大时可开启多模块,若开启命名空间,注意组件内的使用
- 为了方便与代码易读,可引入四个map方法,映射到组件的计算属性和方法
第十三章、扩展
插件原理
在main.js中很多Vue.use()方法,其实是应用的插件,use可接受一个对象,然后调用此对象上的install方法
插件接收的第一个参数是Vue原型对象,在此可注册一些指令、过滤器等等,后面的参数可从use传入,如下:
let pluginObj={
    install(Vue,x,y){
		//全局过滤器
		Vue.filter('mySlice',function(value){
			return value.slice(0,4)
		})

		//定义全局指令
		Vue.directive('fbind',{
			bind(element,binding){},
			inserted(element,binding){},
			update(element,binding){}
		})

		//定义混入
		Vue.mixin({
			data() {
				return {
					x:100,
					y:200
				}
			},
		})

		//给Vue原型上添加一个方法(vm和vc就都能用了)
		Vue.prototype.hello = ()=>{alert('你好啊')}
    }
}

//应用插件
Vue.use(pluginObj,'x','y')
样式作用域
若想某样式仅在组件内使用,不影响外部组件,可在style标签上加入scoped,如下:
<!--若用了Less或者scss,必需加上lang说明-->
<style scoped lang="less">
.demo {
  background-color: skyblue;
}
</style>
可以看到,模板编译后会给标签加上一个随机data属性,然后类选择器变成了属性选择器

更新数据时的坑
Vue中通过Object上的defineProperty方法对数据做了【数据代理】和【数据劫持】,通过重写对象属性的get和set方法来推动页面更新
defineProperty方法
let person = {
	name:'张三',
	sex:'男',
}

Object.defineProperty(person,'age',{
	// value:18,
	// enumerable:true, //控制属性是否可以枚举,默认值是false
	// writable:true, //控制属性是否可以被修改,默认值是false
	// configurable:true //控制属性是否可以被删除,默认值是false

	//当有人读取person的age属性时,get函数(getter)就会被调用,且返回值就是age的值
	get(){
		console.log('有人读取age属性了')
		return 10
	},

	//当有人修改person的age属性时,set函数(setter)就会被调用,且会收到修改的具体值
	set(value){
		console.log('有人修改了age属性,且值是',value)
		number = value
	}
})
为什么data必需为一个函数
因为引入组件概念是为了达到复用,若data为一个对象,则多个组件中的data其实都是一个对象的引用地址。
而如果是一个函数,每生成一个组件,都会调用其data方法,返回一个对象,每个组件单独维护一个数据对象。
Vue监测data的方法
【数据劫持】:
//假设某组件的data如下:
data(){
 	return {
       x: 1,
  	   y: {
    	  z: 2,
  	   },
    }
},

//创建此组件时会调用data(),拿到一个obj
//然后遍历对象的key,若不是对象(如上面的x),则利用defineProperty方法在组件上的_data里定义同样方法
//并在set里推动视图更新
//若是一个对象,则递归,并对深层次的key劫持
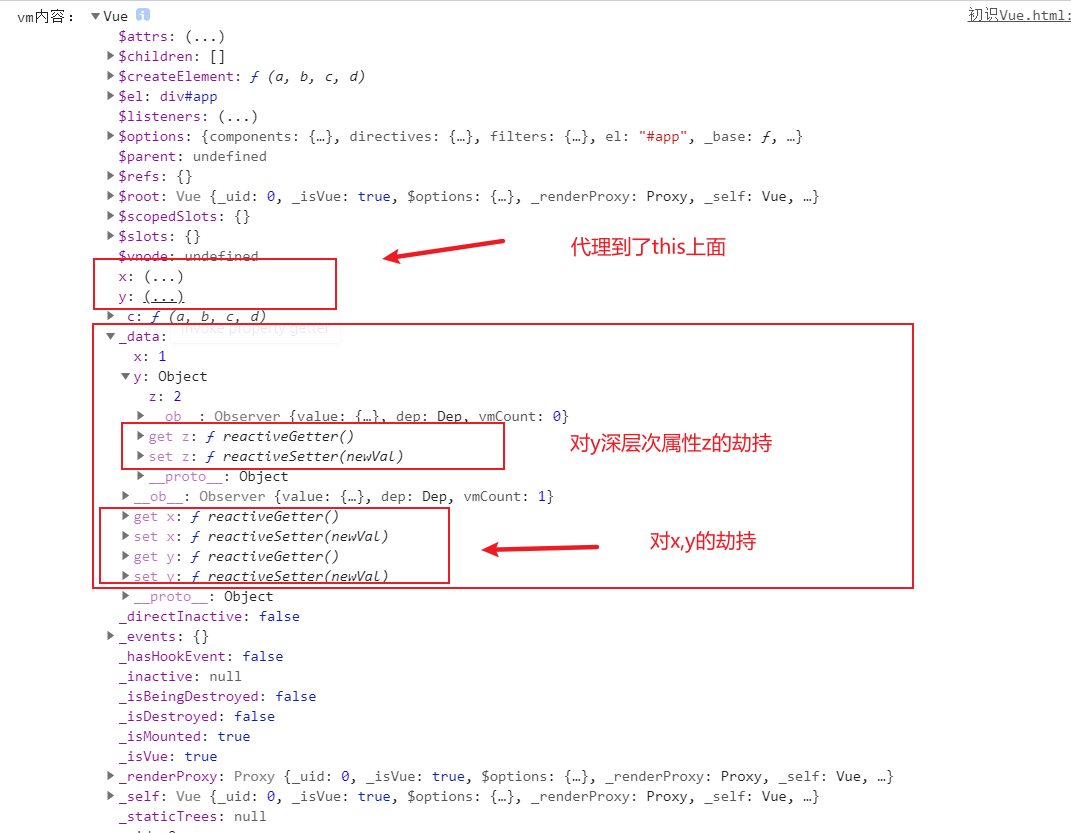
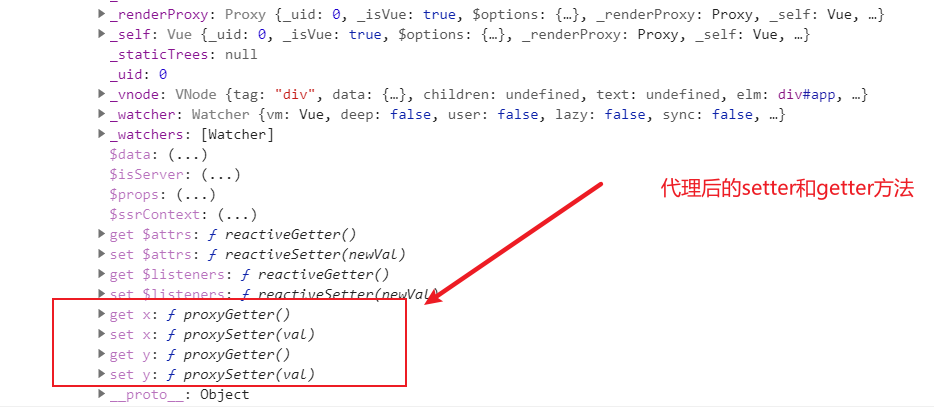
【数据代理】:
//仅仅把数据劫持到_data里还需要通过this._data.x取得数据
//所以Vue又做了一次代理,把数据代理到了this上,可通过this.x直接取得数据
vm对象如下:
对象和数组的坑
Vue2中使用的defineProperty对数组(下标取值)变化、对象新增/删除一个key时,是检测不到的(所以Vue3采取了Proxy来替代defineProperty),如下:
<template>
    <div v-for="item in arr">{{item}}</div>
	<div v-for="(value,key) in person">{{key}}-----{{value}}</div>
	<button @click="change">更改数组/对象</button>
	<button @click="vueChange">Vue更改数组/对象</button>
</template>

data(){
   arr:[1,2,3],
   person:{
       name:'张三',
       age:18
   },
},
methods:{
    change(){
        //数据变了,视图不会更新
        this.arr[0]=100
        //增加key值视图并未变化,因为vue并未劫持此数据
        this.person.sex='男'
        //删除某个key视图也不会变化,因为检测不到
        delete this.person.name
        //打印可看到数据变了,视图并未更新
        console.log(this.arr,this.person)
    },
    vueChange(){
        //让vue代理
        this.$set(this.arr,0,100)
        this.$set(this.person,'sex','男')
        //让vue删除,即可通知视图更新
        this.$delete(this.person,'name')
    }
}
【补充】:当然,vue也重写了数组上的push,pop,shift,unshift等会改变数组自身的方法,也可推动视图更新,或者为了视图更新,也可将整个data里的对象或数组的引用位置变化,也可使得视图变化
全局配置
在根路径下加入一个vue.config.js文件,通过common模块化方法暴露出一个配置对象,可在serve和build时读取配置,更改webpack配置,相对于react的eject更加友好,官网配置指导:https://cli.vuejs.org/zh/config/#vue-config-js
//示范
module.exports={
    publicPath:'/',
    //关闭语法检查
    lintOnSave:false,
    pages:{
        index:{
            entry:'src/main.js'
        }
    }
    //......
}
代理服务器(开发模式)
开发时前端若出现跨域,可在vue.config.js中开启代理服务器解决跨域,如下:
//开启代理服务器(方式一)
	/* devServer: {
    proxy: 'http://localhost:5000'
  }, */

//开启代理服务器(方式二)
devServer: {
    proxy: {
      '/api1': {
          target: 'http://localhost:5000',
          //避免服务器收到/api1,接受一个正则
		  pathRewrite:{'^/api1':''},
          // ws: true, //用于支持websocket
          // changeOrigin: true //用于控制请求头中的host值
      },
      '/api2': {
       	   target: 'http://localhost:5001',
		   pathRewrite:{'^/demo':''},
           // ws: true,
           // changeOrigin: true
      }
    }
 }
$nextTick
Vue只会等某个方法执行完毕才会去更新视图,若想在方法中执行DOM重排重绘后的方法,则可调用nextTick方法
test(){
    //do something

    //这里不管是否是箭头函数,this都不会丢失
    this.$nextTick(()=>{
        //使得input聚焦
        this.$refs.input.focus()
    })

    //若次数不用nextTick,则等待test执行完毕(即执行过focus方法),input重新绘制,并未聚焦
    //所以等待input重绘完毕,再调用focus
}
过度与动画
   console.log(this.arr,this.person)
},
vueChange(){
    //让vue代理
    this.$set(this.arr,0,100)
    this.$set(this.person,'sex','男')
    //让vue删除,即可通知视图更新
    this.$delete(this.person,'name')
}
}
**【补充】:当然,vue也重写了数组上的push,pop,shift,unshift等会改变数组自身的方法,也可推动视图更新,或者为了视图更新,也可将整个data里的对象或数组的引用位置变化,也可使得视图变化**


## 全局配置

**在根路径下加入一个vue.config.js文件,通过common模块化方法暴露出一个配置对象,可在serve和build时读取配置,更改webpack配置,相对于react的eject更加友好,官网配置指导:https://cli.vuejs.org/zh/config/#vue-config-js**

```js
//示范
module.exports={
    publicPath:'/',
    //关闭语法检查
    lintOnSave:false,
    pages:{
        index:{
            entry:'src/main.js'
        }
    }
    //......
}
代理服务器(开发模式)
开发时前端若出现跨域,可在vue.config.js中开启代理服务器解决跨域,如下:
//开启代理服务器(方式一)
	/* devServer: {
    proxy: 'http://localhost:5000'
  }, */

//开启代理服务器(方式二)
devServer: {
    proxy: {
      '/api1': {
          target: 'http://localhost:5000',
          //避免服务器收到/api1,接受一个正则
		  pathRewrite:{'^/api1':''},
          // ws: true, //用于支持websocket
          // changeOrigin: true //用于控制请求头中的host值
      },
      '/api2': {
       	   target: 'http://localhost:5001',
		   pathRewrite:{'^/demo':''},
           // ws: true,
           // changeOrigin: true
      }
    }
 }
$nextTick
Vue只会等某个方法执行完毕才会去更新视图,若想在方法中执行DOM重排重绘后的方法,则可调用nextTick方法
test(){
    //do something

    //这里不管是否是箭头函数,this都不会丢失
    this.$nextTick(()=>{
        //使得input聚焦
        this.$refs.input.focus()
    })

    //若次数不用nextTick,则等待test执行完毕(即执行过focus方法),input重新绘制,并未聚焦
    //所以等待input重绘完毕,再调用focus
}
过度与动画
Vue框架提供Transition组件,用于写过度与动画,官网最佳示范:https://cn.vuejs.org/v2/guide/transitions.html