React
React核心概念之state
-
理解:
- state是组件对象最重要的属性, 值是对象(可以包含多个key-value的组合)
- 组件被称为"状态机", 通过更新组件的state来更新对应的页面显示(重新渲染组件)
-
注意
- 组件中render方法中的this为组件实例对象
- 状态数据,不能直接修改或更新
- 组件自定义的方法中this为undefined,如何解决?
- 强制绑定this: 通过函数对象的bind()
- 箭头函数
React核心概念之props(父传子, 子传父)
实例案例之父传子
首先要在父组件中的state中定义数据, 然后使用 xxx = {xxx} 的形式来传参
class App extends Component {
  state = {
    name:'急急急',
    sex:'不明'
  }
  render() {
    let {name} = this.state
    return (<div>
            <FriendList
              name = {name}
            />
          </div>)
  }
}
export default App;
接着在子组件中使用this.props来接收
class FriendList extends Component {
    render(){
        console.log(this.props) // {name: "急急急"}
        return (
            <div>
                <div className="friend-list">
                    {
                        Object.keys(data).map((item,index) => {
                            return (
                                <Dl
                                    key = {index}
                                    name = {item}
                                    value = {data[item]}
                                />
                            )
                        })
                    }
                </div>
            </div>
        )
    }
}

export default FriendList
实例案例之子传父
因为React的组件都是单向数据流, 所以只能父组件向子组件传递参数, 那如何子传父呢?
这里我们可以利用一个方法this.setState()修改state里面的值, 所以我们可以定义一个方法, 让这个方法来修改state里面的值, 然后通过父传子的方式把这个方法传给子组件,最后在子组件中调用这个方法来达到子组件修改父组件这一目的
class App extends Component {
  state = {
    name:'急急急',
    sex:'不明'
  }

  changValue = (newName)=>{
    this.setState({name:newName})
  }

  render() {
    let {name} = this.state
    return (<div>
            <p>{this.state.name}</p>
            <FriendList
              name = {name}
              changValue = {this.changValue}
            />
          </div>)
  }
}
export default App;
class FriendList extends Component {
    render(){
        let {changValue} = this.props
        return (
            <div>
                <button
                    onClick={() =>{
                        changValue('不急不急不急')
                    }}
                >点我</button>
                <div className="friend-list">
                    {
                        Object.keys(data).map((item,index) => {
                            return (
                                <Dl
                                    key = {index}
                                    name = {item}
                                    value = {data[item]}

                                />
                            )
                        })
                    }
                </div>
            </div>
        )
    }
}
export default FriendList
React核心概念之ref的3种绑定方式
方式1: string类型绑定
类似于vue中的ref绑定方式,可以通过this.refs.绑定的ref的名字获取到节点dom
注意: 这种方式已经不被最新版的react推荐使用,有可能会在未来版本中遗弃
// string ref
class MyComponent extends React.Component {
  componentDidMount() {
    this.refs.myRef.focus();
  }
  render() {
    return <input ref="myRef" />;
  }
}
方式2: react.CreateRef()
通过在class中使用React.createRef()方法创建一些变量,可以将这些变量绑定到标签的ref中
那么该变量的current则指向绑定的标签dom
// callback ref
class MyComponent extends React.Component {
  componentDidMount() {
    this.myRef.focus();
  }
  render() {
    return <input ref={(ele) => {
      this.myRef = ele;
    }} />;
  }
}
方式3: 函数形式
在class中声明函数,在函数中绑定ref
使用这种方法可以将子组件暴露给父组件以使得父组件能够调用子组件的方法
// React.createRef
class MyComponent extends React.Component {
  constructor(props) {
    super(props);
    this.myRef = React.createRef();
  }
  componentDidMount() {
    this.myRef.current.focus();
  }
  render() {
    return <input ref={this.myRef} />;
  }
}
注意: react并不推荐过度使用ref,如果能通过state做到的事情,就不应该使用 refs 在你的 app 中“让事情发生”。过度使用ref并不符合数据驱动的思想
React扩展之Context通信
一种组件间通信方式, 常用于【祖组件】与【后代组件】间通信
使用
1) 创建Context容器对象:
	const XxxContext = React.createContext()

2) 渲染子组时,外面包裹xxxContext.Provider, 通过value属性给后代组件传递数据:
	<xxxContext.Provider value={数据}>
		子组件
    </xxxContext.Provider>

3) 后代组件读取数据:

	  // 第一种方式:仅适用于类组件
	  static contextType = xxxContext  // 声明接收context
	  this.context // 读取context中的value数据

	  // 第二种方式: 函数组件与类组件都可以
	  <xxxContext.Consumer>
	    {
	      value => ( // value就是context中的value数据
	        要显示的内容
	      )
	    }
	  </xxxContext.Consumer>
注意
在应用开发中一般不用context, 一般都用它的封装react插件
组件的通信方式总结
几种通信方式:
1.props:
	1).children props
	2).render props
2.消息订阅-发布:
	pubs-sub、event等等
3.集中式管理:
	redux、dva等等
4.conText:
	生产者-消费者模式
比较好的搭配方式:
父子组件:props
兄弟组件:消息订阅-发布、集中式管理
祖孙组件(跨级组件):消息订阅-发布、集中式管理、conText(开发用的少,封装插件用的多)
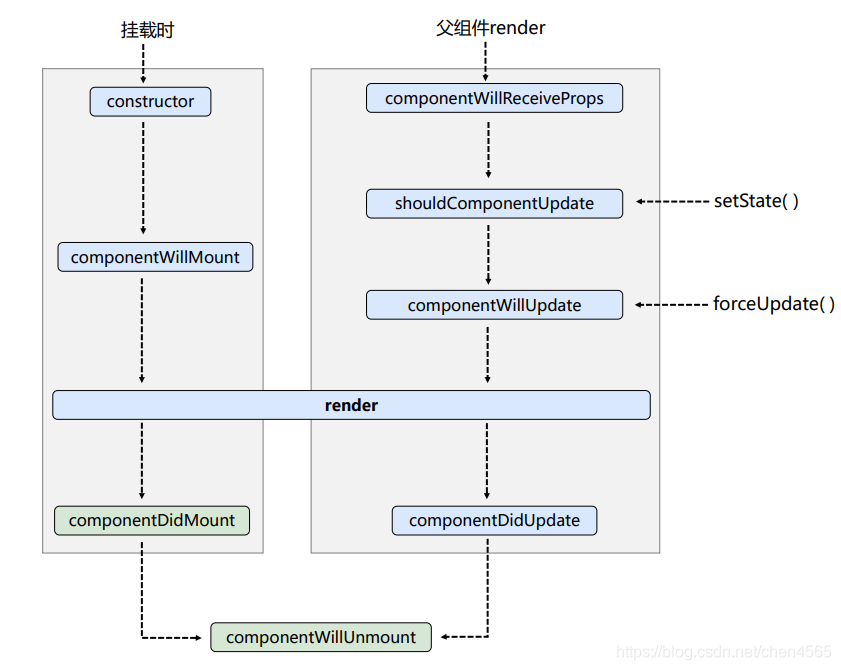
React生命周期(旧)
-
挂载卸载过程
- constructor()
- componentWillMount()
- componentDidMount()
- componentWillUnmount ()
-
更新过程
- componentWillReceiveProps(nextProps)
- shouldComponentUpdate(nextProps,nextState)
- componentWillUpdate (nextProps,nextState)
- componentDidUpdate(prevProps,prevState)
- render()
React的生命周期从广义上分为三个阶段:挂载、渲染、卸载
因此可以把React的生命周期分为两类:挂载卸载过程和更新过程。
React的生命周期图:

挂载卸载过程
1.constructor()
constructor()中完成了React数据的初始化,它接受两个参数:props和context,
当想在函数内部使用这两个参数时,需使用super()传入这两个参数。
注意:只要使用了constructor()就必须写super(),否则会导致this指向错误。
2.componentWillMount()
componentWillMount()一般用的比较少,它更多的是在服务端渲染时使用。
它代表的过程是组件已经经历了constructor()初始化数据后,但是还未渲染DOM时。
3.omponentDidMount()
组件第一次渲染完成,此时dom节点已经生成,可以在这里调用ajax请求,返回数据setState后组件会重新渲染
4.componentWillUnmount ()
在此处完成组件的卸载和数据的销毁,比如进行 清除组件中所有的setTimeout、setInterval等计时器
或 移除所有组件中的监听器removeEventListener 等操作。
更新过程
1.componentWillReceiveProps (nextProps)
接收父组件新的props时,重新渲染组件执行的逻辑。
在接受父组件改变后的props需要重新渲染组件时用到的比较多
接受一个参数nextProps
通过对比nextProps和this.props,将nextProps的state为当前组件的state,从而重新渲染组件
2.shouldComponentUpdate(nextProps,nextState)
主要用于性能优化(部分更新)

唯一用于控制组件重新渲染的生命周期,由于在react中,setState以后,state发生变化,
组件会进入重新渲染的流程,在这里return false可以阻止组件的更新

因为react父组件的重新渲染会导致其所有子组件的重新渲染,
这个时候其实我们是不需要所有子组件都跟着重新渲染的,因此需要在子组件的该生命周期中做判断
3.componentWillUpdate (nextProps,nextState)
shouldComponentUpdate返回true以后,组件进入重新渲染的流程,
进入componentWillUpdate,这里同样可以拿到nextProps和nextState。
4.componentDidUpdate(prevProps,prevState)
组件更新完毕后,react只会在第一次初始化成功会进入componentDidmount,
之后每次重新渲染后都会进入这个生命周期,这里可以拿到prevProps和prevState,即更新前的props和state。
5.render()
render函数会插入jsx生成的dom结构,react会生成一份虚拟dom树,在每一次组件更新时,
在此react会通过其diff算法比较更新前后的新旧DOM树,比较以后,找到最小的有差异的DOM节点,并重新渲染。
注意
- 注意:组件自定义的方法中this为undefined,如何解决:强制绑定this:通过函数对象的bind(),箭头函数
- 注意:组件内部不要修改props数据
- 注意:string类型绑定这种方式已经不被最新版的react推荐使用,有可能会在未来版本中遗弃
- 注意:react并不推荐过度使用ref,如果能通过state做到的事情,就不应该使用 refs 在你的 app 中“让事情发生”。过度使用ref并不符合数据驱动的思想
- 注意:在应用开发中一般不用context, 一般都用它的封装react插件