路由传递参数的方式
pramse传参
-
Route定义方式:<Route path=’/About/:id’ component={About} / >
-
Link组件:< Link to="/path/通过pramse传参">About
在使用params传递参数时,你会清楚的看到参数以路由的形式展现了出来,例如: -
http://localhost:3000/home/message/用户1/文章32
如果,你想传对象的话,可以用JSON.stringify(),想将其转为字符串,然后另外的页面接收后,用JSON.parse()转回去。这里简单提一下,不赘述。
传递 search 参数
这个就是依赖 get的请求方式。
http://localhost/home/message?id=1&title=abc
即 javascript 可以获取到 url 中 ? 后面的请求体。 所以我们可以吧上面的 map 中返回的标签修改以下
<li key={item.id}><Link to={`/home/message/detail?id=${item.id}&title=${item.title}`}>{item.title}</Link></li>
且这种方式不需要在路由中声明接收。
通过 props 中的 location 进行接收
query
-
Route定义方式:
-
Link组件 <Link to=’/Home?id=KaTeX parse error: Expected 'EOF', got '&' at position 3: {}&?title={}’’>Home
state -
Route定义方式:
-
Link组件:<Link to={{pathname: ‘/Home’,state:{传递的参数}}}>Download
-
参数获取:this.props.location.state
- . withRouter 组件 让一般组件拥有路由组件的跳转功能
有的时候,我们想要在其他组件中也使用路由组件的功能,比如导航栏,应该属于公用组件,但是里面的导航链接的功能却是路由组件的功能,我们应该怎么解决呢?
在 react-router 中,提供了这么一种方法,可以让一般组件具有路由组件的功能,则就是 withRouter() 方法。
看看演示:
import {withRouter} from "react-router-dom";
class Header extends Component {
// withRouter后该组件也有了路由组件的功能
goBack = ()=>{
this.props.history.goBack();
}
go = ()=>{
this.props.history.go(2);
}
goForward = ()=>{
this.props.history.goForward();
}
render() {
return (
<div>
<h1>This is a React-router-dom Test!</h1>
<button onClick={this.goBack}>goBack</button>
<button onClick={this.goForward}>goForward</button>
<button onClick={this.go}>go</button>
</div>
)
}
}
// withRouter 用于给一般组件添加上路由组件特有的功能,返回一个新组件
export default withRouter(Header);
外链图片转存失败,源站可能有防盗链机制,建议将图片保存下来直接上传(img-7wReIXDU-1627644504523)(image/QQ%E6%B5%8F%E8%A7%88%E5%99%A8%E6%88%AA%E5%9B%BE20210729191109.png)]
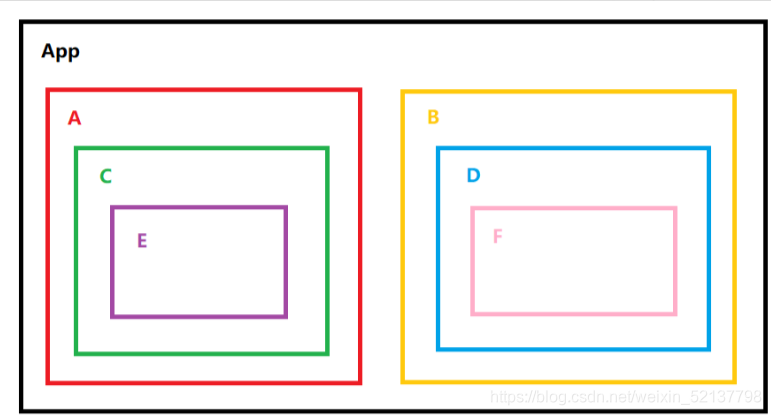
假设我们的组件如同这张图一般,组件之间相互嵌套着。
这时候提出一个要求,在组件E中的数据,要给组件A和组件F使用,要怎么处理呢?
- 方法1:通过不断的
props进行传参,但是这非常的费时费力 - 方法2:使用
Pubsub.js等进行消息发布/订阅功能 - 方法3:使用
react-redux进行数据集中式管理
即 redux可以看作一个管家,负责帮忙存储公共的数据。
十、redux 的使用

假设我们的组件如同这张图一般,组件之间相互嵌套着。
这时候提出一个要求,在组件E中的数据,要给组件A和组件F使用,要怎么处理呢?
- 方法1:通过不断的
props进行传参,但是这非常的费时费力 - 方法2:使用
Pubsub.js等进行消息发布/订阅功能 - 方法3:使用
react-redux进行数据集中式管理
即 redux可以看作一个管家,负责帮忙存储公共的数据。
. 安装 redux
npm i redux -S
2. 核心概念

redux 有着三个核心概念
-
action:
- 动作的对象(操作内容)
- 包含两个属性: a.
type: 表示属性,值为字符串,唯一,必要属性(要干嘛) b.data: 数据属性,值为任意类型,可选属性(怎么干) - 例如:
{ type: "ADD_STUDENT", data: { name: "tom", age: 18 } }
-
reducer:
- 用于初始化状态和加工状态(对数据进行初始化和操作数据的)
- 加工时,根据旧的
state和action,产生新的state的纯函数 - 有两个参数,一个为之前的状态(
prevstate)与动作对象(action)
-
store:
- 将
state、action、reducer联系在一起的对象(大脑)
- 将
我们大致可以把
redux的想象成一家餐厅,而我们就是顾客(component),我们通过叫服务员(action)进行点餐等操作,服务员转达经理(store)后,经理吩咐后厨(reducer)进行做菜,然后把菜做好后由经理传递给顾客
3. 基本使用 redux
(1) 创建文件夹
在 src文件夹中创建 redux文件夹,用于存放 redux的相关内容
-
Compnoent ------ 存放组件相关的文件夹
-
redux
------ 存放
redux相关内容的文件夹
- actions ------ 存放
action相关内容的文件夹 - reducers ------ 存放
reducer相关内容的文件夹 constant.js------ 存放规范命名的文件store.js------ 编写store的文件
- actions ------ 存放
由我来一个个带你们解析。先写一个最简单的 redux
/**
 * store.js
 * 该文件专门用于暴漏一个 store对象,整个应用只有一个 store对象
 */
// 引入 createStore,专门用于创建 redux中最为核心的 store
import {createStore} from "redux";
// 引入为 Count组件服务的 reducer
import countReducer from "./count_reducer";
const store = createStore(countReducer)
// 暴露 store对象
export default store;
复制代码
/**
 * / reducer / count.js
 * 1. 该文件是用于创建一个为 Count组件服务的 reducer,reducer的本质就是一个函数
 *
 * 2. reducer函数会收到两个参数,分别为:之前的状态(preState),动作对象(action)
 *
 * 3. 会自动调用一次 reducer(初始化)
 */
// 初始化的状态
const initState = 0;
export default function countReducer(preState = initState, action){
    if(preState === undefined) preState = 0;
    // 从 action对象中获取 type,data
    const {type, data} = action;
    // 根据 type觉得如何加工数据
    switch (type) {
        case 'increment': // data
            return preState + data;
        case 'decrement': // 如果是减
            return preState - data;
        default:
            return preState;
    }
}
复制代码
// / Component / Count.js
import React, { Component } from 'react'
// 引入store
import store from "../../redux/store";
export default class Count extends Component {
    // 加法
    increment = ()=>{
        const {value} = this.selectNumber;
        // 发送动作对象给 store
        store.dispatch({
            type: "increment",
            data: value*1
        })
    }
    render() {
        return (
            <div>
                <h1>当前求和为:{store.getState()}</h1>
                <select ref={c=>this.selectNumber = c}>
                    <option value="1">1</option>
                    <option value="2">2</option>
                    <option value="3">3</option>
                </select>
                <button onClick={this.increment}>+</button>
            </div>
        )
    }
}
这个必须加不然数据变了但页面不会变化
 componentWillMount(){

       console.log(store.subscribe)

        store.subscribe(()=>{

          this.setState({})

      })

   }
必须加上这段代码不然render函数不会调用页面不会变化
以上就是最精简的 redux,让我们分析一下流程:
-
编写
Count组件,创建Count组件对应的Reducer文件 -
编写
Reducer的代码并抛出::
Reducer是个纯函数- 通常使用
Switch进行action中的type的判断 - 函数返回值为修改后的值
-
创建
store并编写代码:
- 使用方法
createStore()方法来创建一个store,参数是一个reducer - 把编写好的
Count组件的reducer导入
- 使用方法
-
在组件中引入
store并进行调用:
- 在方法中通过使用
dspatch()方法向store传递action dispatch的参数时一个对象(即action动作对象)
- 在方法中通过使用
(2) 使用流程
以上使创建的大致流程,而使用的大致流程是这样的:
store初始化时自动调用了一次reducer进行了值的初始化- 组件发出动
action给store,store进行判断后分发给对应的reducerreducer根据action里的type对数据进行相应的处理后返回新的值store接收返回的新的值,并将旧的值替换掉- 通过方法
store.getState()获取当前store身上的值
(3) 使用异步redux
如果我们需要使用异步的 redux的话,还需要借助另一款插件: redux-thunk
npm i redux-thunk -S
复制代码
这是一个中间件,用于帮忙处理异步的 redux,
异步的 action的值为一个函数 在函数中进行普通的 dispatch() 操作
export const createIncrementAsyncAction = (data, time=500)=>{
    // 返回一个 action
    return ()=>{
        setTimeout(()=>{
            store.dispatch(createIncrementAction(data));
        }, time);
    }
}
复制代码
同时我们要在 store处设置让他支持执行中间件,通过 redux的 applyMiddleware() 方法就可以加载中间件,他的参数就是中间件,然后 applyMiddleware() 将作为 createStore() 的第二个参数引入。
// store.js
// 引入 applyMiddleware,专门用于执行中间件
import {createStore, applyMiddleware} from "redux";
// 引入为 Count组件服务的 reducer
import countReducer from "./count_reducer";
// 引入 redux-thunk,用于支持异步 action
import thunk from "redux-thunk";
// 暴露 store对象
export default createStore(countReducer, applyMiddleware(thunk));
复制代码
(4) 监听状态变化
你写着写着有没有发现,虽然 redux里面的状态确实更新了,但是页面并没有变化啊?
还记得页面渲染使用的是哪个函数吗?render()函数。可是在 redux状态发生变化时,并不会帮助我们调用 render()函数,所以我们需要手动实现实时渲染页面。
在这里我们使用到了 redux的 store上的 subscribe() 方法,用于监听 redux上状态的变化,参数是一个函数,便于我们进行操作。
一般我们都写在根标签上(精简些,不用再每个使用 redux的组件中都写一遍)
import React from 'react';
import ReactDOM from 'react-dom';
import './index.css';
import App from './App';
import store from "./redux/store"
ReactDOM.render(
    <App />,
  document.getElementById('root')
);
// 精简写法
store.subscribe(()=>{
  ReactDOM.render(
      <App />,
    document.getElementById('root')
  );
})
4. 注意事项
-
一般使用到
redux的话,需要使用的组件肯定不止一个,所以创建 actions和reducers用来存储多个action和reducer -
同上,
store肯定不止加载一个
reducer,所以我们使用
redux的
combineReducers()方法来整合所有的
reducercombineReducers()方法的参数是一个对象,里面存放着所有的reducer
import {createStore, applyMiddleware, combineReducers} from "redux";
import countReducer from "./reducers/count";
import personReducer from "./reducers/person";
import thunk from "redux-thunk";
// 汇总所有的 reducer
const allReducer = combineReducers({
    count: countReducer,
    persons: personReducer,
});
export default createStore(allReducer, applyMiddleware(thunk));
-
因为
redux在设计上还有许多的问题,例如:
- 单个组件需要做:与
store打交道,获取数据,监听数据变化,派发action对象等,一个组件负责的事情太多了。 - 需要另外监听
redux的状态变化来更新状态并渲染页面。 - 所以有人对
redux进行了优化,推出了另一个库react-redux(放心,没啥不同,就是多了点优化,后面会讲)
- 单个组件需要做:与
-
能不使用 redux,就不要使用 redux(不管是 redux 还是 react-redux)
-
能不使用 redux,就不要使用 redux(不管是 redux 还是 react-redux)
-
能不使用 redux,就不要使用 redux(不管是 redux 还是 react-redux)
总结
redux就是一个管理react数据的一个状态库,当我们很多地方需要使用到同一组数据的时候,就可以使用redux来管理我们的数据,避开了不必要的多层级,复杂化的传输数据,让我们的数据使用起来更加方便,高效,节省内存空间.