文章目录
来源博客:【Harryの心阁】
v-model
input双向绑定radio使用时双向绑定 如果绑定的时相同的数据,name可以省略selected多个选择加入属性multiple
<!-- <input type="text" v-model='message'>{{message}}  使用v-model实现双向绑定 -->
<input type="text" :value="message" @input="message = $event.target.value">{{message}}
<!--使用input事件-->
修饰符
.lazy失去焦点或者用户点击回车时指向- 默认情况传入的数据类型为
string使用修饰词.number将数据类型转换成number .trim将空格去除
组件化开发
- 拆分成一个一个的, 可复用的组件
步骤 - 创建组件构造器, 调用
Vue.extend()方法 - 注册组件
Vue.component()方法, 全局组件 - 使用组件
components属性
- 构建局部属性, 在Vue实例中
父组件和子组件
- 组件和组件之间存在层级关系
父子组件的通信
props属性 向子组件传递数据- 自定义事件
$emit子传父
props传值类型
- 可以使用对象方法传递, 或者数组
- 在使用对象方法时, 可以给传递的参数设定数据类型String, Array, Object, Null, Undefined, Number, Symbol
- 也可以给传递的参数设定默认值
default, 设定改参数是否必须接受传值required, 也可以自定义验证函数validator - 如果设定的数据类型为对象或者数组时 设置默认值时必须从一个工厂函数获取
default:function(){}es5,default(){}es6
子传父
- 使用emit发送事件, 自定义事件
注册语法糖
Vue.component(组件标签名, {template})注册全局组件的语法糖- 局部注册组件在
components中{(组件标签名, {template})}
分离template方法
- 通过script类型
text/x-template通过id来获取模板 - 或者直接通过
template标签
组件内data动态化实现
- data类型不是对象类型, 而是函数类型, 在函数的返回值中定义数据data
- data函数是为了使组件之间相互独立, 返回的数据 地址不相同
Vue的特性
数据驱动视图
- 当页面数据发生变化时, 页面会重新渲染
- 单向的数据绑定
双向数据绑定
- form表单负责采集数据, ajax负责提交数据
注: 数据驱动视图和双向数据绑定的底层原理是MVVM
MVVM
- Model, View, ViewModel
- Model 表示当前页面渲染时所依赖的数据源
- View 表示当前页面所渲染的DOM结构
- ViewModel 表示Vue的实例
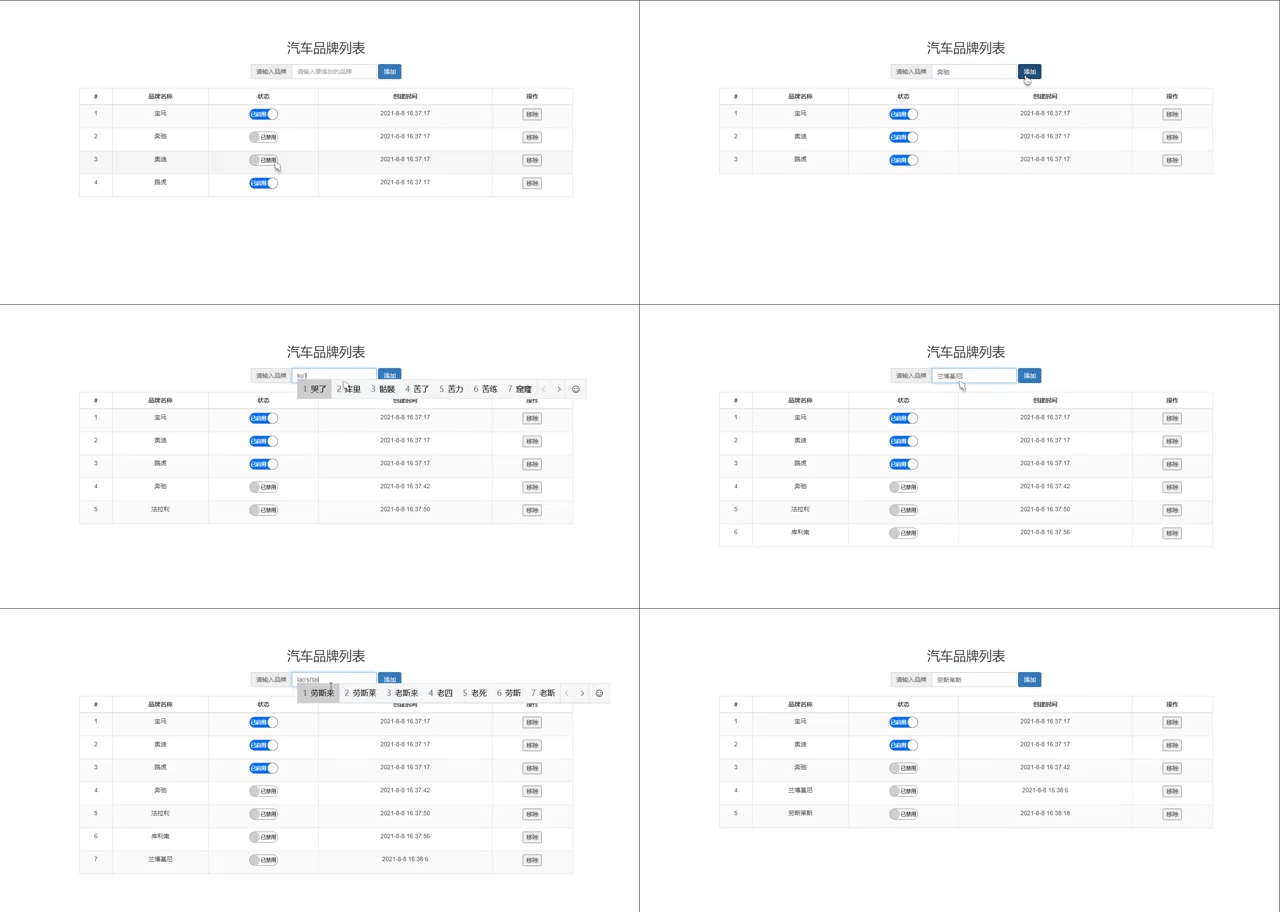
品牌列表案例
<!DOCTYPE html>
<html lang="en">

<head>
  <meta charset="UTF-8">
  <meta http-equiv="X-UA-Compatible" content="IE=edge">
  <meta name="viewport" content="width=device-width, initial-scale=1.0">
  <script src="https://cdn.jsdelivr.net/gh/Rr210/hexofixed@v0.47/js/jquery-3.5.1.min.js"></script>
  <link rel="stylesheet" href="https://cdn.jsdelivr.net/gh/Rr210/hexofixed@frame/frame/bootstrap/3/css/bootstrap.min.css">
  <script src="https://cdn.jsdelivr.net/gh/Rr210/hexofixed@frame/frame/bootstrap/3/js/bootstrap.min.js"></script>
  <title>Document</title>
</head>
<style>
  body {
    padding: 0;
    margin: 0;
    box-sizing: border-box;
  }

  .tab {
    margin: 100px auto;
  }

  .checkOn {
    overflow: hidden;
    width: 66px;
    height: 25px;
    line-height: 25px;
    border-radius: 20px;
    border: 1px solid #888;
    font-size: 8px;
  }

  .check_warp {
    position: relative;
  }

  input[id^="check"][type="checkbox"] {
    position: absolute;
    width: 100%;
    height: 100%;
    top: 0;
    left: 0;
    opacity: 0;
  }

  .on {
    float: left;
    width: 23px;
    height: 23px;
    line-height: 23px;
    border-radius: 50%;
    background-color: #ccc;
    color: #000;
  }

  .isChecked {
    background-color: #fff;
  }

  .isbg {
    color: #fff;
    background-color: rgb(0, 110, 255);
  }

  .form_data {
    margin: 20px 0;
  }

  #btn1 {
    outline: none;
  }
</style>

<body>
  <div class="tab container text-center" id="app">
    <h2>汽车品牌列表</h2>
    <form class="form-inline form_data" @submit.prevent="add">
      <div class="form-group">
        <label class="sr-only" for="exampleInputAmount">Amount (in dollars)</label>
        <div class="input-group">
          <div class="input-group-addon">请输入品牌</div>
          <input type="text" class="form-control" id="exampleInputAmount" name="brand_name" placeholder="请输入要添加的品牌">
        </div>
      </div>
      <button class="btn btn-primary" id="btn1" type="submit">添加</button>
      <a class="" tabindex="0" class="btn btn-lg btn-danger" role="button" id='btn2' data-toggle="popover" data-trigger="" data-delay="show:500;hide:400" title="提示" data-content=""></a>
    </form>
    <table class="table table-striped table-bordered justify-content-center table-hover">
      <thead>
        <tr>
          <th class="text-center" v-for="(item,index) in th_title">{{item}}</th>
        </tr>
      </thead>
      <tbody>
        <tr v-for="(item,index) in brandList" :key="item.id">
          <td>{{index+1}}</td>
          <td>{{item.brand_name}}</td>
          <td>
            <div class="check_warp">
              <label :for="'check'+item.id" :class="item.status?'checkOn isbg':'checkOn'">
                <div :class="item.status?'on isChecked':'on'" :style="item.status?'float:right':'float:left'"></div>
                {{item.status?'已启用':'已禁用'}}
              </label>
              <input @change="getFloat" :data-index='index' type="checkbox" :checked="item.status" name="status" :id="'check' + item.id">
            </div>
          </td>
          <td>{{item.time | formatDate}}</td>
          <td><button @click="remove(index)">移除</button></td>
        </tr>
      </tbody>
    </table>
  </div>
</body>
<script src="../../js/vue.js"></script>
<script>
  const app = new Vue({
    el: '#app',
    data: {
      th_title: ['#', '品牌名称', '状态', '创建时间', '操作'],
      brandList: [{
          id: 0,
          brand_name: '宝马',
          status: true,
          time: new Date()
        },
        {
          id: 1,
          brand_name: '奔驰',
          status: false,
          time: new Date()
        },
        {
          id: 2,
          brand_name: '奥迪',
          status: true,
          time: new Date()
        },
        {
          id: 3,
          brand_name: '路虎',
          status: true,
          time: new Date()
        }
      ]
    },
    methods: {
      getFloat(e) {
        let {
          checked
        } = e.target
        let {
          index
        } = e.target.dataset
        this.brandList[index].status = checked
      },
      remove(index) {
        this.brandList.splice(index, 1)
      },
      add(e) {
        let timer;
        let brand_name = $('#exampleInputAmount').val().trim()
        if (brand_name.length == 0) {
          this.getmodal('您输入的内容为空,请重新输入!!')
        } else {
          this.brandList.push({
            id: this.brandList.length,
            brand_name,
            status: false,
            time: new Date()
          })
          this.getmodal('品牌已成功添加到列表中')
        }
      },
      getmodal(content) {
        $('.popover-content').text('') // 先清空
        $('#btn2').data('content', content).popover('show')
        timer = setTimeout(function() {
          $('#btn2').popover('destroy')
        }, 2500)
      }
    },
    filters: {
      formatDate: function(now) {
        var year = now.getFullYear(); //取得4位数的年份
        var month = now.getMonth() + 1; //取得日期中的月份,其中0表示1月,11表示12月
        var date = now.getDate(); //返回日期月份中的天数(1到31)
        var hour = now.getHours(); //返回日期中的小时数(0到23)
        var minute = now.getMinutes(); //返回日期中的分钟数(0到59)
        var second = now.getSeconds(); //返回日期中的秒数(0到59)
        return year + "-" + month + "-" + date + " " + hour + ":" + minute + ":" + second;
      }
    }
  })
</script>

</html>

过滤器
- 常用于文本的格式化, 插值表达式和v-bind属性绑定
- 格式: 要转换的值 | 方法
- 知识回顾: 获取字符串中第一个值得方法使用
charAt(索引号) - 全局过滤器 在最外面使用Vue.filter() 定义一个全局过滤器
- 如果全局过滤器和私有过滤器得名称一致, 遵循就近原则
侦听器watch
- 监听数据得变化, 侦听器本质上一个函数, 要监视那个数据得变化, 就要把数据作为方法名即可. 而且方法中也可以加上参数; 新值在前, 旧值在后
- 侦听器的格式
方法格式的侦听器无法在进入页面的时候, 自动触发对象格式侦听器在对象中加入immediate属性 将它的值改为true , handler是固定的写法
const app = new Vue({
  el: '#app',
  data: {
    username: ""
  },
  watch: {
    // 方法格式侦听器
    // username: function (newval, oldval) {
    //   if (newval.trim().length == 0) return
    //   $.get('https://www.escook.cn/api/finduser/' + newval, function (e) {
    //     console.log(e);
    //   })
    // }
    // 对象格式
    username: {
      handler(newval, oldval) {
        console.log(newval, oldval);
      },
      immediate: true
    }
  }
})
深度侦听deep
- 在对象格式的侦听器里面加入deep参数
const app = new Vue({
  el: '#app',
  data: {
    info: {
      username: 'admin'
    }
  },
  watch: {
    // info: {
    //   handler(newval) {
    //     console.log(newval);
    //   },
    //   deep: true
    //   // 开启深度侦听只要对象中任何一个属性变化了 都会触发对象的侦听器
    // }
    // 如果要侦听的是对象的子属性的变化,必须包裹一层单引号
    'info.username': {
      handler(newval) {
        console.log(newval);
      }
    }
  }
})
axios
- 专注于网络请求的库, 在请求到数据之后, 在真正的数据之外套了一层壳
config, data, headers, request, status, statusText
- 如果调用某个方法的返回值是Promise实例则前面可以添加await
 <div id="app">
   <button id="infoGet">Get</button>
   <button id="infoPost">Post</button>
 </div>
 <!-- <script src="../../js/vue.js"></script> -->
 <script src="../../js/axios.min.js"></script>
 <script>
   // axios get事件
   document.querySelector('#infoGet').addEventListener('click', async function() {
     const {
       data: res
     } = await axios({
       method: "get",
       url: 'http://www.liulongbin.top:3006/api/getbooks/'
     })
     console.log(res);
   })
   // axios post事件
   document.querySelector('#infoPost').addEventListener('click', async function() {
     const {
       data
     } = await axios({
       method: "post",
       url: 'http://www.liulongbin.top:3006/api/post/',
       data: {
         name: 'zs',
         age: 20
       }
     })
     console.log(data.data);
   })
 </script>
- 将axios请求后的返回值进行解构重命名
- 简写axios.get()和axios.post()类似于ajax中的 $.get()方法
  <div id="app">
    <button id="infoGet">Get</button>
    <button id="infoPost">Post</button>
  </div>
  <!-- <script src="../../js/vue.js"></script> -->
  <script src="../../js/axios.min.js"></script>
  <script>
    // axios get事件
    document.querySelector('#infoGet').addEventListener('click', async function() {
      const {
        data: res
      } = await axios.get('http://www.liulongbin.top:3006/api/getbooks/', {
        params: {
          id: 1
        }
      })
      console.log(res);
    })
    // axios post事件
    document.querySelector('#infoPost').addEventListener('click', async function() {
      const {
        data: res
      } = await axios.post('http://www.liulongbin.top:3006/api/post/', {
        name: 'zs',
        age: 20
      })
      console.log(res);
    })
vue-cli
- 标准工具
- 安装配置参考cli.vuejs.org
- 运行
vue create first-project - 有两种方法指定渲染区域
el或者使用$mount('#app')
公众号:今日在学
