1 最普通的方法:
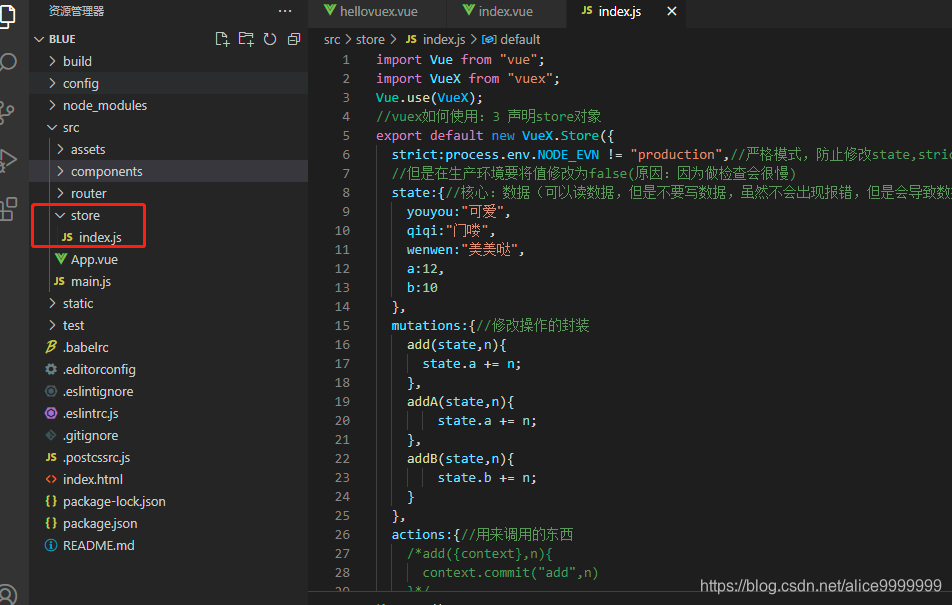
(1)封装Vuex,一般会在src文件夹下新建一个名为store的文件夹,在此文件夹下新建一个index.js(新版本的创建项目的时候会自动生成)

(2)VueX代码:
import Vue from "vue";
import VueX from "vuex";
Vue.use(VueX);
//vuex如何使用:3 声明store对象
export default new VueX.Store({
  strict:process.env.NODE_EVN != "production",//严格模式,防止修改state,strict值为true在开发环境中使用
  //但是在生产环境要将值修改为false(原因:因为做检查会很慢)
  state:{//核心:数据(可以读数据,但是不要写数据,虽然不会出现报错,但是会导致数据难以追踪)
    youyou:"可爱",
    qiqi:"门喽",
    wenwen:"美美哒",
    a:12,
    b:10
  },
  mutations:{//修改操作的封装
    add(state,n){
      state.a += n;
    },
    addA(state,n){
        state.a += n;
    },
    addB(state,n){
        state.b += n;
    }
  },
  actions:{//用来调用的东西
    /*add({context},n){
      context.commit("add",n)
    }*/
    add({commit},n){
      commit("add",n)
    },
    addA({commit},n){
        commit("addA",n)
    },
    addB({commit},n){
        commit("addB",n)
    }
  },
  getters:{//用来专门读取数据,优点类似于computed
    count(state){
        return state.a+state.b;
    }
  },
  modules:{//可以允许将store对象拆分成好多命名空间来用

  }
})
3 Vuex使用:
(1)直接使用:
<template>
  <div>
      <input type="button" value="+5" @click="fn()"/>
  </div>
</template>

<script>
export default {
    name:"haha",
    data (){
        return {

        }
    },
    methods:{
        fn(){
            //this.$store.commit("add",5);//方法一
            this.$store.dispatch("add",1)
        }
    }
}
</script>

<style>

</style>
(2)使用映射方法:
<template>
  <div>
    <div>{{a}}</div>
    <div>{{b}}</div>
    <div>{{count}}</div>
    <input type="button" value="a操作" @click="addA(3)"/>
    <input type="button" value="b操作" @click="addB(1)"/>
    <HelloVuex/>
    <Table :fields="fields" :datas="datas" :aa="this"/>
  </div>
</template>

<script>
//import Table from "./common/table";
import Table from "@/components/common/table";
import HelloVuex from "@/components/hellovuex";
import {mapState,mapActions,mapGetters} from "vuex";
export default {
  name: 'Index',
  data () {
    return {
      datas:[
        {id:1,name:"其其",age:32},
        {id:2,name:"文文",age:18},
        {id:3,name:"柚柚",age:1},
      ],
      fields:[
        {name:"ID",text:"ID"},
        {name:"name",text:"姓名"},
        {name:"age",text:"年龄"},
      ]
    }
  },
  components:{
    Table,
    HelloVuex
  },
  methods:{
    del(id){
      this.datas = this.datas.filter(function (item){
        if(item.id != id){
          return item;
        }
      })
    },
    ...mapActions(["addA","addB"])
  },
  computed:{
    ...mapState(["a","b"]),
    ...mapGetters(["count"])
  }
}
</script>

<!-- Add "scoped" attribute to limit CSS to this component only -->
<style scoped>

</style>