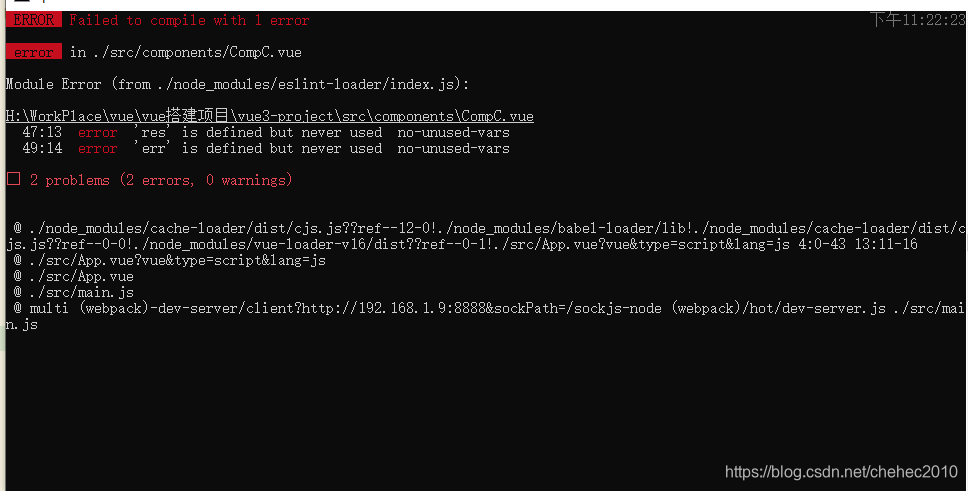
CompC的代码:
<template>
	<div>
		<button @click="sendAjax">发送ajax请求</button>
		//如果user有值就展示,没值就不展示,因为初次进来user没有值
		<div v-if="user">
			<p>姓名:{{user.name}}</p>
			<p>介绍:{{user.bio}}</p>
			<p>头像:<img :src="user.avatar_url" alt="" style="width:100px;height:100px"></p>
		</div>
		<button @click="sendGet">参数传递</button>
	</div>
</template>

<script>
	//导入axios模块
	// import axios from 'axios'
	export default{
		data(){
			return{
				user:null
			}
		},
		methods:{
			// sendAjax(){
			// 	// let p = axios.get('https://gitee.com/api/v5/users/tangyang8942')
			// 	let p = this.$http.get('https://gitee.com/api/v5/users/tangyang8942')
			// 	//请求成功之后
			// 	.then(res =>{//相应对象
			// 		console.log(res.data)
			// 		this.user=res.data
			// 	})
			// 	//请求失败之后
			// 	.catch(err => {
			// 		console.log(err)
			// 	})
			// 	console.log(p)
			// }
			//服务器后台配置跨域访问
			//前台解决跨域访问
			sendGet(){
				this.$http.get('/api/toutiao/index',{
					params:{
						key:'b7cfd84383296b8284dc98ee70ac253e',
						type:'top'
					}
				}).then(res =>{
					console.log(res)
				}).catch(err =>{
					console.log(err)
				})
			}
		}
	}
</script>

<style lang="less">
</style>
vue.config.js
//导出内部的配置项
module.exports = {
	//这表示在测试服务器就是'http://localhost:8888/',打包之后就是'http://localhost:8888//shop/'
	publicPath:process.env.NODE_ENV==='production' ? '/shop/' : '/',
	//项目访问基础url
	// publicPath:'/',
	//开发服务器的配置
	devServer:{
		port:8888,
		//在前端构建代理服务器,进行请求的转发,实现跨域访问
		//编辑vue.config.js.添加代理服务器配置,开发阶段有效
		proxy:{
			'/api':{  //所有以/api开头的请求都被代理转发
				target:'http://v.juhe.cn',  //转发目标服务器
				changeOrigin:true,  //是否需要?
				ws:true,    //启动websocket代理
				secure:false, //如果是https请求,则需要配置
				pathRewrite:{ //重写服务器地址,去掉/api
					'^/api':''
				},
				//输出日志
				logLevel:'debug'  //开启调试模式
			}
		}
	}
}
有一个小bug:

 ?
?
 ?
?
跨域访问,一般都在服务器段进行配置,前段的配置只是在开发阶段可以,具体配置:
//开发服务器的配置
?? ?devServer:{
?? ??? ?port:8888,
?? ??? ?//在前端构建代理服务器,进行请求的转发,实现跨域访问
?? ??? ?//编辑vue.config.js.添加代理服务器配置,开发阶段有效
?? ??? ?proxy:{
?? ??? ??? ?'/api':{ ?//所有以/api开头的请求都被代理转发
?? ??? ??? ??? ?target:'http://v.juhe.cn', ?//转发目标服务器
?? ??? ??? ??? ?changeOrigin:true, ?//是否需要?
?? ??? ??? ??? ?ws:true, ? ?//启动websocket代理
?? ??? ??? ??? ?secure:false, //如果是https请求,则需要配置
?? ??? ??? ??? ?pathRewrite:{ //重写服务器地址,去掉/api
?? ??? ??? ??? ??? ?'^/api':''
?? ??? ??? ??? ?},
?? ??? ??? ??? ?//输出日志
?? ??? ??? ??? ?logLevel:'debug' ?//开启调试模式
?? ??? ??? ?}
?? ??? ?}
?? ?}?
Axios的具体的使用:
<template>
	<div>
		<!-- <button @click="sendAjax">发送ajax请求</button>
		//如果user有值就展示,没值就不展示,因为初次进来user没有值
		<div v-if="user">
			<p>姓名:{{user.name}}</p>
			<p>介绍:{{user.bio}}</p>
			<p>头像:<img :src="user.avatar_url" alt="" style="width:100px;height:100px"></p>
		</div> -->
		<button @click="sendGet">get方法</button>
		<button @click="sendPsot">post方法</button>
		<button @click="sendSimple">使用async和await简化axios的写法</button>
	</div>
</template>

<script>
	//导入axios模块
	// import axios from 'axios'
	//可以把传递的字符串变换为对象
	import qs from 'qs'
	export default{
		data(){
			return{
				user:null
			}
		},
		methods:{
			// sendAjax(){
			// 	// let p = axios.get('https://gitee.com/api/v5/users/tangyang8942')
			// 	let p = this.$http.get('https://gitee.com/api/v5/users/tangyang8942')
			// 	//请求成功之后
			// 	.then(res =>{//相应对象
			// 		console.log(res.data)
			// 		this.user=res.data
			// 	})
			// 	//请求失败之后
			// 	.catch(err => {
			// 		console.log(err)
			// 	})
			// 	console.log(p)
			// }
			//服务器后台配置跨域访问
			//前台解决跨域访问
			sendGet(){
				this.$http.get('/api/toutiao/index',{
					params:{
						key:'b7cfd84383296b8284dc98ee70ac253e',
						type:'top'
					}
				}).then(res =>{
					console.log(res)
				}).catch(err =>{
					console.log(err)
				})
			},
			sendPsot(){
				this.$http.post('/api/toutiao/index',qs.stringify({
					key:'b7cfd84383296b8284dc98ee70ac253e',
					type:'top'
				})).then(res=>{
					console.log(res)
				}).catch(err =>{
					console.log(err)
				})
			},
			//直接拿到对应的结果,异步的写法转换为同步的写法
			async sendSimple(){
				const {data}=await this.$http.post('/api/toutiao/index',qs.stringify({
					key:'b7cfd84383296b8284dc98ee70ac253e',
					type:'top'
				}))
				console.log(data)
			}

		}
	}
</script>

<style lang="less">
</style>
?
 ?
?
?
