路由
路由是一个网络工程里面的术语。
Vue.js 路由允许我们通过不同的 URL 访问不同的内容。
通过 Vue.js 可以实现多视图的单页Web应用(single page web application,SPA)。
-
安装
npm install vue-router --save -
在scr文件目录下创建router文件夹,并创建index.js文件,并进行相关的配置
//index.js
//配置路由相关信息
import Vue from 'vue'
import VueRouter from 'vue-router'
import Home from '../components/Home'
import About from '../components/About'

//1、通过Vue.use(插件)
Vue.use(VueRouter)

//2、创建路由对象
const routes =[
  {
    path:'/home',
    component:Home
  },
  {
    path:'/about',
    component:About
  }

]


const router = new VueRouter({
  routes
})

//3、将router挂载到vue实例中
export default router
- 有了router对象,就需要有相应的组件,在components文件夹下,创建两个组件Home,About
//Home.vue
<template>
  <div>
    <h2>我是首页</h2>
    <p>我是首页内容哈哈哈哈哈哈</p>
  </div>
</template>

<script>
export default {
  name: "Home"
}
</script>

<style>
</style>
//About.vue
<template>
  <div>
    <h2>我是关于哈哈哈哈哈哈</h2>
    <p>我是关于的内容哈哈哈哈会</p>
  </div>
</template>

<script>
export default {
  name : "About"
}
</script>

<style>
</style>
- 有了router对象和组件,就需要在App中进行引用,不然就不会进行显示和跳转
//App.vue
<template>
  <div id="app">
    <router-link to='/home'>首页</router-link>
    <router-link to='/about'>关于</router-link>
    <router-view></router-view>
  </div>
</template>

<script>


export default {
  name: 'App',
}
</script>

<style>

</style>
<router-link>:该标签是一个vue-router中已经内置的组件,它会被渲染成一个a标签
<router-view>:该标签会根据当前的路径,动态渲染出不同的组件
//main.js
import Vue from 'vue'
import App from './App.vue'
import router from './router' //进行导入
Vue.config.productionTip = false

new Vue({
  render: h => h(App),
  router, //进行挂载
}).$mount('#app')
路由的默认路径
但是有个不好的地方就是,首页需要用户点击才能进入,而不是一进入页面就是首页,所以此时需要设置首页为默认路径来解决该方法。
如何让路径默认跳到首页,并且<router-view>渲染首页组件呢?
非常简单,只需要配置多个映射就可以解决了
const routes =[
  {
    path:'/',
    //重定向
    redirect:'/home'
  },
  {
    path:'/home',
    component:Home
  },
  {
    path:'/about',
    component:About
  }
]
如何将默认的hash模式改成history
const router = new VueRouter({
  routes,
  mode:'history'
})
router-link属性
在上述使用<router-link>属性时,只是使用了属性to,用于跳转指定的路径
还有一些其他的属性
- tag: tag可以指定
<router-link>之后渲染成什么组件,<router-link tag="button">,就会渲染成一个按钮。 - replace:replace不会留下history记录,所以指定replace的情况下,后退键不能返回到上一个页面
- active-class:当
<router-link>对应的路由匹配成功后,会自动给当前元素设置一个router-link-active的class,设置active-class可以修改默认的名称。
点击哪个<router-link>,其字体就会变得红色
//index.js
const router = new VueRouter({
  routes,
  mode:'history',
  linkActiveClass:'active'
})

//App.vue
<template>
  <div id="app">
    <router-link to='/home' active-class="active">首页</router-link>
    <router-link to='/about' active-class="active">关于</router-link>
    <router-view></router-view>
  </div>
</template>

动态路由
在某些情况下,一个页面的path路径可能是不确定的,比如进入用户界面时,希望是如下的路径:
/user/aaa或者/user/bbb
如果是上面的路由设置方式就无法进行动态获取不同用户的相关地址。
此时就需要一种path和Component的匹配关系,称之为动态路由。
设置方式也不难:
- 既然是动态获取,那么路径就不能写死。
//index.js
const routes =[
 {
    path:'/user/:userId',  //后面的:userId 跟着是动态获取到的用户ID
    component:User
  }
]
2.需要将路由路径配置到App.vue文件,并设置用户信息
<router-link :to="'/user/'+userId" active-class="active">用户</router-link>  //:to 动态获取用户id,并进行拼接

export default {
  name: 'App',
  data(){
    return {
      userId:'7dongyuxiotang'
    }
  }
- 配置User组件
<template>
  <div>
    <h2>我是用户哈哈哈哈哈哈</h2>
    <p>我是用户内容哈哈哈哈</p>
    <p>{{userId}}</p>
  </div>
</template>

<script>
export default {
  name: "User",
  computed:{
    userId(){
      return this.$route.params.userId
    }
  }
}
</script>

<style>
</style>
其中this.$route.params.userId中的$route 获取到是当前激活的路由的状态信息。
$route.params:一个 key/value 对象,包含了 动态片段 和 全匹配片段,如果没有路由参数,就是一个空对象。后面紧跟的userId,是在index.js中的path中的userId

路由的懒加载
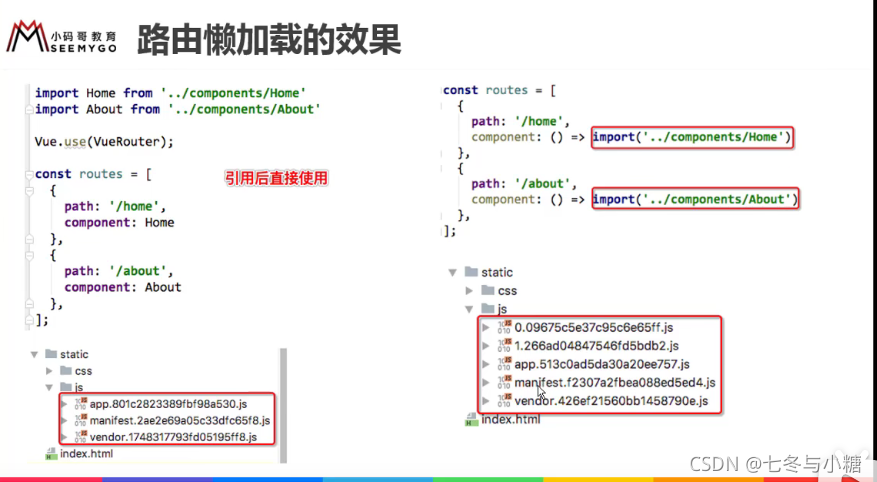
当打包构建应用时,js包会变得非常大,影响页面的加载,如果能把不同路由对应的组件分割成不同的代码块,然后当路由被访问的时候才加载对应组件,这样就更高效。
简单来说就是:只有在某个路由被访问到了再请求,再加载。
图片来源:Vue懒加载视频讲解

配置方法:
const Home = () => import('../components/Home')
const About = () => import('../components/About')
const User = () => import('../components/User')
路径的嵌套
嵌套路由是一个很常见的功能
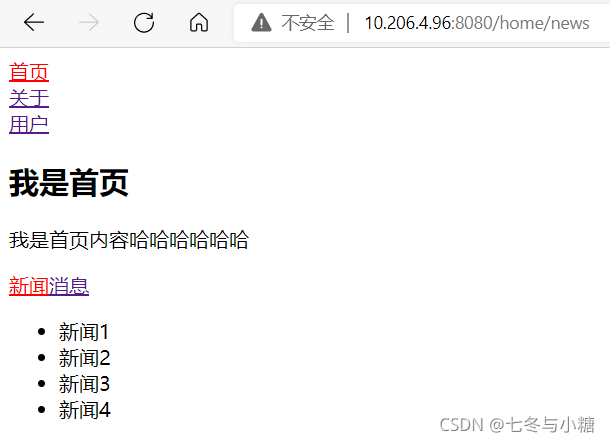
- 比如在home页面中,希望通过home/news 和home/message 访问一些内容
配置方法如下:
- 在原先的home的path文件下,加入children属性,children属性是一个数组:
//index.js
const routes =[
  {
    path:'/home',
    component:Home,
    children:[
      {
        path:'news',
        component: HomeNews
      },
      {
        path:'message',
        component: HomeMessage
      }
    ]
  },
- 因为子组件HomeNews、HomeMessage是在Home组件下,所以需要在Home.vue文件下进行修改
<!--Home.vue-->
template>
  <div>
    <h2>我是首页</h2>
    <p>我是首页内容哈哈哈哈哈哈</p>

    <router-link to="/home/news">新闻</router-link>
    <router-link to="/home/message">消息</router-link>
    <router-view></router-view>
  </div>
</template>
3.配置HomeNews、HomeMessage组件、最后在index.js文件中进行导入
//HomeNews.vue
<template>
  <div>
    <ul>
      <li>新闻1</li>
      <li>新闻2</li>
      <li>新闻3</li>
      <li>新闻4</li>
    </ul>
  </div>
</template>

//HomeMessage.vue
<template>
  <div>
    <ul>
      <li>消息1</li>
      <li>消息2</li>
      <li>消息3</li>
      <li>消息4</li>
    </ul>
  </div>
</template>

箭头函数
箭头函数是ES6新增的函数定义的语法
格式如下:
(参数1, 参数2, …, 参数N) => { 函数声明 }

(参数1, 参数2, …, 参数N) => 表达式(单一)
// 相当于:(参数1, 参数2, …, 参数N) =>{ return 表达式; }

// ES5
var x = function(x, y) {
     return x * y;
}

// ES6
const x = (x, y) => x * y;
当参数列表为一个参数时,圆括号可以省略不写
const x = num => num * num
如果参数列表没有参数,圆括号不能省略
const x = () => console.log("hello world")
有的箭头函数都没有自己的 this。 不适合定义一个 对象的方法。
当我们使用箭头函数的时候,箭头函数会默认帮我们绑定外层 this 的值,所以在箭头函数中 this 的值和外层的 this 是一样的。
这样一个函数的输出结果是什么?
obj = {
      aaa() {
        setTimeout(function () {
          console.log(this);
        })
        setTimeout(() => {
          console.log(this);
        })
      }
    }

obj.aaa();
输出的结果是window,obj
凡是以function () { console.log(this); } 形式的this都是window。
而箭头函数在setTimeout中作为其中的回调函数,本身是没有this定义的,需在上级作用域中找到this定义,而此时上级作用域是aaa函数,而aaa函数是obj中的对象,所以此时this就为obj
另一个案例:
 obj = {
      aaa() {
        setTimeout(function () {
          setTimeout(function () {
            console.log(this);
          })
          setTimeout(() => {
            console.log(this);
          })
        })

        setTimeout(() => {
          setTimeout(function(){
            console.log(this);
          })

          setTimeout(() =>{
            console.log(this);
          })
        })
      }
    }

    obj.aaa();
输出的结果是window、window、window、obj。
第一个和第三个的原因是一样的:
凡是以function () { console.log(this); } 形式的this都是window。
第二个输出window的原因与第一个第三个类似,稍微有点绕,箭头函数没有定义this,需要到上级作用域寻找,而上级作用域就是一个function () { console.log(this); },所以也是window
第四个输出obj的原因是箭头函数没有定义this,需要到上级作用域寻找,而上级作用域也是一个箭头函数,需要再次向上寻找,就寻找到了aaa函数内部,而aaa作用一个obj内的函数属性,自然this就是obj
箭头函数是不能提升的,所以需要在使用之前定义。
URL
协议://主机:端口/路径?查询#片段
scheme: //host :port /path ?query #fragment