1.动态路由配置?
前期准备:
通过 vue create xxx 创建vue项目,这里在创建时我们勾选上 router 选项,自动创建路由
将前面学习 axios 时封装的跨域配置,utils文件夹以及 vue.config.js文件分别放置在该项目的src目录和根目录下
通过 npm install axios --save 安装 axios
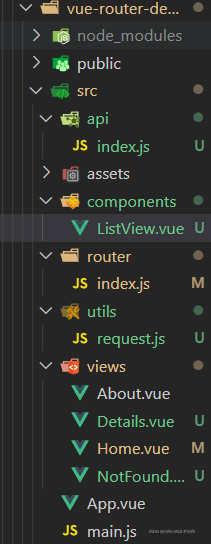
项目结构:

?vue.config.js
module.exports = {
    devServer: {
        proxy: {
            '/api': {
                target: 'http://iwenwiki.com',
                changeOrigin: true,
                pathRewrite: { // 路径重写
                    "^/api": ""
                }
            }
        }
    }
}
?src/utils/request.js
import axios from "axios"
import qs from "querystring"

/**
 * 处理错误信息
 * status:状态吗
 * info:具体信息
 */

const errorHandle = (status,info) =>{
    switch(status){
        case 400:
            console.log("语义错误");
            break;
        case 401:
            console.log("服务器认证失败");
            break;
        case 403:
            console.log("服务器请求拒绝执行");
            break;
        case 404:
            console.log("请检查网路请求地址");
            break;
        case 500:
            console.log("服务器发生意外");
            break;
        case 502:
            console.log("服务器无响应");
            break;
        default:
            console.log(info);
            break;
    }
}


/**
 * 创建Axios对象
 */

const instance = axios.create({
    // 公共配置
    // baseURL:"http://iwenwiki.com",
    timeout:5000,
    // withCredentials: true
})


/**
 * 拦截器
 */

instance.interceptors.request.use(
    config =>{
        if(config.method === 'post'){
            // token:登陆信息凭证
            config.data = qs.stringify(config.data)
        }
        return config
    },
    error => Promise.reject(error)
)

instance.interceptors.response.use(
    // 完成了
    response => response.status === 200 ? Promise.resolve(response) : Promise.reject(response),
    error =>{
        // 错误信息的处理
        const { response } = error;
        if(response){
            errorHandle(response.status,response.info)
        }else{
            console.log("网络请求被中断了");
        }
    }
)

// get和post等请求方案

export default instance
App.vue
<template>
  <div id="app">
    <div id="nav">
      <router-link to="/">Home</router-link> |
      <router-link to="/about">About</router-link>
    </div>
    <router-view/>
  </div>
</template>

<style>
#app {
  font-family: Avenir, Helvetica, Arial, sans-serif;
  -webkit-font-smoothing: antialiased;
  -moz-osx-font-smoothing: grayscale;
  text-align: center;
  color: #2c3e50;
}

#nav {
  padding: 30px;
}

#nav a {
  font-weight: bold;
  color: #2c3e50;
}

#nav a.router-link-exact-active {
  color: #42b983;
}
</style>
src/views/Home.vue
<template>
  <div class="home">
    <ListView />
  </div>
</template>

<script>
import ListView from "../components/ListView.vue"

export default {
  name: 'Home',
  components: {
    ListView
  }
}
</script>
src/views/About.vue
<template>
  <div class="about">
    <h1>This is an about page</h1>
  </div>
</template>
src/views/NotFound.vue
<template>
  <div>
      <h3>404</h3>
  </div>
</template>

<script>
export default {

}
</script>

<style>

</style>
src/views/Details.vue
<template>
  <div>
      <h3>详情页</h3>
      <p>id={{$route.params.id}}</p>
      <div>
          <p>{{detailsData.desc}}</p>
      </div>
  </div>
</template>

<script>
import api from "../api"

export default {
    data () {
        return {
            detailsData:{}
        }
    },
    mounted () {
        api.getDetails({
            id:this.$route.params.id
        }).then(res=>{
            // console.log(res.data);
            this.detailsData = res.data;
        }).catch(error=>{
            console.log(error);
        })
    }
}
</script>

<style>

</style>
components/ListView.vue
<template>
  <div>
      <ul>
          <li v-for="(item,index) in lists" :key="index">
              <!--
                  点击实现跳转到相应的详情页面
                  1.在views里新建Details文件来展示详情页数据
                  2.在router/index.js里进行配置
                -->
              <router-link :to="'/details/'+item.id">
                  <div>
                  <p>{{item.title}}</p>
                  <img :src="item.cover" alt="">
                  <p>{{item.username}}</p>
              </div>
              </router-link>
          </li>
      </ul>
  </div>
</template>

<script>
import api from "../api"

export default {
    data () {
        return {
            lists:[]
        }
    },
    mounted () {
        api.getList().then(res=>{
            // console.log(res.data);
            if(res.data.result === "ok"){
                this.lists = res.data.data;
            }
        }).catch(error=>{
            console.log(error);
        })
    }
}
</script>

<style scoped>
    ul,ol,li{
        list-style: none;
    }

    ul li {
        border-bottom: 2px solid #222;
    }

    img{
        width: 100%;
    }
</style>
src/api/index.js
import axios from "../utils/request"

const base = {
    baseUrl: '/api',
    list: '/api/FingerUnion/list.php',
    details: '/api/FingerUnion/details.php'
};

const api = {
    /**
     * 获得 list 数据
     */
    getList() {
        return axios.get(base.baseUrl + base.list);
    },
    getDetails(params) {
        return axios.get(base.baseUrl + base.details, {
            params
        });
    }
}

export default api;
src/router/index.js
import Vue from 'vue'
import VueRouter from 'vue-router'
import Home from '../views/Home.vue'

Vue.use(VueRouter)

const routes = [{
        path: '/',
        name: 'Home',
        component: Home
    },
    {
        path: '/about',
        name: 'About',
        component: () =>
            import ( /* webpackChunkName: "about" */ '../views/About.vue')
    },
    {
        path: '/details/:id',
        name: 'Details',
        component: () =>
            import ( /* webpackChunkName: "about" */ '../views/Details.vue')
    },
    {
        path: '*',
        name: 'NotFound',
        component: () =>
            import ( /* webpackChunkName: "about" */ '../views/NotFound.vue')
    }
]

const router = new VueRouter({
    mode: 'history',
    base: process.env.BASE_URL,
    routes
})

export default router
main.js
import Vue from 'vue'
import App from './App.vue'
import './registerServiceWorker'
import router from './router'

Vue.config.productionTip = false

new Vue({
  router,
  render: h => h(App)
}).$mount('#app')

点击跳转:
 ?
?
?
?
2.嵌套路由
About页面又嵌套了好几个页面
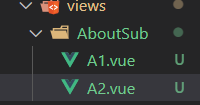
在上面的基础之上,在views目录下新建AboutSub文件夹:

?在src/router/index.js文件里对about路由做如下修改:
{
        path: '/about',
        name: 'About',
        component: () =>
            import ( /* webpackChunkName: "about" */ '../views/About.vue'),
        children: [{
                path: 'a1', //about/a1
                name: 'A1',
                component: () =>
                    import ( /* webpackChunkName: "about" */ '../views/AboutSub/A1.vue')
                /*children:[]作为3级页面*/
            },
            {
                path: 'a2', //about/a2
                name: 'A2',
                component: () =>
                    import ( /* webpackChunkName: "about" */ '../views/AboutSub/A2.vue')
            }
        ]
    },
src/views/About.vue
<template>
  <div class="about">
    <h1>This is an about page</h1>
    <div>
      <router-link to="/about/a1">A1</router-link> |
      <router-link to="/about/a2">A2</router-link>
    </div>
    <router-view></router-view>
  </div>
</template>
src/views/AboutSub/A1.vue
<template>
  <div>
      <h3>A1页面</h3>
  </div>
</template>

<script>
export default {

}
</script>

<style>

</style>
src/views/AboutSub/A2.vue
<template>
   <div>
      <h3>A2页面</h3>
  </div>
</template>

<script>
export default {

}
</script>

<style>

</style>
 ?
?
 ?
?
?
?
?
?