NG-ZORRO
引言
实习了将近两个月,整理了一些前端流程和我常犯的错误,以供自己复习回顾。如果总结有误,欢迎指正!
文章所用软件,语言,组件和框架:vscode,idea,ts,NG-ZORRO,angular
常用包推荐
Lodash(yarn add lodash ,import * as _ from ‘lodash’;),moment(yarn add moment ,import *as moment form moment)
[时间戳转换](angular date)
angular Date
一、使用命令创建模块
创建常用命令(参考) : angualr-cli命令创建文件
1.创建Module 2.创建Component
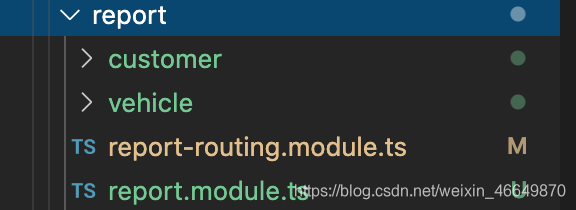
效果展示
遇到的错误:

原因:
1.angular版本过高-------卸载并安装指定版本Angular CLI
2.创建语法错误-------注意命令创建文件的类型
如果新拉取的代码运行报错,试试删掉 node_modules 文件,用yarn命令重新下载依赖,下载完成后记得重启项目。
二、页面连接
将模板导航栏连接到html代码,点击跳转页面
1.在 app-routing.module.ts中引入模块路径
import { NgModule } from '@angular/core';
import { Routes, RouterModule } from '@angular/router';

const routes: Routes = [
    { path: '', pathMatch: 'full', redirectTo: '/order/pending' },
    //引入report模块路径
    { path: 'report', loadChildren: () => import('./report/report.module').then(m => m.ReportModule) },

];

@NgModule({
    imports: [RouterModule.forRoot(routes, { scrollPositionRestoration: 'disabled' })],
    exports: [RouterModule]
})
export class AppRoutingModule { }
2.在report模块的report-routing.module.ts中引入模块功能路径
import { NgModule } from '@angular/core';
import { Routes, RouterModule } from '@angular/router';
import { CustomerComponent } from './customer/customer.component';
import { VehicleComponent } from './vehicle/vehicle.component';

//引入路径
const routes: Routes = [
    {
      path: 'customer',
      component: CustomerComponent,
      data: {reuseRoute: false}
    },
    {
      path: 'vehicle',
      component: VehicleComponent,
      data: {reuseRoute: false}
    },
];

@NgModule({
  imports: [RouterModule.forChild(routes)],
  exports: [RouterModule]
})
export class ReportRoutingModule { }
3.最后找到app.component.html对应的导航部分,引入路径连接
 <li nz-submenu nzTitle="Report" nzIcon="setting">
                <ul>
                    <li nz-menu-item nzMatchRouter>
                        <a routerLink="/report/customer">Customer Report</a>
                    </li>
                    <li nz-menu-item nzMatchRouter>
                        <a routerLink="/report/vehicle">Delivery Report</a>
                    </li>
                </ul>
            </li>
需要注意的问题:
1.注意routLink是否输入正确
2.如果自己手动创建model,而不用命令创建,模块的report.module.ts中不会自动生成模块功能连接,需要自己添加
import { CustomerComponent } from './customer/customer.component';
import { VehicleComponent } from './vehicle/vehicle.component';
@NgModule({
  declarations: [CustomerComponent, VehicleComponent],
  imports: [
  //这里写NG-ZORRO组件中引入的模板
  ]
  })
export class ReportModule { }
三、两页面跳转和 Angualr routerLink传值
参考:Angualr routerLink 两种传参方法及参数的使用
1.两个页面跳转
(1)NG-ZORRO组件中Drawer抽屉模板使用ts方法跳转(略)
(2)用routLink实现两页面跳转
在模块下xxx-routing.module.ts的Routes里添加
const routes: Routes = [

  {
    path: 'detail',
    component: DetailComponent
  }
];
在要实现跳转的标签上添加
//"../"用于返回上层目录,先找到当前页面的上级目录,再跳转同级目录 URL : 'customer/detail'
<a  routerLink="../detail"> Review </a>
常犯的错误:
可能的原因:routlink路径写错,xxx-routing.module.ts的Routes添加错误,没返回上级目录


2.两个页面传值
(1)NG-ZORRO组件中Drawer抽屉模板传值
父到子(略) @input @output
子到父(观察者)
Angular通过订阅观察者对象实现不同组件中数据的实时传递
在service下建立send.service.ts

//send.service.ts

import { Injectable } from '@angular/core';
import { Observable, Subject } from 'rxjs';

@Injectable()
export class SendService {

  constructor() { }

  private msg = new Subject<any>();
  //发送消息
  sendMessage(message: string) {
      this.msg.next(message);
  }
  //清除消息
  clearMessage() {
      this.msg.next();
  }
  //获取消息
public  getMessage(): Observable<any> {
      return this.msg.asObservable();
  }

}
子界面TS(传值)
import { SendService } from 'src/app/service/send/send.service';
 constructor(private sendService: SendService) { }
//发送消息
sendText(value) {
      this.sendService.sendMessage(value);
    }
父界面(接收)
//TS
import { SendService } from 'src/app/service/send/send.service';
@Component({
  selector: 'app-management',
  templateUrl: './management.component.html',
  styleUrls: ['./management.component.less'],
  //注册服务
  providers: [SendService],
})
export class ManagementComponent implements OnInit {
constructor(private sendService: SendService, private message: NzMessageService)
 {
this.sendService.getMessage().subscribe(value => {
      //接收
     if(value==5)
         {
          this.loadCustomerList();
          this.visible=false;
        }
      alert(value);
  })
}

close(){
      this.visible=false;
    }
html把ts里的click方法换为html标签打开子界面
//通过visible来打开子界面,不再用方法
<button  (click)="visible=true"  nz-button nzType="primary" ><i nz-icon nzType="plus-circle" nzTheme="outline"></i> New Branch
</button>

//父界面html(放最外边)
<nz-drawer *ngIf="visible" [nzClosable]="true"  [nzVisible]="visible" [nzPlacement]="'bottom'" [nzHeight]="500" (nzOnClose)="close()">
//子界面ts的标签
//@Component({
 // selector: 'app-new-branch', //这个
//})

(传值nzContentParams: { customerId: this.productId} ---用@Input() customerId = '')
  <app-new-branch [customerId]="productId" ></app-new-branch>

</nz-drawer>
(2)用routLink实现传值
(参考)Angualr routerLink 两种传参方法及参数的使用
法一:
//传值(html)
 <a  [routerLink]="['/customer/detail',data.id]">Review </a>
//接收(ts)
  public productId;
  constructor(private routeInfo:ActivatedRoute) { }
   ngOnInit(): void {
    this.productId = this.routeInfo.snapshot.params['id'];
  }
//模块routing
const routes: Routes = [
  {
  //将路径改为可以传参的路径
    path: 'detail/:id',
    component: DetailComponent
  }
];
法二:不需要改路径
<a [routerLink]="['/quotation/management/review']" [queryParams]="{id:data.id}">Quotation</a>
  constructor(private route: ActivatedRoute) { }
  ngOnInit(): void {
    const id = this.route.snapshot.queryParamMap.get('id') as any;
    });
四、搜索功能
//搜索
 <input   nz-input id="name"  placeholder="search by name"  [(ngModel)]="inputValue"   (keyup)="search(inputValue)"/>
 //重置
 <button nz-button nzType="primary" (click)="inputValue = null"  nzDanger (click)="loadSearch(idSearch)">Clear</button>
search(value: any) {
    //将输入框的值转小写,去掉空格
    value = _.replace(value, /\s*/g, "").toLowerCase();
    //新建一个全部数据的临时数组,实现监听键盘来实时搜索
    this.listOfData = _.filter(this.allListOfData, (item: any) => _.replace(item.name, /\s*/g, "").toLowerCase().indexOf(value) !== -1);
  }
五、modal框+form表单
html
<nz-modal [(nzVisible)]="isQuantityModal" (-判断是否要打开modal)    [nzTitle]="modalTitle4" [nzContent]="modalContent4" [nzFooter]="modalFooter4"
  (nzOnCancel)="quantityCancel()" (取消方法)>
  <ng-template #modalTitle4>Change Quantity</ng-template>

  <ng-template #modalContent4>
    <form nz-form [formGroup]="validateForm4">

      <nz-form-item>
        <nz-form-label [nzSm]="6" [nzXs]="24" nzRequired (是否显示*)nzFor="newQuantity">New Quantity</nz-form-label>
        <nz-form-control [nzSm]="14" [nzXs]="24" nzErrorTip="Please input new quantity!">
          <nz-input-number formControlName="newQuantity" (-必写用于表单传值,类似ngmodal)[nzMin]="0" [nzStep]="0.1" style="width: 150px;">
          </nz-input-number>
        </nz-form-control>
      </nz-form-item>

      <nz-form-item>
        <nz-form-label [nzSm]="6" [nzXs]="24" nzFor="newUnit" nzRequired>Unit</nz-form-label>
        <nz-form-control [nzSm]="14" [nzXs]="24" nzErrorTip="Please select Unit!">
          <nz-select formControlName="newUnit" style="width: 150px;">
            <nz-option nzValue="1" (传给formControlName的值,即newUnit的值) nzLabel="KG" (显示的值)></nz-option>
            <nz-option nzValue="2" nzLabel="PC"></nz-option>
          </nz-select>
        </nz-form-control>
      </nz-form-item>
    </form>
  </ng-template>

  <ng-template #modalFooter4>
    <button nz-button nzType="default" (click)="quantityCancel()">Cancel</button>
    <button nz-button nzType="primary" (click)="quantityOk()" [nzLoading]="isConfirmLoading">Save</button>
  </ng-template>
</nz-modal>
ts
  validateForm4!: FormGroup;

//constructor
  constructor(private modal: NzModalService,private fb: FormBuilder) { }


//ngOnint
ngOnInit(): void {
    // from
    this.validateForm4 /*表单名*/ = this.fb.group({
      newQuantity: [null, [ Validators.required]/*表示必填项*/],
   // newQuantity: [null, null/*非必填*/],

      newUnit: [null, [Validators.required]],
    });

  }
//quantityModal

//表单判断方法写死
submitForm(): void {
  for (const i in this.validateForm4.controls) {
    this.validateForm4.controls[i].markAsDirty();
    this.validateForm4.controls[i].updateValueAndValidity();
  }
}

isQuantityModal=false //是否打开modal框
quantityModal(): void {
  this.isQuantityModal = true;
  this.validateForm4.reset();
}

quantityOk(): void {
//表单判断,固定模板,必写
  for (const i in this.validateForm4.controls) {
    this.validateForm4.controls[i].markAsDirty();
    this.validateForm4.controls[i].updateValueAndValidity();
  }
  //判断表单是否为空
  if (!this.validateForm4.valid) {
    return
  }

  //从表单获取值
  const newQuantity=this.validateForm4.value.newQuantity;
  let newUnit=this.validateForm4.value.newUnit;

  //调用方法
  this.orderService.updateQuantity(this.orderIdReview,this.quantityId,newQuantity,newUnit).toPromise().then(res=>{

      this.message.success(`Execution Successful`)
      this.isQuantityModal = false;
     this.loadDetail();
    }).catch(err=>{
      this.message.error(`Execution Error`);
    });
}

quantityCancel(): void {
  this.isQuantityModal = false;
}
六、多选框+时间格式
<th nzWidth="5%" [(nzChecked)]="checked[tableValue]" [nzIndeterminate]="indeterminate[tableValue]"
                    (nzCheckedChange)="onAllChecked($event)"></th>

 <tr *ngFor="let data of basicTable.data">
                <td [nzChecked]="setOfCheckedId.has(data.id)" (nzCheckedChange)="onItemChecked(data.id, $event)"></td>
                //时间格式
                <td nzEllipsis>{{ data.deliverTime | date:"dd-MM-yyyy" }}</td>

 </tr>

({{setOfCheckedId.size}})
  let selectList = [];
    selectList = [...this.setOfCheckedId];
七、判断方法是否重名
//拿已存在的列表过滤,看已存在的值是否和输入的值相同
 let item=_.filter(this.allData, function(o) { return o.locationId==location; });

    //如果循环出的列表有值则同名
    if(item.length>0){
      this.msg.error(this.i18n.fanyi('pick.tjcf'))
      return;
    }
八、进度条导航页面
<nz-page-header-content>
  <div class="content">
    <!-- ---------------------------- 0 ------------------------------------- -->
    <div  [hidden]="index!==0" *ngFor="let data of pendingList">
    </div>
    <!-- ---------------------------- 1 ------------------------------------- -->
    <div [hidden]="index!==1" style="margin-top: 10px;">
    </div>
     <!-- -------------------------- 2 --------------------------------------- -->
    <div [hidden]="index!==2" style="margin-top: 10px;">
     </div>
  </div>
</nz-page-header-content>
 onIndexChange(event: number): void {
    switch (event) {
      case 0:
        this.index = event;
        break;
      case 1:
        {
          this.index = event;
          this.getCustomerQuotation();
          break;
        }
      case 2:
        this.index = event;
        break

    }
  }
九、拼接字段+前台显示后台未返回数据
//拼接字段
 for (let index = 0; index < arr.length; index++) {
        arr[index].branchId = String(arr[index].branchId);
        arr[index].orderRefNew = arr[index].branchId + arr[index].orderRef.slice(-5);
      }
//前台显示后台未返回数据

  public Sum: any[] = [];
  public loadDetail() {
    this.detailList = [];
    this.arr = [];
    this.orderService.getOrderItems(detailId).toPromise().then((src: any) => {

      this.detailList = [...src];
      for (let index = 0; index < this.detailList.length; index++) {
      //在返回的json里添加一个sum字段,相乘
        this.detailList[index].Sum = numeral(this.detailList[index].orderItemBean.price).multiply(this.detailList[index].orderItemBean.invoiceQuantity).value()
      }
    });
  }

  changeSum(e, id) {
    for (let index = 0; index < this.detailList.length; index++) {
      if (this.detailList[index].orderItemBean.id == id) {
        this.detailList[index].Sum = numeral(this.detailList[index].orderItemBean.price).multiply(e).value()

      }
    }

  }