1.如何学习CSS
1.定义
Cascading Style Sheet 层叠级联样式表
- CSS选择器(重点)
- 美化网页(文字,阴影,超链接,列表,渐变…)
- 盒子模型
- 浮动
- 定位
- 网页动画(特效)
?
2.发展史
CSS1.0
CSS2.0:DIV(块)+ CSS,提出了HTML与CSS分离的思想,网页变得简单,立于SEO(搜索引擎优化)
CSS2.1:浮动,定位
CSS3.0:圆角边框,阴影,动画…,浏览器兼容性
?
3.快速入门
style可以编写CSS代码
语法:
? ? ?选择器{
? ? ? ? ? ? ?声明1;
? ? ? ? ? ? 声明2;
? ? ? ? }
<!DOCTYPE html>
<html lang="en">
<head>
    <meta charset="UTF-8">
    <title>Title</title>
    <style>h1{
        color: aqua;
    }
    </style>
</head>
<body>
<h1>标题</h1>
</body>
</html>
建议使用下面的规范:
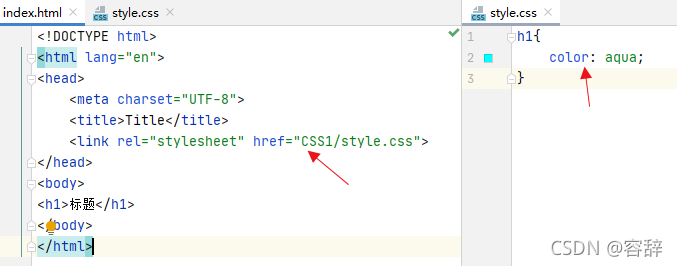
建立文件方式要规范:

?
4.优势
- 内容和样式分离
- 页面结构表现统一,可以实现复用
- 样式十分丰富
- 建议使用独立于html的css文件
- 利用SEO,容易被搜索引擎收录(Vue极其不易被搜索引擎收录)
?
5.CSS的3种导入方式
优先级:行内样式>内部样式和外部样式,采取就近原则。
<!DOCTYPE html>
<html lang="en">
<head>
    <meta charset="UTF-8">
    <title>Title</title>
    <!--外部样式-->
    <link rel="stylesheet" href="CSS/style.css">
    <!--内部样式 -->
    <style>
        h1{
            color: red;
        }
    </style>
</head>
<body>
<!--行内样式:在标签元素中编写一个style属性-->
<h1 style="color: aqua">标题</h1>
</body>
</html>
/*外部样式*/
h1{
    color: mediumorchid;
}
拓展:外部样式两种写法
-
链接式:
<!--外部样式--> <link rel="stylesheet" href="CSS/style.css"> -
导入式:(CSS2.1)
<style>
        @import url(CSS/style.css);
</style>
?
?
2.选择器
作用:选择页面上的某一个或者某一类元素
优先级:id选择器>class选择器>标签选择器
1.基本选择器
1.标签选择器style
<!DOCTYPE html>
<html lang="en">
<head>
    <meta charset="UTF-8">
    <title>Title</title>
<!--标签选择器,会选择到页面上所有这个标签的元素-->
    <style>
        h1{
            color: #e22a65;
            background: darkgray;
            border-radius: 24px;
        }
        p{
            font-size: 80px;
        }
    </style>
</head>
<body>
<h1>java</h1>
<h1>java</h1>
<p>css</p>
</body>
</html>
效果:
?
2.类选择器class
<!DOCTYPE html>
<html lang="en">
<head>
    <meta charset="UTF-8">
    <title>Title</title>
<!--类选择器格式:  .class的名称{}
    好处:可以多个标签归类,是同一个class,实现标签复用,可以跨标签
-->
    <style>
        .mark{
            color: #e22a65;
        }
        .text{
            color: darkorange;
        }
    </style>
</head>
<body>
<h1 class="text">x</h1>
<h1 class="mark">w</h1>
<h1 class="text">o</h1>
<p class="text">p标签</p>
</body>
</html>
效果:
?
3.Id选择器
<!DOCTYPE html>
<html lang="en">
<head>
    <meta charset="UTF-8">
    <title>Title</title>
<!--Id选择器:#id名称{}
id唯一,不能复用-->
    <style>
        #text{
          color: brown;
        }
        #mark{
            color: chocolate;
        }
    </style>
</head>
<body>
<h1 id="text">小</h1>
<h1 id="mark">熊</h1>
</body>
</html>
效果:
?
?
2.层次选择器

根据这个层次写html:
<!DOCTYPE html>
<html lang="en">
<head>
    <meta charset="UTF-8">
    <title>Title</title>
</head>
<body>
<p class="m">p1</p>
<p>p2</p>
<p>p3</p>
<ul>
    <li>
        <p>p4</p>
    </li>
    <li>
        <p>p5</p>
    </li>
    <li>
        <p>p6</p>
    </li>
</ul>
</body>
</html>
?
1.后代选择器
在某个元素后面的所有元素
<style>
    /*后代选择器*/
    body p{
        color: lightsalmon;
    }
</style>
效果: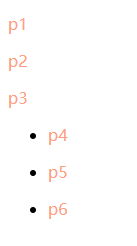
?
2.子选择器
只有一代
<style>
    /*子选择器*/
        body>p{
            background: #ac8974;
        }
</style>
效果: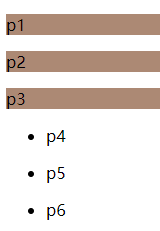
?
3.相邻兄弟选择器
同辈只有一个,对下面相邻的一个有效
<style>
      /*相邻兄弟选择器*/
        .m+p{
            background: gray;
        }
</style>
效果:
?
4.通用兄弟选择器
向下的所有同辈
<style>
    /*通用兄弟选择器*/
    .m~p{
            background: cadetblue;
        }
</style>
效果: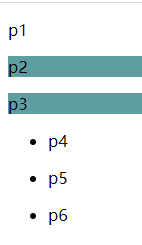
?
?
3.结构伪类选择器
伪类:带冒号的
<!DOCTYPE html>
<html lang="en">
<head>
    <meta charset="UTF-8">
    <title>Title</title>
    <style>
        /*ul的第一个子元素*/
        ul li:first-child{
            background: #fc92b3;
        }
        /*ul的最后一个子元素*/
        ul li:last-child{
            background: #77ea81;
        }
        /*选中p1:定位到父元素,然后选第一个元素,按顺序选*/
        p:nth-child(1){
            background: gray;
        }
        /*选中p2:定位到父元素,然后选p元素中的第二个元素,按类型选*/
        p:nth-of-type(2){
            background: gray;
        }
    </style>
</head>
<body>
<p>p1</p>
<p>p2</p>
<p>p3</p>
<ul>
    <li>li1</li>
    <li>li2</li>
    <li>li3</li>
</ul>
</body>
</html>
效果:
?
?
4.属性选择器(常用)
<!DOCTYPE html>
<html lang="en">
<head>
    <meta charset="UTF-8">
    <title>Title</title>
    <style>
        .o a{
            float: left;
            display: block;
            height: 50px;
            width: 50px;
            border-radius: 20px;
            background: #fc92b3;
            text-align: center;
            color: #398d05;
            text-decoration: none;
            margin-right: 5px;
            font: bold 20px/50px Arial;
        }
        a[id]{
            background: gold;
        }
        /*
        =是绝对等于
        *=是包含等于
        */
        a[class="links"]{
            background: darkgray;
        }
        /*
        ^=以什么开头
        ¥=以这个结尾
         */
        a[href^=http]{
            background: #4ad9cd;
        }
        a[href$=f]{
            background: #c070e7;
        }
    </style>
</head>
<body>
<p class="o">
    <a href="" id="first">1</a>
    <a href="" class="links arrive">2</a>
    <a href="http://www.baidu.com">3</a>
    <a href="" class="links">4</a>
    <a href="www.f">5</a>
</p>
</body>
</html>
效果:
?
?
?
3.美化网页元素
-
凸显页面主题
-
提高用户体验
1.span标签
重点要突出的字,使用span套起来
<!DOCTYPE html>
<html lang="en">
<head>
    <meta charset="UTF-8">
    <title>Title</title>
    <style>
        #t1{
            font-size: 50px;
        }
    </style>
</head>
<body>
学习<span id="t1">java</span>
</body>
</html>
效果:
?
2.字体样式
font-family:字体
font-size:字体大小
font-weight:粗体
<!DOCTYPE html>
<html lang="en">
<head>
    <meta charset="UTF-8">
    <title>Title</title>
    <style>
        body{
            font-family: 新宋体;
        }
        h1{
            font-size: large;
        }
        .p1{
            font-weight: bold;
        }
    </style>
</head>
<body>
<h1 class="p1">故事简介</h1>
<p>《航海王》改编自日本漫画家尾田荣一郎同名漫画,由东映动画制作,于1999年10月20日起在日本富士电视台首播。</p>
<p>该动画故事以“大海贼时代”为背景,讲述了橡皮人路飞以成为海贼王为目标和同伴在大海展开冒险的故事。</p>
</body>
</html>
效果:
?
body{
    font: oblique bolder 16px 宋体;
}
/*斜体,粗细,大小,字体*/
效果:
?
3.文本样式
1.普通文本
-
颜色
-
字母表示
-
RGB:
-
0~F#000000黑色,#FFFFFF白色,#FF0000红色,#00FF00绿色,#0000FF蓝色
-
rgb(0,255,255) 绿色加蓝色
-
-
RGBA:A是透明度 0~1
-
-
文本对齐方式
- text-align排版居中
-
首行缩进
- text-indent
-
行高
- 行高和块的高度一样就能居中
- line-height
-
装饰
-
text-decoration: underline;下划线
-
text-decoration: none;去掉下划线
-
<!DOCTYPE html>
<html lang="en">
<head>
    <meta charset="UTF-8">
    <title>Title</title>
    <style>
        h1{
            color: rgba(0,0,255,0.9);
            text-align: center;
        }
        .l4{
            text-indent: 4em;
        }
        .hz{
            background: #fc92b3;
            height: 100px;
            line-height: 100px;
        }
        .l1{
            text-decoration: underline;
        }
        .l2{
            text-decoration: line-through;
        }
        .l3{
            text-decoration: overline;
        }
        a{
            text-decoration: none;
        }
    </style>
</head>
<body>
<h1>故事简介</h1>
<p class="l4">《航海王》改编自日本漫画家尾田荣一郎同名漫画,由东映动画制作,于1999年10月20日起在日本富士电视台首播。</p>
<p class="hz">该动画故事以“大海贼时代”为背景,讲述了橡皮人路飞以成为海贼王为目标和同伴在大海展开冒险的故事。</p>
<p class="l1">123</p>
<p class="l2">123</p>
<p class="l3">123</p>
<a href="">123</a>
</body>
</html>
效果:
?
2.文本图片水平对齐
vertical-align: middle;
<!DOCTYPE html>
<html lang="en">
<head>
    <meta charset="UTF-8">
    <title>Title</title>
    <style>
        img,span{
            vertical-align: middle;
        }
    </style>
</head>
<body>
<p>
    <img src="image/电脑2.jpg" alt="" width="100px" height="80px">
    <span>啦啦啦啦啦啦啦啦</span>
</p>
</body>
</html>
效果:
?
3.超链接伪类hover
<!DOCTYPE html>
<html lang="en">
<head>
    <meta charset="UTF-8">
    <title>Title</title>
    <style>
        /*默认的颜色*/
        a{
            text-decoration: none;
            color: #000000;
        }
        /*鼠标悬浮的状态*/
        a:hover{
            color: darkorange;
        }
        /*鼠标按住未释放的状态*/
        a:active{
            color: #398d05;
        }
        /*水平距离,竖直距离,模糊半径*/
        #w{
            text-shadow: #c60013 15px -8px 2px;
        }
    </style>
</head>
<body>
<a href="#">
    <img src="image/立书.jpg" alt="">
</a>
<p>
    <a href="">码出高效:java开发手册</a>
</p>
<p>
    <a href="">孤尽老师</a>
</p>
<p id="w">$99</p>
</body>
</html>
效果:
?
4.列表
<!DOCTYPE html>
<html lang="en">
<head>
<meta charset="UTF-8">
<title>Title</title>
<link rel="stylesheet" href="../列表/CSS/style.css">
</head>
<body>
<div id="nav">
<h1 class="tltle">商品列表</h1>
<ul>
<li><a href="#">家用电器</a> <a href="#">音像</a> <a href="#">内衣</a></li>
<li><a href="#">手机</a> <a href="#">运营商</a> <a href="#">数码</a></li>
<li><a href="#">家居</a> <a href="#">家具</a></li>
<li><a href="#">男装</a> <a href="#">女装</a> <a href="#">童装</a></li>
<li><a href="#">美妆</a> <a href="#">个护清洁</a> <a href="#">宠物</a></li>
<li><a href="#">女鞋</a> <a href="#">珠宝</a></li>
<li><a href="#">男鞋</a> <a href="#">家装</a> <a href="#">户外</a></li>
<li><a href="#">房产</a> <a href="#">汽车</a> <a href="#">汽车用品</a></li>
</ul>
</div>
</body>
</html>
#nav{
    width: 300px;
    background: #d2ceca;
}
.tltle{
    font-size: 30px;
    font-weight: bold;
    text-indent: 1.2em;
    line-height: 30px;
    /*颜色,图片,图片位置,平铺方式*/
    background: #c60013 url("../image/向下.jpg")  280px 10px no-repeat;
}
/*list-style:
none去掉圆点
circle空心圆
decimal数字
square正方形
*/
ul li{
    height: 30px;
    list-style: none;
    text-indent: 2em;
    background: url("../image/向右.jpg") no-repeat 180px 4px;
}
a{
    text-decoration: none;
    color: black;
    font-size: 14px;

}
a:hover{
    color: darkorange;
    text-decoration: underline;
}
效果: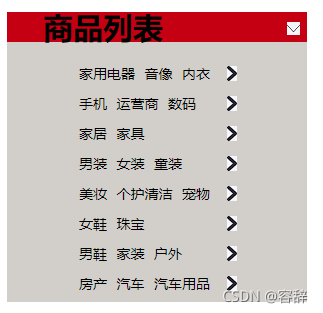
?
5.背景图片应用
<!DOCTYPE html>
<html lang="en">
<head>
    <meta charset="UTF-8">
    <title>Title</title>
    <style>
        div{
            width: 200px;
            height: 100px;
            /*边框:边框粗细,边框样式,边框颜色*/
            border: 1px solid #c60013;
            /*默认是全部平铺的*/
            background-image: url("image/101.jpg");
        }
        .d1{
            background-repeat: repeat-x;
        }
        .d2{
            background-repeat: repeat-y;
        }
    </style>
</head>
<body>
<div class="d1"></div>
<div class="d2"></div>
<div class="d3"></div>
</body>
</html>
效果: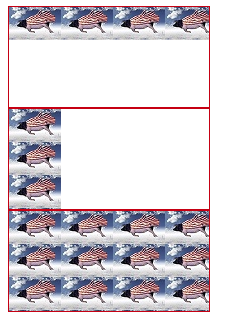
?
6.渐变
<!DOCTYPE html>
<html lang="en">
<head>
    <meta charset="UTF-8">
    <title>Title</title>
    /*径向渐变,圆形渐变*/
    <style>
        body{
            background-color: #F4D03F;
            background-image: linear-gradient(132deg, #F4D03F 0%, #16A085 100%);
        }
    </style>
</head>
<body>
</body>
</html>
效果:
?
?
?
4.盒子模型
1.边框
border: 1px solid #ff0000; 大小,边框粗细,实线,颜色

margin:外边距
padding:内边距
border:边框
auto×auto=margin + padding + border + 内容宽度
<!DOCTYPE html>
<html lang="en">
<head>
    <meta charset="UTF-8">
    <title>Title</title>
    <style>
        /*body,a,h,ul,li
        总有外边距margin,一般要置零
        margin: 0;
        padding:0;
        text-decoration: none;
        */
        h1{
            font-size: 20px;
            background: #ff0000;
            margin: 0;
            line-height: 50px;
            color: #000000;
            text-align: center;
        }
        /*
        外边距妙用整个框居中-->margin: 0 auto居中条件要是一个块,并且块元素有长宽
        上外边距妙用整个框居中:下是0,左右是auto
        margin: 0 1px 2px 3px:上右下左,顺时针方向*/
        #app{
            width: 300px;
            border: 1px solid #ff0000;
            margin: 0 auto;
        }
        form{
            background: #d2ceca;
            line-height: 30px;
            text-align: center;
        }
        div:nth-of-type(1) input{
            border: 2px solid #000000;
        }
        /*dashed虚框*/
        div:nth-of-type(2) input{
            border: 2px dashed #000000;
        }
    </style>
</head>
<body>
<div id="app">
    <h1>会员登陆</h1>
    <form action="#">
        <div>
            <span>用户名:</span>
            <input type="text">
        </div>
        <div>
            <span>密码:</span>
            <input type="text">
        </div>
    </form>
</div>
</body>
</html>
效果:
?
2.圆角边框border-radius
<!DOCTYPE html>
<html lang="en">
<head>
    <meta charset="UTF-8">
    <title>Title</title>
    <style>
        /*圆角边框也有四个参数,仍为顺时针顺序*/
        div{
            width: 100px;
            height: 100px;
            background: #fc92b3;
            border-radius: 100px;
        }
    </style>
</head>
<body>
<div>
</div>
</body>
</html>
效果:
?
3.阴影box-shadow
<!DOCTYPE html>
<html lang="en">
<head>
    <meta charset="UTF-8">
    <title>Title</title>
    <style>
        img{
            width: 100px;
            height: 100px;
            border-radius: 100px;
            box-shadow: 10px 10px 10px red;
        }
    </style>
</head>
<body>
<div style="text-align: center">
    <img src="image/101.jpg" alt="">
</div>
</body>
</html>
效果:
?
?
?
5.浮动
1.display
也是实现行内元素排列的方式,但是我们一般用float
<!DOCTYPE html>
<html lang="en">
<head>
    <meta charset="UTF-8">
    <title>Title</title>
    <style>
        /*block 块元素
        inline 行内元素
        inline-block 既是块元素又有行内元素特性
        none 消失*/
        div{
            width: 100px;
            height: 100px;
            border: 1px solid red;
            display: inline;
        }
        span{
            width: 100px;
            height: 100px;
            border: 1px solid red;
            display: block;
        }
    </style>
</head>
<body>
<div>div块元素</div>
<span>span行内元素</span>
</body>
</html>
效果: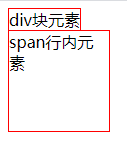
?
2.float
<!DOCTYPE html>
<html lang="en">
<head>
    <meta charset="UTF-8">
    <title>Title</title>
    <link rel="stylesheet" href="sytle.css" type="text/css">
</head>
<body>
<div id="father">
    <div class="layer1"><img src="image/103.jpg" alt=""></div>
    <div class="layer2"><img src="image/中国风景.jpg" alt=""></div>
    <div class="layer3"><img src="image/timg%20(2).jpeg" alt=""></div>
    <div class="layer4">浮动的盒子可以向左浮动,也可以向右浮动,直到他的外边缘碰到边框</div>
</div>
</body>
</html>
div{
    margin: 10px;
    padding: 5px;
}
#father{
    border: 1px solid #000000;
}
.layer1{
    border: 1px #ff0000 dashed;
    display: inline-block;
    float: left;
}
.layer2{
    border: 1px #00f dashed;
    display: inline-block;
    float: right;
}
.layer3{
    border: 1px #006600 dashed;
    display: inline-block;
}
.layer4{
    border: 1px #666 dashed;
    font-size: 12px;
    line-height: 23px;
    display: inline-block;
    float: left;
    /*既有浮动效果,又是块元素*/
    clear: both;
}
效果:
?
?
3.父级边框塌陷问题
1.解决方案
-
设置父级边框高度足够高
#father{ border: 1px solid #000000; height: 800px; } -
在div里增加一个空的div,清除浮动
很简单,但是代码中尽量避免空的div
<div class="clear"></div> .clear{ clear: both; margin: 0; padding: 0; } -
overflow
#father{
    border: 1px solid #000000;
    overflow: hidden;
}
-
在父级添加一个伪类:after(最认可的方法)
#father:after{
    content: "";
    display: block;
    clear: both;
}
?
2.对比
- display
? 方向不可控
-
float
方向可控,但浮动起来会脱离标准文档流,出现父级塌陷
?
?
6.定位
1.相对定位relative
1.定义
相对于自己原来的位置进行指定的偏移,相对定位的话,仍然在标准文档流里面,原来的位置会保留下来。
<!DOCTYPE html>
<html lang="en">
<head>
    <meta charset="UTF-8">
    <title>Title</title>
    <style>
        div{
            margin: 10px;
            padding: 5px;
            line-height: 25px;
            font-size: 10px;
        }
        #father{
           border: 1px solid #666;
        }
        #first{
            border: 1px dashed #025972;
            background: #fc92b3;
            position: relative;/*相对定位,上下左右*/
            top: -20px;/*距离下面20个距离*/
            left: 10px;/*距离左边10个位置*/
        }
        #second{
            border: 1px dashed #1db112;
            background: #c070e7;
            position: relative;
            bottom: 10px;/*距离下面10个距离*/
            right: 30px;/*距离右面30个距离*/
        }
        #third{
            border: 1px dashed #a312a1;
            background: bisque;
        }
    </style>
</head>
<body>
<div id="father">
    <div id="first">第一个</div>
    <div id="second">第二个</div>
    <div id="third">第三个</div>
</div>
</body>
</html>
效果:
?
2.练习
<!DOCTYPE html>
<html lang="en">
<head>
    <meta charset="UTF-8">
    <title>Title</title>
    <style>
        #lian{
            margin: 0;
            padding: 10px;
            width: 300px;
            height: 300px;
            border: 1px solid red;
        }
        #l2{
            position: relative;
            left: 200px;
            top: -100px;
        }
        #l4{
            position: relative;
            left: 200px;
            top: -100px;
        }
        #l5{
            position: relative;
            bottom: 300px;
            left: 100px;
        }
        a{
            width: 100px;
            height: 100px;
            text-decoration: none;
            background: #fc92b3;
            text-align: center;
            line-height: 85px;
            color: #fffff0;
            display: block;
        }
        a:hover{
            background-color: #0913e2;
        }
    </style>
</head>
<body>
<div id="lian">
    <div id="l1"><a href="#">链接一</a></div>
    <div id="l2"><a href="#">链接二</a></div>
    <div id="l3"><a href="#">链接三</a></div>
    <div id="l4"><a href="#">链接四</a></div>
    <div id="l5"><a href="#">链接五</a></div>
</div>
</body>
</html>
效果:
?
2.绝对定位absolute
相对于父级或者浏览器的位置进行指定的偏移,绝对定位的话,不在标准文档流里面,原来的位置不会保留下来。
基于xxx定位,上下左右
- 在父级没有定位的情况下,基于浏览器定位
- 假设父级元素存在定位,相对于父级元素定位
<!DOCTYPE html>
<html lang="en">
<head>
    <meta charset="UTF-8">
    <title>Title</title>
    <style>
        div{
            margin: 10px;
            padding: 5px;
            line-height: 25px;
            font-size: 10px;
        }
        #father{
            border: 1px solid #666;
            position: relative;/*父级定位*/
        }
        #first{
            border: 1px dashed #025972;
            background: #fc92b3;

        }
        #second{
            border: 1px dashed #1db112;
            background: #c070e7;
            position: absolute;/*绝对定位*/
            right: 20px;
            bottom: -10px;
        }
        #third{
            border: 1px dashed #a312a1;
            background: bisque;
        }
    </style>
</head>
<body>
<div id="father">
    <div id="first">第一个</div>
    <div id="second">第二个</div>
    <div id="third">第三个</div>
</div>
</body>
</html>
效果:
?
3.固定定位fixed
<!DOCTYPE html>
<html lang="en">
<head>
    <meta charset="UTF-8">
    <title>Title</title>
    <style>
        body{
            height: 1000px;
        }
        div:nth-of-type(1){       /*相对定位*/
            width: 100px;
            height: 100px;
            background-color: red;
            position: absolute;
            right: 0;
            bottom: 0;
        }
        div:nth-of-type(2){       /*绝对定位*/
            width: 50px;
            height: 50px;
            background-color: #1b98d2;
            position: absolute;
            right: 0;
            bottom: 0;
            position: fixed;
        }
    </style>
</head>
<body>
<div>div1</div>
<div>div2</div>
</body>
</html>
效果: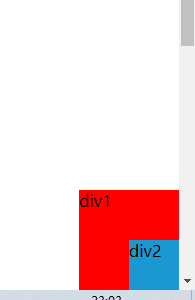
-------------->
?
4.z-index
一个图层的概念
<!DOCTYPE html>
<html lang="en">
<head>
    <meta charset="UTF-8">
    <title>Title</title>
    <link rel="stylesheet" href="z-index%20style.css">
</head>
<body>
<div id="content1">
    <ul>
        <li><img src="image/电脑壁纸1.jpg" alt=""></li>
        <li class="text">加油学java</li>
        <li class="textbg"></li>
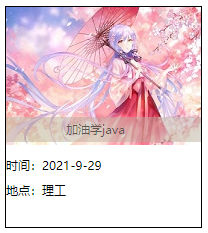
        <li>时间:2021-9-29</li>
        <li>地点:理工</li>
    </ul>
</div>
</body>
</html>
#content1{
     margin: 0;
    padding: 0;
    width: 195px;
    height: 220px;
    font-size: 12px;
    line-height: 25px;
    overflow: hidden;
    border: 1px solid #000;
}
ul,li{
    margin: 0;
    padding: 0;
    list-style: none;
}
/*父级元素相对定位*/
#content1 ul{
    position: relative;
}
.text{
    position: absolute;
    top: 110px;
    left: 60px;
    /*层级0-999*/
    z-index: 0;
}
.textbg{
    position: absolute;
    width: 195px;
    height: 25px;
    top: 110px;
     background: #baafa0;
    /*透明度opacity 0-1*/
    opacity: 0.5;
}
效果: