前言
笔者目前只学习到BOM的内容,因此所用代码都只限于HTML5、CSS、JS的部分
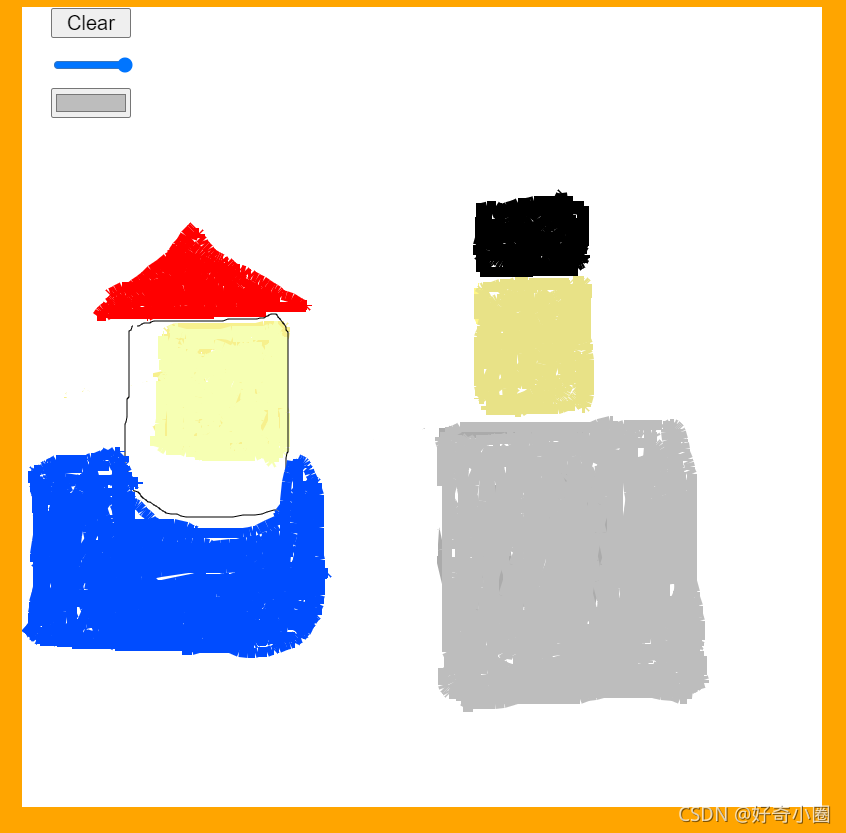
效果图:

高情商:蜡笔质感
低情商:画笔不连续(我也不清楚怎么改善,还请大佬指教)
一、HTML部分
1、代码
主要指body
<body>
    <div id="content">
    	<!-- 用于选画笔颜色 -->
        <label for="color_picker" hidden></label>
        <input type="color" id="color_picker" />
        <!-- 用于全屏清除 -->
        <input type="button" id="clear_button" value="Clear" />
        <!-- 用于设定画笔宽度(画笔宽度越大断流的现象越明显) -->
        <input type="range" id="line_range" min="1" max="10" />
    </div>
    <canvas id="canvas">
    </canvas>
</body
2、温习
(1)input标签
type:输入的类型,
此处用到了“color”颜色选择;
“button”普通按钮,value可以设置显示的内容;
“range”滑块类型,min和max分别设置最小值和最大值。
(2)label for属性
for 属性规定 label 绑定的表单元素。
(3)canvas标签
Canvas API 提供了一个通过JavaScript 和 HTML的元素来绘制图形的方式。它可以用于动画、游戏画面、数据可视化、图片编辑以及实时视频处理等方面。具体使用在JavaScript部分
二、CSS部分
1、代码
<style>

        #canvas {
        /*设置居中,画板大小800px*800px(设置于JavaScript部分)*/
            position: absolute;
            background-color: white;
            left: 50%;
            margin-left: -400px;
        }

        input {
        /*设置按钮统一样式*/
            border-color: 1px #888;
            width: 80px;
            height: 30px;
        }

        #clear_button {
        /*设置按钮的位置,下同*/
            z-index: 10;
            position: absolute;
            left: 100px;
            top: 1px;
            font-size: 20px;
        }

        #line_range {
            z-index: 10;
            position: absolute;
            left: 100px;
            top: 41px;
            font-size: 20px;
        }

        #color_picker {
            z-index: 10;
            position: absolute;
            left: 100px;
            top: 81px;
            font-size: 20px;
        }

        #content {
            position: absolute;
        }
		/*设置背景颜色*/
        body {
            background: orange;
        }
    </style>
2、温习
(1)定位
概念
作为CSS的重要组成,既浮动、定位、过渡之一,定位分为:静态定位(static)、相对定位(relative)、绝对定位(absolute)、固定定位(fixed)、粘性定位(sticky)等。
边偏移
既top、bottom、left、right四个属性,可以用来设置与各个方向的距离
相对定位
子元素为绝对定位时,父元素必须为相对定位,默认为html。
既position:relative;
移动的参照点是自己原来的位置,原来的标准流位置仍然占有,不脱标。
绝对定位
相对于其父移动,在没有设定父元素时,以浏览器为准定位(document文档)。会脱离标准流。
(2)边框border
可用于设置border-width, border-style,和border-color。
(3)盒子模型
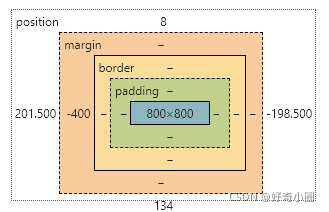
以画板大小(Chrome浏览器)为例可见盒子模型的组成

使用
left: 50%;
margin-left: -400px;
即可实现居中对齐
三、JavaScript部分
1、代码
<script>
    //  获取用于线宽设置的滑块
    var linew = document.querySelector('input[type="range"]');
    //  获取canvas标签
    let canvas = document.getElementById('canvas');
    //  获取2D渲染接口
    const ctx = canvas.getContext('2d');
    //  将渲染颜色设置为 黑色 #000000
    ctx.strokeStyle = '#000000';

    ctx.setLineDash([]);
    //设置画板大小
    canvas.setAttribute('height', 800 + 'px');
    canvas.setAttribute('width', 800 + 'px');


    //  线段开始位置
    let startP = { x: 0, y: 0 };
    //  线段结束位置
    let endP = { x: 0, y: 0 };
    //  添加 mousedown 事件
    canvas.addEventListener('mousedown', mousedown);
    //  添加 mouseup 事件
    canvas.addEventListener('mouseup', mouseup);
    //  添加 mouseleave 事件
    canvas.addEventListener('mouseleave', mouseleave);

    function mousedown(e) {
        //  将线段开始位置设为鼠标点击的位置
        startP = { x: e.clientX - (window.innerWidth - 800) / 2, y: e.clientY };
        //  将画笔移到始点
        ctx.moveTo(startP.x, startP.y);
        console.log('Mouse down.');
        ctx.lineWidth = linew.value;
        canvas.addEventListener('mousemove', mousemove);
    }

    function mousemove(e) {
        ctx.beginPath();
        ctx.moveTo(startP.x, startP.y);
        //  设置线段终点
        endP = { x: e.clientX - (window.innerWidth - 800) / 2, y: e.clientY };
        console.log(JSON.stringify(startP) + ',' + JSON.stringify(endP));
        //  告诉画笔线段终点位置
        ctx.lineTo(endP.x, endP.y);
        //  画线段
        ctx.stroke();
        //  将下一条线段七点设置为当前线段的终点
        startP = endP;
        ctx.moveTo(startP.x - (window.innerWidth - 800) / 2, startP.y);
    }

    function mouseup(e) {
        console.log('Mouse up.');
        canvas.removeEventListener('mousemove', mousemove);
        //clearInterval(interval);
    }


    function mouseleave(e) {
        canvas.removeEventListener('mousemove', mousemove);
        console.log('Mouse leave.')
    }
    const color_picker = document.getElementById('color_picker');
    color_picker.onchange = function (e) {
        console.log('Color changed to.' + color_picker.value);
        //  改变画笔颜色
        ctx.strokeStyle = color_picker.value;
    };
    const clear_button = document.getElementById('clear_button');
    clear_button.onclick = function (e) {
        //  清空画板
        ctx.clearRect(0, 0, canvas.width, canvas.height);
    }
</script>
2、温习
(1)canvas API
菜鸟教程


MDN
Document.getElementById() 方法获取HTML 元素的引用。接着,HTMLCanvasElement.getContext() 方法获取这个元素的context——图像稍后将在此被渲染。
(2)元素获取
document.getElementById(‘输入ID’);通过ID获取
document.querySelector();HTML5新增方法
该方法’.box’获取类,’#nav’获取id,'li’直接获取标签。
(3)鼠标事件与方法监听
上述代码用到了鼠标按下、鼠标抬起、移出元素
	   //  添加 mousedown 事件
	    canvas.addEventListener('mousedown', mousedown);
	    //  添加 mouseup 事件
	    canvas.addEventListener('mouseup', mouseup);
	    //  添加 mouseleave 事件
	    canvas.addEventListener('mouseleave', mouseleave);
总结
还有很多生疏的地方,参考于CSDN