一. svg图标介绍
svg图标是用作Web应用程序或移动应用程序内的图标或图像按钮。
图标使用svg的优点:
- 可以轻松地按比例放大和缩小图标,具体取决于要在应用程序中显示的位置以及显示应用程序的屏幕尺寸。
- svg图标具有优于位图图形的优点,即按比例放大或缩小时它们仍然看起来不错。
- 位图图形在按比例放大时趋于像素化,而在按比例缩小时会失去质量(像素)。
这里只讨论svg的特点,不对svg图标的文件结构进行介绍。
二. svg图标的获取方式
漂亮和精致的图标ICON可以为整个UI界面加分不少,下面提供四个常用的免费SVG下载地址,提供给大家使用,基本可以满足绝大部分的使用需求。
这里推荐国内Iconfont-阿里巴巴矢量图标库
地址:https://www.iconfont.cn/
介绍:阿里巴巴体验团队倾力打造,功能很强大且图标内容很丰富的矢量图标库,提供矢量图标下载、在线存储、格式转换等功能。
三. Vue项目使用svg图标的环境配置
安装依赖
npm install --save-dev svg-sprite-loader
四. Vue项目使用svg图标的项目配置
-
新建
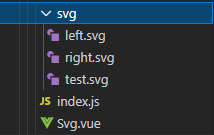
icon文件夹放置icon图标,并在此文件夹中新建svg文件夹放置svg文件,文件名尽量不要用中文。

-
svg依赖的配置
2.1Vue 2.x的配置
在webpack.base.conf.js中配置允许svg依赖如下:
 module: {
    rules: [
      {
        test: /\.svg$/,
        loader: 'svg-sprite-loader',
        include: [resolve('src/assets/icons')],
        options: {
          symbolId: 'icon-[name]'
        }
      },
      {
        test: /\.(png|jpe?g|gif|svg)(\?.*)?$/,
        loader: 'url-loader',
        exclude: [resolve('src/assets/icons')],
        options: {
          limit: 10000,
          name: utils.assetsPath('img/[name].[hash:7].[ext]')
        }
      }
    ]
  },
2.2 Vue 3.x的配置
在根目录新建vue.config.js文件中配置如下:
module.exports = {
  chainWebpack: config => {
    // svg rule loader
    const svgRule = config.module.rule('svg') // 找到svg-loader
    svgRule.uses.clear() // 清除已有的loader, 如果不这样做会添加在此loader之后
    svgRule.exclude.add(/node_modules/) // 正则匹配排除node_modules目录
    svgRule // 添加svg新的loader处理
      .test(/\.svg$/)
      .use('svg-sprite-loader')
      .loader('svg-sprite-loader')
      .options({
        symbolId: 'icon-[name]',
      })
    // 修改images loader 添加svg处理
    const imagesRule = config.module.rule('images')
    imagesRule.exclude.add(resolve('src/assets/icons'))
    config.module
      .rule('images')
      .test(/\.(png|jpe?g|gif|svg)(\?.*)?$/)
  }
}
2.3 Vue 4.x的配置
在根目录新建vue.config.js文件中配置如下:
const path = require('path')
module.exports = {
  /**
   * svg矢量图标使用配置
   * 使用svg-sprite-loader编译svg,如果使用file-loader时排除src/icons下的矢量图标
   * @param config
   */
  chainWebpack: (config) => {
    const svgRule = config.module.rule('svg')
    // 清除已有的所有 loader。
    // 如果你不这样做,接下来的 loader 会附加在该规则现有的 loader 之后。
    svgRule.uses.clear()
    svgRule
      .test(/\.svg$/)
      .include.add(path.resolve(__dirname, './src/icons'))
      .end()
      .use('svg-sprite-loader')
      .loader('svg-sprite-loader')
      .options({
        symbolId: 'icon-[name]',
      })
    const fileRule = config.module.rule('file')
    fileRule.uses.clear()
    fileRule
      .test(/\.svg$/)
      .exclude.add(path.resolve(__dirname, './src/icons'))
      .end()
      .use('file-loader')
      .loader('file-loader')
  },
}
- 在
icon文件夹中新建Svg.vue文件
<template>
  <svg :class="svgClass" aria-hidden="true">
    <use :xlink:href="iconName" />
  </svg>
</template>

<script>
export default {
  name: 'SvgIcon',
  props: {
    iconClass: {
      type: String,
      required: true,
    },
    className: {
      type: String,
      default: '',
    },
  },
  computed: {
    iconName() {
      return `#icon-${this.iconClass}`
    },
    svgClass() {
      if (this.className) {
        return 'svg-icon ' + this.className
      } else {
        return 'svg-icon'
      }
    },
  },
}
</script>

<style scoped>
.svg-icon {
  width: 1rem;
  height: 1rem;
  vertical-align: -0.25em;
  fill: currentColor;
  overflow: hidden;
}
</style>
- 在
icon文件夹中新建index.js文件
//下面这个是导入svgIcon/svg下的所有svg文件
const requireAll = (requireContext) => requireContext.keys().map(requireContext)
const req = require.context('./svg', false, /\.svg$/)
/*
 第一个参数是:'./svg' => 需要检索的目录,
 第二个参数是:false => 是否检索子目录,
 第三个参数是: /\.svg$/ => 匹配文件的正则
*/
requireAll(req)
- 在
main.js文件中配置svg图标的相关设置
//svg图标的设置
import '@/assets/icon'
import svgIcon from '@/assets/icon/Svg.vue'
Vue.component('svg-icon', svgIcon)
- 使用
svg组件
...
<svg-icon icon-class="left" className="icon"></svg-icon>
...
其中icon-class对应图标svg文件的名称;className对应图标的css样式属性,设置相关属性可以改变svg图标的样式。
注意
若svg图标的颜色并没有变化,可以选择打开svg文件,删除style标签里的每一项fill样式设置.