1、前端路由
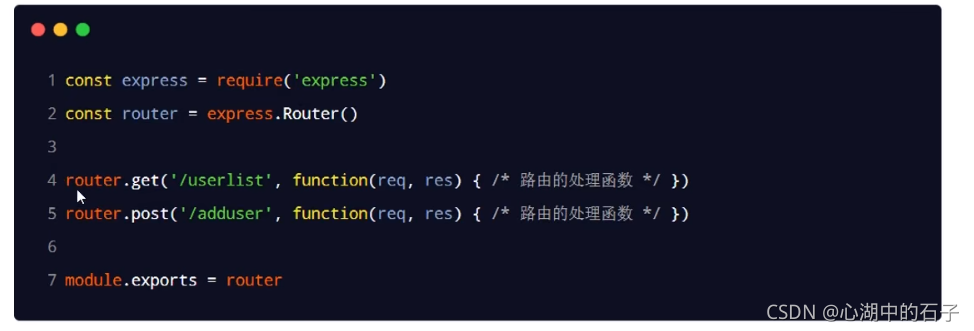
后端路由:请求方式,请求地址与function处理函数之间的对应关系。
后端路由基本使用方法(以express为例)

2、spa与前端路由
单页面应用程序,所有组件的展示与切换都在这唯一的一个页面内完成,不同组件的切换需要通过前端路由来实现
前端路由:就是hash地址与组件之间的关系
3、前端路由的工作方式
1、用户点击了页面上的路由连接
2、导致了url地址栏中的hash值发生了变化
3、前端路由监听到了hash地址的变化
4、前端路由把当前hash地址对应的组件渲染到浏览器中

4、前端路由的工作步骤
1、创建一个组件占位符,用is绑定组件名称
2、创建若干连接,连接的href对应响应的hash路由
3、导入并注册响应的不同组件
4、在create(){}方法中创建window.onhashchange事件的回调函数,通过监听并判断浏览器的location.hash值,进行路由跳转的操作
<template>
  <component :is="showcompent"></component>
  <hr>
  <a href="#/home">主页</a><br/>
  <a href="#/movie">影视</a><br/>
  <a href="#/about">关于</a><br/>
</template>


<script>
  import Home from './components/Home.vue'
  import Movie from './components/Movie.vue'
  import About from './components/About.vue'

  export default {
  name: 'App',
  data(){
    return {
      showcompent:'Home',
    }
  },

  methods:{

  },
  created () {
    window.onhashchange=()=>{
      switch (location.hash){
        case '#/home':
          this.showcompent='Home'
          break
        case '#/movie':
          this.showcompent='Movie'
          break
        case '#/about':
          this.showcompent='About'
          break
        default:
          this.showcompent='Home'
      }
    }
  },

  components: {
    Home,
    Movie,
    About
  }
}
</script>

<style scoped>

</style>
5、vue-router
vue-router是vue.js官方给出的路由解决方案,它只能结合vue进行使用,能够轻松的管理spa项目中组件的切换
vue-router3.x只能配合vue2使用
vue-router4.x只能结合vue4使用
6、vue-router的使用步骤
- 1、安装vue-router
npm i vue-router@next --save
- 2、定义路由组件
就是创建若干个子组件
- 3、声明路由连接和占位符
使用<router-link>标签来声明路由连接,并使用<router-view>标签来声明路由占位符。
<router-link>中用to属性替换a标签的href属性
<template>
  <!--声明路由连接-->
  <router-link to="/home"></router-link>
  <router-link to="/movie"></router-link>
  <router-link to="/about"></router-link>

  <!--  声明路由占位符-->
  <router-view></router-view>
</template>
- 4、创建路由模块
这一部分都需要创建一个router.js,在这个文件里完成、
a、从vue-router中按需导入两个方法
//从vue-router中按需导入两个方法
//createRouter方法用于创建路由的实例对象
//createWebhashHishtory用于指定路由的工作模式(hash模式)
import {creatRouter,createWebHashHistory} from 'vue-router'
b、导入需要使用路由控制的组件
import Home from '../components/Home.vue'
import Movie from '../components/Movie.vue'
import About from '../components/About.vue'
c、创建路由实例对象
const router=creatRouter({
  history:createWebHashHistory(),
  routes:[
    {path:'/home',component:Home},
    {path:'/movie',component:Movie},
    {path:'/about',component:About}
  ]

})
d、向外共享路由实例对象
export default {
  router
}
e、在main.js中导入并挂载路由模块
import { createApp } from 'vue'
import App from './App.vue'
import './index.css'
//引入路由模块
import router from './js/router.js'
const app=createApp(App)
//挂载路由模块
app.use(router)
app.mount('#app')
- 5、导入并挂载路由模块
完整代码
- 1、三个组件Home,Movie,About略
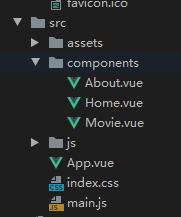
- 2、文档结构

- 3、router.js
//从vue-router中按需导入两个方法
//createRouter方法用于创建路由的实例对象
//createWebhashHishtory用于指定路由的工作模式(hash模式)
import {createRouter,createWebHashHistory} from 'vue-router'
//导入路由组件
import Home from '../components/Home.vue'
import Movie from '../components/Movie.vue'
import About from '../components/About.vue'
//创建路由对象
const router=createRouter({
  history:createWebHashHistory(),
  routes:[
    {path:'/',component:Home},
    {path:'/home',component:Home},
    {path:'/movie',component:Movie},
    {path:'/about',component:About}
  ]

})
//导出路由对象
export default router
- 4、main.js
import { createApp } from 'vue'
import App from './App.vue'
import './index.css'
//引入路由模块
import router from './js/router.js'
const app=createApp(App)
//挂载路由模块
app.use(router)
app.mount('#app')
- 5、app.vue
<template>
  <div>
    <!--声明路由连接-->
    <router-link to="/"></router-link>
    <router-link to="/home">首页</router-link><br/>
    <router-link to="/movie">电影</router-link><br/>
    <router-link to="/about">关于</router-link>
    <hr/>
    <!--  声明路由占位符-->
    <router-view></router-view>
  </div>

</template>


<script>
  export default {
  name: 'App',
  data(){
    return {
    }
  },

  methods:{

  },

  components: {

  }
}
</script>

<style scoped>

</style>
7、路由重定向
通过路由规则的redirect属性,指定一个新的路由地址,可以很方便地设置路由的重定向
更关键代码
const router=createRouter({
  history:createWebHashHistory(),
  routes:[
    {path:'/',redirect:'/home'},
    {path:'/home',component:Home},
    {path:'/movie',component:Movie},
    {path:'/about',component:About}
  ]

})
8、路由高亮
设置高亮路由的class
方法一:默认高亮class
被激活的路由连接,默认会应用一个几号座router-link-active的类名,开发者可以使用此类名选择器,为激活的路由连接设置高亮的样式
这个样式要在index.css中定义
index.css
.router-link-active{
    background-color: red;
    color:white;
    font-weight: bold;
}
方法二:自定义高亮class
在创建路由的实例对象时,开发者可以基于linkActiveClass属性,自定义路由连接被激活时所应用的类名
在创建路由的实例对象时,添加一个linkActiveClass属性,属性值为自己所定义的样式类名
router.js
//从vue-router中按需导入两个方法
//createRouter方法用于创建路由的实例对象
//createWebhashHishtory用于指定路由的工作模式(hash模式)
import {createRouter,createWebHashHistory} from 'vue-router'
//导入路由组件
import Home from '../components/Home.vue'
import Movie from '../components/Movie.vue'
import About from '../components/About.vue'

const router=createRouter({
  history:createWebHashHistory(),
  linkActiveClass:'myactiveclass',
  routes:[
    {path:'/',redirect:'/home'},
    {path:'/home',component:Home},
    {path:'/movie',component:Movie},
    {path:'/about',component:About}
  ]

})

export default router
index.css
.myactiveclass{
    background-color: red;
    color:white;
    font-weight: bold;
}
9、嵌套路由(二级路由)
通过路由实现组件的嵌套展示就是嵌套路由
1、声明子路由连接和子路由占位符
<template>
  <h3>movie</h3>
  <router-link to="/movie/chinese">国产</router-link><br/>
  <router-link to="/movie/hoolywood">好莱坞</router-link>
  <hr/>
  <router-view></router-view>
</template>
2、在父路由规则里面,通过children属性嵌套声明子路由规则
子路由规则一定不要有反斜杠,否则会被默认从根目录解析
const router=createRouter({
  history:createWebHashHistory(),
  linkActiveClass:'myactiveclass',
  routes:[
    {path:'/',redirect:'/home'},
    {path:'/home',component:Home},
    {
      path:'/movie',
      component:Movie,
      //使用children属性来声明二级路由
      children:[
      //二级路由不要写反斜杠,会被编译成从根目录开始解析
        {path:'chinese',component:ChineseMovie},
        {path:'hoolywood',component:Hollywood}
      ]
    },
    {path:'/about',component:About}
  ]

})
完整代码
1、创建chineseMovie和Hoolywood两个组件,代码略
2、app.vue
<template>
  <div>
    <!--声明路由连接-->
    <router-link to="/home">首页</router-link><br/>
    <router-link to="/movie">电影</router-link><br/>
    <router-link to="/about">关于</router-link>
    <hr/>
    <!--  声明路由占位符-->
    <router-view></router-view>
  </div>

</template>


<script>
  export default {
  name: 'App',
  data(){
    return {
    }
  },

  methods:{

  },

  components: {

  }
}
</script>

<style scoped>

</style>
3、movie.vue
<template>
  <div>
    <h3>movie</h3>
    <router-link to="/movie/chinese">国产</router-link><br/>
    <router-link to="/movie/hoolywood">好莱坞</router-link>
    <hr/>
    <!--  声明路由占位符-->
    <router-view></router-view>
  </div>


</template>

<script>
  import ChineseMovie from './ChineseMovie.vue'
  export default {
    name: 'Movie',
    components:{
      ChineseMovie
    }
  }
</script>

<style scoped>

</style>
4、router.js
//从vue-router中按需导入两个方法
//createRouter方法用于创建路由的实例对象
//createWebhashHishtory用于指定路由的工作模式(hash模式)
import {createRouter,createWebHashHistory} from 'vue-router'
//导入路由组件
import Home from '../components/Home.vue'
import Movie from '../components/Movie.vue'
import About from '../components/About.vue'
import ChineseMovie from '../components/ChineseMovie.vue'
import Hollywood from '../components/Hollywood.vue'

const router=createRouter({
  history:createWebHashHistory(),
  linkActiveClass:'myactiveclass',
  routes:[
    {path:'/',redirect:'/home'},
    {path:'/home',component:Home},
    {
      path:'/movie',
      component:Movie,
      children:[
        {path:'chinese',component:ChineseMovie},
        {path:'hoolywood',component:Hollywood}
      ]
    },
    {path:'/about',component:About}
  ]

})

export default router
5、main.js
import { createApp } from 'vue'
import App from './App.vue'
import './index.css'
//引入路由模块
import router from './js/router.js'
const app=createApp(App)
//挂载路由模块
app.use(router)
app.mount('#app')
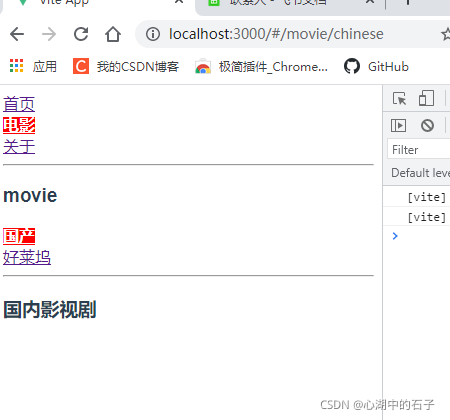
结果:

10、嵌套路由实现重定向
直接在router.js中对二级路由的上级添加redirect
const router=createRouter({
  history:createWebHashHistory(),
  linkActiveClass:'myactiveclass',
  routes:[
    {path:'/',redirect:'/home'},
    {path:'/home',component:Home},
    {
      path:'/movie',
      component:Movie,
      redirect:'/movie/chinese',
      children:[
        {path:'chinese',component:ChineseMovie},
        {path:'hoolywood',component:Hollywood}
      ]
    },
    {path:'/about',component:About}
  ]

})
11、动态路由匹配
动态路由匹配就是把hash地址中可变的部分定义为参数项,从而提高路由规则的复用性。在vue-router中使用英文的冒号:来定义路由的参数项。
往往使用id绑定如
{path:'/movie/:id',compent:Movie}
app.vue
<template>
<div>
<!--声明路由连接-->
<router-link to="/home">首页</router-link><br/>
<router-link to="/movie">电影</router-link><br/>
<router-link to="/about/1">关于1</router-link>
<router-link to="/about/2">关于2</router-link>
<router-link to="/about/3">关于3</router-link>
<hr/>
<!-- 声明路由占位符-->
<router-view></router-view>
</div>
</template>
<script>
export default {
name: 'App',
data(){
return {
}
},
methods:{
},
components: {
}
}
</script>
<style scoped>
</style>
router.js
//从vue-router中按需导入两个方法
//createRouter方法用于创建路由的实例对象
//createWebhashHishtory用于指定路由的工作模式(hash模式)
import {createRouter,createWebHashHistory} from 'vue-router'
//导入路由组件
import Home from '../components/Home.vue'
import Movie from '../components/Movie.vue'
import About from '../components/About.vue'
import ChineseMovie from '../components/ChineseMovie.vue'
import Hollywood from '../components/Hollywood.vue'

const router=createRouter({
  history:createWebHashHistory(),
  linkActiveClass:'myactiveclass',
  routes:[
    {path:'/',redirect:'/home'},
    {path:'/home',component:Home},
    {
      path:'/movie',
      component:Movie,
      redirect:'/movie/chinese',
      children:[
        {path:'chinese',component:ChineseMovie},
        {path:'hoolywood',component:Hollywood}
      ]
    },
    {path:'/about/:id',component:About}
  ]

})

export default router
12、获得动态路由参数的两种方法
就是如何拿到上例子的id值
1、$router.params参数对象
router.js
//从vue-router中按需导入两个方法
//createRouter方法用于创建路由的实例对象
//createWebhashHishtory用于指定路由的工作模式(hash模式)
import {createRouter,createWebHashHistory} from 'vue-router'
//导入路由组件
import Home from '../components/Home.vue'
import Movie from '../components/Movie.vue'
import About from '../components/About.vue'
import ChineseMovie from '../components/ChineseMovie.vue'
import Hollywood from '../components/Hollywood.vue'

const router=createRouter({
  history:createWebHashHistory(),
  linkActiveClass:'myactiveclass',
  routes:[
    {path:'/',redirect:'/home'},
    {path:'/home',component:Home},
    {
      path:'/movie',
      component:Movie,
      redirect:'/movie/chinese',
      children:[
        {path:'chinese',component:ChineseMovie},
        {path:'hoolywood',component:Hollywood}
      ]
    },
    //这里是用了绑定id的语法
    {path:'/about/:id',component:About}
  ]

})

export default router
About.vue
<template>
<!--  这里可以直接渲染出参数的值,注意名称要和router.js一致-->
  <h3>about=--{{$route.params.id}}</h3>
</template>

<script>
  export default {
    name: 'About'
  }
</script>

<style scoped>

</style>
2、使用props接收路由参数
为了简化路由参数的获取形式,vue-router允许在路由规则中开启props传参。
a、在路由规则中添加新属性props:true
b、定义props属性接收路由规则中匹配到的参数
router.js
//从vue-router中按需导入两个方法
//createRouter方法用于创建路由的实例对象
//createWebhashHishtory用于指定路由的工作模式(hash模式)
import {createRouter,createWebHashHistory} from 'vue-router'
//导入路由组件
import Home from '../components/Home.vue'
import Movie from '../components/Movie.vue'
import About from '../components/About.vue'
import ChineseMovie from '../components/ChineseMovie.vue'
import Hollywood from '../components/Hollywood.vue'

const router=createRouter({
  history:createWebHashHistory(),
  linkActiveClass:'myactiveclass',
  routes:[
    {path:'/',redirect:'/home'},
    {path:'/home',component:Home},
    {
      path:'/movie',
      component:Movie,
      redirect:'/movie/chinese',
      children:[
        {path:'chinese',component:ChineseMovie},
        {path:'hoolywood',component:Hollywood}
      ]
    },
    {path:'/about/:id',component:About,props:true}
  ]

})

export default router
about.vue
<template>
<!--  直接绑定props的数据-->
  <h3>about=--{{id}}</h3>
</template>

<script>
  export default {
    name: 'About',
    //添加props属性
    props:['id']
  }
</script>

<style scoped>

</style>
13、编程式导航
通过调用API实现导航的方式,叫做编程式导航,与之对应的,通过点击链接实现导航的方式,叫做声明式导航。
常用的编程式导航api:
1、this.$router.push('hash地址')
跳转到指定hash地址,从而展示对应的组件
在home.vue上
<template>
  <h3>home</h3>
  <button @click="jump(3)">跳转</button>
</template>

<script>
  export default {
    name: 'Home',
    methods:{
      jump(id){
      //跳转到具体的路由
        this.$router.push(`/about/${id}`)
      }


    }
  }
</script>

<style scoped>

</style>
2、this.$router.go(数字n)
实现导航历史的前进,后退
about.vue
<template>
<!--  直接绑定props的数据-->
  <h3>about=--{{id}}</h3>
  <button @click="goback">后退</button>
</template>

<script>
  export default {
    name: 'About',
    //添加props属性
    props:['id'],

    methods:{
      //处理后退
      goback(){
      //回退到上一个页面
        this.$router.go(-1)
      }
    }

  }
</script>

<style scoped>

</style>
14、命名路由
通过name属性为路由规则定义名称的方式,叫做命名路由,命名路由的name值不能重复,必须保证唯一性
- 1、使用命名路由实现声明式导航
为<router-link>标签动态绑定to属性的值,并通过name属性指定要跳转的路由规则,期间还可以用params属性指定跳转期间要携带的路由参数
模板页面app.vue
<router-link :to="{name:'about',params:{id:2} }">命名路由</router-link>
路由文件router.js
//从vue-router中按需导入两个方法
//createRouter方法用于创建路由的实例对象
//createWebhashHishtory用于指定路由的工作模式(hash模式)
import {createRouter,createWebHashHistory} from 'vue-router'
//导入路由组件
import Home from '../components/Home.vue'
import Movie from '../components/Movie.vue'
import About from '../components/About.vue'
import ChineseMovie from '../components/ChineseMovie.vue'
import Hollywood from '../components/Hollywood.vue'

const router=createRouter({
  history:createWebHashHistory(),
  linkActiveClass:'myactiveclass',
  routes:[
    {path:'/',redirect:'/home'},
    {path:'/home',component:Home},
    {
      path:'/movie',
      component:Movie,
      redirect:'/movie/chinese',
      children:[
        {path:'chinese',component:ChineseMovie},
        {path:'hoolywood',component:Hollywood}
      ]
    },
    {
      path:'/about/:id',
      //命名路由
      name:'about',
      component:About,props:true}
  ]

})

export default router
- 2、使用命名路由实现编程式导航
上例基础上修改app.vue
<template>
<div>
<!--声明路由连接-->
<router-link to="/home">首页</router-link><br/>
<router-link to="/movie">电影</router-link><br/>
<router-link to="/about/1">关于1</router-link>
<router-link to="/about/2">关于2</router-link>
<router-link to="/about/3">关于3</router-link>
<button @click="jumprouter(3)">命名路由跳转</button>
<hr/>
<!-- 声明路由占位符-->
<router-view></router-view>
</div>
</template>
<script>
export default {
name: 'App',
data(){
return {
}
},
methods:{
jumprouter(id){
this.$router.push({name:'about',params:{id:3}})
}
},
components: {
}
}
</script>
<style scoped>
</style>
15、导航守卫
导航守卫可以控制路由的访问权限。

全局导航守卫会拦截每个路由规则,从而对每个路由进行访问权限的控制,可以按照如下方法定义全局导航守卫
a、调用路由实例对象的beforeEach函数,声明“全局前置守卫”
b、fn必须是一个函数,每次拦截到路由的请求,就会调用fn进行处理
c、因此fn叫做‘守卫方法’
//从vue-router中按需导入两个方法
//createRouter方法用于创建路由的实例对象
//createWebhashHishtory用于指定路由的工作模式(hash模式)
import {createRouter,createWebHashHistory} from 'vue-router'
//导入路由组件
import Home from '../components/Home.vue'
import Movie from '../components/Movie.vue'
import About from '../components/About.vue'
import ChineseMovie from '../components/ChineseMovie.vue'
import Hollywood from '../components/Hollywood.vue'

const router=createRouter({
  history:createWebHashHistory(),
  linkActiveClass:'myactiveclass',
  routes:[
    {path:'/',redirect:'/home'},
    {path:'/home',component:Home},
    {
      path:'/movie',
      component:Movie,
      redirect:'/movie/chinese',
      children:[
        {path:'chinese',component:ChineseMovie},
        {path:'hoolywood',component:Hollywood}
      ]
    },
    {
      path:'/about/:id',
      //命名路由
      name:'about',
      component:About,props:true}
  ]

})
//声明全局的导航守卫
router.beforeEach(()=>{
  console.log('全局导航守卫')
})

export default router
16、守卫方法的三个形参
全局导航守卫的守卫方法接收3个形参
to:目标路由对象
from:当前导航正要离开的路由对象
next:是一个函数,表示放行
router.beforeEach((to,from,next)=>{
  console.log('全局导航守卫')
})
- 如果守卫方法不声明next形参,则默认允许用户访问每一个路由
- 如果守卫方法中声明了next形参,则必须调用next()函数,否则不允许用户访问任何一个路由(如果next不调用,任何一个路由都无法访问)
//声明全局的导航守卫
router.beforeEach((to,from,next)=>{
  console.log('ok')
  //如果next不调用,任何一个路由都无法访问
  next()
})
17、next函数的三种调用方式

1、调用next直接放行
next()
2、强制其停留在当前页面
next(false)
router.beforeEach((to,from,next)=>{

  if (to.path==='main'){

    next(false)
  }else{
    next()
  }

})
3、强制其跳转到登录(指定)页面
next(Login)
//声明全局的导航守卫
router.beforeEach((to,from,next)=>{

  if (to.path==='main'){

    next('/login')
  }else{
    next()
  }

})
完整代码
router.js
//从vue-router中按需导入两个方法
//createRouter方法用于创建路由的实例对象
//createWebhashHishtory用于指定路由的工作模式(hash模式)
import {createRouter,createWebHashHistory} from 'vue-router'
//导入路由组件
import Home from '../components/Home.vue'
import Movie from '../components/Movie.vue'
import About from '../components/About.vue'
import ChineseMovie from '../components/ChineseMovie.vue'
import Hollywood from '../components/Hollywood.vue'
import Main from '../components/Main.vue'
import Login from '../components/Login.vue'

const router=createRouter({
  history:createWebHashHistory(),
  linkActiveClass:'myactiveclass',
  routes:[
    {path:'/',redirect:'/home'},
    {path:'/home',component:Home},
    {
      path:'/movie',
      component:Movie,
      redirect:'/movie/chinese',
      children:[
        {path:'chinese',component:ChineseMovie},
        {path:'hoolywood',component:Hollywood}
      ]
    },
    {
      path:'/about/:id',
      //命名路由
      name:'about',
      component:About,props:true},
    {
      path:'/main',
      component:Main
    } ,
    {
      path:'/login',
      component:Login
    }
  ]

})
//声明全局的导航守卫
router.beforeEach((to,from,next)=>{

  if (to.path==='main'){

    next('/login')
  }else{
    next()
  }

})

export default router
18、结合token控制后台主页的访问权限
通过localStorage.getItem(‘token’)拿到token值
//从vue-router中按需导入两个方法
//createRouter方法用于创建路由的实例对象
//createWebhashHishtory用于指定路由的工作模式(hash模式)
import {createRouter,createWebHashHistory} from 'vue-router'
//导入路由组件
import Home from '../components/Home.vue'
import Movie from '../components/Movie.vue'
import About from '../components/About.vue'
import ChineseMovie from '../components/ChineseMovie.vue'
import Hollywood from '../components/Hollywood.vue'
import Main from '../components/Main.vue'
import Login from '../components/Login.vue'

const router=createRouter({
  history:createWebHashHistory(),
  linkActiveClass:'myactiveclass',
  routes:[
    {path:'/',redirect:'/home'},
    {path:'/home',component:Home},
    {
      path:'/movie',
      component:Movie,
      redirect:'/movie/chinese',
      children:[
        {path:'chinese',component:ChineseMovie},
        {path:'hoolywood',component:Hollywood}
      ]
    },
    {
      path:'/about/:id',
      //命名路由
      name:'about',
      component:About,props:true},
    {
      path:'/main',
      component:Main
    } ,
    {
      path:'/login',
      component:Login
    }
  ]

})
//声明全局的导航守卫
router.beforeEach((to,from,next)=>{
  const token=localStorage.getItem('token')
  if (to.path==='main' && !token){
    //强行跳转到登录页面
    next('/login')
  }else{
    //直接放行
    next()
  }

})

export default router