Vue是一款优秀的渐进式Javascript框架,从2013年诞生以来,受到越来越多的前端程序员的喜爱。
Vue的特点
1、架构式,方便移植
2、声明式UI
Vue的开始
1、第一个Hello World实例
<!DOCTYPE html>
<html lang="en">

<head>
    <meta charset="UTF-8">
    <meta name="viewport" content="width=device-width, initial-scale=1.0">

    <title>Document</title>
    <script type="text/javascript" src="../js/vue.js"></script>
</head>

<body>
    <div id='root'>
        <h1>Hello {{name}}</h1>
    </div>
    <script type="text/javascript">
        Vue.config.productionTip = false

        new Vue({
            el:'#root',
            data:{
                name:'world'
            }
        })
    </script>
</body>

</html>
初识Vue:
1)、想让Vue工作,就必须创建一个Vue实例,且要传入一个配置对象
2)、root容器中的代码依然符合HTML代码规范,
3)、root容器里的代码被称为模板代码

数据绑定
v-bind :单向绑定
vue实例中定义的值可以影响页面的参数,反过来页面中的值却不能影响vue中定义的属性值
单向数据绑定 使用 v-bind:属性 可以简写成 :属性
v-model:双向绑定
vue实例中定义的值可以影响页面的参数,同时页面中的值却也能影响vue中定义的属性值 ,双向绑定只适用于表单元素
双向数据绑定 使用v-model:属性 可以简写成 v-model
<!DOCTYPE html>
<html lang="en">

<head>
    <meta charset="UTF-8">
    <meta name="viewport" content="width=device-width, initial-scale=1.0">
    <title>Document</title>
    <script type="text/javascript" src="../js/vue.js"></script>
</head>

<body>
    <div id="root">

        <!--
            单向绑定 : vue实例中定义的值可以影响页面的参数,反过来页面中的值却不能影响vue中定义的属性值
            双向绑定 :vue实例中定义的值可以影响页面的参数,同时页面中的值却也能影响vue中定义的属性值
                       双向绑定只适用于表单元素
        -->
        <!-- 单向数据绑定 使用  v-bind:属性
            可以简写成  :属性
        -->
        单向数据绑定:<input type="text" v-bind:value="value"></br>
        <!-- <input type="text" :value="value"> -->
        <!--双向数据绑定 使用v-model:属性
            可以简写成 v-model 因为v-model就是收集value值
        -->
        双向数据绑定:<input type="text" v-model:value="value">
        <!-- <input type="text" v-model="value"> -->
    	<!--会报错 提示不能用在这个元素上-->
        <!-- <h1 v-model:x='value'>你好</h1> -->

    </div>
    <script type="text/javascript">
        new Vue({
            el: '#root',
            data: {
                value: '123455'
            }
        })

    </script>

</body>

</html>
el元素的两种写法
第一种写法:
直接将el元素写在vue的构造函数中
new Vue({
    el: '#root',
    data: {
        value: '123455'
    }
 })
第二种写法:
通过vue构造函数返回的对象,调用mount()方法
var v = new Vue({
            // 第一种写法
            // el: '#root',
            data: {
                name: 'World'
            }
        })
//第二种写法
v.$mount("#root")
data数据赋值的两种写法
第一种写法 :对象式
直接通过对象赋值
new Vue({
            // 第一种写法
            // el: '#root',

            //data 赋值第一种写法
             data: {
               name: 'World'
            }
        })
第二种写法:函数式
通过function函数返回一个对象赋值
new Vue({
             el: '#root',
            //data 赋值第二种写法
            data: function () {
                return {
                    name: 'hihihi'
                }

        })
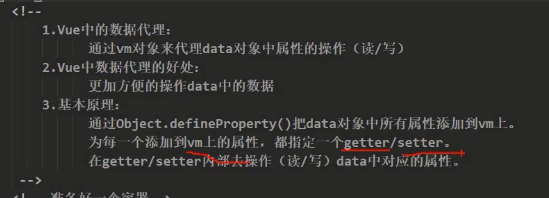
vue数据代理
vue事件处理
使用v-on:xx绑定事件
v-on可以简写成@:xx
事件可以传参,通过事件名(xx)参数的形式进行传递,在方法中可以接受传递的参数
但是如果只传递参数,会丢失之前的event对象,此时可以通过添加$event参数将event事件传递出去
<!DOCTYPE html>
<html lang="en">

<head>
    <meta charset="UTF-8">
    <meta name="viewport" content="width=device-width, initial-scale=1.0">
    <title>Document</title>
    <script type="text/javascript" src="../js/vue.js"></script>
</head>

<body>
    <div id="root">
        <!-- 使用v-on:xx绑定事件 -->
        <!-- v-on可以简写成@:xx -->
        <button v-on:click='showInfo'>点我弹窗1</button>
        <!-- 事件可以传参,通过事件名(xx)参数的形式进行传递,在方法中可以接受传递的参数 -->
        <!-- 但是如果只传递参数,会丢失之前的event对象,此时可以通过添加$event参数将event事件传递出去 -->
        <button @click='showInfo1($event,66)'>点我弹窗2</button>
    </div>
    <script type="text/javascript">
        let vm = new Vue({
            el: '#root',
            data: {},
            methods: {
                showInfo(event) {
                    console.log(event)
                    alert('同学你好!')
                },
                showInfo1(event, num) {
                    console.log(event, num)
                    alert('同学你好!!')
                }
            }
        })
    </script>
</body>

</html>
事件处理总结为下图:

事件修饰符
使用@click.修饰符阻止事件
比如 下面的代码阻止a标签默认的事件
<a href="http://www.baidu.com" @click.prevent="showInfo">点我</a>
常用的修饰符如下:

<!DOCTYPE html>
<html lang="en">

<head>
    <meta charset="UTF-8">
    <meta name="viewport" content="width=device-width, initial-scale=1.0">
    <title>Document</title>
    <script type="text/javascript" src="../js/vue.js"></script>
    <style>
        .div1{
            width: 300px;
            height: 60px;
            padding: 5px;
            background: red;
        }
        .div2{
            width: 250px;
            height: 50px;
            padding: 5px;
            background-color: royalblue;
        }
    </style>
</head>

<body>
    <div id="root">
        <a href="http://www.baidu.com" @click.prevent="showInfo">点我</a>
        <div class="div1" @click.once="showInfo">
            <div class="div2" @click.stop="showInfo">点我提示弹窗</div>
        </div>
        <button @click.once="showInfo1">点我弹窗2</button>
    </div>
    <script type="text/javascript">
        let vm = new Vue({
            el: '#root',
            data: {},
            methods: {
                showInfo(event) {
                    // event.preventDefault()
                    console.log(event)
                    alert('同学你好!')
                },
                showInfo1(event, num) {
                    console.log(event, num)
                    alert('同学你好!!')
                }
            }
        })
    </script>
</body>

</html>
vue常用的按键别名(键盘事件 keyup/keydown)

<!DOCTYPE html>
<html lang="en">

<head>
    <meta charset="UTF-8">
    <meta name="viewport" content="width=device-width, initial-scale=1.0">
    <title>Document</title>
    <script type="text/javascript" src="../js/vue.js"></script>
    <style>
        .div1 {
            width: 300px;
            height: 60px;
            padding: 5px;
            background: red;
        }

        .div2 {
            width: 250px;
            height: 50px;
            padding: 5px;
            background-color: royalblue;
        }
    </style>
</head>

<body>
    <div id="root">
        <!-- 绑定按键输入事件监听,有两种keyup(按下并抬起) keydown(按下) -->
        <!-- 如果要制定键盘上某个键按下才触发事件,可以使用按键别名,比如按下回车键才触发 -->
        <!-- enter按下回车键触发
        delete 按下删除和回退键触发 -->

        <input type="text" placeholder="请输入" @keyup.delete="input" />
    </div>
    <script type="text/javascript">
        let vm = new Vue({
            el: '#root',
            data: {},
            methods: {
                input(event) {
                    // event.preventDefault()
                    console.log(event.target.value)

                },

            }
        })
    </script>
</body>

</html>
vue计算属性
相对于差值取值,进行了优化,通过data中定义的值来计算最终的属性值。

<!DOCTYPE html>
<html lang="en">

<head>
    <meta charset="UTF-8">
    <meta name="viewport" content="width=device-width, initial-scale=1.0">
    <title>Document</title>
    <script type="text/javascript" src="../js/vue.js"></script>
</head>

<body>
    <div id="root">
        <!-- v-model双向绑定 -->

        姓:<input type="text" v-model="firstName" /><br>
        名:<input type="text" v-model="lastName"><br>
        全名:{{fullName}}<br>
        <!-- 全名:{{fullName}}<br>
        全名:{{fullName}} -->
    </div>
    <script type="text/javascript">
        let vm = new Vue({
            el: '#root',
            data: {
                firstName: '张',
                lastName: '三'
            },
            //计算属性
            computed: {
                //  通过已有属性来计算最后的值,必须要有get函数,且不能为箭头函数
                //  多次取fullName的值,get函数只会调用一次,vue将fullName的值进行缓存
                //  当已有属性发生改变时,会再次调用get函数
                fullName: {
                    get() {
                        console.log("get", this)
                        return this.firstName + '-' + this.lastName
                    },
                    set(value){
                        console.log('set',value)
                        let values=value.split('-')
                        this.firstName= values[0]
                        this.lastName= values[1]
                    }
                }
            }
        })
    </script>
</body>

</html>
//  当计算属性只考虑读取不考虑修改的时候可以简写,简写样式如下
computed: {
      fullName: function () {
         console.log("get", this)
         return this.firstName + '-' + this.lastName
        }
}
vue监视属性
当属性发生改变时使用watch进行监视,
immediate 这个属性表示一上来就会执行一次观察,如果需要的话可以设置

<!DOCTYPE html>
<html lang="en">

<head>
    <meta charset="UTF-8">
    <meta name="viewport" content="width=device-width, initial-scale=1.0">
    <title>Document</title>
    <script type="text/javascript" src="../js/vue.js"></script>
</head>

<body>
    <div id="root">
        <!-- v-model双向绑定 -->

        <label>今天天气很{{info}}</label><br>
        <button @click="changeWeather">点击修改</button>

    </div>
    <script type="text/javascript">
        let vm = new Vue({
            el: '#root',
            data: {
                isHot: true
            },
            methods: {
                changeWeather() {
                    this.isHot = !this.isHot
                }
            },
            //计算属性
            computed: {
                //  当计算属性只考虑读取不考虑修改的时候可以简写,简写样式如下
                info: function () {
                    return this.isHot ? "炎热" : '凉爽'
                }
            },
            //当需要观察某个属性值的变化可以使用watch ,这里的属性值包含计算属性
            watch: {
                isHot: {
                    handler() {
                        console.log("ishot变化了", this.isHot)
                    }

                },
                //简写省略了handler
                // isHot: function () {
                //     console.log("ishot变化了", this.isHot)
                // },
                info: function () {
                    console.log('info变化了')
                }
            }
        })
        // watch 的第二种写法
        // vm.$watch('isHot', function () {
        //     console.log("ishot变化了", this.isHot)
        // })

    </script>
</body>

</html>
vue属性深度监视
vue data中嵌套的属性要想监视它的数据变化,要配置deep属性为true
<!DOCTYPE html>
<html lang="en">

<head>
    <meta charset="UTF-8">
    <meta name="viewport" content="width=device-width, initial-scale=1.0">
    <title>Document</title>
    <script type="text/javascript" src="../js/vue.js"></script>
</head>

<body>
    <div id="root">
        <!-- v-model双向绑定 -->

        <h1>{{name}}</h1><br>
        <h1>{{numbers.a}}</h1>


    </div>
    <script type="text/javascript">
        let vm = new Vue({
            el: '#root',
            data: {
                name: '深度监视',
                numbers: {
                    a: 100,
                    b: 200
                }
            },
            methods: {
                changeWeather() {
                    this.isHot = !this.isHot
                }
            },

            //当需要观察某个属性值的嵌套属性的变化,要配置deep属性为true
            watch: {
                numbers: {
                    deep: true,
                    handler() {
                        console.log("numbers变化了")
                    }
                },

            }
        })
        // watch 的第二种写法
        // vm.$watch('isHot', function () {
        //     console.log("ishot变化了", this.isHot)
        // })

    </script>
</body>

</html>

watch和computed的对比

vue绑定class样式

vue条件渲染
vue条件渲染使用v-show v-if v-else-if v-else实现

<!DOCTYPE html>
<html lang="en">

<head>
    <meta charset="UTF-8">
    <meta name="viewport" content="width=device-width, initial-scale=1.0">
    <title>Document</title>
    <script type="text/javascript" src="../js/vue.js"></script>
</head>

<body>
    <div id="root">
        <!-- v-show控制的元素在页面中还是存在,渲染到页面中通过控制display属性控制显示或隐藏 -->
        <h1 v-show="show">hello world 条件渲染{{num}}</h1>
        <!-- v-if 控制的元素如果不满足条件不会在页面中渲染 -->
        <!-- <h1 v-if="show">hello world 条件渲染</h1> -->
        <button @click="num+=1">点我加1</button>
        <!-- v-if v-else-if v-else条件渲染必须是连续的,否则不起作用,并且控制台会报错 -->
        <h1 v-if="num==1">Jack</h1>
        <h1 v-else-if="num==2">Rose</h1>
        <!-- <h1>aa</h1>  错误的 -->
        <h1 v-else-if="num==3">hanny</h1>
        <h1 v-else>哈哈</h1>
        <!-- 如果控制多个元素一起显示或者隐藏 使用template配合v-if,不同使用v-show -->
        <template v-if="show">
            <h1>aaa</h1>
            <h1>bbb</h1>
            <h1>ccc</h1>
        </template>

    </div>

    <script type="text/javascript">
        new Vue({
            el: '#root',
            data: {
                show: true,
                num: 0
            }
        })
    </script>
</body>

</html>
vue列表渲染
vue列表渲染使用v-for,后面跟上渲染的表达式,最好加上:key作为唯一标识
<!DOCTYPE html>
<html lang="en">

<head>
    <meta charset="UTF-8">
    <meta name="viewport" content="width=device-width, initial-scale=1.0">
    <title>Document</title>
    <script type="text/javascript" src="../js/vue.js"></script>
</head>

<body>
    <div id="root">
        <h1>人员信息列表</h1>
        <ul>
            <!-- <li v-for="p in persons" >{{p.name}}-{{p.age}}</li> -->
            <!-- 在遍历的时候可以同时遍历出item和index -->
            <!-- 使用in或者of关键字都能实现遍历 -->
            <!-- <li v-for="(p,index) of persons" :key='index'>{{p.name}}-{{p.age}}</li> -->
            <!-- 使用:key绑定唯一标识时 最好使用对象的唯一标识属性,而不建议使用遍历的下标作为标识 ,写唯一标识的时候不要加{{}}-->
            <!-- 如果使用列表的下标作为:key,在遇到有输入性的form时可能会造成数据错乱
                 当向数组头部添加元素时,数据会错乱 -->

            <li v-for="(p,index) in persons" :key='p.id'>{{p.name}}-{{p.age}} <input type="text"></li>
        </ul>
        <button @click='add'>添加人员</button>

    </div>

    <script type="text/javascript">
        new Vue({
            el: '#root',
            data: {
                persons: [
                    { id: 001, name: '张三', age: 18 },
                    { id: 002, name: '李四', age: 19 },
                    { id: 003, name: '王五', age: 20 },
                ]
            }
            ,
            methods: {
                add() {
                    // this.persons.push({ id: 004, name: '赵柳', age: 30 })
                    // 向数组头部添加元素,使用unshift
                    this.persons.unshift({ id: 004, name: '赵柳', age: 30 })
                }
            },
        })
    </script>
</body>

</html>
vue列表过滤
使用watch和computed(计算属性)来实现
<!DOCTYPE html>
<html lang="en">

<head>
    <meta charset="UTF-8">
    <meta name="viewport" content="width=device-width, initial-scale=1.0">
    <title>Document</title>
    <script type="text/javascript" src="../js/vue.js"></script>
</head>

<body>
    <div id="root">
        <h1>查找人员信息</h1>
        <!-- 需要获取输入的信息 使用v-bind或v:model,但这里输入的信息对数据产生影响,只能只用v-model -->
        <input type="text" placeholder="请输入姓名" v-model='kewords'>
        <ul>
            <li v-for="(p,index) in filterPesons" :key='p.id'>{{p.name}}-{{p.age}} </li>
        </ul>
    </div>

    <script type="text/javascript">
        new Vue({
            el: '#root',
            data: {
                kewords: '',
                persons: [
                    { id: 001, name: '马冬梅', age: 18, sex: '女' },
                    { id: 002, name: '周冬雨', age: 19, sex: '女' },
                    { id: 003, name: '周杰', age: 20, sex: '男' },
                    { id: 004, name: '王杰', age: 21, sex: '男' },
                ],
                // filterPesons: []
            }
            ,
            // 使用watch来实现人员过滤
            // watch: {
            //     // 用完整的方式解决了用简写出现的问题
            //     kewords: {
            //         //这个属性表示一上来就会执行一次观察
            //         immediate: true,
            //         handler(newValue, old) {
            //             console.log('keyword值改变了', newValue)
            //             this.filterPesons = this.persons.filter((p) => {
            //                 return p.name.indexOf(newValue) != -1
            //             })
            //         },

            //     }
            //     // 用简写的方式虽实现的过滤功能,但第一次进来页面没有数据
            //     // kewords(newValue) {
            //     //     console.log('keyword值改变了', newValue)
            //     //     this.filterPesons = this.persons.filter((p) => {
            //     //         return p.name.indexOf(newValue) != -1
            //     //     })
            //     // }
            // },
            // 用计算属性实现过滤 相当于watch来说简单了一些
            computed: {
                filterPesons() {
                    return this.persons.filter((p) => {
                        return p.name.indexOf(this.kewords) != -1
                    })
                }
            }
        })
    </script>
</body>

</html>
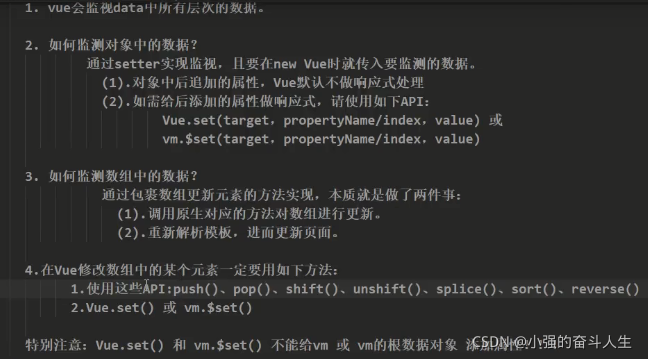
vue通过调用API set方法给模板数据添加新的响应式数据
Vue.set(tartget,property,value)
vm.$set(tartget,property,value)
<!DOCTYPE html>
<html lang="en">

<head>
    <meta charset="UTF-8">
    <meta http-equiv="X-UA-Compatible" content="IE=edge">
    <meta name="viewport" content="width=device-width, initial-scale=1.0">
    <title>Document</title>
    <script type="text/javascript" src="../js/vue.js"></script>
</head>

<body>
    <div id="root">
        <h1>学校信息</h1>
        <h2>学校名称:{{name}}</h2>
        <h2>学校地址:{{address}}</h2>
        <hr>
        <h1>学生信息</h1>
        <button @click="addSex">添加学生性别</button>
        <h2>姓名:{{student.name}}</h2>
        <h2>年龄:{{student.age}}</h2>
        <h2>性别:{{student.sex}}</h2>
        <h2>朋友信息</h2>
        <ul>
            <li v-for="(f,index) in student.friends" :key="index">
                {{f.name}}--{{f.age}}
            </li>
        </ul>
    </div>
    <script type="text/javascript">
        const vm = new Vue({
            el: '#root',
            data: {
                name: '武汉大学',
                address: "武汉",
                student: {
                    name: 'jack',
                    age: 20,
                    friends: [
                        { name: 'dock', age: 19 },
                        { name: 'mary', age: 18 }
                    ]
                }
            },
            methods: {
                addSex(){
                    // 通过Vue.set(tartget,property,value)给data添加其他属性
                    // 或者通过vm.$set(tartget,property,value)
                    // 这个api不能直接用在vm对象上也就是target不能是vm,也不能用在根数据上 也就是target不能是data
                    // Vue.set(this.student,'sex','男')
                    this.$set(this.student,'sex','女')
                }
            },
        })
    </script>
</body>

</html>
vue数据代理总结
vue收集表单数据

<!DOCTYPE html>
<html lang="en">

<head>
    <meta charset="UTF-8">
    <meta http-equiv="X-UA-Compatible" content="IE=edge">
    <meta name="viewport" content="width=device-width, initial-scale=1.0">
    <title>Document</title>
    <script type="text/javascript" src="../js/vue.js"></script>
</head>

<body>
    <div id="root">
        <!-- @submit提交表单数据 .prevent阻止表单默认的跳转行为 -->
        <form @submit.prevent="submit">
            <!-- 使用.trim修饰符可以去掉左右两边的空格 -->
            用户名:<input type="text" v-model.trim="userInfo.name"><br><br>
            密码:<input type="password" v-model="userInfo.password"><br><br>
            <!-- 收集的值如果为数字类型的,可以加上.number修饰符直接获取number类型的值 -->
            年龄:<input type="number" v-model.number="userInfo.age"><br><br>
            性别:
            <!-- 使用type为radio的input元素时,要设置value值,否则收集的数据为空 -->
            男<input type="radio" name="sex" v-model="userInfo.sex" value="male">
            女<input type="radio" name="sex" v-model="userInfo.sex" value="female"><br><br>
            爱好:
            <!-- 使用type为checkbox的input元素时,如果有多个值需要收集,要设置value值,并且收集的值类型为数组 -->
            <input type="checkbox" v-model="userInfo.hobby" value="study">看书
            <input type="checkbox" v-model="userInfo.hobby" value="play">打篮球
            <input type="checkbox" v-model="userInfo.hobby" value="game">玩游戏<br><br>
            校区:<select v-model="userInfo.area">
                <option value="moren">请选择校区</option>
                <option value="beijing">北京</option>
                <option value="shanghai">上海</option>
                <option value="shenzhen">深圳</option>
            </select><br><br>
            其他信息:<textarea v-model="userInfo.other"></textarea><br><br>
            <input type="checkbox" v-model="userInfo.agree"> 我同意<a href="http://www.baidu.com">《用户协议》</a><br><br>
            <button>提交</button>
        </form>
    </div>
    <script type="text/javascript">
        new Vue({
            el: '#root',
            data: {
                userInfo: {
                    name: '',
                    password: '',
                    age: '',
                    sex: '',
                    hobby: [],
                    area: '',
                    other: '',
                    agree: ''
                }
            },
            methods: {
                submit() {
                    console.log(JSON.stringify(this.userInfo))
                }
            },
        })
    </script>

</body>

</html>
vue使用过滤器

<!DOCTYPE html>
<html lang="en">

<head>
    <meta charset="UTF-8">
    <meta http-equiv="X-UA-Compatible" content="IE=edge">
    <meta name="viewport" content="width=device-width, initial-scale=1.0">
    <title>Document</title>
    <script type="text/javascript" src="../js/vue.js"></script>
    <script type="text/javascript" src="../js/dayjs.min.js"></script>
</head>

<body>
    <div id="root">
        <h1>过滤器使用</h1>
        <h2>当前时间是:{{time | timeFormatter}}</h2>
        <h2>当前时间是:{{time | timeFormatter('YYYY年MM月DD日')}}</h2>
        <h2>当前时间是:{{time | timeFormatter('YYYY年MM月DD日') | myslice}}</h2>
    </div>
    <script type="text/javascript">
        // 可以定义全局过滤器
        Vue.filter('myslice', function (value) {
            return value.slice(0, 4)
        })

        new Vue({
            el: '#root',
            data: {
                time: 1627815645904
            },
            //局部过滤器
            filters: {
                // 过滤器可以传参数 ,传了就放在第二个参数位置上
                timeFormatter(value, str = 'YYYY-MM-DD HH:mm:ss') {
                    return dayjs(value).format(str)
                },
                //过滤器可以连着调用 即将上个过滤器返回的值作为参数传递到下个过滤器
                // myslice(value) {
                //     return value.slice(0, 4)
                // }
            }
        })
    </script>

</body>

</html>
vue其他内置指令
v-text
v-html

v-cloak

v-once

v-pre

vue自定义指令
<!DOCTYPE html>
<html lang="en">

<head>
    <meta charset="UTF-8">
    <meta http-equiv="X-UA-Compatible" content="IE=edge">
    <meta name="viewport" content="width=device-width, initial-scale=1.0">
    <title>Document</title>
    <script type="text/javascript" src="../js/vue.js"></script>
</head>

<body>
    <div id="root">
        <div>当前n的值是 <span v-text='n'></span></div>
        <div>放大10倍后n的值是<span v-big='n'></span></div>
        <button @click='n++'>点我加1</button>
    </div>
    <script type="text/javascript">
        new Vue({
            el: '#root',
            data: {
                n: 1
            },
            //使用directives 自定义指令
            directives:{
                //当指令和模板发生关联时调用
                //当模板重新渲染时调用
                big(elememt,databing){
                    elememt.innerText= databing.value*10
                    console.log('big',elememt,databing)
                }
            }
        })
    </script>
</body>

</html>

vue生命周期


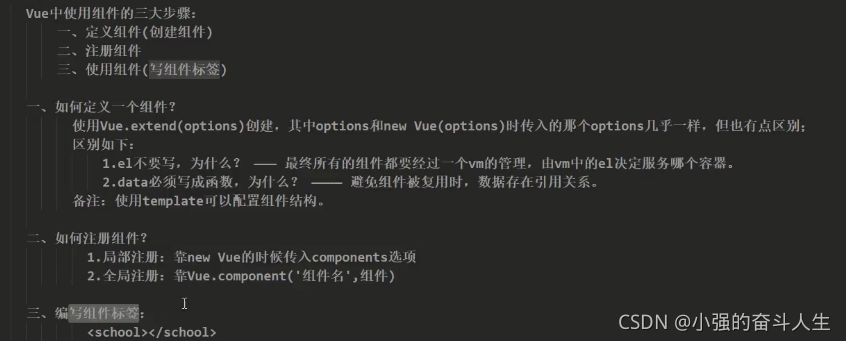
vue创建组件
<!DOCTYPE html>
<html lang="en">

<head>
    <meta charset="UTF-8">
    <meta http-equiv="X-UA-Compatible" content="IE=edge">
    <meta name="viewport" content="width=device-width, initial-scale=1.0">
    <title>Document</title>
    <script type="text/javascript" src="../js/vue.js"></script>
</head>

<body>
    <div id="root">
        <!-- 第三步 引入组件 -->
        <school></school>
        <hr>
        <student></student>
        <student></student>
    </div>
    <div id="root2">
        <school></school>
    </div>
    <script type="text/javascript">


        //第一步 创建组件 extend 不能写成extends
        const school = Vue.extend({
            template: `
                <div>
                    <h1>学校名字:{{schoolName}}</h1>
                    <h1>学校地址:{{address}}</h1>
                </div>
            `,
            data() {
                return {
                    schoolName: '武汉大学',
                    address: '武汉'
                }
            },
        })
        const student = Vue.extend({
            template: `
                <div>
                    <h1>学生名字:{{studentName}}</h1>
                    <h1>学生年龄:{{age}}</h1>
                </div>
            `,
            data() {
                return {
                    studentName: '张三',
                    age: 18
                }
            },
        })
        //全局注册组件 不需要再vue在单独注册
        Vue.component('school', school)
        new Vue({
            el: '#root',
            // 第二步 注册组件
            components: {
                school: school,
                student: student
            }
        })
        new Vue({
            el: "#root2"
        })
    </script>
</body>

</html>
vue组件注意事项

vue组件嵌套
Vuecomponent

单文件组件
单文件组件以.vue结尾,运行需要借助脚手架(vue-cli)
脚手架的安装
使用npm安装
1、配置npm淘宝镜像
npm config get registry
2、使用install命令安装vue/cli
npm install -g @vue/cli
3、验证vue脚手架是否安装成功
vue --version
使用脚手架创建和运行项目
切换到创建项目的目录,运行
vue create xxx(项目名称 比如vue_test)
进入创建的项目比如vue_test目录中,执行
npm run serve
运行成功后,会有以下提示

在浏览器中打开上面的地址就可以了
单文件查找组件或者标签使用this.$refs.xx
<div id="app">
    <img alt="Vue logo" src="./assets/logo.png" ref="img" />
    <School ref="sch"></School>
    <Student></Student>
    <button @click="showComponent"></button>
  </div>

<script>
import School from "./components/School.vue";
import Student from "./components/Student.vue";

export default {
  name: "App",
  components: {
    School,
    Student,
  },
  methods: {
    showComponent() {
      console.log("@@", this.$refs.img);
      console.log("@@", this.$refs.sch);
    },
  },
};
</script>
传递数据

<!--School.vue-->
<template>
  <div>
    <h1>学生姓名:{{ name }}</h1>
    <h1>学生年龄:{{ age }}</h1>
  </div>
</template>

<script>
export default {
  name: "student",
  // data() {
  //   return {
  //     name: "张三",
  //     age: 18,
  //   };
  // },
  //第一种方式
  // props:['name','age']
  //第二种方式
  // props: {
  //   name: String,
  //   age: Number,
  // },
  //第三种方式
  props: {
    name: {
      type: String,
      required: true,
    },
    age: {
      type: Number,
      default: 99,
    },
  },
};
</script>

<style>
</style>
<!--App.vue-->
<template>
  <div id="app">
    <img alt="Vue logo" src="./assets/logo.png" ref="img" />
    <School ref="sch"></School>
    <Student name="李四" :age="18" ></Student>
    <button @click="showComponent">显示组件</button>
  </div>
</template>

<script>
import School from "./components/School.vue";
import Student from "./components/Student.vue";

export default {
  name: "App",
  components: {
    School,
    Student,
  },
  methods: {
    showComponent() {
      console.log("@@", this.$refs.img);
      console.log("@@", this.$refs.sch);
    },
  },
};
</script>

<style>
#app {
  font-family: Avenir, Helvetica, Arial, sans-serif;
  -webkit-font-smoothing: antialiased;
  -moz-osx-font-smoothing: grayscale;
  text-align: center;
  color: #2c3e50;
  margin-top: 60px;
}
</style>
组件共性抽取-混合

//minx.js
export const minx = {
    data() {
        return {
            x: 10
        }
    },
    methods: {
        showName() {
            alert(this.name);
            alert(this.xssssss)
        }
    },
}
<!-- Student.vue-->
<template>
  <div>
    <h1 @click="showName">学生姓名:{{ name }}</h1>
    <h1>学生年龄:{{ age }}</h1>
  </div>
</template>

<script>
 // 引入minx.js
import { minx } from "../minx";
export default {
  name: "student",
  mixins: [minx],
};
</script>

<style>
</style>
<!-- School.vue-->
<template>
  <div>
    <h1 @click="showName">学校名称:{{ name }}</h1>
    <h2>学校地址:{{ address }}</h2>
  </div>
</template>

<script>
import { minx } from "../minx";
export default {
  name: "school",
  data() {
    return {
      name: "武汉大学",
      address: "武汉",
    };
  },
  mixins: [minx],
};
</script>

<style>
</style>
使用插件 增强组件

// plugin.js
export default {
    install(Vue) {
        //过滤器
        Vue.filter('myslice', function (value) {
            return value.slice(0, 3)
        })
        //自定义指令
        Vue.directive('big', function (elememt, databing) {
            elememt.innerText = databing.value * 10
        })
        //混合 共性抽取
        Vue.mixin({
            data() {
                return {
                    x: 10
                }
            }
        })
        //原型定义属性
        Vue.prototype.hello = ()=> {
            alert('你好')
            console.log('你好')
        }
    }
}
// main.js
import Vue from 'vue'
import App from './App.vue'
// 引入插件
import plugin from './plugins'

Vue.config.productionTip = false

//使用插件
Vue.use(plugin)
new Vue({
  render: h => h(App),
}).$mount('#app')
<template>
  <div>
     <!--使用过滤器-->
    <h1 @click="showName">学校名称:{{ name | myslice }}</h1>
    <h2>学校地址:{{ address }}</h2>
    <button @click="hell">点击一下</button>
  </div>
</template>
组件样式冲突解决

浏览器本地存储

自定义事件
使用自定义事件使用 this.$emit(‘showName’,‘aaaa’)
销毁自定义事件使用 this.$off(“showName”)

<template>
  <div id="app">
    <img alt="Vue logo" src="./assets/logo.png" ref="img" />
    <School ref="sch"></School>
      //定义事件
    <Student name="李四" v-on:showName="showStudentName" ></Student>

  </div>
</template>

<script>
import School from "./components/School.vue";
import Student from "./components/Student.vue";

export default {
  name: "App",
  components: {
    School,
    Student,
  },
  methods: {
    showComponent() {
      console.log("@@", this.$refs.img);
      console.log("@@", this.$refs.sch);
    },
    showStudentName(value){
      console.log("接受传递的数据",value)
    }
  },
};
</script>

<style>
#app {
  font-family: Avenir, Helvetica, Arial, sans-serif;
  -webkit-font-smoothing: antialiased;
  -moz-osx-font-smoothing: grayscale;
  text-align: center;
  color: #2c3e50;
  margin-top: 60px;
}
</style>
<template>
  <div>
    <h1 @click="showName">学生姓名:{{ name }}</h1>
    <h1>学生年龄:{{ age }}</h1>
    <h1 v-big="age"></h1>
    <button @click="clickName">传递数据</button>
    <button @click="death">销毁事件</button>
  </div>
</template>

<script>
import { minx } from "../minx";
export default {
  name: "student",

  props: {
    name: {
      type: String,
      required: true,
    },
    age: {
      type: Number,
      default: 99,
    },
  },
  mixins: [minx],
  methods: {
    clickName() {
        //使用自定义事件
      this.$emit("showName", this.name);
    },
    death() {
      //销毁一个事件
      // this.$off('showName')
      //销毁两个或多个事件

      // this.$off(["showName"]);
      //销毁全部事件
      this.$off();
    },
  },
};
</script>

<style>
</style>
全局事件总线 (组件间相互传递数据)

消息订阅与发布

<template>
  <div>
    <h1 @click="showName">学校名称:{{ name | myslice }}</h1>
    <h2>学校地址:{{ address }}</h2>
    <button @click="hell">点击一下</button>
  </div>
</template>

<script>
import { minx } from "../minx";
import pubsub from "pubsub-js";
export default {
  name: "school",
  data() {
    return {
      name: "武汉大学",
      address: "武汉",
    };
  },
  //   components: { School },
  methods: {
    //   showName() {
    //     alert(this.name);
    //   },
    hell() {
      this.hello();
      console.log(this);
      // console.log('hello')
    },
    hello(msgName, data) {
      console.log("hello接受到数据", data);
    },
  },
  mixins: [minx],
  mounted() {
      //订阅消息
    this.pubId = pubsub.subscribe("hello", this.hello);
  },
  beforeDestroy() {
    pubsub.unsubscribe(this.pubId);
  },
};
</script>

<style>
</style>
<template>
  <div>
    <h1 @click="showName">学生姓名:{{ name }}</h1>
    <h1>学生年龄:{{ age }}</h1>
    <h1 v-big="age"></h1>
    <button @click="clickName">传递数据</button>
    <button @click="death">销毁事件</button>
  </div>
</template>

<script>
import { minx } from "../minx";
import pubsub from "pubsub-js"
export default {
  name: "student",
  // data() {
  //   return {
  //     name: "张三",
  //     age: 18,
  //   };
  // },
  //第一种方式
  // props:['name','age']
  //第二种方式
  // props: {
  //   name: String,
  //   age: Number,
  // },
  //第三种方式
  props: {
    name: {
      type: String,
      required: true,
    },
    age: {
      type: Number,
      default: 99,
    },
  },
  mixins: [minx],
  methods: {
    clickName() {
      // this.$emit("showName", this.name);
      //使用消息订阅与发布发送消息
      pubsub.publish('hello',this.name)
    },
    death() {
      //销毁一个事件
      // this.$off('showName')
      //销毁两个或多个事件

      // this.$off(["showName"]);
      //销毁全部事件
      // this.$off();
    },
  },
};
</script>

<style>
</style>
nextTick

vue过渡与动画
<template>
<!--定义动画-->
  <transition name="todo" appear>
    <li>
      <input
        type="checkbox"
        :checked="todo.done"
        @change="handleCheck(todo.id)"
      />
      <span v-show="!todo.isEdit">{{ todo.title }}</span>
      <input
        v-show="todo.isEdit"
        :value="todo.title"
        @blur="handleEdit(todo, $event)"
        ref="inputTitle"
      />
      <button class="btn btn-edit" @click="editTodo(todo)">编辑</button>
      <button class="btn btn-delete" @click="deleteTodo(todo.id)">删除</button>
    </li>
  </transition>
</template>

<script>
export default {
  // props: ["todo", "handleTodo", "handleDeletTodo"],
  props: ["todo"],
  methods: {
    handleCheck(id) {
      console.log(id);
      // this.handleTodo(id);
      this.$bus.$emit("handleTodo", id);
    },
    deleteTodo(id) {
      // this.handleDeletTodo(id);
      this.$bus.$emit("handleDeletTodo", id);
    },
    editTodo(todo) {
      console.log("todo", todo);
      //当前对象是否有这个属性

      if (Object.prototype.hasOwnProperty.call(todo, "isEdit")) {
        todo.isEdit = true;
      } else {
        this.$set(todo, "isEdit", true);
      }
      this.$nextTick(() => {
        this.$refs.inputTitle.focus();
      });
    },
    handleEdit(todo, e) {
      todo.isEdit = false;
      if (!e.target.value.trim()) return alert("请输入要修改的关键词");
      this.$bus.$emit("handleEditTodo", todo.id, e.target.value);
    },
  },
};
</script>

<style >
li {
  width: 100%;
  height: 30px;
  line-height: 30px;
  position: relative;
  display: flex;
  align-items: center;
  /* padding: 10px auto; */
}
li .btn {
  color: white;
  display: none;
}
li .btn-delete {
  position: absolute;
  right: 10px;
  background-color: orangered;
  border: 1px solid rgb(167, 74, 41);
}
li .btn-edit {
  position: absolute;
  right: 60px;
  background-color: skyblue;
  border: 1px solid rgb(53, 125, 153);
}
li:hover {
  background: oldlace;
}
li:hover .btn {
  display: block;
}
//使用动画属性
.todo-enter-active,
.todo-leave-active {
  transition: 0.5s linear;
}
.todo-enter,
.todo-leave-to {
  transform: translateX(100%);
}
.todo-enter-to,
.todo-leave {
  transform: translateX(0);
}
</style>
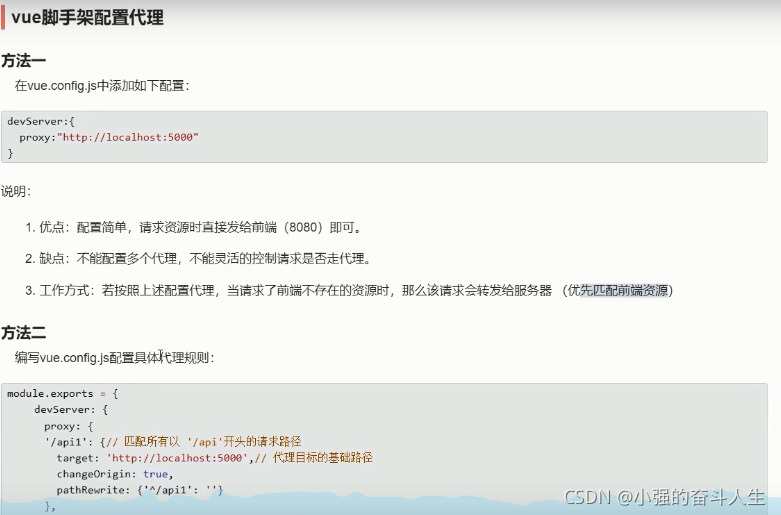
脚手架配置代理(解决跨域请求)
插槽


vuex的使用
1.安装vuex
npm install -g vuex
2.在项目src目录中创建store目录,store目录中添加index.js文件,index.js文件配置如下
import Vuex from "vuex"
import Vue from 'vue'
//用于响应组件中的动作
const actions = {
    add(context, value) {
        console.log('add被调用了', context, value)
        context.commit('ADD', value)
    },
    dec(context, value) {

        context.commit('DEC', value)
    }
}
//用于操作数据
const mutations = {
    ADD(state, value) {
        console.log('mutations中ADD被调用了', state, value)
        state.totalNum += value
    },
    DEC(state, value) {
        state.totalNum -= value
    }
}
//用于存储数据
const state = {
    totalNum: 0
}

Vue.use(Vuex)
const store = new Vuex.Store({
    actions,
    mutations,
    state
})
export default store
3.在项目入口文件main.js中引入index.js,配置如下
import Vue from 'vue'
import App from './App.vue'
import plugin from './plugins'
//引入store下的index
import store from './store/index'

Vue.config.productionTip = false


Vue.use(plugin)

const vm=new Vue({
  render: h => h(App),
    //配置store,这样全局都可以使用$store
  store
}).$mount('#app')
** 计算复杂的属性值使用getters,配置如下**
const getters = {
    bigSum(state) {
        return state.totalNum * 10
    }
}
Vue.use(Vuex)
const store = new Vuex.Store({
    actions,
    mutations,
    state,
    getters
})
export default store
使用 getters属性
<h1>放大10倍后的求和为:{{ $store.getters.bigSum }}</h1>
组件中使用state或getters中的值,可以借助vuex中方法实现自动生成计算属性值
<script>
//引入mapState和mapGetters 两个方法
import { mapState, mapGetters } from "vuex";
export default {
  name: "Count",
  data() {
    return {
      num: 1,
      //   totalNum: 0,
    };
  },
  methods: {
    ...
  },
  computed: {
     //value值必须为 字符串 表示去state中查找对应的参数名
    // ...mapState({ totalNum: "totalNum" }),
    //state属性简写
    ...mapState(["totalNum"]),
    // ...mapGetters({ bigSum: "bigSum" }),
    //getters属性简写
    ...mapGetters(["bigSum"]),
  },
};
</script>
页面中使用计算属性如下
 <!--页面中使用属性-->
 <h1>当前求和为:{{ totalNum }}</h1>
 <h1>放大10倍后的求和为:{{ bigSum }}</h1>
组件中使用actions和mutations处理事件时,可以借助vuex中方法中的mapMutations和mapActions来实现
<script>
import { mapState, mapGetters, mapMutations,mapActions } from "vuex";
export default {
  name: "Count",
  data() {
    return {
      num: 1,
      //   totalNum: 0,
    };
  },
  methods: {
    selectNum() {
      //   console.log(this);
      console.log(this.num);
    },
    // increment() {
    //   //   this.totalNum += this.num;
    //   this.$store.dispatch("add", this.num);
    // },
    // decrement() {
    //   //   this.totalNum -= this.num;
    //   this.$store.dispatch("dec", this.num);
    // },

    ...mapMutations({ increment: "ADD", decrement: "DEC" }),
    //可以使用简写属性,上面的方法名要和这里的一致
    // ...mapMutations(["ADD","DEC"]),

    ...mapActions({increment:"add",decrement:"dec"}),
    //使用简写属性和mapMutations简写属性一样
    // ...mapActions(["add","dec"]),

    oddIncrement() {
      if (this.$store.state.totalNum % 2) {
        this.$store.dispatch("add", this.num);
        //   this.totalNum += this.num;
      }
    },
    waitIncrement() {
      setTimeout(() => {
        // this.totalNum += this.num;
        this.$store.dispatch("add", this.num);
      }, 500);
    },
  },
  computed: {
 	...
  },
};
</script>
组件中使用
<button @click="increment(num)">+</button>
<button @click="decrement(num)">-</button>
vuex模块分包
1.修改store文件夹下index.js的配置文件
import Vuex from "vuex"
import Vue from 'vue'

const countModule = {
    namespaced: true,//设置命名空间 必选配置为true
    //用于响应组件中的动作
    actions: {
        add(context, value) {
            console.log('add被调用了', context, value)
            context.commit('ADD', value)
        },
        dec(context, value) {
            context.commit('DEC', value)
        }
    },
    mutations: {
        ADD(state, value) {
            console.log('mutations中ADD被调用了', state, value)
            state.totalNum += value
        },
        DEC(state, value) {

            state.totalNum -= value
        },
    },
    state: {
        totalNum: 0,
    },
    getters: {
        bigSum(state) {
            return state.totalNum * 10
        }
    }
}

const personModule = {
    namespaced: true,
    //用于响应组件中的动作
    actions: {
    },
    mutations: {
        ADD_PERSON(state, value) {
            state.persons.unshift(value)
        }
    },
    state: {
        persons: [
            { id: '001', name: '张三' }
        ]
    },
    getters: {

    }
}

Vue.use(Vuex)
const store = new Vuex.Store({
	//使用modules对象
    modules: {
        countAbout: countModule,
        personAbout: personModule
    }

})
export default store
2.修改组件中使用actions、mutations、state、getters中的对象
<template>
  <div>
    <h3>当前求和为:{{ totalNum }}</h3>
    <h3>放大10倍后的求和为:{{ bigSum }}</h3>
    <h3>person组件总人数是:{{ persons.length }}</h3>
    <select v-model.number="num" @change="selectNum">
      <option value="1">1</option>
      <option value="2">2</option>
      <option value="3">3</option>
    </select>

    <button @click="increment(num)">+</button>
    <button @click="decrement(num)">-</button>
    <button @click="oddIncrement">当前求和为奇数再加</button>
    <button @click="waitIncrement">等一等再加</button>
  </div>
</template>

<script>
import { mapState, mapGetters, mapMutations, mapActions } from "vuex";
export default {
  name: "Count",
  data() {
    return {
      num: 1,
      //   totalNum: 0,
    };
  },
  methods: {
    selectNum() {
      //   console.log(this);
      console.log(this.num);
    },
      //加上countAbout 命名空间
    ...mapMutations("countAbout", { increment: "ADD", decrement: "DEC" }),

    ...mapActions("countAbout", { increment: "add", decrement: "dec" }),
    //使用简写属性和mapMutations简写属性一样
    // ...mapActions(["add","dec"]),

    oddIncrement() {
       //直接读取对象属性 通过$store.state.countAbout.totalNum方式读取
      if (this.$store.state.countAbout.totalNum % 2) {
        // this.$store.dispatch("add", this.num);
          //调用actions中方法,通过 countAbout/add这种方式
        this.$store.dispatch("countAbout/add",this.num)
      }
    },
    waitIncrement() {
      setTimeout(() => {

        this.$store.dispatch("countAbout/add",this.num)
      }, 500);
    },
  },
  computed: {

    ...mapState("countAbout", ["totalNum"]),
      //不同的对象使用不同的命名空间
    ...mapState("personAbout", ["persons"]),
    ...mapGetters("countAbout", ["bigSum"]),
  },
  mounted() {
    console.log(this);
  },
};
</script>

<style>
button {
  margin-right: 5px;
}
</style>

vue-router(路由)的使用
一、组件的安装和配置
1、使用npm安装vue-router,命令如下:
npm install -g vue-router
2、在src目录中新建router文件夹,在文件夹中创建index.js文件
import VueRouter from 'vue-router'
import About from '../components/About'
import Home from '../components/Home'

export default new VueRouter({
    //注意这个名称
    routes: [
        {
            path: '/about',
            component: About
        },
        {
            path: '/home',
            component: Home
        }
    ]
})
3、在项目的入口文件中引入配置的文件
import Vue from 'vue'
import App from './App.vue'
import plugin from './plugins'
//引入vue-router插件
import VueRouter from 'vue-router'
//引入配置文件
import router from './router'

Vue.config.productionTip = false


Vue.use(plugin)
//使用插件
Vue.use(VueRouter)

new Vue({
  render: h => h(App),
    //配置 配置文件
  router: router
}).$mount('#app')
4、在App.vue中将之前的a标签替换成router-link标签,占位的使用
<template>
  <div id="app">
    <div class="guide">
      <!-- <a class="active" href="">关于</a>
            <a href="">首页</a> -->
        <!--跳转使用to属性, 激活使用active-class属性-->
      <router-link active-class='active' to="/about">关于</router-link>
      <router-link active-class='active' to="/home">首页</router-link>
    </div>
    <div class="content">
        <!--占位 指定组件的呈现位置-->
      <router-view></router-view>
    </div>
  </div>
</template>

<script>


export default {
  name: "App",

};
</script>

<style>
#app {
  font-family: Avenir, Helvetica, Arial, sans-serif;
  -webkit-font-smoothing: antialiased;
  -moz-osx-font-smoothing: grayscale;
  /* text-align: center; */
  color: #2c3e50;
  margin-top: 60px;
  display: flex;

}

.guide{
  display: flex;
  flex-direction: column;
}
.guide a{
  width: 80px;
  height: 30px;
  line-height: 30px;
  background-color: #e5e5e5;
  text-decoration:none;
  text-align: center;
  border: 1px solid rgb(212, 204, 204);
  color: white;

}
.guide  .active{
   background-color: rgb(28, 99, 128);
}
.content{
  margin-left: 15px;
}
</style>
注意点:

二、路由嵌套
1、在index.js配置文件中添加子路由
export default new VueRouter({
    routes: [
        {
            path: '/about',
            component: About
        },
        {
            path: '/home',
            component: Home,
            //配置子路由
            children:[
                {
                    //这里不能添加/ 表示在一级路由下的二级路由
                    path:'message',
                    component:Message
                },
                {
                    path:'news',
                    component:News
                }
            ]
        }
    ]
})
2、在home组件中添加路由相关link和view
<template>
  <div>
    <h3>这是Home页面</h3>
    <div>
      <router-link class="link" active-class="active"
                   <!--要配置成/一级路由/二级路由-->
                   to="/home/message">消息</router-link>
      <router-link class="link" active-class="active" to="/home/news">新闻</router-link>
    </div>
    <hr />
    <router-view></router-view>
  </div>
</template>

<script>
export default {};
</script>

<style scoped>
.link{
  text-decoration: none;
  margin-right: 10px;
}
.active {
  color: red;
}
</style>
3.路由间传参
//传参的vue
<template>
  <div>
    <ul>
      <li v-for="m in messages" :key="m.id">
        <router-link
          :to="{
            path: '/home/message/detail',
            query: {
              id: m.id,
              title: m.title,
            },
          }"
          >{{ m.title }}</router-link
        >
      </li>
    </ul>
    <hr />
    <router-view></router-view>
  </div>
</template>

<script>
export default {
  name: "Message",

  data() {
    return {
      messages: [
        { id: "001", title: "message detail 1" },
        { id: "002", title: "message detail 2" },
        { id: "003", title: "message detail 3" },
      ],
    };
  },
};
</script>

<style>
</style>
//接受传参的vue
<template>
  <div>
    <h5>编号是:{{$route.query.id}}</h5>
    <h5>标题是:{{$route.query.title}}</h5>
  </div>
</template>

<script>
export default {
    name:'Detail',
    mounted(){
        console.log(this.$route)
    }
};
</script>

<style>
</style>
4.命名路由,路由可以设置名字,成为命名路由
import VueRouter from 'vue-router'
import About from '../pages/About'
import Home from '../pages/Home'
import Message from '../pages/Message'
import News from '../pages/News'
import Detail from '../pages/Detail'
export default new VueRouter({
    routes: [
        {
            //定义命名路由
            name:'about',
            path: '/about',
            component: About
        },
        {
            path: '/home',
            component: Home,
            children:[
                {
                    path:'message',
                    component:Message,
                    children:[
                        {
                            name:'detail',
                            path:'detail',
                            component:Detail
                        }
                    ]
                },
                {
                    path:'news',
                    component:News
                }
            ]
        }
    ]
})
5.params参数传参
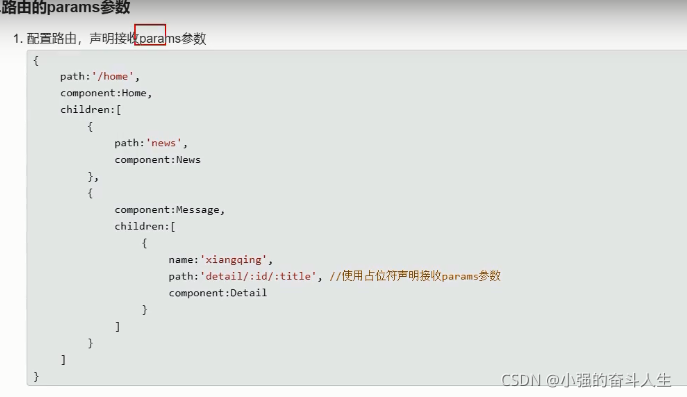

children:[
           {
             name:'detail',
               //配置成params方式
             path:'detail/:id/:title',
             component:Detail,
             props:true
            }
          ]
<li v-for="m in messages" :key="m.id">
        <router-link
          :to="{
             name:'detail',
             params: {
              id: m.id,
              title: m.title,
            },
          }"
          >{{ m.title }}</router-link
        >
</li>
<template>
  <div>
    <h5>编号是:{{id}}</h5>
    <h5>标题是:{{title}}</h5>
  </div>
</template>

<script>
export default {
    name:'Detail',
    //propos设置为true,这里可以接受params参数
    props:['id','title'],
    mounted(){
        console.log(this.$route)
    }
};
</script>
6、路由的propos配置

7、router-link replace模式

8、编程式路由跳转

9、缓存路由组件

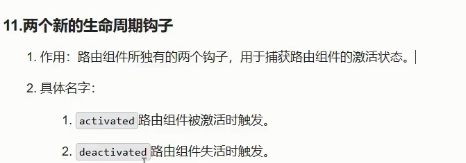
10.两个新的生命周期钩子
11、设置路由跳转前权限校验
全局守卫
import VueRouter from 'vue-router'
import About from '../pages/About'
import Home from '../pages/Home'
import Message from '../pages/Message'
import News from '../pages/News'
import Detail from '../pages/Detail'

const router = new VueRouter({
    routes: [
        {
            //定义命名路由
            name: 'about',
            path: '/about',
            component: About
        },
        {
            path: '/home',
            component: Home,
            children: [
                {
                    path: 'message',
                    component: Message,
                    meta: { isAuth: true },
                    children: [
                        {
                            name: 'detail',
                            path: 'detail/:id/:title',
                            component: Detail,
                            props: true
                        }
                    ]
                },
                {
                    path: 'news',
                    component: News,
                    meta: { isAuth: true },
                }
            ]
        }
    ]
})
router.beforeEach((to, from, next) => {
    console.log('from', from)
    console.log('to', to)
    // console.log('next', next)
    if (to.meta.isAuth) {
        alert('你没有权限')
    } else {
        next()
    }

})

export default router
局部守卫
children: [
    {
        name: 'detail',
        path: 'detail/:id/:title',
        component: Detail,
        props: true,
                            beforeEnter(to, from,){
                                if (to.meta.isAuth) {
                                    alert('你没有权限')
                                } else {
                                    next()
                                }
                            }
                        }
                    ]
nk
>
<template>
  <div>
    <h5>编号是:{{id}}</h5>
    <h5>标题是:{{title}}</h5>
  </div>
</template>

<script>
export default {
    name:'Detail',
    //propos设置为true,这里可以接受params参数
    props:['id','title'],
    mounted(){
        console.log(this.$route)
    }
};
</script>
6、路由的propos配置

7、router-link replace模式

8、编程式路由跳转

9、缓存路由组件

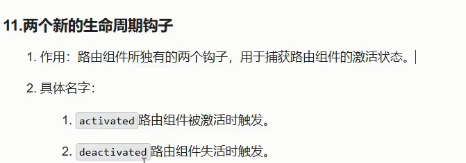
10.两个新的生命周期钩子
11、设置路由跳转前权限校验
全局守卫
import VueRouter from 'vue-router'
import About from '../pages/About'
import Home from '../pages/Home'
import Message from '../pages/Message'
import News from '../pages/News'
import Detail from '../pages/Detail'

const router = new VueRouter({
    routes: [
        {
            //定义命名路由
            name: 'about',
            path: '/about',
            component: About
        },
        {
            path: '/home',
            component: Home,
            children: [
                {
                    path: 'message',
                    component: Message,
                    meta: { isAuth: true },
                    children: [
                        {
                            name: 'detail',
                            path: 'detail/:id/:title',
                            component: Detail,
                            props: true
                        }
                    ]
                },
                {
                    path: 'news',
                    component: News,
                    meta: { isAuth: true },
                }
            ]
        }
    ]
})
router.beforeEach((to, from, next) => {
    console.log('from', from)
    console.log('to', to)
    // console.log('next', next)
    if (to.meta.isAuth) {
        alert('你没有权限')
    } else {
        next()
    }

})

export default router
局部守卫
children: [
    {
        name: 'detail',
        path: 'detail/:id/:title',
        component: Detail,
        props: true,
                            beforeEnter(to, from,){
                                if (to.meta.isAuth) {
                                    alert('你没有权限')
                                } else {
                                    next()
                                }
                            }
                        }
                    ]