前言:
之前我们在写react组件时,我们要么是通过类组件内定义state来管理数据,要么就是在函数组件内使用useState来管理数据。但如果一个数据牵扯到了很多个组件,那么我们管理起来就会十分麻烦。
所以 react-hooks 为我们提供了一个类似与redux的功能 – useReducer来帮助我们集中式的处理复杂的state管理。
一、useReducer的使用
useReducer接收三个参数(第三个可不传):
第一个参数:reducer函数。
第二个参数:初始化的state。返回值为最新的state和dispatch函数(用来触发reducer函数,计算对应的state)。按照官方的说法:对于复杂的state操作逻辑,嵌套的state的对象,推荐使用useReducer。
第三个参数(一个函数,用于惰性初始化):你可以选择惰性地创建初始 state。为此,需要将 init 函数(接收initialState,可对其进行一些处理)作为 useReducer 的第三个参数传入,这样初始 state 将被设置为 initialArg。
const [state, dispatch] = useReducer(reducer, initialState, init);
用useReducer实现一个计数器:
const initialState = {count: 0}; // 设置初始状态

// reducer:负责生成新的State
function reducer(state, action) { // 定义 reducer 函数,在这里面对状态改变 进行统一处理,
// state:是上一次state的状态数据
// action:是基于dispatch派发的行为数据:值 或 一个对象
  switch (action.type) {
  // 根据action 对 State 进行修改
    case 'increment':
      return {count: state.count + 1};
    case 'decrement':
      return {count: state.count - 1};
    default:
      throw new Error();
  }
}
function Counter() {
  const [state, dispatch] = useReducer(reducer, initialState);
  // dispatch 派发action
  return (
    <>
      Count: {state.count}
      <button onClick={() => dispatch({type: 'decrement'})}>-</button>
      <button onClick={() => dispatch({type: 'increment'})}>+</button>
    </>
  );
}
使用useState实现计数器:
function App() {
    const [state, setState] = useState({
        count: 0
    });
    const increment = () =>{
        setState({count:state.count + 1})
    }
    const decrement = () =>{
        setState({count:state.count - 1})
    }
    return (
      <>
        Count: {state.count}
        <button onClick={decrement}>-</button>
        <button onClick={increment}>+</button>
      </>
    );
  }
对比两者,虽然说useReducer看起来更复杂,代码量更多,但如果这个组件里面涉及到了更多的状态,更多的状态数据修改,那么把状态放到UI组件里面管理是一件很不明智的选择,也很难维护状态。
所以用useReducer可以更方便帮助我们管理状态,让我们 UI 和 状态 能够分别维护。
二、用useReducer 和 useContext 简单实现 全局的状态管理
如果我们上面的计数器案例里有子组件,那么我们要如何让子组件也能直接用上 reducer 呢?
首先,我们先看看能不能再子组件上,再用一次 useReducer 来对数据进行管理
const initialState = { count: 0, name: '' }

function reducer(state, action) {
    switch (action.type) {
        case 'increase':
            return { ...state, count: state.count + 1 }
        case 'decrease':
            return { ...state, count: state.count - 1 }
        default:
            return state
    }
}
function App() {
    const [state, dispatch] = useReducer(reducer, initialState)
    return (
        <div>
            <h2>App Component</h2>
            <p>count:{state.count}</p>
            <hr />
            <Count_1></Count_1>
        </div>
    )
}
function Count_1() {
    const [state, dispatch] = useReducer(reducer, initialState)
    return (
        <>
            <h4>Count_1 Component</h4>
            <p>count:{state.count}</p>
            <button onClick={() => dispatch({ type: 'increase' })}>increase</button>
            <button onClick={() => dispatch({ type: 'decrease' })}>decrease</button>
        </>
    )
}
 点击increase后
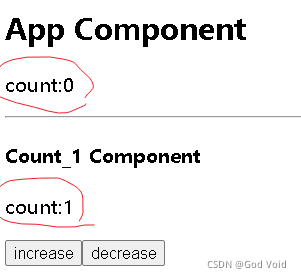
很显然,分开用useReducer不能让我们父子组件的状态同步。
那么我们可以试一试用上useContext,来实现我们的全局数据管理
// useReducer 公共状态 整合到Provider里面
// 让所有子组件 都能直接使用reducer:直接操作dispatch和使用state
const CountContext = React.createContext()

const initialState = { count: 0, name: '' }

function reducer(state, action) {
    switch (action.type) {
        case 'increase':
            return { ...state, count: state.count + 1 }
        case 'decrease':
            return { ...state, count: state.count - 1 }
        default:
            return state
    }
}
// 如果每个子组件都直接用reducer,那么他们是独立的,数据不会共享
// 而如果在根组件上,用context共享state,dispatch,则数据就可以共享了
function App() {
    const [state, dispatch] = useReducer(reducer, initialState)
    return (
        <CountContext.Provider value={{ state, dispatch }}>
            <h2>App Component</h2>
            <p>count:{state.count}</p>
            <hr />
            <Count_1></Count_1>
        </CountContext.Provider>
    )
}
function Count_1() {
    // const [state,dispatch] = useReducer(reducer,initialState)
    const { state, dispatch } = useContext(CountContext)
    return (
        <>
            <h4>Count_1 Component</h4>
            <p>count:{state.count}</p>
            <button onClick={() => dispatch({ type: 'increase' })}>increase</button>
            <button onClick={() => dispatch({ type: 'decrease' })}>decrease</button>
        </>
    )
}
点击 increase 后,发现数据状态同步了,
所以,我们使用 useContext 来让我们的所有子组件都能获取到reducer来进行状态管理。

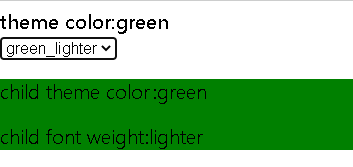
三、下面是上一章的 useContext 主题转换案例的升级版
使用了useContext 和 useReducer进行状态管理
const ThemeContext = React.createContext()

const initialState = { color: 'red', font: 'bold' }

function reducer(state, action) {
    console.log(action);
    switch (action) {
        case 'red_bold':
            return { color: 'red', font: 'bold' }
        case 'red_lighter':
            return { color: 'red', font: 'lighter' }
        case 'green_bold':
            return { color: 'green', font: 'bold' }
        case 'green_lighter':
            return { color: 'green', font: 'lighter' }
        default:
            return state
    }
}
function App() {
    const [state, dispatch] = useReducer(reducer, initialState)
    const selectTheme = (e) => {
        const value = e.target.value
        dispatch(value)
    }
    return (
        <div>
            <div>theme color:{state.color}</div>
            <select onChange={selectTheme}>
                <option value="red_bold">red_bold</option>
                <option value="red_lighter">red_lighter</option>
                <option value="green_bold">green_bold</option>
                <option value="green_lighter">green_lighter</option>
            </select>
            <ThemeContext.Provider value={{state}}>
                <Child></Child>
            </ThemeContext.Provider>
        </div>
    )
}
function Child() {

    const { state } = useContext(ThemeContext)
    console.log(state);
    return (
        <div style={{ backgroundColor: state.color, fontWeight: state.font }}>
            <p>child theme color:{state.color}</p>
            <p>child font weight:{state.font}</p>
        </div>
    )
}
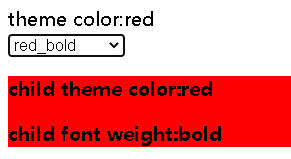
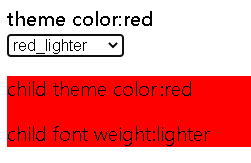
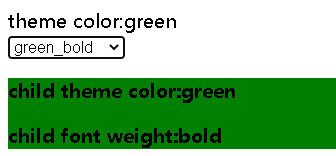
四、总结
使用reducer的场景:
1. 如果你的state是一个数组或者对象
2. 如果你的state变化很复杂,经常一个操作需要修改很多state
3. 如果你希望构建自动化测试用例来保证程序的稳定性
4. 如果你需要在深层子组件里面去修改一些状态
5. 如果你用应用程序比较大,希望UI和业务能够分开维护
useReducer 可以说是简化版 redux, 当我们后面学习 redux 之后,再回来看 useReducer , 我们将会更加的了解其 reducer 的原理。