前言
许久不见,最近在怼pytorch头有点小大,不过还好。最近也是要到期末了,所以的话刚刚好准备把这个Springboot和vue 用起来了,把前面的那个white hole 重新用Springboot 重构。当然Django版本的white hole说句大实话我是没变更新了,但是不会放弃,原因看下面的图你就明白了。

那么现在大体重新用vue + element ui 做出来的页面张这个样子。
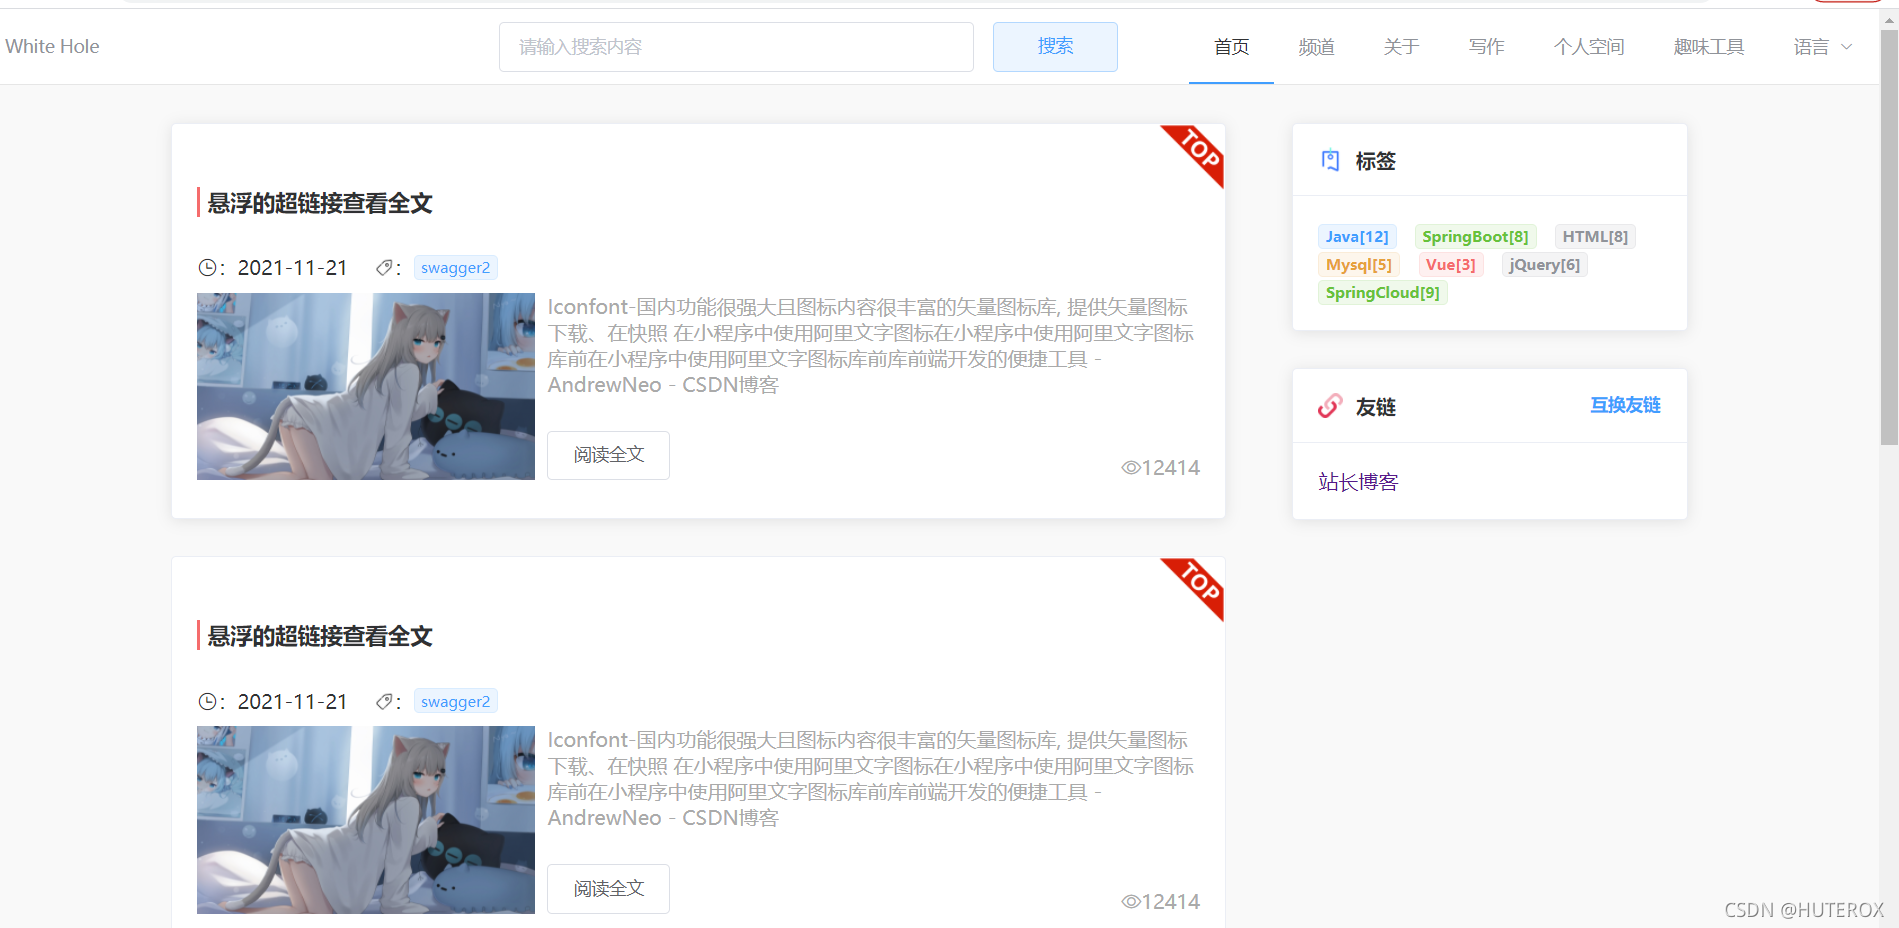
这个页面也是有参考别人做出来的。
但是这个都不是重点,等我把前端做的差不多的时候会直接开源,也就这个礼拜的事情。问题不大,大的都是后端。
当然本篇博文的目的是登录模块怎么做,这个是一个前后端分离的项目,所以验证码什么的都是前端生成的。
环境准备
我这里由于本机上的还是vue 2 所以这边还是vue2开发的,而且主要是好嫖组件,毕竟不是专业的前端。
这里的话由于某些原因,我这里使用的包管理是 cnpm
不为别的就为了安装的时候不会被雷到。
这里先装一个 vuex 用来管理状态,怎么装一条命令的事情。
页面跳转
之所以要登录是因为主要有这个玩意

代码是这样的(只是针对那个模块的代码)。
<template>
<div>
  <p>
    这个是个人空间,后面的个人页面,个人博客管理,频道管理都在这一块做,如果可以后面嫖一套可视化
    的数据展示工具。
  </p>
</div>
</template>

<script>
export default {
  name: "Space",
  beforeRouteEnter: (to, from, next) => {
    console.log("准备进入个人信息页");
    let islogin = sessionStorage.getItem("isLogin")
    if(!islogin){
      next({path:'/login'});
    }
    next();
  },
}
</script>

<style scoped>

</style>
登录页面
这里的话先来看看当前的项目结构吧

space就是个人空间了。也是从那里跳转到的。
验证码组件
这个组建的话其实也是从网上搞过来的,很多而且都叫一个名字。
SIdentify
<template>
  <div class="s-canvas">
    <canvas id="s-canvas" :width="contentWidth" :height="contentHeight"></canvas>
  </div>
</template>

<script>
export default {
  name: "SIdentify",
  props: {
    identifyCode: {
      type: String,
      default: '1234'
    },
    fontSizeMin: {
      type: Number,
      default: 25
    },
    fontSizeMax: {
      type: Number,
      default: 30
    },
    backgroundColorMin: {
      type: Number,
      default: 255
    },
    backgroundColorMax: {
      type: Number,
      default: 255
    },
    colorMin: {
      type: Number,
      default: 0
    },
    colorMax: {
      type: Number,
      default: 160
    },
    lineColorMin: {
      type: Number,
      default: 100
    },lineColorMax: {
      type: Number,
      default: 255
    },
    dotColorMin: {
      type: Number,
      default: 0
    },
    dotColorMax: {
      type: Number,
      default: 255
    },
    contentWidth: {
      type: Number,
      default: 112
    },
    contentHeight: {
      type: Number,
      default: 31
    }
  },
  methods: {
    // 生成一个随机数
    randomNum(min, max) {
      return Math.floor(Math.random() * (max - min) + min)
    },
    // 生成一个随机的颜色
    randomColor(min, max) {
      let r = this.randomNum(min, max)
      let g = this.randomNum(min, max)
      let b = this.randomNum(min, max)
      return 'rgb(' + r + ',' + g + ',' + b + ')'
    },
    drawPic() {
      let canvas = document.getElementById('s-canvas')
      let ctx = canvas.getContext('2d')
      ctx.textBaseline = 'bottom'
      // 绘制背景
      ctx.fillStyle = this.randomColor(this.backgroundColorMin, this.backgroundColorMax)
      ctx.fillRect(0, 0, this.contentWidth, this.contentHeight)
      // 绘制文字
      for (let i = 0; i < this.identifyCode.length; i++) {
        this.drawText(ctx, this.identifyCode[i], i)
      }
      this.drawLine(ctx)
      this.drawDot(ctx)
    },
    drawText(ctx, txt, i) {
      ctx.fillStyle = this.randomColor(this.colorMin, this.colorMax)
      ctx.font = this.randomNum(this.fontSizeMin, this.fontSizeMax) + 'px SimHei'
      let x = (i + 1) * (this.contentWidth / (this.identifyCode.length + 1))
      let y = this.randomNum(this.fontSizeMax, this.contentHeight - 5)
      var deg = this.randomNum(-45, 45)
      // 修改坐标原点和旋转角度
      ctx.translate(x, y)
      ctx.rotate(deg * Math.PI / 180)
      ctx.fillText(txt, 0, 0)
      // 恢复坐标原点和旋转角度
      ctx.rotate(-deg * Math.PI / 180)
      ctx.translate(-x, -y)
    },
    drawLine(ctx) {
      // 绘制干扰线
      for (let i = 0; i < 5; i++) {
        ctx.strokeStyle = this.randomColor(this.lineColorMin, this.lineColorMax)
        ctx.beginPath()
        ctx.moveTo(this.randomNum(0, this.contentWidth), this.randomNum(0, this.contentHeight))
        ctx.lineTo(this.randomNum(0, this.contentWidth), this.randomNum(0, this.contentHeight))
        ctx.stroke()
      }
    },
    drawDot(ctx) {
      // 绘制干扰点
      for (let i = 0; i < 80; i++) {
        ctx.fillStyle = this.randomColor(0, 255)
        ctx.beginPath()
        ctx.arc(this.randomNum(0, this.contentWidth), this.randomNum(0, this.contentHeight), 1, 0, 2 * Math.PI)
        ctx.fill()
      }
    }
  },
  watch: {
    identifyCode() {
      this.drawPic()
    }
  },
  mounted() {
    this.drawPic()
  }
}
</script>

<style scoped>
.s-canvas {
  height: 38px;

}
.s-canvas canvas{
  margin-top: 1px;
  margin-left: 8px;
}
</style>
你把这个复制下来就好了,然后放到制定的文件内。
使用组件
现在的话我们需要在登录界面使用这个组件。
引入组件
import SIdentify from "../components/SIdentify"
在需要的位置放入组件即可
  <div class="login-code" @click="refreshCode">
    <!--验证码组件-->
    <s-identify :identifyCode="identifyCode"></s-identify>
  </div>
页面使用
直接看代码即可,是直接使用element ui 来做的。
<template>
<div>
  <el-form :model="formLogin" :rules="rules" ref="ruleForm" label-width="0px" class="login-bok">
    <el-form-item prop="username">
      <el-input v-model="formLogin.username" placeholder="账号">
        <i slot="prepend" class="el-icon-s-custom"/>
      </el-input>
    </el-form-item>
    <el-form-item prop="password">
      <el-input type="password" placeholder="密码" v-model="formLogin.password">
        <i slot="prepend" class="el-icon-lock"/>
      </el-input>
    </el-form-item>
    <el-form-item prop="code">
      <el-row :span="24">
        <el-col :span="12">
          <el-input v-model="formLogin.code" auto-complete="off" placeholder="请输入验证码" size=""></el-input>
        </el-col>
        <el-col :span="12">
          <div class="login-code" @click="refreshCode">
            <!--验证码组件-->
            <s-identify :identifyCode="identifyCode"></s-identify>
          </div>
        </el-col>
      </el-row>
    </el-form-item>
    <el-form-item>
      <div class="login-btn">
        <el-button type="primary" @click="submitForm()" style="margin-left: auto;width: 35%">登录</el-button>
        <el-button type="primary" @click="submitForm()" style="margin-left: 27%;width: 35%" >注册</el-button>
      </div>
    </el-form-item>
  </el-form>


</div>
</template>
完整代码
这里的话就不像其他教程那样了,老卖关子,样式都不给。
这里主要是页面刷新的方法,验证码的验证之类的,还有就是相关的变量的绑定,还是比较重要的。
<template>
<div>
  <el-form :model="formLogin" :rules="rules" ref="ruleForm" label-width="0px" class="login-bok">
    <el-form-item prop="username">
      <el-input v-model="formLogin.username" placeholder="账号">
        <i slot="prepend" class="el-icon-s-custom"/>
      </el-input>
    </el-form-item>
    <el-form-item prop="password">
      <el-input type="password" placeholder="密码" v-model="formLogin.password">
        <i slot="prepend" class="el-icon-lock"/>
      </el-input>
    </el-form-item>
    <el-form-item prop="code">
      <el-row :span="24">
        <el-col :span="12">
          <el-input v-model="formLogin.code" auto-complete="off" placeholder="请输入验证码" size=""></el-input>
        </el-col>
        <el-col :span="12">
          <div class="login-code" @click="refreshCode">
            <!--验证码组件-->
            <s-identify :identifyCode="identifyCode"></s-identify>
          </div>
        </el-col>
      </el-row>
    </el-form-item>
    <el-form-item>
      <div class="login-btn">
        <el-button type="primary" @click="submitForm()" style="margin-left: auto;width: 35%">登录</el-button>
        <el-button type="primary" @click="submitForm()" style="margin-left: 27%;width: 35%" >注册</el-button>
      </div>
    </el-form-item>
  </el-form>


</div>
</template>

<script>
import SIdentify from "../components/SIdentify"

export default {
  name: "login",
  components: { SIdentify },
  data() {
    return{
      formLogin: {
        username: "",
        password: "",
        code: ""
      },
      identifyCodes: '1234567890abcdefjhijklinopqrsduvwxyz',//随机串内容
      identifyCode: '',
      // 校验
      rules: {
        username:
          [
          { required: true, message: "请输入用户名", trigger: "blur" }
          ],
        password: [{ required: true, message: "请输入密码", trigger: "blur" }],
        code: [{ required: true, message: "请输入验证码", trigger: "blur" }]
      }

    }
  },
  mounted () {
    // 初始化验证码
    this.identifyCode = ''
    this.makeCode(this.identifyCodes, 4)
  },
  methods:{
    refreshCode () {
      this.identifyCode = ''
      this.makeCode(this.identifyCodes, 4)
    },
    makeCode (o, l) {
      for (let i = 0; i < l; i++) {
        this.identifyCode += this.identifyCodes[this.randomNum(0, this.identifyCodes.length)]
      }
    },
    randomNum (min, max) {
      return Math.floor(Math.random() * (max - min) + min)
    },

    submitForm(){
      this.$router.push("/space")
      sessionStorage.setItem("isLogin",true)
      // if (this.formLogin.code.toLowerCase() !== this.identifyCode.toLowerCase()) {
      //   this.$message.error('请填写正确验证码')
      //   this.refreshCode()
      //
      // }
      // else {
      //   //这边后面做一个提交,服务器验证,通过之后获得token
      //   console.log("code is right")
      //   console.log(this.formLogin.password)
      //   console.log(this.formLogin.username)
      // }
    }

  },

}
</script>

<style scoped>
.login-bok{
  width: 30%;

  margin: 150px auto;
  border: 1px solid #DCDFE6;
  padding: 20px;
  border-radius: 10px;
  box-shadow: 0 0 30px #DCDFE6;
}
</style>
这里你直接复制都可以,但是注意的是改一下你自己的路由。
效果如下:

还可以看起来。
后面的登录模块也是类似的,到时候验证的时候用 axious 发一个请求验证一下账号密码对不对,然后的话给个token。