网址:https://uniapp.dcloud.io/
uni-app是一个使用Vue.js开发所有前端应用的框架,开发者编写一套代码,可发布到iOS、Android、H5、以及各种小程序(微信/支付宝/百度/头条/QQ/钉钉/淘宝)、快应用等多个平台。

基本使用
4.1、创建小程序项目
两种创建方式:
- 通过HBuilderX可视化界面(推荐)
- HBuilderX是绿色包,需要解压然后才能使用,运行HBuildX.exe即可
- 通过vue-cli命令行
如果使用uniapp开发小程序,后续需要使用文档,请去uniapp官网文档去复制,不要再去各自小程序的文档中复制了。
使用hbuilderX 编辑工具创建项目:
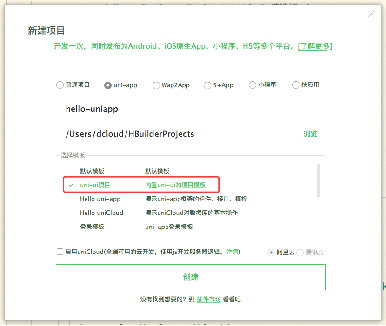
4.2、目录结构
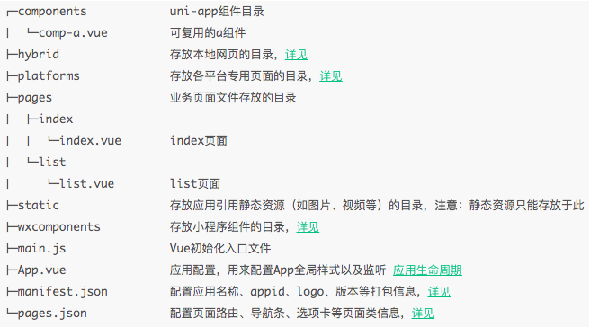
4.3、配置选项
文档地址:https://uniapp.dcloud.io/collocation/pages
"pages": [{
		"path": "pages/index/index",
		"style": {
			"navigationBarTitleText": "首页",
			"navigationStyle":"custom"
		}
	}, {
		"path": "pages/fen/fen",
		"style": {
			"navigationBarTitleText": "分类",
			"navigationStyle":"custom"
		}
	}, {
		"path": "pages/car/car",
		"style": {
			"navigationBarTitleText": "购物车",
			"navigationStyle":"custom"
		}
	}, {
		"path": "pages/mine/mine",
		"style": {
			"navigationBarTitleText": "我的",
			"navigationStyle":"custom"
		}
	}],
 	"tabBar": {
	    "color": "#7A7E83",
	    "selectedColor": "#3cc51f",
	    "borderStyle": "black",
	    "backgroundColor": "#ffffff",
	    "list": [{
	        "pagePath": "pages/index/index",
	        "iconPath": "static/img/index1.png",
	        "selectedIconPath": "static/img/index2.png",
	        "text": "首页"
	    }, {
	       "pagePath": "pages/fen/fen",
	       "iconPath": "static/img/fen1.png",
	       "selectedIconPath": "static/img/fen2.png",
	       "text": "分类"
	    },{
	       "pagePath": "pages/car/car",
	       "iconPath": "static/img/car1.png",
	       "selectedIconPath": "static/img/car2.png",
	       "text": "购物车"
	    },{
	       "pagePath": "pages/mine/mine",
	       "iconPath": "static/img/mine1.png",
	       "selectedIconPath": "static/img/mine2.png",
	       "text": "我的"
	    }]
	}
4.4、组件
文档地址:https://uniapp.dcloud.io/component/README
4.5、页面布局
同微信小程序布局一样,使用的单位也是rpx ,可以以iphone6 为视觉稿。
750
4.6、样式
在 App.vue 中的样式为全局样式,作用于每一个页面。
在 pages 目录下 的 vue 文件中定义的样式为局部样式。
局部样式只作用在对应的页面,并会覆盖 App.vue 中相同的选择器。
1.外部样式导入
在static 静态目录下可以导入外联样式表,使用@import 后跟需要导入的外联样式表的相对路径,用;表示语句结束
<style>
/* 导入外链样式 */
@import url("static/css/common.css");
/* 全局css样式 */
page{
	width: 750rpx;
	font-size:24rpx
}

/* 解决头条小程序组件内引入字体不生效的问题 */
/* #ifdef MP-TOUTIAO */
@font-face {
	font-family: uniicons;
	src: url('/static/uni.ttf');
}
/* #endif */
</style>
注意:如果在app.vue 中导入,则此外联样式为全局样式
2. style和class 样式
-
style:静态的样式统一写到 class 中。style 接收动态的样式,在运行时会解析,请尽量避免将静态的样式写进 style 中,以免影响渲染速度
<view :style='{color:color}'> </view> -
class:用于指定样式规则,其属性值是样式规则中类选择器名(样式类名)的集合,样式类名不需要带上.,样式类名之间用空格分隔
4.7 选择器
注意:在 uni-app 中不能使用 * 选择器,page 相当于 body 节点,支持的选择器有:
4.8 页面栈
- uni.navigateTo({ url: ‘test?id=1&name=uniapp’ });
- uni.redirectTo({ url: ‘test?id=1’ });
- uni.reLaunch({ url: ‘test?id=1’ });
- uni.switchTab({ url: ‘/pages/index/index’ });
- uni.navigateBack({ delta: 2 });
4.9、网络请求
文档地址:https://uniapp.dcloud.io/api/request/request
request.js
// 封装请求
  const  ajax = (url,method,data)=>{
  // 显示loading
   wx.showLoading({
     title: '加载中',
   })
   return new Promise((resolve,reject)=>{
     wx.request({
       url: url, //仅为示例,并非真实的接口地址
       data:data,
       method:method,
       header: {
         'content-type': 'application/json' // 默认值
       },
       success (res) {
         // console.log(res.data)
         resolve(res.data)
         // 隐藏loading
         wx.hideLoading()
       },
       fail(err){
         reject(err)
       }
     })
   })
}

export default ajax
http.js
import ajax from "./request.js"


let base_url = 'http://121.42.230.80/api/'

// 首页推荐套餐接口
export function GetHotHospital(data){
	return ajax(base_url+'hothospital','get',data)
}
4.10、生命周期
uni-app 完整支持 Vue 实例的生命周期,还新增应用生命周期及页面生命周期,即uniapp 对vue 和小程序的生命周期都支持。
-
created
-
mounted
-
updated
-
destroyed
-
onload
-
onshow
-
onReady
-
onHide
-
onUnload
4.11、globalData
Vue 之前是没有这类概念的,但 uni-app 引入了globalData概念
// app.vue 定义全局变量globalData
<script>
export default {
	// 整个uniapp 项目的生命周期
	onLaunch: function() {
		console.log('App Launch');
	},
	onShow: function() {
		console.log('App Show');
	},
	onHide: function() {
		console.log('App Hide');
	},
	globalData:{
		// 这是全局变量
		nameArr:['迪迦','盖亚','塞罗','泰罗']
	}
};
</script>

// 获取globalData 全局变量
<script>
	let app =  getApp();
</script>
2、跨端和条件编译
2.1 条件编译的必要性
uni-app 已将常用的组件、JS API 封装到框架中,开发者按照 uni-app 规范开发即可保证多平台兼容,大部分业务均可直接满足,但每个平台有自己的一些特性,因此会存在一些无法跨平台的情况,大量写 if else,会造成代码执行性能低下和管理混乱,编译到不同的工程后二次修改,会让后续升级变的很麻烦
-
编译期判断 编译期判断,即条件编译,不同平台在编译出包后已经是不同的代码

-
条件编译是用特殊的注释作为标记,在编译时根据这些特殊的注释,将注释里面的代码编译到不同平台
语法:以 #ifdef 或 #ifndef 加 %PLATFORM% 开头,以 #endif 结尾
? #ifdef:if defined 仅在某平台存在
? #ifndef:if not defined 除了某平台均存在
? %PLATFORM%:平台名称
2.2 条件编译类型
-
页面的条件编译
<!-- #ifdef H5 --> <view class=""> h5端 </view> <!-- #endif --> <!-- #ifdef MP-WEIXIN --> <view class=""> 微信端 </view> <!-- #endif --> -
编译样式的条件
/* #ifdef H5 */ .on{ font-size: 50rpx; background: purple; } /* #endif */ -
pages.json的条件编译
// #ifdef H5 ,{ "path" : "pages/detail/detail", "style" : {} } // #endif -
static目录的条件编译
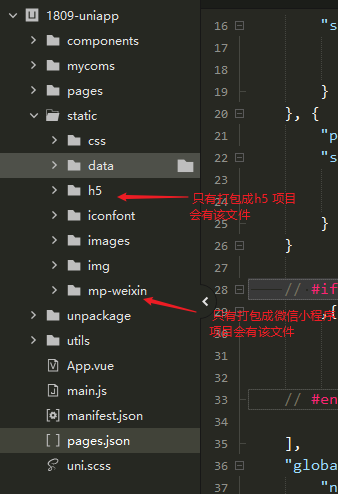
3、uniapp 插件使用
例如:使用SearchBar 搜索栏
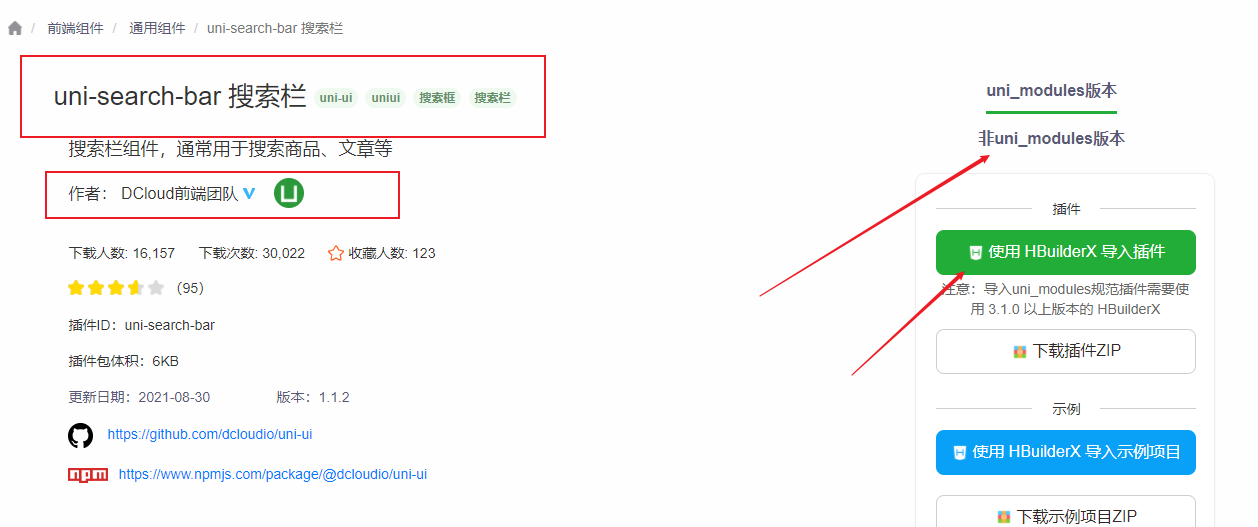
4、重构案例
4.1、项目工作环境初始化
uniapp的两种使用方式推荐使用基于
HBuilder X的形式,因此在操作之前请先做好其安装工作。
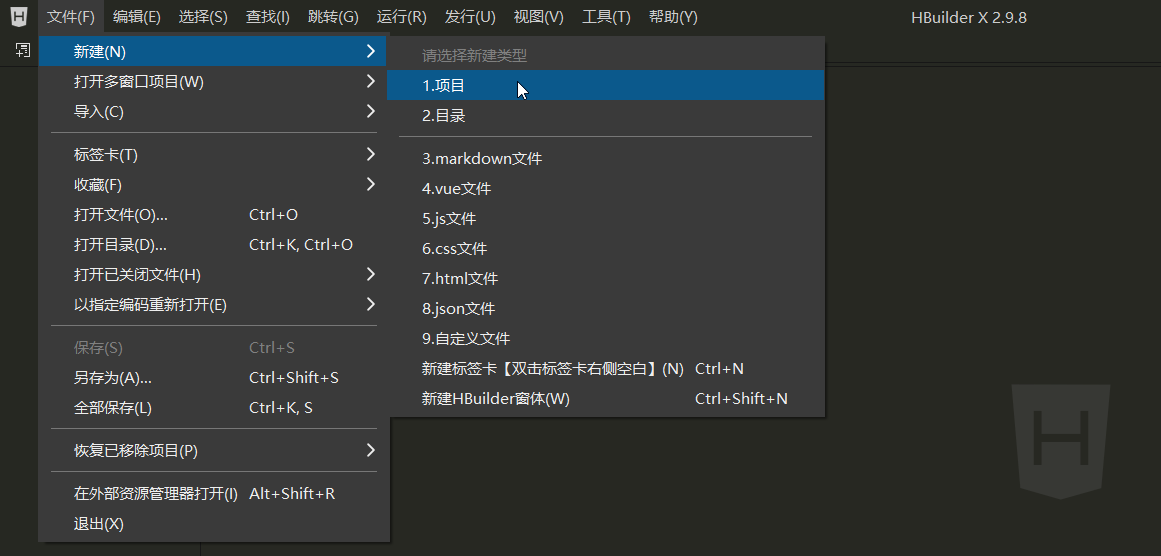
a. 使用HBuilder x新建一个项目
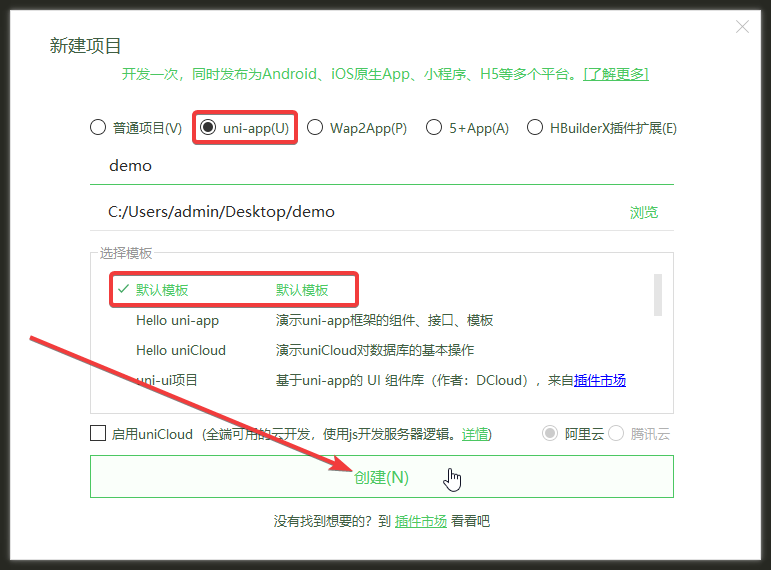
b. 填入项目的基本信息,项目名称根据自身需要自行决定
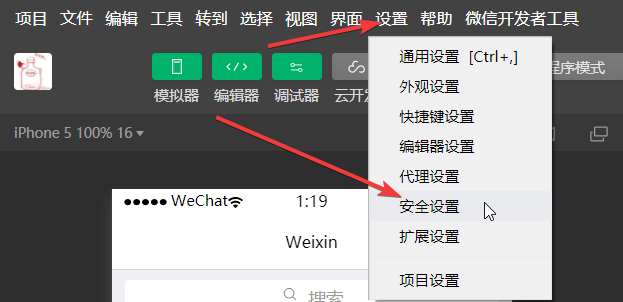
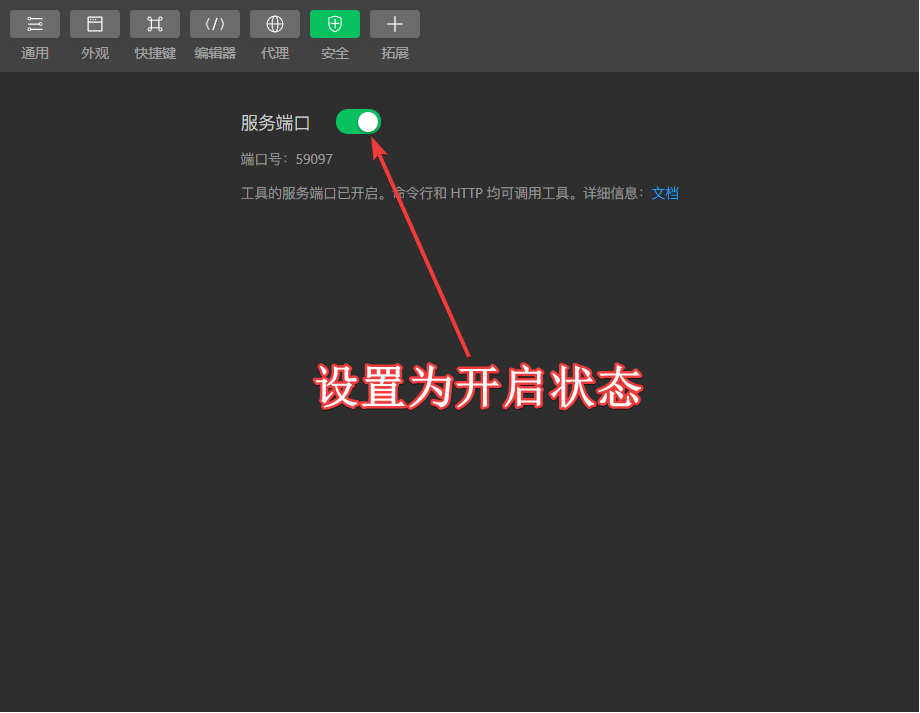
c. 后续我们将使用HBuilder X进行编码、开发,而小程序开发者工具作为小程序的预览工作;为了将让HBuilder X能够将编译好的小程序代码准确的传给小程序开发者工具,此处我们需要设置小程序工具,以允许小程序开发者工具被其他程序调用:
d. 在HBuilder X中设置运行,以体验执行效果
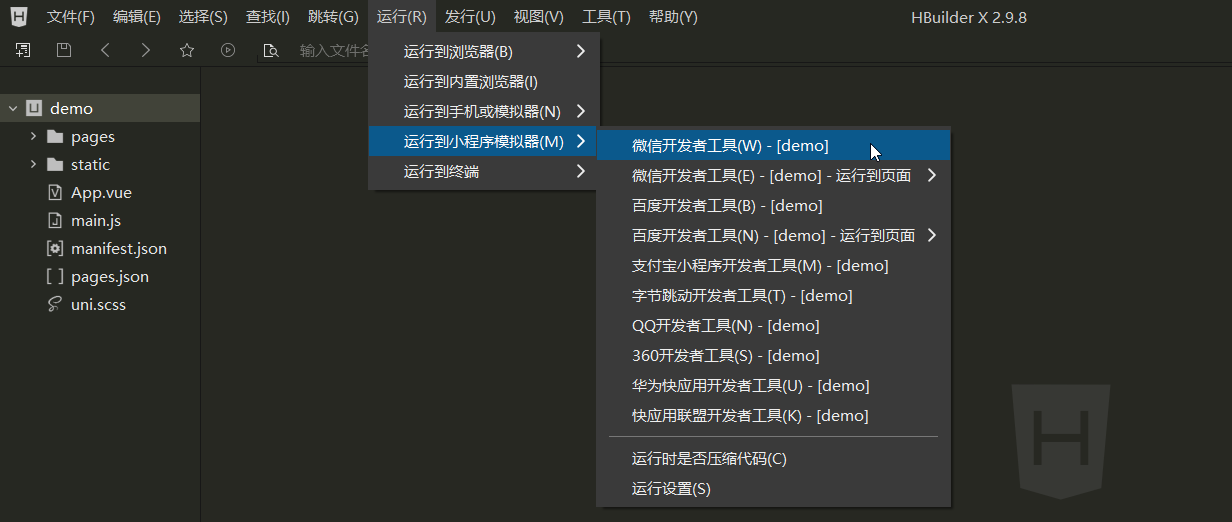
启动时可能会弹出窗口询问
小程序开发者工具的安装位置,如果弹出该窗口,请根据自己电脑上安装的位置选中安装目录,随后点击确定。
最终设置操作完毕,后续我们每次在HBuilder X中修改的代码一经保存,微信小程序开发者工具就会实时更新显示效果。
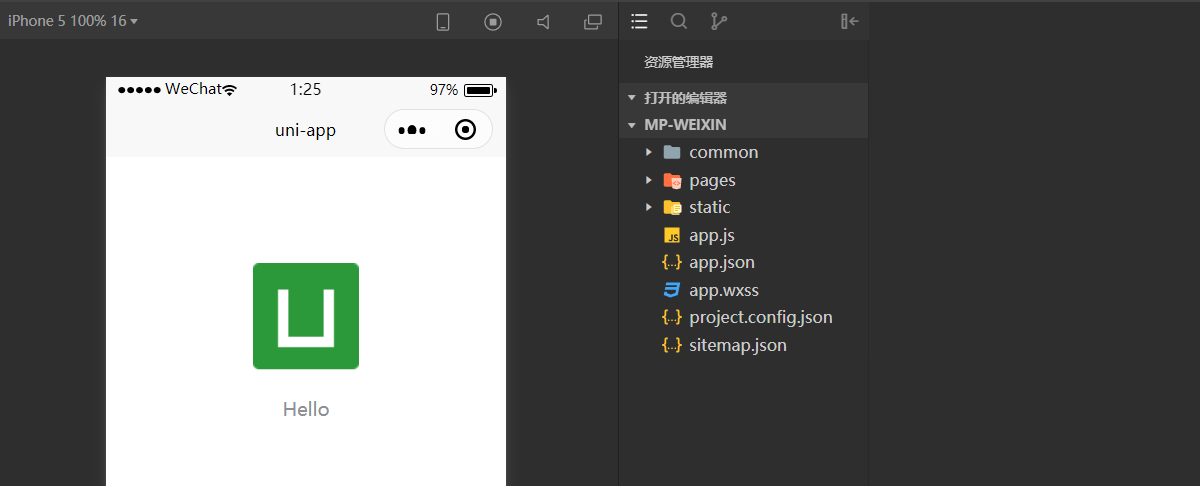
另外不要忘了给我们的最终输出程序类型做配置:
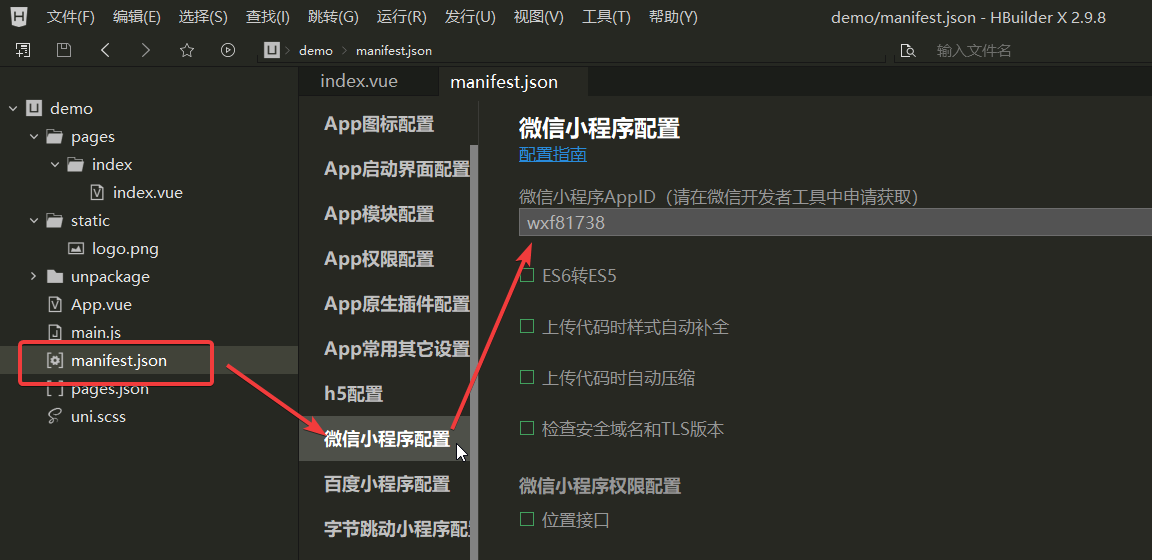
如果需要其他类型的小程序输出,操作也是如此。
4.2、重构swiper案例
此时已经不再是使用原生小程序语法,因此请务必:参考uni-app官网文档,结合vue框架语法
a. 新建页面,右键pages,选择新建页面

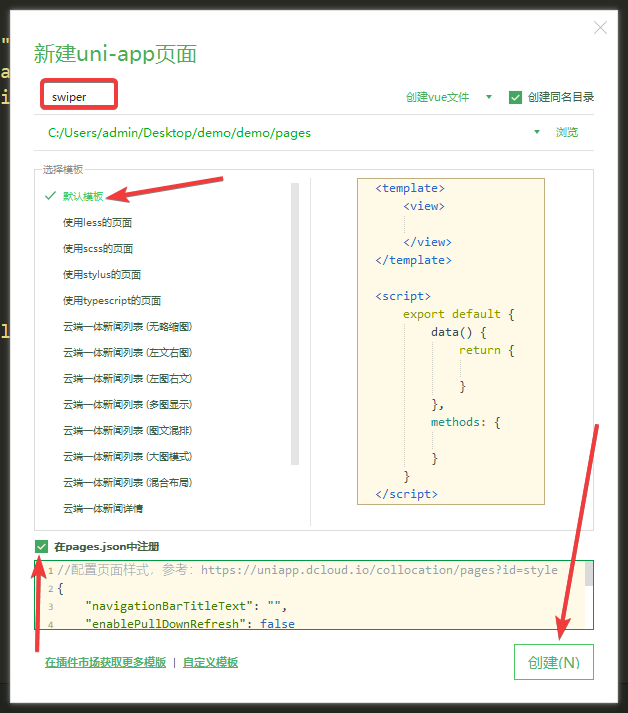
b. 去pages.json文件中设置项目的启动页(将启动页的内容移动第一个元素)
{
	"pages": [ //pages数组中第一项表示应用启动页,参考:https://uniapp.dcloud.io/collocation/pages
		{
			// 将重构的案例放到最前面
			"path" : "pages/swiper/swiper",
			"style" :
			{
				"navigationBarTitleText": "",
				"enablePullDownRefresh": false
			}

		},
		{
			"path": "pages/index/index",
			"style": {
				"navigationBarTitleText": "uni-app"
			}
		}
    ],
	"globalStyle": {
		"navigationBarTextStyle": "black",
		"navigationBarTitleText": "uni-app",
		"navigationBarBackgroundColor": "#F8F8F8",
		"backgroundColor": "#F8F8F8"
	}
}
参考代码
文档地址:https://uniapp.dcloud.io/component/swiper
<template>
	<!-- 在uniapp中,template标签就相当于之前的wxml文件 -->
	<view>
		<swiper class="swiper" :indicator-dots="indicatorDots" :autoplay="autoplay" :interval="interval" :duration="duration">
			<!-- 循环输出获取到的数据 -->
			<swiper-item v-for="(item,index) in swiper" :key="item.id">
				<navigator :url="'/pages/detail/detail?id=' + item.id">
					<image :src="item.pic" />
				</navigator>
			</swiper-item>
		</swiper>
	</view>
</template>

<script>
	// 在uniapp中,script段落就相当于之前的js文件
	export default {
		data() {
			return {
				// 是否显示轮播图的圆点
				indicatorDots: true,
				// 是否自动播放
				autoplay: true,
				// 一张图要显示的持续时间(单位是毫秒)
				interval: 2000,
				// 切换图片需要的时间(单位是毫秒)
				duration: 500,
				// swiper列表的数据
				swiper: []
			}
		},
		// vue的生命周期:created
		created() {
			uni.request({
				url: 'https://mpapi.iynn.cn/api/v1/news/hot', //仅为示例,并非真实接口地址。
				success: (res) => {
					// console.log(res.data);
					if (res.data.status == 0) {
						let arr = [];
						res.data.data.forEach(el => {
							arr.push({
								id: el.id,
								pic: el.pic
							})
						})
						// 将组装好的数据赋值给data中的swiper(vue的赋值,不是react的setState,也不是小程序的setData)
						this.swiper = arr;
					}
				}
			});
		},
		methods: {

		}
	}
</script>

<style>
	/* 在uniapp中,style标签就相当于之前的wxss文件 */
</style>
5、uniapp下的小程序发布
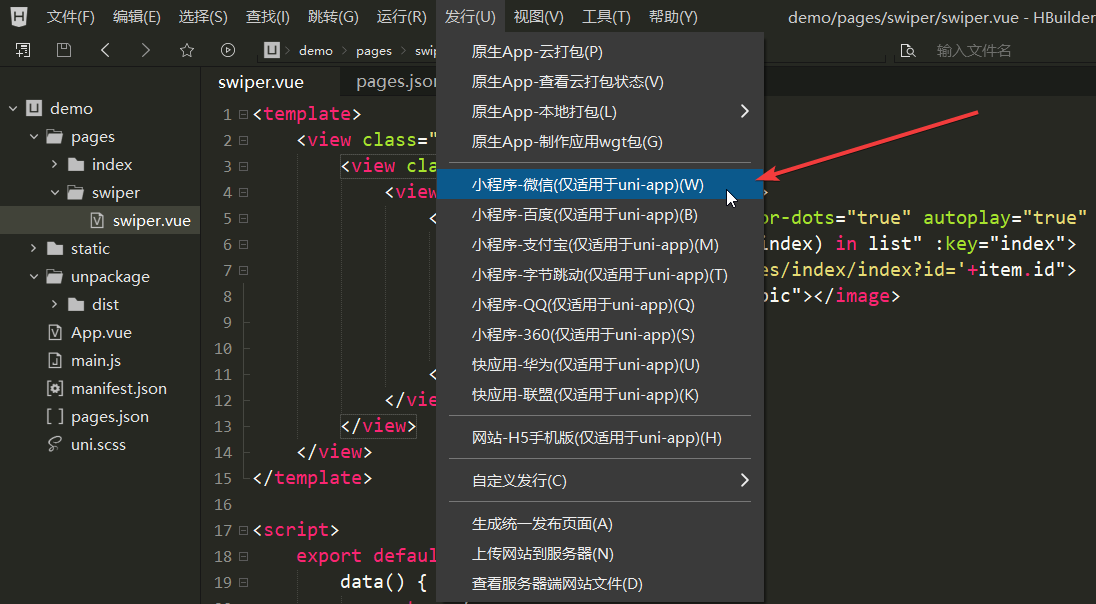
随后依据弹窗的窗口提示填写需要的信息,按照步骤进行即可。

6、uniapp下的app打包
1.首先在mainfest.json 中配置app 应用对应的配置项。
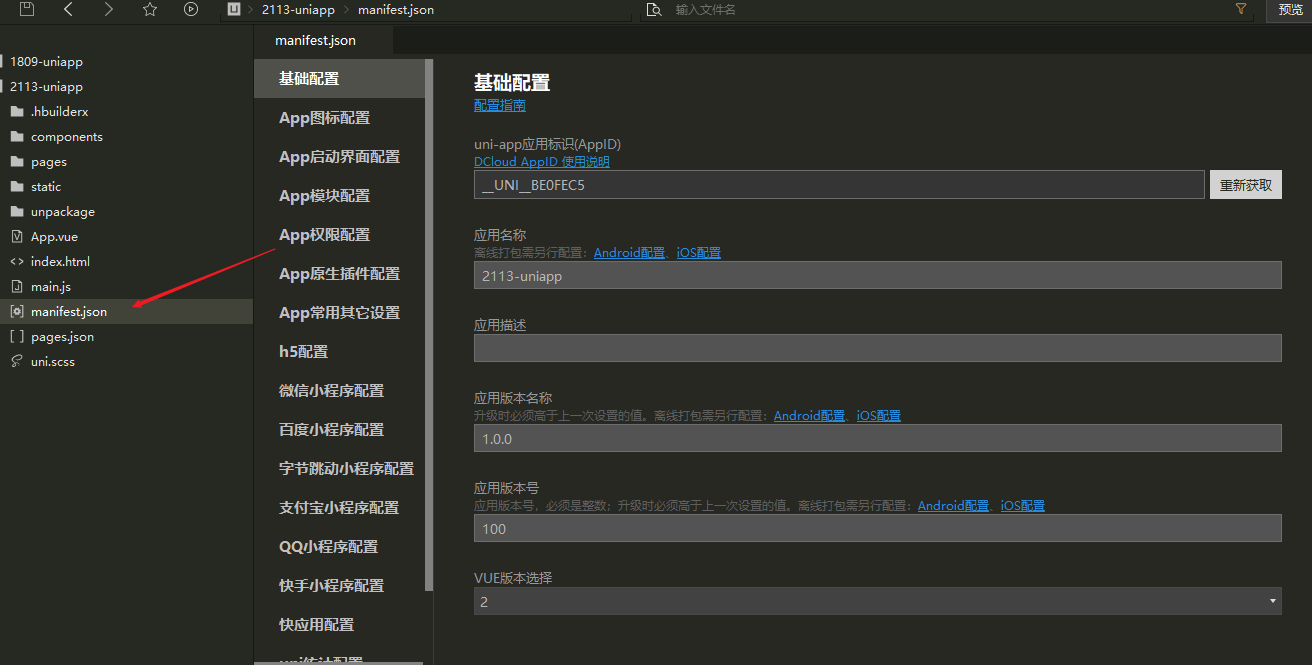
2.点击hbuilderX 发行,选择 原生App-云打包
