目录
1)Vue3使用provide/inject实现父子组件间传值
1)根据路由配置文件中定义的path修改相应菜单的index值,要带上“/”
参考链接
自定义组件:vue3.x 中的自定义组件及使用 - 清和时光 - 博客园
父子组件传参:vue3.0笔记二:vue3.0中props父子传值的改动_浩星-CSDN博客
官方文档:Provide / Inject | Vue.js
前言
????????本人职场小白,公司让学习Vite和Vue3并搭建项目Demo,借这个机会自己尝试写写博客,主要目的是搭项目,所以原理性的知识没有过多阐述,写博客时也根据步骤复现了,对于新手直接跟着操作就可以把项目搭起来,少走了很多弯路,希望对大家有帮助。
? ? ? ? 文中参考链接都有附上,参考时可以看看,如果有任何错误或意见也欢迎大家指点。
项目码云Gitea地址
Vite-Demo: 使用vite2.0及vue3.0并集成Element Plus,开发后台管理系统demo。https://gitee.com/YG-CST/vite-demo
其他文章
Vite2+Vue3学习笔记(一):Vue3.0项目搭建及配置过程_YGいくこさん的博客-CSDN博客
Vite2+Vue3学习笔记(二):引入Vue-Router_YGいくこさん的博客-CSDN博客
Vite2+Vue3学习笔记(三):引入Axios并调用后端接口_YGいくこさん的博客-CSDN博客
Vite2+Vue3学习笔记(四):引入Vue-i18n并实现按钮切换页面语言_YGいくこさん的博客-CSDN博客
五、自定义组件并实现父子组件响应式传参
1.新建自定义组件
把Main.vue中的侧边导航栏抽离到单独的组件中。
- src/components/MyMenu.vue
<template>
? <el-menu :default-openeds="['1', '3']" style="height: 100%">
? ? <el-sub-menu index="1">
? ? ? <template #title>
? ? ? ? <el-icon><location /></el-icon>
? ? ? ? <span>Navigator One</span>
? ? ? </template>
? ? ? <el-menu-item-group>
? ? ? ? <template #title><span>Group One</span></template>
? ? ? ? <el-menu-item index="1-1">item one</el-menu-item>
? ? ? ? <el-menu-item index="1-2">item two</el-menu-item>
? ? ? </el-menu-item-group>
? ? ? <el-menu-item-group title="Group Two">
? ? ? ? <el-menu-item index="1-3">item three</el-menu-item>
? ? ? </el-menu-item-group>
? ? ? <el-sub-menu index="1-4">
? ? ? ? <template #title><span>item four</span></template>
? ? ? ? <el-menu-item index="1-4-1">item one</el-menu-item>
? ? ? </el-sub-menu>
? ? </el-sub-menu>
? ? <el-menu-item index="2">
? ? ? <el-icon><icon-menu /></el-icon>
? ? ? <template #title>Navigator Two</template>
? ? </el-menu-item>
? ? <el-menu-item index="3" disabled>
? ? ? <el-icon><document /></el-icon>
? ? ? <template #title>Navigator Three</template>
? ? </el-menu-item>
? ? <el-menu-item index="4">
? ? ? <el-icon><setting /></el-icon>
? ? ? <template #title>Navigator Four</template>
? ? </el-menu-item>
? </el-menu>
</template>
<script>
import { defineComponent } from "vue";
import { Location, Document, Menu as IconMenu, Setting } from "@element-plus/icons";
export default defineComponent({
? components: {
? ? Location,
? ? Document,
? ? Setting,
? ? IconMenu,
? },
? setup() {
? ? let methods = {};
? ? return {
? ? ? ...methods,
? ? };
? },
});
</script>
<style></style>
2.在需要用到的地方引入MyMenu组件
-
src/components/Main.vue
1)引入组件:
//<script>
import MyMenu from "../components/MyMenu.vue";
2)挂载组件:
//<script>
export default defineComponent({
? components: {
? ? MyMenu, // ※
    "v-mymenu": MyMenu,
    "my-menu": MyMenu
? },
? setup() {}
});
其中,※处有三种写法:
a. 直接挂载:MyMenu
b.使用别名:"v-mymenu": MyMenu
c.横杠连接:"my-menu": MyMenu
3)展示组件:
//<template>
<el-aside width="200px">
? ? <MyMenu></MyMenu> // ※
? ? <v-mymenu></v-mymenu>
? ? <my-menu></my-menu>
</el-aside>
其中,※处有三种写法,分别对应2)的写法:
a. 直接挂载:<MyMenu></MyMenu>
b.使用别名:<v-mymenu></v-mymenu>
c.横杠连接:<my-menu></my-menu>
3.修改父组件
Main.vue增加单选框按钮组,切换时传参到自定义子组件,控制侧边导航栏的折叠与否。
- src/components/Main.vue
<template>
? <el-config-provider :locale="elLocale">
? ? <el-container style="border: 1px solid #eee">
? ? ? <el-aside width="200px">
? ? ? ? <MyMenu></MyMenu>
? ? ? </el-aside>
? ? ? <el-container>
? ? ? ? <el-header class="flex-center-space-between">
? ? ? ? ? <el-radio-group
? ? ? ? ? ? v-model="toggle_collapse"
? ? ? ? ? ? size="mini"
? ? ? ? ? ? style="margin-right: 20px"
? ? ? ? ? ? @change="changeMenu"
? ? ? ? ? >
? ? ? ? ? ? <el-radio-button :label="false">expand</el-radio-button>
? ? ? ? ? ? <el-radio-button :label="true">collapse</el-radio-button>
? ? ? ? ? </el-radio-group>
? ? ? ? ? <div class="flex-center-flex-end">
? ? ? ? ? ? <!-- 头像和中英文切换组件 -->
? ? ? ? ? </div>
? ? ? ? </el-header>
? ? ? ? <el-main>
? ? ? ? ? <router-view></router-view>
? ? ? ? </el-main>
? ? ? </el-container>
? ? </el-container>
? </el-config-provider>
</template>
<script>
import { defineComponent, ref } from "vue";
import MyMenu from "../components/MyMenu.vue";

export default defineComponent({
? components: {
? ? ElConfigProvider,
? ? MyMenu,
? },
? setup() {
? ? // 侧边导航栏
? ? // 切换菜单折叠与否
? ? const changeMenu = (e) => {
? ? ? console.log(e);
? ? };

? ? let methods = {
? ? ? // 菜单折叠
? ? ? changeMenu,
? ? };
? ? return {
? ? ? // 折叠菜单
? ? ? toggle_collapse: ref(true),

? ? ? ...methods,
? ? };
? },
});
</script>

<style>
.el-header {
? background-color: #b3c0d1;
? color: var(--el-text-color-primary);
? line-height: 60px;
}
.el-aside {
? color: var(--el-text-color-primary);
}
.flex-center-flex-end {
? display: flex;
? align-items: center;
? justify-content: flex-end;
}
.flex-center-space-between {
? display: flex;
? align-items: center;
? justify-content: space-between;
}
</style>
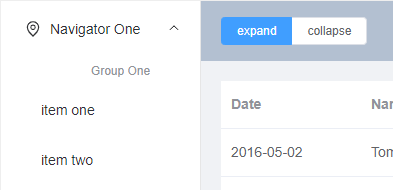
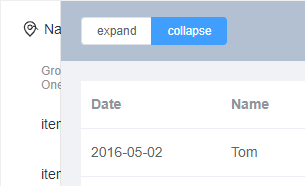
4.父组件引入provide向子组件传参
src/components/Main.vue
- <template>
动态修改菜单宽度。
<el-aside :width="asideWidth">
? ? <MyMenu></MyMenu>
</el-aside>- <script>
provide/inject本身传递数据是不具有响应性的。
当provide传递的数据是ref或reactive对象时,子组件inject的数据才具有响应性,即此时父组件修改该数据,子组件也会接收到修改后的数据。
import { defineComponent, ref, provide, computed } from "vue";

setup() {
    // 侧边导航栏
    // 左侧菜单是否折叠:父组件初始化单选框组用,并传给子组件,初始化为展开状态
    const isCollapse = ref(false);
    provide("isCollapse", isCollapse);
    // 计算asideWidth的值,与isCollapse同步更新
    const asideWidth = computed(() => {
    ? return isCollapse.value == "true" ? "64px" : "200px";
    });
    // 切换菜单折叠与否
    const changeMenu = (e) => {
    ? // console.log(e);
    ? isCollapse.value = e ? "true" : "false";
    };

    let methods = {
    ? // 折叠菜单
    ? changeMenu,
    };
    return {
    ? // 折叠菜单
    ? toggle_collapse: ref(isCollapse.value),
    ? asideWidth,
    ? ...methods,
    };
}
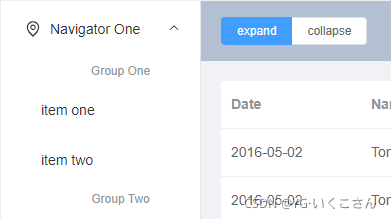
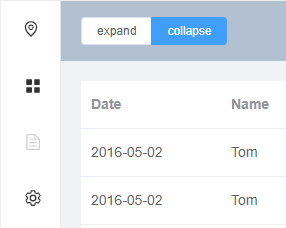
5.子组件使用inject接受父组件提供的数据
src/components/MyMenu.vue
- ?<template>
<el-menu
? ? :default-openeds="['1', '3']"
? ? style="height: 100%; width: 100%"
? ? :collapse="menuCollapse"
? ? :collapse-transition="false"
? ? @open="handleOpen"
? ? @close="handleClose"
? >
  ......
</el-menu>- <script>
import { defineComponent, inject, computed } from "vue";
import { Location, Document, Menu as IconMenu, Setting } from "@element-plus/icons";

export default defineComponent({
? components: {
? ? Location,
? ? Document,
? ? Setting,
? ? IconMenu,
? },
? setup() {
? ? //调用 inject 函数,通过指定的数据名称获取到父级共享的数据:const customVal = inject("customVal");
? ? const isCollapse = inject("isCollapse");
? ? // 左侧菜单是否折叠:子组件绑定el-menu用
? ? const menuCollapse = computed(() => {
? ? ? return isCollapse.value == "true" ? true : false;
? ? });
? ? const handleOpen = (key, keyPath) => {
? ? ? console.log(key, keyPath);
? ? };
? ? const handleClose = (key, keyPath) => {
? ? ? console.log(key, keyPath);
? ? };

? ? let methods = {
? ? ? handleOpen,
? ? ? handleClose,
? ? };
? ? return {
? ? ? menuCollapse,
? ? ? ...methods,
? ? };
? },
});
6.相关知识点总结
1)Vue3使用provide/inject实现父子组件间传值
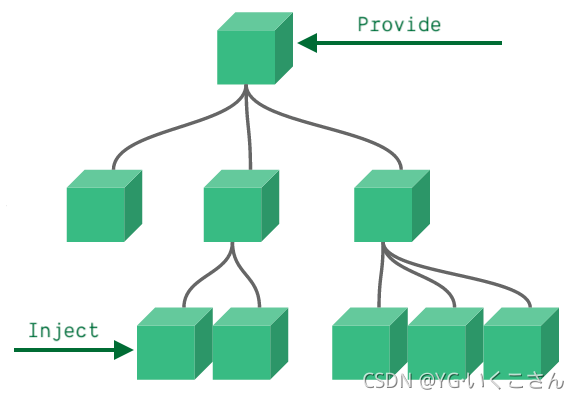
注意:provide/inject只能在setup()中使用,使用前需要从vue中import进来。
provide 函数有两个参数:
- name ( 类型)
- value
inject 函数有两个参数:
- 要 inject 的 property 的 name
- 默认值 (可选)
a.将值传给自定义组件(子组件):provide('数据名称', 要传递的数据)
import { provide } from 'vue'

setup() {
    provide('location', 'North Pole')
    provide('geolocation', {
      longitude: 90,
      latitude: 135
    })
}
b.调用 inject 函数,通过指定的数据名称获取到父组件共享的数据:const customVal = inject("customVal");
import { inject } from 'vue'

setup() {
    const userLocation = inject('location', 'The Universe')
    const userGeolocation = inject('geolocation')

    return {
      userLocation,
      userGeolocation
    }
}
2)使传递的数据响应式更新
为了增加 provide 值和 inject 值之间的响应性,我们可以在 provide 值时使用 ref 或 reactive。
import { provide, reactive, ref } from 'vue'

setup() {
    const location = ref('North Pole')
    const geolocation = reactive({
      longitude: 90,
      latitude: 135
    })

    provide('location', location)
    provide('geolocation', geolocation)
}
3)同组件中,数据A的值挂靠在数据B的更新上
使用vue提供的计算属性computed,Vue知道数据B依赖于数据A,所以当数据A更新时,数据B也会更新。
参考文档:vue3动态的改变样式 - 一封未寄出的信 - 博客园
7.折腾系列之美化折叠菜单按钮
src/components/Main.vue
单选框组太丑了,改为根据菜单宽度动态显示相应的svg图标,同时添加样式。
- <template>
<el-header class="flex-center-space-between">
? <div class="collapseBtn" @click="collapseMenu">
? ? <el-icon v-if="asideWidth == '64px'"><Expand /></el-icon>
? ? <el-icon v-else><Fold /></el-icon>
? </div>
? <div class="flex-center-flex-end">
  ......
  </div>
</el-header>- <script>
import { Expand, Fold } from "@element-plus/icons";

components: {
? ? ElConfigProvider,
? ? MyMenu,
? ? Expand,
? ? Fold
},

setup(){
    let methods = {
    ? // 菜单折叠
    ? collapseMenu
    };
}- <style>
.el-header {
? background-color: var(--el-color-white);
? color: var(--el-text-color-primary);
? line-height: 60px;
? padding-left: 0;
}
.el-aside {
? color: var(--el-text-color-primary);
}
.flex-center-flex-end {
? display: flex;
? align-items: center;
? justify-content: flex-end;
}
.flex-center-space-between {
? display: flex;
? align-items: center;
? justify-content: space-between;
}
.collapseBtn {
? width: 60px;
? height: 60px;
? cursor: pointer;
? color: var(--el-text-color-secondary);
}
.collapseBtn:hover {
? background-color: var(--el-color-primary-light-9);
? border-color: var(--el-color-primary-light-7);
? color: var(--el-color-primary-light-2);
}
.collapseBtn .el-icon {
? font-size: 1.2em;
? width: 1.2em;
? height: 1.2em;
? line-height: 1.2em;
? padding-top: 0.9em;
}
.collapseBtn .el-icon svg {
? width: 1.2em;
? height: 1.2em;
}
8.折腾系列之菜单路由跳转
1)根据路由配置文件中定义的path修改相应菜单的index值,要带上“/”
- src/router/index.js
const router = createRouter({
? ? history: routerHistory,
? ? routes: [{
? ? ? ? path: "/login",
? ? ? ? name: "login",
? ? ? ? component: () =>
? ? ? ? ? ? import ("../components/Login.vue")
? ? }, {
? ? ? ? path: "/", // 父级路径
? ? ? ? name: "main",
? ? ? ? component: () =>
? ? ? ? ? ? import ("../components/Main.vue"),
? ? ? ? children: [{
? ? ? ? ? ? ? ? path: "/", // 空路径路由的路径与父级路径保持一致,否则会显示Main.vue,没有渲染router-view
? ? ? ? ? ? ? ? redirect: "/appListTable"
? ? ? ? ? ? }, // 定义空路径,用户访问localhost:3000时跳转至首页
? ? ? ? ? ? {
? ? ? ? ? ? ? ? path: "/appListTable",
? ? ? ? ? ? ? ? name: "appListTable",
? ? ? ? ? ? ? ? component: () =>
? ? ? ? ? ? ? ? ? ? import ("../views/AppList.vue")
? ? ? ? ? ? },
? ? ? ? ? ? {
? ? ? ? ? ? ? ? path: "/appListChart",
? ? ? ? ? ? ? ? name: "appListChart",
? ? ? ? ? ? ? ? component: () =>
? ? ? ? ? ? ? ? ? ? import ("../views/HelloWorld.vue")
? ? ? ? ? ? }
? ? ? ? ]
? ? }, {
? ? ? ? path: "/:pathMatch(.*)*",
? ? ? ? name: "notFound",
? ? ? ? component: () =>
? ? ? ? ? ? import ("../components/NotFound.vue")
? ? }]
});- src/components/MyMenu.vue
<el-sub-menu index="/">
? <template #title>
? ? <el-icon><location /></el-icon> <span>Navigator One</span>
? </template>
? <el-sub-menu index="/appListTable">
? ? <template #title><span>item one</span></template>
? ? <el-menu-item index="/appListTable">item one</el-menu-item>
? ? <el-menu-item index="/appListChart">item two</el-menu-item>
? </el-sub-menu>
</el-sub-menu>
2)使用getCurrentInstance来获取上下文
import { defineComponent, inject, computed, getCurrentInstance } from "vue";

const { proxy } = getCurrentInstance();
const currentPath = proxy.$route.path;

return {
? currentPath,
};
3)el-menu配置router模式
Element Plus的el-menu组件提供了router属性值,开启后会在激活导航时以 index 作为 path 进行路由跳转。
动态绑定default-active属性,根据当前页面路由高亮相应的菜单选项。
<el-menu
? ? :default-active="currentPath"
? ? router
? >
  ......
</el-menu>