前言:为熟悉HTML、CSS和JavaScript,从GitHub上选取项目代码进行解析和学习。
一、总体效果

功能:点击每一个图片会动态划过。
实现方式:新建一个文件夹,文件夹中新建三个txt,改后缀,分别命名style.css;script.js;index.html;将下面三部分代码对应放入。
二、JavaScript部分
const panels=document.querySelectorAll('.panel')
panels.forEach(panel=>{
    panel .addEventListener('click',()=>{
        removeActiveClasses()
        panel.classList.add('active')
    })
})
function removeActiveClasses(){
    panels.forEach(panel=>{
        panel.classList.remove('active')
    })
}
代码解析
第一行:
获取文档中class=“.panel”的所有元素。
语法:
elementList = document.querySelectorAll(selectors);
其中elementList 是一个静态的 NodeList 类型的对象。
selectors 是一个由逗号连接的包含一个或多个 CSS 选择器的字符串。
第二至七行:
1、利用forEach()方法调用数组的每一个元素,并将元素传递给回调函数。
语法:array.forEach(function(currentValue, index, arr), thisValue)
其中function(currentValue, index, arr)必需,数组中每个元素需要调用的函数;currentValue必需,指当前元素;index可选,指当前元素的索引值;arr可选,值当前元素所属的数组对象。
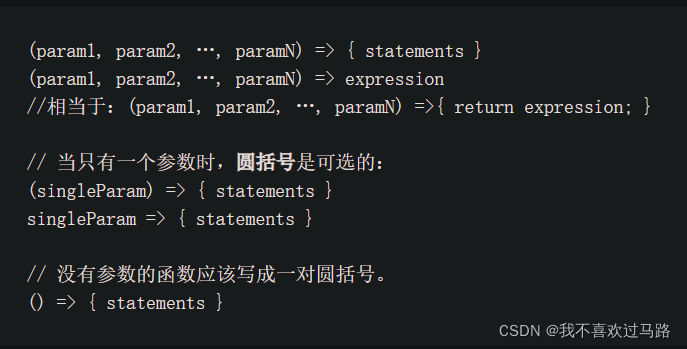
2、利用箭头函数 panel=>{ }
箭头函数表达式的语法比函数表达式更简洁,并且没有自己的this,arguments,super或new.target。箭头函数表达式更适用于那些本来需要匿名函数的地方,并且它不能用作构造函数。
语法

3、利用element.addEventListener()方法向指定元素添加事件句柄。
语法: element.addEventListener(event, function, useCapture)
 4、利用element.classList.add(),为元素添加新的类
第八至十二行:
定义了removeActiveClasses()函数,语法同上。
小结:我理解的Js部分代码是为实现面板图像的一个动态转换,当点击一个面板,移除active,显示一个图片,点击完所有面板后再添加active,回到初始状态。
三、css部分
@import url('https://fonts.googleapis.com/css?family=Muli&display=swap'); /*import Google Fone*/

*{
    box-sizing:border-box;
    /*计算元素的总宽度和总高度;
    content-box:表示设置的宽度中不包括padding(内边框)和border(边框);
    bortder-box:表示设置的宽度中包括padding(内边框)和border(边框);
    inherit:从父元素继承;
    */
}
body{
    font-family: 'Muli',sans-serif;
    display: flex;
    align-items: center;
    justify-content: center;
    height: 100vh;
    overflow: hidden;
    margin: 0;
}
.container{
    /*
    用于固定宽度并支持响应式布局的容器,弹性盒子之类
    */
    display: flex;
    width: 90vw;
}

.panel{
    /*
    .panel表示类选择器
    设置面板背景大小、位置、颜色、高度、四个角的弧度等
    */
    background-size: cover;
    background-position: center;
    background-repeat: no-repeat;
    height: 80vh;
    border-radius: 50px;
    color: #fff;
    cursor: pointer;  /*定义鼠标指针放在一个元素范围内时所用的光标形状。pointer是一只手*/
    flex: 0.5; /*设置让所用弹性模型对象的子元素都有相同的长度*/
    margin: 10px; /*设置元素的所有四个边距*/
    position: relative;
    -webkit-transition: all 700ms ease-in; /*过渡效果*/

}

.panel h3{
    font-size: 24px;
    position: absolute;
    bottom: 20px;
    left: 20px;
    margin: 0;  /*设置元素的所有四个边距*/
    opacity: 0; /*设置元素的透明度级别*/
}


.panel.active{
    flex: 5;
}
.panel.active h3{
    opacity: 1; /*设置元素的透明度级别*/
    transition: opacity 0.3s ease-in 0.4s; /*设置元素过渡效果*/
}


@media (max-width:480px){
    .container{
        width: 100vw;
    }

    .panel:nth-of-type(4),
    .pamel:nth-of-type(5){
        display: none;
    }
}
代码解析
第一块:
利用@import设置文本字体为谷歌字体
第二块:*{}
目的是设置元素总宽度和总高度
其中 *{}表示class类选择器,class 选择器用于描述一组元素的样式,class 选择器有别于id选择器,class可以在多个元素中使用。
第三块:body{ }
目的设置body中字体、显示等属性
第四块:.container{ }
目的是用于固定宽度并支持响应式布局的容器,弹性盒子之类【这块我理解的不是很好】
第五块:.panel{ }
目的是设置每一个面板的背景、大小等属性
第六块:.panel h3{ }
目的是设置面板中标题3的样式。透明度级别
第七块:.panel.active{ }
目的设置样式
第八块:.panel.active h3{}
目的设置样式
第九块:@media (max-width:480px){ }
CSS @规则 可用于基于一个或多个 媒体查询 的结果来应用样式表的一部分。 使用它,您可以指定一个媒体查询和一个CSS块,当且仅当该媒体查询与正在使用其内容的设备匹配时,该CSS块才能应用于该文档。
nth-of-type伪类指定一个实际参数,这个参数使用一种模式来匹配哪些元素应该被选中。
小结:CSS部分设置出现在页面的每一个要素的属性。
四、HTML部分
<!DOCTYPE html>
<html lang="en">
<head>
    <meta charset="UTF-8">
    <meta http-equiv="X-UA-Compatible" content="IE=edge">
    <meta name="viewport" content="width=device-width, initial-scale=1.0">
    <link rel="stylesheet" href="style.css"/>
    <title>探索</title>
</head>
<body>
    <div class="container">
        <div class="panel active" style="background-image: url('https://images.unsplash.com/photo-1558979158-65a1eaa08691?ixlib=rb-1.2.1&ixid=eyJhcHBfaWQiOjEyMDd9&auto=format&fit=crop&w=1350&q=80');">
            <h3>Explore The World</h3>
        </div>
        <div class="panel" style="background-image: url('https://images.unsplash.com/photo-1572276596237-5db2c3e16c5d?ixlib=rb-1.2.1&ixid=eyJhcHBfaWQiOjEyMDd9&auto=format&fit=crop&w=1350&q=80')">
            <h3>Wild Forest</h3>
        </div>
        <div class="panel" style="background-image: url('https://images.unsplash.com/photo-1507525428034-b723cf961d3e?ixlib=rb-1.2.1&ixid=eyJhcHBfaWQiOjEyMDd9&auto=format&fit=crop&w=1353&q=80')">
            <h3>Sunny Beach</h3>
        </div>
        <div class="panel" style="background-image: url('https://images.unsplash.com/photo-1551009175-8a68da93d5f9?ixlib=rb-1.2.1&ixid=eyJhcHBfaWQiOjEyMDd9&auto=format&fit=crop&w=1351&q=80')">
            <h3>City on Winter</h3>
        </div>
        <div class="panel" style="background-image: url('https://images.unsplash.com/photo-1549880338-65ddcdfd017b?ixlib=rb-1.2.1&ixid=eyJhcHBfaWQiOjEyMDd9&auto=format&fit=crop&w=1350&q=80')">
            <h3>Mountains - Clouds</h3>
        </div>
    </div>
    <script src="script.js"></script>

</body>
</html>
代码解析
head部分引入css样式
body部分设置一个大标签,大标签内有5个小标签;
后期继续进行代码解析,加油!
转载请说明出处,谢谢!