1. 项目搭建
?
1.1 新建项目
- 创建项目
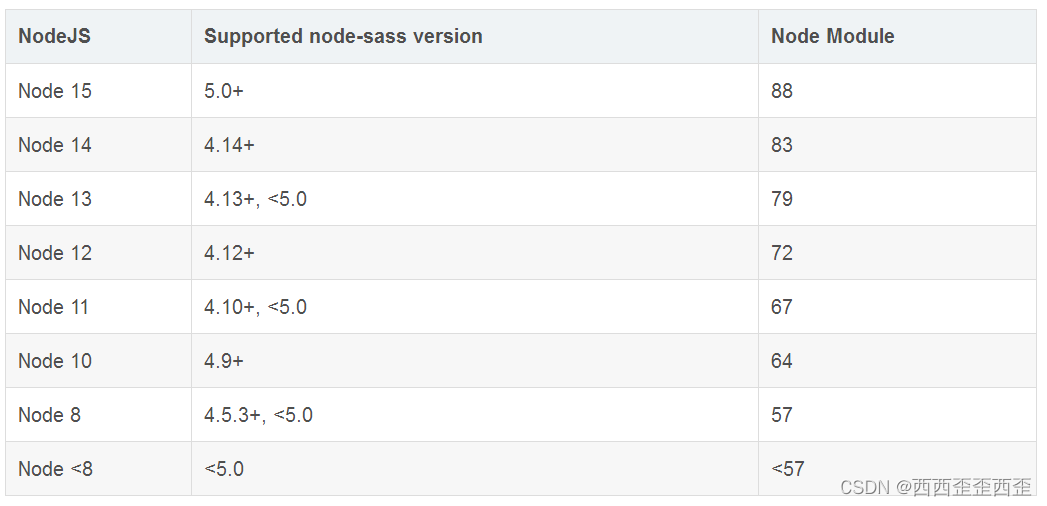
vue create -p dcloudio/uni-preset-vue dnpicture - 安装 sass依赖??
npm install sass-loader@7.3.1
npm install node-sass@4.14.1
node -v查看自己的node版本根据node和node-sass版本关系按照相应的sass依赖

-
运行项目并导入微信开发者工具
?npm run dev:mp-weixin
{
			"path": "pages/home/index",
			"style": {
				"navigationBarTitleText": "首页"
			}
		},
		{
			"path": "pages/horizontal/index",
			"style": {
				"navigationBarTitleText": "横屏"
			}
		},
		{
			"path": "pages/video/index",
			"style": {
				"navigationBarTitleText": "精美视频"
			}
		},
		{
			"path": "pages/search/index",
			"style": {
				"navigationBarTitleText": "搜索"
			}
		},
		{
			"path": "pages/mine/index",
			"style": {
				"navigationBarTitleText": "我的"
			}
		},
"tabBar": {
"color": "#8a8a8a",
"selectedColor": "#d4237a",
"backgroundColor": "#fff",
"position": "bottom",
"borderstyle": "black",
"list": [
{
"pagePath": "pages/home/index",
"text": "首页",
"iconPath": "./static/icon/1.png",
"selectedIconPath": "./static/icon/-1.png"
},
{
"pagePath": "pages/horizontal/index",
"text": "横屏",
"iconPath": "./static/icon/2.png",
"selectedIconPath": "./static/icon/-2.png"
},
{
"pagePath": "pages/video/index",
"text": "精美视频",
"iconPath": "./static/icon/3.png",
"selectedIconPath": "./static/icon/-3.png"
},
{
"pagePath": "pages/search/index",
"text": "搜索",
"iconPath": "./static/icon/4.png",
"selectedIconPath": "./static/icon/-4.png"
},
{
"pagePath": "pages/mine/index",
"text": "我的",
"iconPath": "./static/icon/5.png",
"selectedIconPath": "./static/icon/-5.png"
}
]
}1.2 引入字体图标
- 字体图标使用的是 iconfont
Iconfont-阿里巴巴矢量图标库:https://www.iconfont.cn
从 阿里巴巴矢量图标库 下载到本地的,但是uni-app不支持本地iconfont.css,报错
解决方案:从阿里巴巴矢量图标库 获取在线连接
然后复制代码粘贴到自己新建的iconfont.css文件里面
@font-face {
  font-family: "iconfont"; /* Project id 2973828 */
  src: url('https://at.alicdn.com/t/font_985780_km7mi63cihi.eot?t=1545807318834');
  src: url('https://at.alicdn.com/t/font_985780_km7mi63cihi.eot?t=1545807318834#iefix') format('embedded-opentype'),

}

.iconfont {
  font-family: "iconfont" !important;
  font-size: 16px;
  font-style: normal;
  -webkit-font-smoothing: antialiased;
  -moz-osx-font-smoothing: grayscale;
}

.icon-jiantou:before {
  content: "\e662";
}

.icon-search:before {
  content: "\e600";
}

.icon-shouye:before {
  content: "\e64f";
}

.icon-shipin:before {
  content: "\e644";
}

.icon-hengping:before {
  content: "\e671";
}

.icon-wode:before {
  content: "\e602";
}
在 App.vue中 全局引入
<style>
@import "./styles/iconfont.css";
</style>
在home/index.vue中使用
<template>
 <view class="iconfont icon-search"></view>
</template>
1.3 uni-ui
- ?uni-app官网
-
uni-ui 是 DCloud 提供的一个跨端 ui 库,它是基于vue组件的,flex布局的,无dom 的跨全端 ui 框架
-
uni-ui 不包括基础组件,它是基础组件的补充
-
数字角标,日历,卡片,折叠面板,倒计时,抽屉,悬浮按钮,收藏按钮,底部购物导航,宫格,图标,索引列表,加载更多,自定义导航栏,通告栏,数字输入框,分页器,弹出层,评分,搜索栏,分段器,步骤条,滑动操作,轮播图指示点,标签
2 uni-ui 使用
- 安装 uni-ui
npm install @dcloudio/uni-ui - 局部引入组件
- 注册组件
- 使用组件
?在 script 中引用组件:
<script>
import { uniBadge } from "@dcloudio/uni-ui";
export default {
  components: {
    uniBadge,
  }
</script>
在 template 中使用组件:
<template>
  <view
    >首页
    <view class="iconfont icon-jiantou"></view>
    <uni-badge text="1"></uni-badge>
    <uni-badge text="2" type="success"></uni-badge>
    <uni-badge text="3" type="primary" :inverted="true"></uni-badge>
  </view>
</template>
1.4 uni-api 介绍?
- https://uniapp.dcloud.io/api/README
- 原生的微信小程序的 api 都是不支持 promise(承诺)
- uni-app 对大部分的小程序的原生 api 做了封装。使之支持 promise
- 使用方法? ?
- ? ? ? ?原生微信小程序 wx.request
- ? ? ? ?uni-api 的方式 uni.request
- ? ? ? ?
<script>
export default {
  onLoad(){
	 // http://157.122.54.189:9088/image/v3/homepage/vertical
     // 1 原生的微信小程序的API
	 wx.request({
		 url:"http://157.122.54.189:9088/image/v3/homepage/vertical",
		 success(res){
			 console.log(res)
		 }
	 })
	 // 2 uni-app
	 uni.request({
		url:"http://157.122.54.189:9088/image/v3/homepage/vertical"
	 })
    .then(res=>{
		console.log(res)
	})
  }
}
</script>
2. 首页模块
2.1 功能分析
- 修改 导航栏的外观
- 使用 分段器组件 搭建子页面
- 封装自己的异步请求
2.2 搭建子页面
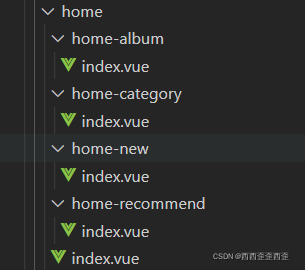
- 首页模块分为 4个部分,分别是 推荐,分类,最新,专辑
- 新建自定义组件来代替 上述的4个页面
- home-recommend(推荐)
- home-category(分类)
- home-new(最新)
- home-album(专辑)

?在home/index.vue中引入组件
<template>
  <view>
    <home-recommend></home-recommend>
    <home-category></home-category>
    <home-new></home-new>
    <home-album></home-album>
  </view>
</template>

<script>
import homeAlbum from "./home-album";
import homeCategory from "./home-category";
import homeNew from "./home-new";
import homeRecommend from "./home-recommend";

export default {
  components: {
    homeAlbum,
    homeCategory,
    homeNew,
    homeRecommend,
  }
}
</script>
2. 分段器介绍
分段器·指的是 uni-ui 中的一个组件,其实就是我们俗称的 标签页,tab页
uni-segmented-control 分段器 - DCloud 插件市场
? 在 script 中引用组件:
<script>
import { uniSegmentedControl } from "@dcloudio/uni-ui";

export default {
  components: {
    uniSegmentedControl,
  },
  data() {
    return {
      items: ["选项卡1","选项卡2","选项卡3"],
      current: 0,
    };
  },
  methods: {
    onClickItem(e) {
      if (this.current !== e.currentIndex) {
        this.current = e.currentIndex;
      }
    },
  },
}
</script>
? 在 template 中使用组件:
<template>
  <view>
      <uni-segmented-control
            :current="current"
            :values="items"
            @clickItem="onClickItem"
            style-type="button"
            active-color="#d4237a"
          ></uni-segmented-control>
      <view class="content">
        <view v-show="current === 0">
          选项卡1的内容
        </view>
        <view v-show="current === 1">
          选项卡2的内容
        </view>
        <view v-show="current === 2">
         选项卡3的内容
        </view>
     </view>
  </view>
</template>3.分段器样式优化?

调整后首页的代码
<template>
  <view>
    <view class="home_tab">
      <view class="home_tab_title">
        <view class="title_inner">
          <uni-segmented-control
            :current="current"
            :values="items.map((v) => v.title)"
            @clickItem="onClickItem"
            style-type="text"
            active-color="#d4237a"
          ></uni-segmented-control>
        </view>
        <view class="iconfont icon-search"></view>
      </view>
      <view class="home_tab_content">
        <view v-if="current === 0">
          <home-recommend></home-recommend>
        </view>
        <view v-if="current === 1">
          <home-category></home-category>
        </view>
        <view v-if="current === 2">
          <home-new></home-new>
        </view>
        <view v-if="current === 3">
          <home-album></home-album>
        </view>
      </view>
    </view>
  </view>
</template>

<script>
import homeAlbum from "./home-album";
import homeCategory from "./home-category";
import homeNew from "./home-new";
import homeRecommend from "./home-recommend";
import { uniSegmentedControl } from "@dcloudio/uni-ui";

export default {
  components: {
    homeAlbum,
    homeCategory,
    homeNew,
    homeRecommend,
    uniSegmentedControl,
  },
  data() {
    return {
      items: [
        { title: "推荐" },
        { title: "分类" },
        { title: "最新" },
        { title: "专辑" },
      ],
      current: 0,
    };
  },
  methods: {
    onClickItem(e) {
      if (this.current !== e.currentIndex) {
        this.current = e.currentIndex;
      }
    },
  },
};
</script>

<style lang="scss">
.home_tab {
  .home_tab_title {
    position: relative;
    .title_inner{
      width: 60%;
      margin: 0 auto;
    }
    .icon-search{
      position: absolute;
      top: 50%;
      transform: translateY(-50%);
      right: 5%;
    }
  }
}
</style>
? ? ? ? ? ? ??
2.3 封装自己的异步请求
- 原生的请求不支持 promise
- uni-api 的请求不够方便的添加 请求中 效果
- uni-api 的请求返回值是个数组,不方便
2.封装的思路
- 基于原生的 promise 来封装
- 挂载到 Vue 的原型上
- 通过 this.request 的方式来使用
在src中新建文件夹utils,在utils中新建文件request.js
//es6  promise  微信小程序的API的铺垫
export default (params)=>{

    //加载中
    uni.showLoading({
        title:"加载中"
    })
    // 函数调用返回Promise对象
    return new Promise((resolve,reject)=>{
        wx.request({
            ...params,  //形参params解构
            //请求成功返回一个值到resolve
            success(res){
                resolve(res.data)
            },
            //请求失败返回一个值到reject
            fail(err){
                reject(err)
            },
            complete(){
                uni.hideLoading()
            }
        })
    })
}?在main.js中
import request from "./utils/request";
Vue.prototype.request = request;返回首页在 script 中?
<script>
export default {
  onLoad(){

	this.request({
		url:"http://157.122.54.189:9088/image/v3/homepage/vertical"
	}).then(res=>{
		console.log(res);
	})
 }
}
</script>
3. 编写 首页-推荐 页面
3.1 功能介绍
-
接口文档
懂你找图--ShowDoc -
数据动态渲染
<template> <!-- 推荐开始 --> <view class="recommend_wrap"> <view class="recommend_item" v-for="item in recommends" :key="item.id"> <!-- mode图片高度自适应 --> <image mode="widthFix" :src="item.thumb"></image> </view> </view> <!-- 推荐结束 --> <!-- 月份开始 --> <view class="monthes_wrap"> <view class="monthes_title"> <view class="monthes_title_info"> <view class="monthes_info"> <text> {{ monthes.DD }} / </text> {{ monthes.MM }} 月 </view> <view class="monthes_text">{{ monthes.title }}</view> </view> <view class="monthes_title_more">更多 ></view> </view> <view class="monthes_content"> <view class="monthes_item" v-for="item in monthes.items" :key="item.id"> <image mode="aspectFill" :src="item.thumb + item.rule.replace('$<Height>', 360)" ></image> </view> </view> </view> <!-- 月份结束 --> </template> <script> // 引入moment import moment from "moment"; export default { // 定义数据 data() { return { //推荐列表 recommends: [], // 月份 monthes: {}, }, // mounted组件生命周期事件,表示组件挂载完毕 mounted() { this.request({ url: "http://157.122.54.189:9088/image/v3/homepage/vertical", data: { //要获取几条 limit: 30, //关键字 order: "hot", //要跳过几条 skip: 0, }, }).then((result) => { console.log(result); // 赋值拿到数据 推荐模块 this.recommends = result.res.homepage[1].items; // 赋值拿到数据 月份模块 this.monthes = result.res.homepage[2]; // 将时间戳改成18号/月 用到moment.js 按照代码npm install moment this.monthes.MM = moment(this.monthes.stime).format("MM"); this.monthes.DD = moment(this.monthes.stime).format("DD"); }); }, }; </script> <style lang="scss" scopd> .recommend_wrap { //flex布局 display: flex; flex-wrap: wrap; .recommend_item { width: 50%; border: 5rpx solid #fff; } } .monthes_wrap { .monthes_title { display: flex; justify-content: space-between; padding: 20rpx; .monthes_title_info { color: $color; font-size: 30rpx; font-weight: 600; display: flex; .monthes_info { text { font-size: 36rpx; } .monthes_text { font-size: 34rpx; color: #666; margin-left: 30rpx; } } .monthes_title_more { color: $color; font-size: 24rpx; } } .monthes_content { display: flex; flex-wrap: wrap; .monthes_item { width: 33.33%; border: 5rpx solid #fff; } } } } </style> -
moment.js 的使用(时间格式)
momentjs.cnnpm install moment在 script 中引用
<script> // 引入moment import moment from "moment"; this.monthes.MM = moment(this.monthes.stime).format("MM"); this.monthes.DD = moment(this.monthes.stime).format("DD"); </script> -
“热门” 列表的基于 scroll-view 的分页加载
<template>
     <!-- 热门开始 -->
    <view class="hots_wrap">
      <view class="hots_title">
        <text> 热门 </text>
      </view>
      <view class="hots_content">
        <view class="hots_item" v-for="item in hots" :key="item.id">
          <image mode="widthFix" :src="item.thumb"></image>
        </view>
      </view>
    </view>
    <!-- 热门结束 -->
</template>


<style lang="scss" scopd>
.hots_wrap {
  .hots_title {
    padding: 20rpx;
    text {
      border-left: 20rpx solid $color;
      font-size: 34rpx;
      font-weight: 600;
      padding-left: 20rpx;
    }
  }

  .hots_content {
    display: flex;
    flex-wrap: wrap;
    .hots_item {
      width: 33.33%;
      border: 5rpx solid #fff;
    }
  }
}
</style>
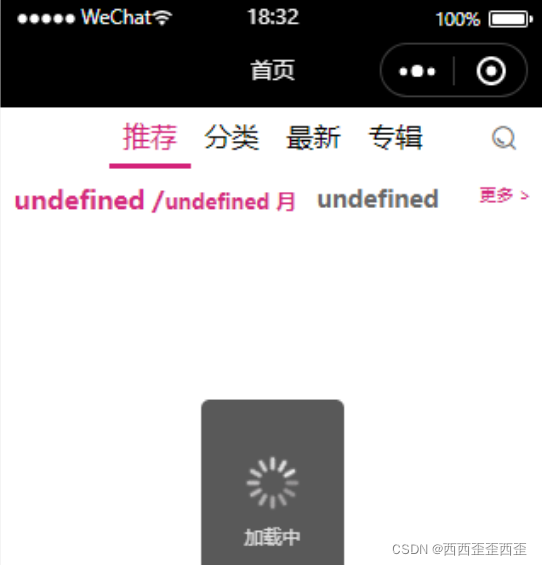
3.2 解决一闪而过的问题
在最外层view加个判断条件,当长度大于零的时候才显示里面的标签
<template>
<view v-if="recommends.length > 0>

</template>
3.3 分页功能分析
- 使用 scroll-view 标签充当分页的容器
<template> <!-- scroll-view标签充当分页的容器 --> <scroll-view class="recommend_view" scroll-y> </scroll-view> </template> <style lang="scss" scopd> .recommend_view { // height= 屏幕的高度(不能写死) - 头部标题的高度 height: calc(100vh - 36px); } </style> - 绑定滚动条触底事件 scrolltolower
<template> <! scrolltolower绑定触底事件 --> <view @scrolltolower="handleToLower"> <view> </template> <script> export default { methods: { handleToLower() { console.log(大帅哥) } } } </script> - 实现分页逻辑
<script>
// 引入moment
import moment from "moment";
export default {
  // 定义数据
  data() {
    return {
      //推荐列表
      recommends: [],
      // 月份
      monthes: {},
      // 热门
      hots: [],
      // 请求参数
      params: {
        //要获取几条
        limit: 30,
        //关键字
        order: "hot",
        //要跳过几条
        skip: 0,
      },
      // 是否还有下一页
      hasMore: true,
    };
  },
  // mounted组件生命周期事件,表示组件挂载完毕
  mounted() {
    this.getList();
  },
  methods: {
    // 获取接口数据
    getList() {
      this.request({
        url: "http://157.122.54.189:9088/image/v3/homepage/vertical",
        data: this.params,
      }).then((result) => {
        // console.log(result);

        // 判断是否还有下一页数据
        if (result.res.vertical.length === 0) {
          this.hasMore = false;
          return;
        }

        // 第一次发送的请求
        if (this.recommends.length === 0) {
          // 赋值拿到数据 推荐模块
          this.recommends = result.res.homepage[1].items;
          // 赋值拿到数据 月份模块
          this.monthes = result.res.homepage[2];
          // 将时间戳改成18号/月 用到moment.js  按照代码npm install moment
          this.monthes.MM = moment(this.monthes.stime).format("MM");
          this.monthes.DD = moment(this.monthes.stime).format("DD");
        }
        // 赋值获取热门数据的列表
        // 数组拼接 es6   (为下面第三步)
        this.hots = [...this.hots, ...result.res.vertical];
      });
    },
    // 滚动条触底事件
    handleToLower() {
      /*  1 修改参数 skip+=limit
          2 重新发送请求 getList()
          3 请求回来成功 hots 数据的叠加
      */
      if (this.hasMore) {
        this.params.skip += this.params.limit;
        this.getList();
      } else {
        // 弹窗提示用户
        uni.showToast({
          title: "没有数据了",
          icon: "none",
        });
      }
    },
  },
};
</script>
首页-推荐 页面:
<template>
  <!-- scroll-view标签充当分页的容器 scrolltolower绑定触底事件 -->
  <scroll-view
    @scrolltolower="handleToLower"
    class="recommend_view"
    scroll-y
    v-if="recommends.length > 0"
  >
    <!-- 推荐开始 -->
    <view class="recommend_wrap">
      <view class="recommend_item" v-for="item in recommends" :key="item.id">
        <!-- mode图片高度自适应 -->
        <image mode="widthFix" :src="item.thumb"></image>
      </view>
    </view>
    <!-- 推荐结束 -->

    <!-- 月份开始 -->
    <view class="monthes_wrap">
      <view class="monthes_title">
        <view class="monthes_title_info">
          <view class="monthes_info">
            <text> {{ monthes.DD }} / </text>
            {{ monthes.MM }} 月
          </view>
          <view class="monthes_text">{{ monthes.title }}</view>
        </view>
        <view class="monthes_title_more">更多 ></view>
      </view>
      <view class="monthes_content">
        <view class="monthes_item" v-for="item in monthes.items" :key="item.id">
          <image
            mode="aspectFill"
            :src="item.thumb + item.rule.replace('$<Height>', 360)"
          ></image>
        </view>
      </view>
    </view>
    <!-- 月份结束 -->

    <!-- 热门开始 -->
    <view class="hots_wrap">
      <view class="hots_title">
        <text> 热门 </text>
      </view>
      <view class="hots_content">
        <view class="hots_item" v-for="item in hots" :key="item.id">
          <image mode="widthFix" :src="item.thumb"></image>
        </view>
      </view>
    </view>
    <!-- 热门结束 -->
  </scroll-view>
</template>

<script>
// 引入moment
import moment from "moment";
export default {
  // 定义数据
  data() {
    return {
      //推荐列表
      recommends: [],
      // 月份
      monthes: {},
      // 热门
      hots: [],
      // 请求参数
      params: {
        //要获取几条
        limit: 30,
        //关键字
        order: "hot",
        //要跳过几条
        skip: 0,
      },
      // 是否还有下一页
      hasMore: true,
    };
  },
  // mounted组件生命周期事件,表示组件挂载完毕
  mounted() {
    this.getList();
  },
  methods: {
    // 获取接口数据
    getList() {
      this.request({
        url: "http://157.122.54.189:9088/image/v3/homepage/vertical",
        data: this.params,
      }).then((result) => {
        // console.log(result);

        // 判断是否还有下一页数据
        if (result.res.vertical.length === 0) {
          this.hasMore = false;
          return;
        }

        // 第一次发送的请求
        if (this.recommends.length === 0) {
          // 赋值拿到数据 推荐模块
          this.recommends = result.res.homepage[1].items;
          // 赋值拿到数据 月份模块
          this.monthes = result.res.homepage[2];
          // 将时间戳改成18号/月 用到moment.js  按照代码npm install moment
          this.monthes.MM = moment(this.monthes.stime).format("MM");
          this.monthes.DD = moment(this.monthes.stime).format("DD");
        }
        // 赋值获取热门数据的列表
        // 数组拼接 es6   (为下面第三步)
        this.hots = [...this.hots, ...result.res.vertical];
      });
    },
    // 滚动条触底事件
    handleToLower() {
      /*  1 修改参数 skip+=limit
          2 重新发送请求 getList()
          3 请求回来成功 hots 数据的叠加
      */
      if (this.hasMore) {
        this.params.skip += this.params.limit;
        this.getList();
      } else {
        // 弹窗提示用户
        uni.showToast({
          title: "没有数据了",
          icon: "none",
        });
      }
    },
  },
};
</script>

<style lang="scss" scopd>
.recommend_view {
  // height= 屏幕的高度(不能写死) - 头部标题的高度
  height: calc(100vh - 36px);
}
.recommend_wrap {
  //flex布局
  display: flex;
  flex-wrap: wrap;
  .recommend_item {
    width: 50%;
    border: 5rpx solid #fff;
  }
}
.monthes_wrap {
  .monthes_title {
    display: flex;
    justify-content: space-between;
    padding: 20rpx;
    .monthes_title_info {
      color: $color;
      font-size: 30rpx;
      font-weight: 600;
      display: flex;
      .monthes_info {
        text {
          font-size: 36rpx;
        }

        .monthes_text {
          font-size: 34rpx;
          color: #666;
          margin-left: 30rpx;
        }
      }

      .monthes_title_more {
        color: $color;
        font-size: 24rpx;
      }
    }

    .monthes_content {
      display: flex;
      flex-wrap: wrap;
      .monthes_item {
        width: 33.33%;
        border: 5rpx solid #fff;
      }
    }
  }
}
.hots_wrap {
  .hots_title {
    padding: 20rpx;
    text {
      border-left: 20rpx solid $color;
      font-size: 34rpx;
      font-weight: 600;
      padding-left: 20rpx;
    }
  }

  .hots_content {
    display: flex;
    flex-wrap: wrap;
    .hots_item {
      width: 33.33%;
      border: 5rpx solid #fff;
    }
  }
}
</style>
?

