目录
注:
- ?routes的写错,会导致后续link-view无法渲染内容 。非routers!!!? (参考:vue-router 中router-view不能渲染)
- 使用?this.$router.push('/home')?时,会出现报错:‘Avoided redundant navigation to current location’。解决方案参考《?vue-router 路由重复点击报错?》
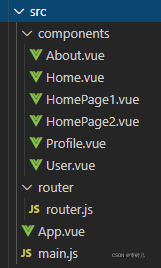
(一)src文件夹下的文件结构

(1)router文件夹-router.js
????????src文件夹-->新建router文件夹-->新建router.js文件(可将在创建vueCli项目后,自动生成的router.js删除)。
// 0.导入Router
import Router from 'vue-router'
import Vue from 'vue'
//*************************路由正常写法******************************************
// 导入组件components下的不同vue文件,即不同的页面
//import Home from '../components/Home'
//import About from '../components/About'
//import User from '../components/User'
//*************************路由懒加载写法:避免打包后的app.js文件太大******************************************
// 1个路由懒加载,打包后,在js文件夹下会生成1个js文件。只有路由被访问时,才会加载对应的js文件。
const Home= () => import('../components/Home')
const HomePage1= () => import('../components/HomePage1')  //Home页面的子页面1
const HomePage2= () => import('../components/HomePage2')  //Home页面的子页面2
const About= () => import('../components/About')
const User= () => import('../components/User')

// 1.安装Router插件。通过Vue.use(插件)
Vue.use(Router)
// 2.配置路由和组件之间的应用关系。
const routes=[  //注意:是routes,非routers。
  {
    // 保证网页默认打开首页
    path: '',
    redirect:'/home',
  },
  {
    path: '/home',
    component: Home,
    // component:()=>import('../components/Home') , //不推荐写法
    meta: {
      title:'首页',
    },
    children: [
      {
        path: '',
        redirect:'page1' ,
      },
      {
        path: 'page1',
        component: HomePage1,
      },
      {
        path: 'page2',
        component: HomePage2,
      },
    ]

  }, {
    path: '/about',
    component: About,
    meta: {
      title:'关于',
    },
  }, {
    path: '/user/:userid', //userid是自定义的。符号:不能省略。
    component: User,
    meta: {
      title:'用户',
    },
  }, {
    path: '/profile',
    component: Profile,
    meta: {
      title:'档案',
    },
    beforeEnter:(to,from,next)=> {
      console.log('档案界面'); //局部路由监测
    }
  }
]
//3.新建Router对象,并命名为router。
const router = new Router({
  routes,
  linkExactActiveClass:'ExactActive', //修改自动生成的类名称——router-link-exact-active
  linkActiveClass:'Active', //修改自动生成的类名称——router-link-active
  mode:'history',  //html5的history模式.能够将网址上的#去掉
});

// 4.将router对象传入到Vue实例
export default router;

//*****************其他功能****************************8
// 全局导航守卫监测
router.beforeEach((to, from, next) => {
  document.title = to.matched[0].meta.title;
  next(); //不能省略
});
// 后置钩子(hook)
router.afterEach((to,from) => {
  //不需要next()
});

// 避免多次push导致router重复
const originalPush = Router.prototype.push
Router.prototype.push = function push(location) {
   return originalPush.call(this, location).catch(err => err)
}
(2)App.vue文件
????????在src文件夹下--> App.vue文件中使用。
<template>
  <div id="app">
    <!-- router-link标签,默认是a标签 -->
    <!-- <router-link to="/home">首页</router-link> -->
    <!-- replace属性无效,不知道为什么 -->
     <!-- <router-link to="/home" tag="button" replace>首页</router-link> -->
    <!-- <router-link to="/home" tag="button">首页</router-link>
    <router-link to="/about" tag="button">关于</router-link> -->

    <!-- ***************************************************************** -->

    <!-- 普通组件方法 -->
    <button @click="homeClick">首页</button>
    <button  @click="aboutClick">关于</button>

     <!-- 动态路由 -->
    <router-link :to="'/user/'+userId">用户</router-link>

    <!-- 保证子页面内容的呈现 -->
    <router-view></router-view>
  </div>
</template>
<script>
// 导出
export default {
  name:'App',
  data(){
     return{
       userId:'张三',
     }
  },
  methods:{
    homeClick(){
       this.$router.push('/home')
    },
    aboutClick(){
      this.$router.push('/about')
    },
  }
}
</script>

<style>

button:hover{
   cursor: pointer;
}

/*router-link-active类名的重新定义*/
.Active{
  color:#fff;
  background-color:transparent;
  border:1px solid black;

}

/*router-link-exact-active类名的重新定义*/
.ExactActive{
  background-color:royalblue;

}
</style>
(3)main.js文件
????????在src文件夹下--> main.js文件中使用。
import Vue from 'vue'
import App from './App.vue'
import router from './router/router.js'

Vue.config.productionTip = false

new Vue({
  router, //使用router
  render: h => h(App)  //网页打开后,首先会渲染App.vue文件的原因!!!
}).$mount('#app')
(4)components文件夹下的文件
????????1. Home.vue文件
????????在src文件夹下--> components文件夹-->Home.vue文件。
<template>
    <div id="home">
        <div>我是首页</div>
        <div>我是首页内容,哈哈哈</div>

        <router-link to="/home/page1">子页面1</router-link>
        <router-link to="/home/page2">子页面2</router-link>

         <!-- 保证子页面的内容呈现 -->
        <router-view></router-view>
    </div>
</template>
<script>
// 导出
export default {
    name:'Home',
}
</script>
<style scoped>

</style>
????????2. HomePage1.vue文件
????????在src文件夹下--> components文件夹-->HomePage1.vue文件。
<template>
    <div id="homePage1">
        <ul>
            <li>子页面1的内容1</li>
            <li>子页面1的内容2</li>
            <li>子页面1的内容3</li>
            <li>子页面1的内容4</li>
        </ul>
    </div>
</template>
<script>
// 导出
export default {
    name:'HomePage1',
}
</script>
<style scoped>

</style>
????????3. HomePage2.vue文件
?????????在src文件夹下--> components文件夹-->HomePage2.vue文件。
<template>
    <div id="homePage2">
        <ul>
            <li>子页面2的内容1</li>
            <li>子页面2的内容2</li>
            <li>子页面2的内容3</li>
            <li>子页面2的内容4</li>
        </ul>
    </div>
</template>
<script>
// 导出
export default {
    name:'HomePage2',
}
</script>
<style scoped>

</style>
????????4.? About.vue文件
????????在src文件夹下--> components文件夹-->About.vue文件。
<template>
    <div id="about">
        <div>我是关于</div>
        <div>我是关于内容,哈哈哈</div>
    </div>
</template>
<script>
export default {
    name:'About',
}
</script>
<style scoped>

</style>
????????5. User.vue文件
?????????在src文件夹下--> components文件夹-->User.vue文件。
<template>
    <div id="user">
        <div>我是用户</div>
        <div>{{userName}}</div>
    </div>
</template>
<script>
// 导出
export default {
    name:'User',
    computed:{
        userName(){
            console.log(this); //测试
            return this.$route.params.abc; //保持与router.js文件中自定义的变量abc一致
        }
    }
}
</script>
<style scoped>

</style>
(二)路由懒加载
- 路由懒加载写法:避免打包后的app.xxxx.js文件太大。
- 1个路由懒加载,打包后,在js文件夹下会生成1个js文件。
- 只有路由被访问时,才会加载对应的js文件,提高页面访问效率。
