一、Element Plus
1. 基础配置
// 安装
$ npm install element-plus --save
2. 全局引用:
新建 src / plugins / elementPlus.ts 文件:
import ElementPlus from 'element-plus'
import 'element-plus/dist/index.css'
import { App } from 'vue'

export default {
  install (app: App) {
    app.use(ElementPlus)
  }
}
编辑 src / main.js 文件:
import elementPlus from './plugins/element-plus'

createApp(App)
...
  .use(elementPlus, { size: 'small', zIndex: 2000 })
3. 汉化(国际化):
新建 src / index.vue 文件:
<template>
  <!-- 汉化 -->
  <el-config-provider :locale="locale">
    <!-- 路由渲染出口 -->
    <router-view />
  </el-config-provider>
</template>

<script lang="ts" setup>
import locale from 'element-plus/lib/locale/lang/zh-cn'
</script>
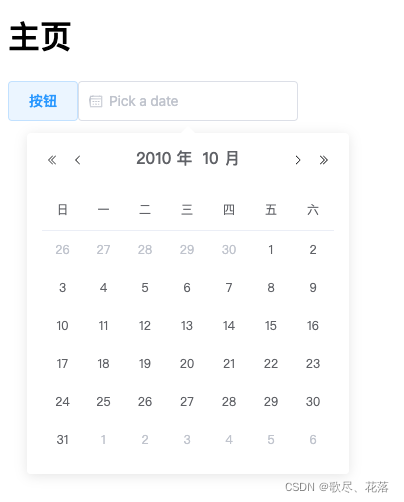
4. 页面展示:
新建 src / views / home / index.vue 文件:
<template>
  <h1>主页</h1>
  <el-button>按钮</el-button>
  <el-date-picker
    v-model="value1"
    type="date"
    placeholder="Pick a date"
    :default-value="new Date(2010, 9, 1)"
  />
</template>

<script lang="ts" setup>
const value1 = ''
</script>

<style lang="scss" scoped>
</style>

二、Layout 布局
1. layout 组件
新建 src / layout / AppLayout.vue 文件:
<template>
  <el-container>
    <el-aside width="200px">
      Aside
    </el-aside>
    <el-container>
      <el-header>Header</el-header>
      <el-main>Main</el-main>
    </el-container>
  </el-container>
</template>

<script lang="ts" setup></script>
<style lang="scss" scoped>
.el-header,
.el-footer {
  background-color: #b3c0d1;
  color: var(--el-text-color-primary);
  text-align: center;
  line-height: 60px;
}

.el-aside {
  background-color: #d3dce6;
  color: var(--el-text-color-primary);
  text-align: center;
  line-height: 200px;
}

.el-main {
  background-color: #e9eef3;
  color: var(--el-text-color-primary);
  text-align: center;
  line-height: 160px;
}

.el-container {
  height: 100vh;
}
</style>
2. 路由配置
编辑 src / router / index.ts 文件:
...
const routes: RouteRecordRaw[] = [
  {
    path: '/',
    component: AppLayout,
    children: [
      {
        path: '', // 默认子路由
        name: 'home',
        component: () => import('../views/home/index.vue')
      }
    ]
  },
  {
    path: '/login',
    name: 'login',
    component: () => import('../views/login/index.vue')
...
3. 样式优化
编辑 src / styles / common.scss 文件:
* {
  margin: 0;
  padding: 0;
}
4. 页面展示

三. NavMenu 菜单导航
Vue3 + elementPlus 好像是存在未解决问题
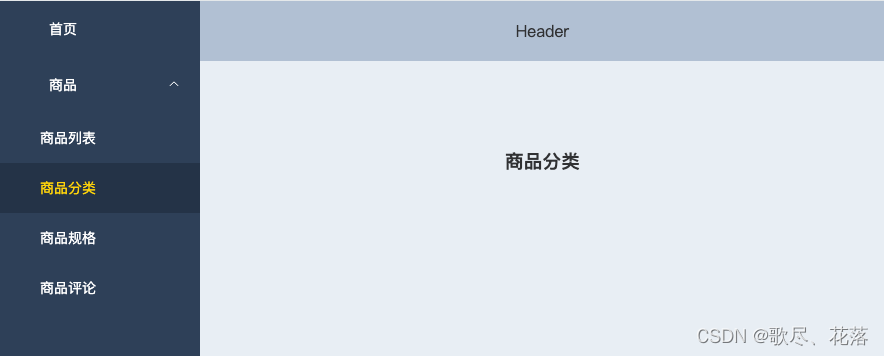
1. 菜单样式
2. 侧边栏组件
新建 src / layout / components / AppMenu 文件:
<template>
  <el-menu
    active-text-color="#ffd04b"
    background-color="#304156"
    class="el-menu-vertical-demo"
    default-active="2"
    text-color="#fff"
    router
  >
    <el-menu-item index="/">
      <el-icon><icon-menu /></el-icon>
      <span>首页</span>
    </el-menu-item>
    <el-sub-menu index="1">
      <template #title>
        <el-icon><location /></el-icon>
        商品
      </template>
      <el-menu-item index="/product/product_list">
        商品列表
      </el-menu-item>
      <el-menu-item index="/product/product_classify">
        商品分类
      </el-menu-item>
      <el-menu-item index="/product/product_attr">
        商品规格
      </el-menu-item>
      <el-menu-item index="/product/product_reply">
        商品评论
      </el-menu-item>
    </el-sub-menu>
  </el-menu>
</template>

<script lang="ts" setup>
</script>

<style lang="scss" scoped>
.el-menu {
  border-right: none;
}

.el-menu:not(.el-menu--collapse) {
  width: 200px;
  min-height: 400px;
}

::-webkit-scrollbar {
  display: none;
}
</style>
编辑 src / layout / AppLayout 文件:
...
.el-aside {
  background-color: #304156;
3. 新增文件
新建 src / views / product / attr / index.vue 文件:
<template>
  <h1>商品规格</h1>
</template>

<script lang="ts" setup>
</script>

<style lang="scss" scoped></style>
新建 src / views / product / reply / index.vue 文件:
<template>
  <h1>商品评价</h1>
</template>

<script lang="ts" setup>
</script>

<style lang="scss" scoped></style>
新建 src / views / product / classify / index.vue 文件:
<template>
  <h1>商品分类</h1>
</template>

<script lang="ts" setup>
</script>

<style lang="scss" scoped></style>
新建 src / views / product / list / index.vue 文件:
<template>
  <h1>商品列表</h1>
</template>

<script lang="ts" setup>
</script>

<style lang="scss" scoped></style>
4. 配置路由
新建 src / router / modules / product 文件:
import { RouteRecordRaw, RouterView } from 'vue-router'

const routes: RouteRecordRaw = {
  path: 'product',
  component: RouterView,
  meta: {
    title: '商品'
  },
  children: [
    {
      path: 'product_list',
      name: 'product-list',
      component: () => import('@/views/product/list/index.vue'),
      meta: { // 自定义路由元数据
        title: '商品列表'
      }
    },
    {
      path: 'add_product',
      name: 'product-add',
      component: () => import('@/views/product/add/index.vue'),
      meta: {
        title: '添加商品'
      }
    },
    {
      path: 'product_attr',
      name: 'product-attr',
      component: () => import('@/views/product/attr/index.vue'),
      meta: {
        title: '商品规格'
      }
    },
    {
      path: 'product_classify',
      name: 'product-classify',
      component: () => import('@/views/product/classify/index.vue'),
      meta: {
        title: '商品分类'
      }
    },
    {
      path: 'product_reply',
      name: 'product-reply',
      component: () => import('@/views/product/reply/index.vue'),
      meta: {
        title: '商品评论'
      }
    }
  ]
}

export default routes
编辑 src / router / index.ts 文件:
...
import productRouter from './modules/product'

const routes: RouteRecordRaw[] = [
  {
    path: '/',
    component: AppLayout,
    children: [
      {
        path: '', // 默认子路由
        name: 'home',
        component: () => import('../views/home/index.vue')
      },
      productRouter
    ]
  },
  {
    path: '/login',
...
5. 页面样式

四. 侧边栏展开收起
1. 全局变量 vuex
编辑 src / store / index.ts文件:
import { createStore, Store, useStore as baseUseStore } from 'vuex'
import { InjectionKey } from 'vue'

export interface State {
  count: number
  isCollapse: boolean
}

// 定义 injection key
export const key: InjectionKey<Store<State>> = Symbol('store')

// 创建一个新的 store 实例
export const store = createStore<State>({
  state () {
    return {
      count: 0,
      isCollapse: false
    }
  },
  mutations: {
    setIsCollapse (state, payload) {
      state.isCollapse = payload
    }
  }
})

// 定义自己的 `useStore` 组合式函数
export function useStore () {
  return baseUseStore(key)
}
2. 侧栏组件
编辑 src / layout / components / AppMenu / index.vue 文件:
<template>
  <el-menu
    active-text-color="#ffd04b"
    background-color="#304156"
    class="el-menu-vertical-demo"
    default-active="2"
    text-color="#fff"
    :collapse="$store.state.isCollapse"
    router
  >
    <el-menu-item index="/">
      <el-icon><home-filled /></el-icon>
      <span>首页</span>
    </el-menu-item>
    <el-sub-menu index="1">
      <template #title>
        <el-icon><goods-filled /></el-icon>
        <span>商品</span>
      </template>
      <el-menu-item index="/product/product_list">
        <i class="el-icon-menu" />
        <span>商品列表</span>
      </el-menu-item>
      <el-menu-item index="/product/product_classify">
        <el-icon><remove-filled /></el-icon>
        <span>商品分类</span>
      </el-menu-item>
      <el-menu-item index="/product/product_attr">
        <el-icon><avatar /></el-icon>
        <span>商品规格</span>
      </el-menu-item>
      <el-menu-item index="/product/product_reply">
        <el-icon><brush-filled /></el-icon>
        <span>商品评论</span>
      </el-menu-item>
    </el-sub-menu>
  </el-menu>
</template>

<script lang="ts" setup>
import { HomeFilled, GoodsFilled } from '@element-plus/icons-vue'
// import { ref } from 'vue'

// const isCollapse = ref(false)
</script>

<style lang="scss" scoped>
.el-menu {
  border-right: none;
}

.el-menu:not(.el-menu--collapse) {
  width: 200px;
  min-height: 400px;
}
</style>
3. 头部组件
新建 src / layout / components / AppHeader / index.vue 文件:
<template>
  <el-icon
    @click="$store.commit('setIsCollapse', false)"
    v-show="$store.state.isCollapse"
    style="cursor: pointer;"
  >
    <expand />
  </el-icon>
  <el-icon
    @click="$store.commit('setIsCollapse', true)"
    v-show="!$store.state.isCollapse"
    style="cursor: pointer;"
  >
    <fold />
  </el-icon>
  <h1>header1</h1>
</template>
<script lang="ts" setup>
import { Fold, Expand } from '@element-plus/icons-vue'
</script>
<style lang="scss" scoped></style>
4. Layout 布局
新建 src / layout / AppLayout.vue 文件:
<template>
  <el-container>
    <el-aside>
      <AppMenu />
    </el-aside>
    <el-container>
      <el-header>
        <AppHeader />
      </el-header>
      <el-main>
        <router-view />
      </el-main>
    </el-container>
  </el-container>
</template>

<script lang="ts" setup>
import AppMenu from './components/AppMenu/index.vue'
import AppHeader from './components/AppHeader/index.vue'
</script>

<style lang="scss" scoped>
.el-header{
  background-color: #b3c0d1;
  color: #333;
  display: flex;
  justify-content: space-between;
  align-items: center;
}

.el-aside {
  width: auto;
  background-color: #304156;
  color: #333;
}

.el-main {
  background-color: #e9eef3;
  color: #333;
}

.el-container {
  height: 100vh;
}
</style>
5. 页面样式

五. 面包屑导航条
1. 面包屑导航组件
新建 src / layout / AppHeader /Breadcrumb.vue 文件:
<template>
  <el-breadcrumb :separator-icon="ArrowRight">
    <el-breadcrumb-item
      v-for="item in routes"
      :key="item.path"
    >
      {{ item.meta.title }}
      <i class="el-icon-edit" />
    </el-breadcrumb-item>
  </el-breadcrumb>
</template>

<script lang="ts" setup>
import { computed } from 'vue'
import { useRouter } from 'vue-router'
import { ArrowRight } from '@element-plus/icons-vue'

const router = useRouter()
console.log(router.currentRoute.value.matched)

const routes = computed(() => {
  return router.currentRoute.value.matched.filter(item => item.meta.title)
})
</script>

<style lang="scss" scoped></style>
2. 自定义路由元数据
新建 src / router / modules /product.ts 文件:
import { RouteRecordRaw, RouterView } from 'vue-router'

const routes: RouteRecordRaw = {
  path: 'product',
  component: RouterView,
  meta: {
    title: '商品'
  },
  children: [
    {
      path: 'product_list',
      name: 'product-list',
      component: () => import('@/views/product/list/index.vue'),
      meta: { // 自定义路由元数据
        title: '商品列表'
      }
    },
    {
      path: 'product_attr',
      name: 'product-attr',
      component: () => import('@/views/product/attr/index.vue'),
      meta: {
        title: '商品规格'
      }
    },
    {
      path: 'product_classify',
      name: 'product-classify',
      component: () => import('@/views/product/classify/index.vue'),
      meta: {
        title: '商品分类'
      }
    },
    {
      path: 'product_reply',
      name: 'product-reply',
      component: () => import('@/views/product/reply/index.vue'),
      meta: {
        title: '商品评论'
      }
    }
  ]
}

export default routes
编辑 src / router / index.ts 文件:
...
        name: 'home',
        component: () => import('../views/home/index.vue'),
        meta: { title: '首页' }
      },
3. 页面样式

4. TS 类型补充
新建 src / router.d.ts 文件:
import 'vue-router'

declare module 'vue-router' {
  // eslint-disable-next-line no-unused-vars
  interface RouteMeta {
    title: string
  }
}
效果:

六. 全屏
1. 全屏组件
新建 src / layout / AppHeader / components / FullScreen.vue 文件
<template>
  <el-icon
    @click="toggleFullScreen"
    style="cursor: pointer;"
  >
    <full-screen />
  </el-icon>
</template>

<script lang="ts" setup>
import { FullScreen } from '@element-plus/icons-vue'

const toggleFullScreen = () => {
  if (!document.fullscreenElement) {
    document.documentElement.requestFullscreen()
  } else {
    if (document.exitFullscreen) {
      document.exitFullscreen()
    }
  }
}
</script>

<style lang="scss" scoped></style>
2. 头部组件
<template>
  <el-space>
    <ToggleSidebar />
    <BreadcrumbVue />
  </el-space>
  <el-space>
    <FullScreen />
    <h1>header1</h1>
  </el-space>
</template>
<script lang="ts" setup>
import ToggleSidebar from './components/ToggleSidebar.vue'
import BreadcrumbVue from './components/Breadcrumb.vue'

import FullScreen from './components/FullScreen.vue'
</script>
<style lang="scss" scoped></style>
3. 浏览器样式

七. 页面加载进度条
1. 进度条组件
// 安装
$ npm install --save nprogress
// ts 类型补充
$ npm i --save-dev @types/nprogress
2. 路由配置
新建 src / router / index.vue 文件
...
import nprogress from 'nprogress'
import 'nprogress/nprogress.css'

...
// 全局前置守卫
router.beforeEach(() => {
  nprogress.start() // 开始加载进度条
})

// 全局后置守卫
router.afterEach(() => {
  nprogress.done() // 结束进度条
})

export default router
3. 页面样式

