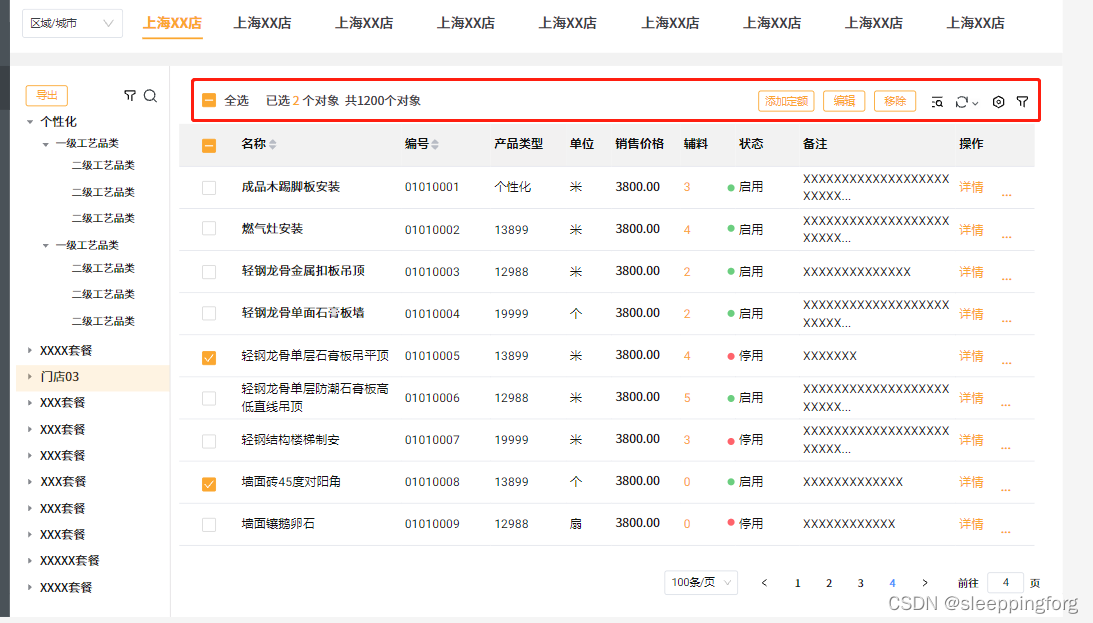
react中最重要的两个概念:props和state。props代表的是父组件传递过来的数据。而state则代表组件内部的状态。我们要实现slot的结构。就只能依靠props了。在react中,传递props的时候。我们除了可以传递正常的数据外。还可以把jsx作为一个数据给传递过去。这样,我们就可以定制组件内部的slot结构。我们先看一个截图:

 ?
?
?仔细看。会发现这两个表格只有右侧的操作按钮不同。其他数据和交互基本上一样。我们不需要重写这样相同的逻辑。所以打算把这个表格封装一下。在需要展示右侧操作按钮的时候,传递过去。不需要右侧的操作按钮的时候不展示。我们看看代码:
首先我们封装这个表格:
import {useState} from "react"
import {Button,Table,Space,Row,Col,Checkbox } from "antd"

function QuotaTable(props){
    let {columns,dataSource,renderTitleRtConts=<span></span>}=props
    // renderTitleRtConts 头部右侧操作内容
    console.log("renderTitleRtConts:",renderTitleRtConts)

    const [selectedRowKeys,setSelectedRowKeys]=useState([])
    const [isCheckeAll,setIsCheckeAll]=useState(false)


    const selectAll=(e)=>{
        if(e.target.checked){
          let keys=[];
          dataSource.forEach(i=>keys.push(i.key))
          setSelectedRowKeys(keys)
        }else{
          setSelectedRowKeys([])
        }
        setIsCheckeAll(e.target.checked)
      }
      const rowSelection = {
        onChange: (selectedRowKeys, selectedRows) => {
          console.log("selectedRowKeys:",selectedRowKeys)
          if(selectedRowKeys.length===dataSource.length){
            setSelectedRowKeys(selectedRowKeys)
            setIsCheckeAll(true)
          }else{
            setSelectedRowKeys(selectedRowKeys)
            setIsCheckeAll(false)
          }
        },
        selectedRowKeys,
        getCheckboxProps: (record) => ({
          disabled: record.name === 'Disabled User',
          name: record.name,
        }),
      };

    return(
        <div>
            <Table
                title={(data) =>
                <div className="table-title">
                    <Row>
                        <Col span={12}>
                            <Checkbox onChange={(e)=>selectAll(e)} checked={isCheckeAll}>全选</Checkbox>
                            已选<span className="num">{selectedRowKeys.length}</span>个对象,共1200个对象
                        </Col>
                        <Col span={12} >
                            <div className="table-title-rt">{renderTitleRtConts}</div>
                        </Col>
                    </Row>
                </div>
            }
            hideSelectAll={true}
            rowSelection={rowSelection}
            columns={columns}
            dataSource={dataSource}
            >
            </Table>
        </div>
    )
 }
export default QuotaTable
然后我们看如下两个用到这个表格的地方是如何使用的:
页面A:
//页面A里用到封装的表格。注意renderTitleRtConts把jsx传递过去

 const remove=()=>{

      Modal.confirm({
        title:"确定移除定额?",
        width:520,
        content:<p>移除定额仅取消本门店的定额数据,不影响基础定额以及分配的其他门店,确认移除吗?</p>,
        okText:"确定",
        cancelText:"取消",
        onCancel:()=>{

        },
        onOK:()=>{

        }
      })
  }

  //添加定额
  const addQuota=()=>{
    console.log("shopQuotaRef.current:",shopQuotaRef.current)
    shopQuotaRef.current.showModelRef(true)
  }
  const editQuota=()=>{
    console.log("编辑定额")
  }


<Tabs defaultActiveKey="1" size="large">
                {
                    combo.map(item=>
                        ( <TabPane tab={item.name} key={item.id} >
                                <div className="tab-container">
                                    <div className="tree-menu">
                                        <Tree
                                            defaultExpandParent
                                            onSelect={onSelect}
                                            treeData={treeData}
                                            titleRender={renderTitle}
                                        />
                                    </div>
                                    <div className="content">
                                      <QuotaTable
                                          columns={columns}
                                          dataSource={data}
                                          renderTitleRtConts={
                                              <Space >
                                                  <Button type="primary" onClick={addQuota}>添加定额</Button>
                                                  <Button type="primary" onClick={editQuota}>编辑</Button>
                                                  <Button type="primary" onClick={remove}>移除</Button>
                                              </Space>
                                          }>
                                        </QuotaTable>
                                    </div>
                                </div>
                            </TabPane>
                        )
                )
            }
如上代码点击“添加定额”时再出现一个弹窗。弹窗内容就是我们封装的表格
//注意这个弹窗中不需要右侧操作按钮。我们不传

import {useHistory} from "react-router-dom"
import {Button,Space,Table,Row,Col ,Checkbox,Menu,Dropdown ,Modal , } from "antd";
import {useState,forwardRef,useImperativeHandle  } from "react"
import "./quotaModalStyles//addShopQuotaModal.less"
import QuotaTable from "../quotaTable"
const menu = (
  <Menu>
    <Menu.Item>
      <a target="_blank" rel="noopener noreferrer" >
       删除
      </a>
    </Menu.Item>
    <Menu.Item >
      <a target="_blank" rel="noopener noreferrer" >
        移动
      </a>
    </Menu.Item>
    <Menu.Item >
      <a target="_blank" rel="noopener noreferrer" >
       其他
      </a>
    </Menu.Item>

  </Menu>
);

  const columns = [
    {
      title: '名称',
      dataIndex: 'name',

    },
    {
      title: '编号',
      dataIndex: 'code',
    },
    {
      title: '产品类型',
      dataIndex: 'type',
    },
    {
      title: '单位',
      dataIndex: 'unit',
    },
     {
      title: '销售价格',
      dataIndex: 'price',
    },
    {
      title: '辅料',
      dataIndex: 'fuliao',
    },
    {
      title: '状态',
      dataIndex: 'status',
    },
    {
      title: '备注',
      dataIndex: 'mark',
    },
    {
      title: '操作',
      dataIndex: 'operate',
      render:()=>{
        return(
          <Space>
              <span>详情</span>
              <span>
              <Dropdown overlay={menu}>
                <a className="ant-dropdown-link" onClick={e => e.preventDefault()}>
                ...
                </a>
              </Dropdown>
              </span>
          </Space>
        )
      }
    }
  ];

  const data = [];
  for (let i = 0; i < 10; i++) {
    data.push({
      key: i,
      name: `天然气安装 ${i}`,
      code: `00000-${i}`,
      type:"1",
       unit: `米`,
       price:2349.00,
       fuliao:2,
       status:`${i}`,
       mark:"xxxxxxxxxxx",
       operate:null
    });
  }


function AddShopQuotaModal(props,ref){

  const router=useHistory()
  const [vis,setVis]=useState(false)
  const [isCheckeAll,setIsCheckeAll]=useState(false)
  const [selectedRowKeys,setSelectedRowKeys]=useState([])


  useImperativeHandle(ref, () => ({
    showModelRef:()=> operateModal('show'),
    hideModelRef:()=> operateModal('hidden')
  }))

   // modal的显示与隐藏
  const operateModal=(type)=>{
    if(type==="show"){
      setVis(true)
    }else{
      setVis(false)
    }
  }
    return (
        <Modal
          width={1000}
          title="添加定额"
          visible={vis}
          onOk={(e)=>{operateModal("hidden")}}
          onCancel={(e)=>{operateModal("hidden")}}
         >
              <QuotaTable
                columns={columns}
                dataSource={data}
              >
              </QuotaTable>
      </Modal>
    )
}

export default forwardRef(AddShopQuotaModal)
不得不说。react的jsx真的厉害