引言
与TinUI的下拉框(组合框)combobox类似,列表框也是向用户显示若干个可选择的提示文本段,待用户点击选择后调用响应的函数,并且传递选择的参数,也就是被选中的文本段文字。那么这两个组件矛盾吗?当然不矛盾。
combobox的应用场景:
-
有限元素个数
-
文本长度短
总结起来就是小而精。而listbox的应用场景:
-
很多个可选内容
-
可选文本长短、格式相差巨大,一般为长文本或复杂格式文本
-
占用位置固定
所以说,这两个组件实际上是互补的。再加上TinUI已经完成了滚动条的绘制,为这些视野可变的组件创建打下了基础。
布局
函数结构
def add_listbox(self,pos:tuple,width:int=200,height:int=200,font='微软雅黑 12',data=('a','b','c'),bg='#f2f2f2',fg='black',activebg='#e9e9e9',sel='#b4bbea',anchor='nw',command=None):#绘制列表框
    '''
    pos::起始位置
    width::宽度
    height::高度
    font::字体
    data::一元元素集,可选提示文本数据
    bg::背景色
    fg::文本和滚动条颜色
    activebg::响应鼠标的背景颜色
    sel::选中时背景颜色
    anchor::对齐方向
    command::回调函数,必须接受一个参数,被选中的文本
    '''
组件框架
因为需要使用到滚动条,我们使用两个BasicTinUI组件嵌套。
        frame=BasicTinUI(self,bg=bg)#主显示框,显示滚动条
        box=BasicTinUI(frame,bg=bg,width=width,height=height)#显示选择内容
        box.place(x=12,y=12)
绑定滚动条
就像平常使用tkinter原生滚动条,只不过更加简便,(对开发者)只需要一次绑定即可。这也相当于一个TinUI滚动条绑定“编外组件”的官方示例。
        uid=self.create_window(pos,window=frame,width=width+24,height=height+24,anchor=anchor)
        frame.add_scrollbar((width+12,12),widget=box,height=height,bg=bg,color=fg,oncolor=fg)#纵向
        frame.add_scrollbar((12,height+12),widget=box,height=height,direction='x',bg=bg,color=fg,oncolor=fg)#横向
不同于combobox的逻辑
你们可以认为是我的逻辑水平的提升,在listbox中,我们将使用独立的数据结构,来判断每个选项响应事件的不同反应。
这个变量如下:
choices={}#'a':[a_text,a_back,is_sel:bool]
也就是以文本内容为键,分别对应文本对象、背景框对象、选中状态的值。
添加可选元素
类似于combobox和table的重绘技术,这里不再赘述,详情请看那两篇文章。
        maxwidth=0#最大宽度
        for i in data:
            end=box.bbox('all')
            end=5 if end==None else end[-1]
            text=box.create_text((5,end+7),text=i,fill=fg,font=font,anchor='nw')
            bbox=box.bbox(text)
            twidth=bbox[2]-bbox[0]
            maxwidth=twidth if twidth>maxwidth else maxwidth
            back=box.create_rectangle((3,bbox[1]-2,bbox[2]+2,bbox[3]+2),width=0,fill=bg)
            box.tkraise(text)
            choices[i]=[text,back,False]
            box.tag_bind(text,'<Enter>',lambda event,text=i : in_mouse(text))
            box.tag_bind(text,'<Leave>',lambda event,text=i : out_mouse(text))
            box.tag_bind(text,'<Button-1>',lambda event,text=i : sel_it(text))
            box.tag_bind(back,'<Enter>',lambda event,text=i : in_mouse(text))
            box.tag_bind(back,'<Leave>',lambda event,text=i : out_mouse(text))
            box.tag_bind(back,'<Button-1>',lambda event,text=i : sel_it(text))
        if maxwidth<width:#判断最大宽度
            maxwidth=width
        repaint_back()#重绘
重绘函数如下:
        def repaint_back():
            for v in choices.values():
                bbox=box.coords(v[1])
                box.coords(v[1],3,bbox[1]-2,5+maxwidth+2,bbox[3]+2)
别忘了绑定可视范围。
        bbox=box.bbox('all')
        box.config(scrollregion=bbox)
        def set_y_view(event):
            box.yview_scroll(int(-1*(event.delta/120)), "units")
        box.bind('<MouseWheel>',set_y_view)
绑定样式
因为上面已经绑定了各个画布对象对鼠标的事件响应,这里直接指明绑定的函数功能。
鼠标进出事件:
        def in_mouse(t):
            if choices[t][2]==True:#已被选中
                return
            box.itemconfig(choices[t][1],fill=activebg)
        def out_mouse(t):
            if choices[t][2]==True:#已被选中
                box.itemconfig(choices[t][1],fill=sel)
            else:
                box.itemconfig(choices[t][1],fill=bg)
可以看到,我们通过数据结构来判断该选项是否已经被选中,如果没有,则进行样式调整,否则不做任何处理。
使用这种方法,可以避免通过画布对象的样式判断,来决定样式更改操作的冗杂过程。
选择操作:
        def sel_it(t):
            box.itemconfig(choices[t][1],fill=sel)
            choices[t][2]=True
            for i in choices.keys():
                if i==t:
                    continue
                choices[i][2]=False
                out_mouse(i)
            if command!=None:
                command(t)
除了使用变量数据结构的判断之外,其它比如选定、取消选定、样式恢复等逻辑和操作与combobox一样。
完整代码函数
    def add_listbox(self,pos:tuple,width:int=200,height:int=200,font='微软雅黑 12',data=('a','b','c'),bg='#f2f2f2',fg='black',activebg='#e9e9e9',sel='#b4bbea',anchor='nw',command=None):#绘制列表框
        def repaint_back():
            for v in choices.values():
                bbox=box.coords(v[1])
                box.coords(v[1],3,bbox[1]-2,5+maxwidth+2,bbox[3]+2)
        def in_mouse(t):
            if choices[t][2]==True:#已被选中
                return
            box.itemconfig(choices[t][1],fill=activebg)
        def out_mouse(t):
            if choices[t][2]==True:#已被选中
                box.itemconfig(choices[t][1],fill=sel)
            else:
                box.itemconfig(choices[t][1],fill=bg)
        def sel_it(t):
            box.itemconfig(choices[t][1],fill=sel)
            choices[t][2]=True
            for i in choices.keys():
                if i==t:
                    continue
                choices[i][2]=False
                out_mouse(i)
            if command!=None:
                command(t)
        frame=BasicTinUI(self,bg=bg)#主显示框,显示滚动条
        box=BasicTinUI(frame,bg=bg,width=width,height=height)#显示选择内容
        box.place(x=12,y=12)
        uid=self.create_window(pos,window=frame,width=width+24,height=height+24,anchor=anchor)
        frame.add_scrollbar((width+12,12),widget=box,height=height,bg=bg,color=fg,oncolor=fg)#纵向
        frame.add_scrollbar((12,height+12),widget=box,height=height,direction='x',bg=bg,color=fg,oncolor=fg)#横向
        choices={}#'a':[a_text,a_back,is_sel:bool]
        maxwidth=0#最大宽度
        for i in data:
            end=box.bbox('all')
            end=5 if end==None else end[-1]
            text=box.create_text((5,end+7),text=i,fill=fg,font=font,anchor='nw')
            bbox=box.bbox(text)
            twidth=bbox[2]-bbox[0]
            maxwidth=twidth if twidth>maxwidth else maxwidth
            back=box.create_rectangle((3,bbox[1]-2,bbox[2]+2,bbox[3]+2),width=0,fill=bg)
            box.tkraise(text)
            choices[i]=[text,back,False]
            box.tag_bind(text,'<Enter>',lambda event,text=i : in_mouse(text))
            box.tag_bind(text,'<Leave>',lambda event,text=i : out_mouse(text))
            box.tag_bind(text,'<Button-1>',lambda event,text=i : sel_it(text))
            box.tag_bind(back,'<Enter>',lambda event,text=i : in_mouse(text))
            box.tag_bind(back,'<Leave>',lambda event,text=i : out_mouse(text))
            box.tag_bind(back,'<Button-1>',lambda event,text=i : sel_it(text))
        if maxwidth<width:
            maxwidth=width
        repaint_back()
        bbox=box.bbox('all')
        box.config(scrollregion=bbox)
        def set_y_view(event):
            box.yview_scroll(int(-1*(event.delta/120)), "units")
        box.bind('<MouseWheel>',set_y_view)
        return box,uid
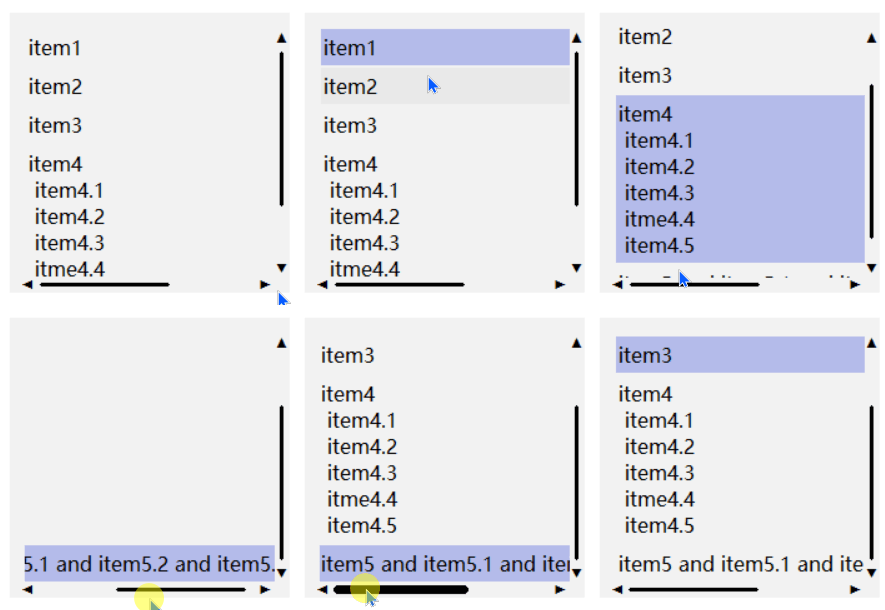
效果
测试代码
def test(event):
    a.title('TinUI Test')
    b.add_paragraph((50,150),'这是TinUI按钮触达的事件函数回显,此外,窗口标题也被改变、首行标题缩进减小')
    b.coords(m,100,5)
def test1(word):
    print(word)
def test2(event):
    ok1()
def test3(event):
    ok2()
def test4(event):
    from time import sleep
    for i in range(1,101):
        sleep(0.02)
        progressgoto(i)
def test5(result):
    b.itemconfig(scale_text,text='当前选值:'+str(result))

if __name__=='__main__':
    a=Tk()
    a.geometry('700x700+5+5')

    b=TinUI(a,bg='white')
    b.pack(fill='both',expand=True)
    m=b.add_title((600,0),'TinUI is a modern way to show tkinter widget in your application')
    m1=b.add_title((0,680),'test TinUI scrolled',size=2,angle=24)
    b.add_paragraph((20,290),'''     TinUI是基于tkinter画布开发的界面UI布局方案,作为tkinter拓展和TinEngine的拓展而存在。目前,TinUI已可应用于项目。''',
    angle=-18)
    b.add_paragraph((20,100),'下面的段落是测试画布的非平行字体显示效果,也是TinUI的简单介绍')
    b.add_button((250,450),'测试按钮',activefg='white',activebg='red',command=test,anchor='center')
    b.add_checkbutton((80,430),'允许TinUI测试',command=test1)
    b.add_label((10,220),'这是由画布TinUI绘制的Label组件')
    b.add_entry((250,330),350,'这里用来输入',command=print)
    b.add_separate((20,200),600)
    b.add_radiobutton((50,480),300,'sky is blue, water is blue, too. So, what is your heart',('red','blue','black'),command=test1)
    b.add_link((400,500),'TinGroup知识库','http://tinhome.baklib-free.com/')
    b.add_link((400,530),'执行print函数',print)
    _,ok1,_=b.add_waitbar1((500,220),bg='#CCCCCC')
    b.add_button((500,270),'停止等待动画',activefg='cyan',activebg='black',command=test2)
    bu1=b.add_button((700,200),'停止点状滚动条',activefg='white',activebg='black',command=test3)[1]
    bu2=b.add_button((700,250),'nothing button 2')[1]
    bu3=b.add_button((700,300),'nothing button 3')[1]
    b.add_labelframe((bu1,bu2,bu3),'box buttons')
    _,_,ok2,_=b.add_waitbar2((600,400))
    b.add_combobox((600,550),text='你有多大可能去珠穆朗玛峰',content=('20%','40%','60%','80%','100%','1000%'))
    b.add_button((600,480),text='测试进度条(无事件版本)',command=test4)
    _,_,_,progressgoto,_,_=b.add_progressbar((600,510))
    b.add_table((180,630),data=(('a','space fans over the\nworld','c'),('you\ncan','2','3'),('I','II','have a dream, then try your best to get it!')))
    b.add_paragraph((300,850),text='上面是一个表格')
    b.add_onoff((600,100))
    b.add_spinbox((680,100))
    b.add_scalebar((680,50),command=test5)
    scale_text,_=b.add_label((890,50),text='当前选值:2')
    b.add_info((680,140),info_text='this is info widget in TinUI')
    mtb=b.add_paragraph((0,720),'测试菜单(右键单击)')
    b.add_menubar(mtb,cont=(('command',print),('menu',test1),'-',('TinUI文本移动',test)))
    ttb=b.add_paragraph((0,800),'TinUI能做些什么?')
    b.add_tooltip(ttb,'很多很多')
    b.add_back(pos=(0,0),uids=(ttb,),bg='cyan')
    _,_,ok3,_=b.add_waitbar3((600,800),width=240)
    b.add_button((600,750),text='停止带状等待框',command=lambda event:ok3())
    textbox=b.add_textbox((890,100),text='这是文本输入框,当然,无法在textbox的参数中绑定横向滚动'+'\n换行'*30)[0]
    textbox['wrap']='none'
    b.add_scrollbar((1095,100),textbox)
    b.add_scrollbar((890,305),textbox,direction='x')
    b.add_listbox((890,430),data=('item1','item2','item3','item4\n item4.1\n item4.2\n item4.3\n itme4.4\n item4.5','item5 and item5.1 and item5.2 and item5.3'),
    command=print)

    a.mainloop()
最终效果

github项目
pip下载
pip install tinui
修改开源协议
从2022年2月开始,TinUI(包括TinUIXml技术)使用GPLv3开源协议。若要在你的软件或程序中使用TinUI,请遵照TinUI开源协议和开源条款。
开源条款见TinUI的github项目地址。
结语
TinUI推出了最新的现代化xml布局方式——TinUIXml。赶快去使用吧!!!
愿世界和平,祖国强盛
🔆tkinter创新🔆