正如Redux一样,当你不知道是否需要Vuex那就是不需要。不要因为想用Vuex而使用它。
用过Vue的人都知道,Vuex是Vue的一个全局状态管理模块,它的作用是多个组件共享状态及数据,当某个组件将全局状态修改时,在绑定了该状态的另一个组件也将响应。实际上可以将Vue理解为一个function,在Vue的作用域中有一个数据代理,在每个Vue的实例中都能对其读和写
我们都知道Vue的数据驱动原理是用Object.defineProperty()进行数据代理,在setter中对数据绑定的view进行异步响应(vue3.0则是使用proxy)
通过查看Vuex源码可知Vuex的核心原理就是在Vue的beforeCreate钩子前混入(mixin)Vuex,并在init中将$store属性注册到Vue中


为了使案例更具体,我这还是简单使用脚手架搭了个项目(可参考另一篇文章),虽然只有两个组件,但是能清晰的理解其用法,我的src目录如下,除了最基础的App.vue和main.js外只有两个组件和一个store

先说明一下两个组件的作用,第一个组件是输入框,在里面输入字符,在二个组件div中显示,就是这么简单
首先我们使用常规方式(EventBus)实现一下,这里只需要在mainjs中创建一个vue实例,然后注册在vue中就可以通过事件emit和on来进行组件通信
main.js
import Vue
  from 'vue'
import App
  from './App'
Vue.prototype.$eventBus = new Vue()

new Vue({
  el: '#app',
  components: {App},
  template: '<App/>'
})
inputComp.vue
<template>
  <input type="text" @input="inputHandler" />
</template>

<script>

export default {
  name: "inputComp",
  methods: {
    inputHandler(e) {
      this.$eventBus.$emit('changeVal',e.target.value)//输入时通过eventBus发送消息
    },
  },
};
</script>

<style
  scoped>
</style>
divComp.vue
<template>
  <div>
    {{
      val
    }}
  </div>
</template>

<script>
export default {
  name: "divComp",
  data () {
    return {
      val: ''
    }
  },
  mounted () {
    this.$eventBus.$on('changeVal', (e) => {//监听输入事件通过eventBus传递信息
      this.val = e
    })
  }
}
</script>

<style
  scoped>

</style>
效果如下:

下面我会逐级介绍Vuex在这个案例中如何使用
首先我们先加入state用来存放数据值(类似于组件中的data),在store中添加一个state,并在main中引入store
import Vue
  from "vue";
import Vuex
  from "vuex";

Vue.use(Vuex);
const state = {
  val: ''
}
export default new Vuex.Store({
  state
})
然后在上面的inputHandler中将eventBus换成以下代码
inputHandler(e) {
      this.$store.state.val = e.target.value;
    }
将div标签中的val换成this.$store.state.val,这就是最简单的Vuex使用,仅仅通过修改state从而达到全局状态的目的,如果你的项目并不复杂,这个简单的全局状态就足够了
下一步,我们加入一个mutations,这里我们可以将mutations当成发布/订阅的调度中心,将函数写在mutations中相当于注册了一个事件,在页面中通过emit来触发
在store中新增****mutations
const state = {
  val: ''
}

const mutations = {
  changeVal (state, _val) {
    state.val = _val
  }
}

export default new Vuex.Store({
  state,
  mutations
})
在inputHandler中调用一下该函数,其中changeVal是mutations中的函数名,通过emit传参达到和发布订阅效果
this.$store.commit('changeVal',e.target.value)
了解了mutations,我们来看看getters,我们都知道Vue中有一个computed计算属性,当被代理的值发生变化时,它会被重新计算,Vuex中的派生属性getters会绑定state中的某个或某些值,通过传递参数,达到对该值过滤,修改的作用
这里我们做个简单的计算,输入字符后计算其长度并拼接一下,inputHandler中操作不变,在store中新增getters
import Vue
  from "vue";
import Vuex
  from "vuex";

Vue.use(Vuex);
const state = {
  val: ''
}

const mutations = {
  changeVal (state, _val) {
    state.val = _val
  }
}

const getters = {
  getValueLength (state) {
    return `长度:${state.val.length}`
  }
}
export default new Vuex.Store({
  state,
  mutations,
  getters
})
然后在div标签中的this. s t o r e . s t a t e . v a l 后 面 添 加 t h i s . store.state.val后面添加this. store.state.val后面添加this.store.getters.getValueLength
 <div>
    {{
      this.$store.state.val+this.$store.getters.getValueLength
    }}
  </div>
效果如下:

如果到这一步,你仍然感觉难度不大,那么恭喜你,Vuex的使用已经掌握了一大半了
**下面,我们来说说actions,在说actions之前,我们先回顾一下mutations,mutations中注册了一些事件,在组件中通过emit对事件进行触发,达到处理异步且解耦的效果,然而官方并不推荐我们直接对store进行操作
官方对actions的说明是:**Action 类似于 mutation,不同在于1.Action 提交的是 mutation,而不是直接变更状态。2.Action 可以包含任意异步操作。
**也就是说,我们要把组件中的emit操作放到actions中,而在组件中通过某些方式来触发actions中的函数间接调用emit,**此时,为了让action更直观,我们添加一个清除输入框字符的方法,当点击清除按钮时清除state.val
在输入框组件中将value绑定到state上
<template>
  <input type="text" @input="inputHandler" :value="this.$store.state.val" />
</template>

<script>
export default {
  name: "inputComp",
  methods: {
    inputHandler(e) {
      this.$store.dispatch("actionVal", e.target.value);
    },
  },
};
</script>

<style
  scoped>
</style>
在另一个显示数据的组件中新增删除按钮并绑定删除事件,通过dispatch告知store并通过emit操作state
<template>
  <div>
    <button @click="clickHandler">清除</button>
    <span>{{ this.$store.state.val + this.$store.getters.getValueLength }}</span>
  </div>
</template>

<script>
export default {
  name: "divComp",
  methods: {
    clickHandler(){
      this.$store.dispatch('actionClearVal')
    }
  },
};
</script>

<style
  scoped>
</style>
最后在store中新建删除的actions和mutations
import Vue
from "vue";
import Vuex
from "vuex";

Vue.use(Vuex);
const state = {
  val: ''
}

const mutations = {
  changeVal(state, _val) {
    state.val = _val
  },
  clearVal(state, _val) {
    state.val = ''
  }
}
const actions = {
  actionVal(state, _val) {
    state.commit('changeVal', _val)
  },
  actionClearVal(state) {
    state.commit('clearVal')
  }
}
const getters = {
  getValueLength(state) {
    return `长度:${state.val.length}`
  }
}
export default new Vuex.Store({
  state,
  mutations,
  actions,
  getters
})
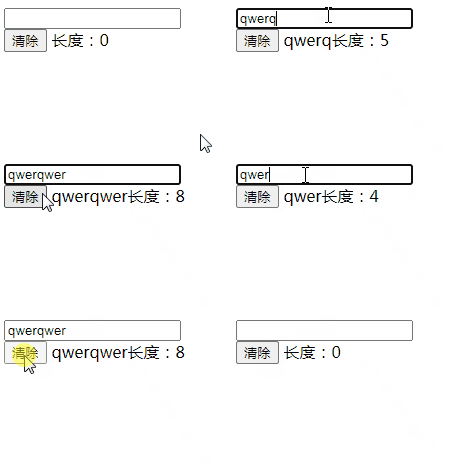
最终效果如下:

到这里为止,Vuex的基本用法就介绍完毕了。
然而除此之外,Vuex官方还提供了辅助函数(mapState,mapMutations,mapGetters,mapActions)和Modules(store的子模块,当有许多全局状态时,我们为了避免代码臃肿,就可以将各个store分割成模块)方便我们书写
下面我们用辅助函数重新实现一下上述功能
输入框:
<template>
  <input type="text" @input="inputHandler" :value="value" />
</template>

<script>
import { mapState, mapMutations } from "vuex";
export default {
  name: "inputComp",
  computed: {
    ...mapState({ value: "val" }),
  },
  methods: {
    ...mapMutations({ sendParams: "changeVal" }), // sendParams用来传递参数,先把sendParams注册到mutations上,输入时触发sendParams
    inputHandler(e) {
      this.sendParams(e.target.value);
    },
  },
};
</script>

<style
  scoped>
</style>
显示框:
<template>
  <div>
    <button @click="clickHandler">清除</button>
    <span>{{ value + valueLength }}</span>
  </div>
</template>

<script>
import { mapState, mapGetters, mapActions } from "vuex";
export default {
  name: "divComp",
  computed: {
    ...mapState({ value: "val" }),
    ...mapGetters({ valueLength: "getValueLength" }),
  },
  methods: {
    ...mapActions({ clickHandler: "actionClearVal" }),
  },
};
</script>

<style
  scoped>
</style>
这里需要注意的一点就是mapActions和mapMutations的传参问题,这里我使用另一个函数接收参数并且注册到store中
关于Modules的这里就不多做介绍,官方已给出了详细说明
最后,附上案例地址,有需要可以自取,感谢你看到了最后,如果这篇文章有帮助到你,请帮忙支持一下,非常感谢!