准备工作
需要的文件我已经打包好了:
链接:https://pan.baidu.com/s/1gTIi2nTHHv3bfcy5khKxgw
提取码:i2al
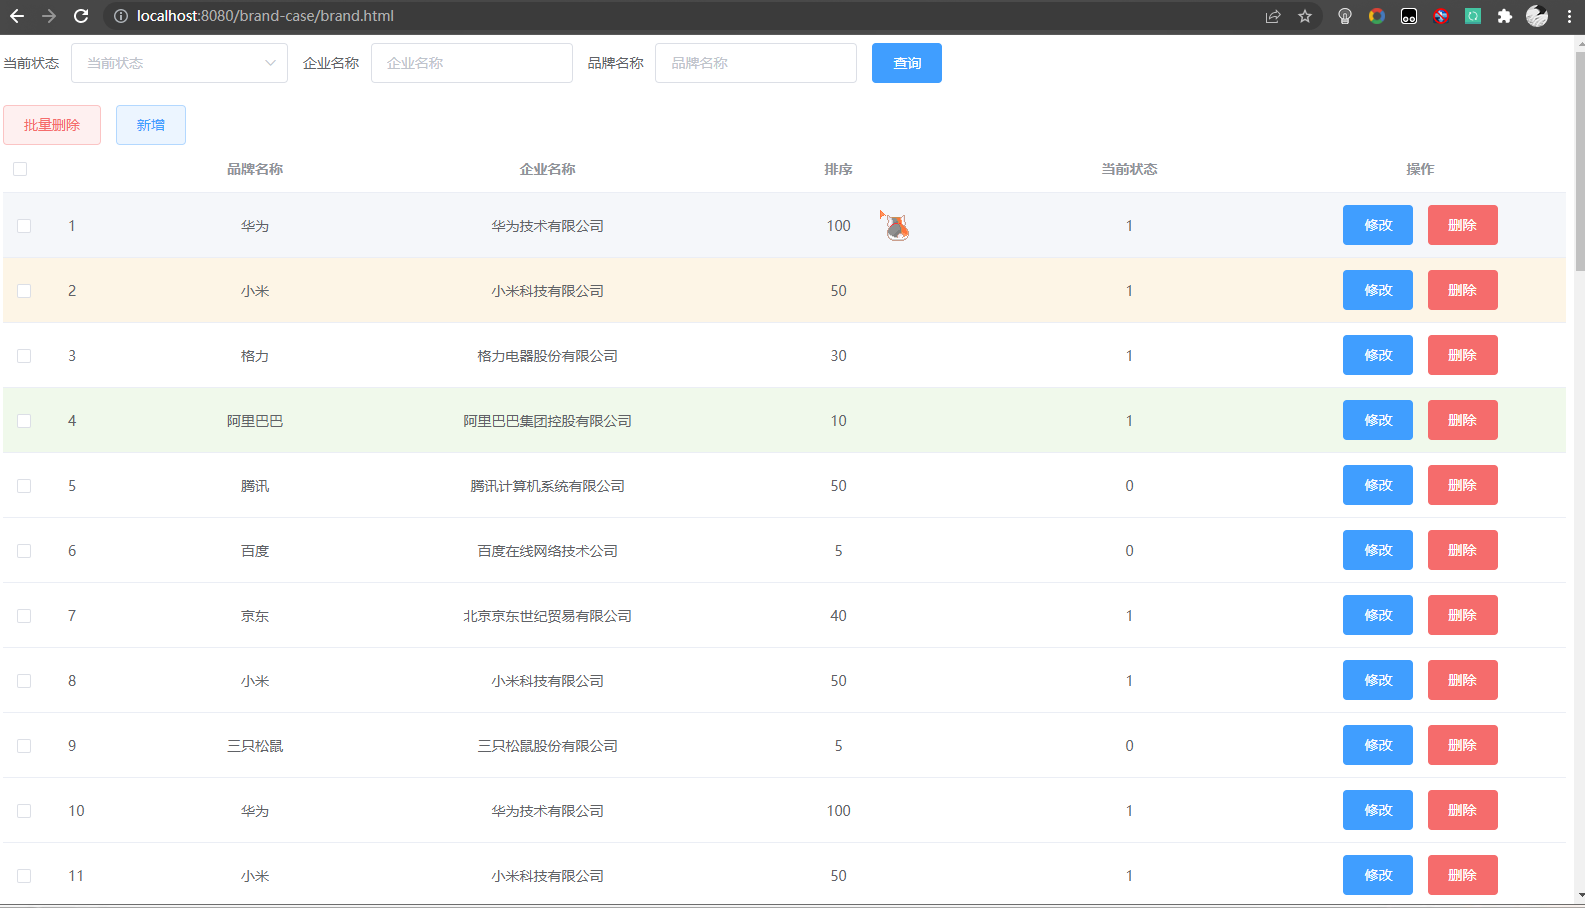
- 前端页面:可参考此篇文章 Element 入门教程 自行编写,也可以直接使用我准备好的模板
- sql 文件
-- 创建数据库
create database db1 character set utf8;
use db1;

-- 删除tb_brand表
drop table if exists tb_brand;
-- 创建tb_brand表
create table tb_brand
(
    -- id 主键
    id           int primary key auto_increment,
    -- 品牌名称
    brand_name   varchar(20),
    -- 企业名称
    company_name varchar(20),
    -- 排序字段
    ordered      int,
    -- 描述信息
    description  varchar(100),
    -- 状态:0:禁用  1:启用
    status       int
);
-- 添加数据
insert into tb_brand (brand_name, company_name, ordered, description, status)
values
       ('华为', '华为技术有限公司', 100, '万物互联', 1),
       ('小米', '小米科技有限公司', 50, 'are you ok', 1),
       ('格力', '格力电器股份有限公司', 30, '让世界爱上中国造', 1),
       ('阿里巴巴', '阿里巴巴集团控股有限公司', 10, '买买买', 1),
       ('腾讯', '腾讯计算机系统有限公司', 50, '玩玩玩', 0),
       ('百度', '百度在线网络技术公司', 5, '搜搜搜', 0),
       ('京东', '北京京东世纪贸易有限公司', 40, '就是快', 1),
       ('小米', '小米科技有限公司', 50, 'are you ok', 1),
       ('三只松鼠', '三只松鼠股份有限公司', 5, '好吃不上火', 0),
       ('华为', '华为技术有限公司', 100, '万物互联', 1),
       ('小米', '小米科技有限公司', 50, 'are you ok', 1),
       ('格力', '格力电器股份有限公司', 30, '让世界爱上中国造', 1),
       ('阿里巴巴', '阿里巴巴集团控股有限公司', 10, '买买买', 1),
       ('腾讯', '腾讯计算机系统有限公司', 50, '玩玩玩', 0),
       ('百度', '百度在线网络技术公司', 5, '搜搜搜', 0),
       ('京东', '北京京东世纪贸易有限公司', 40, '就是快', 1),
       ('华为', '华为技术有限公司', 100, '万物互联', 1),
       ('小米', '小米科技有限公司', 50, 'are you ok', 1),
       ('格力', '格力电器股份有限公司', 30, '让世界爱上中国造', 1),
       ('阿里巴巴', '阿里巴巴集团控股有限公司', 10, '买买买', 1),
       ('腾讯', '腾讯计算机系统有限公司', 50, '玩玩玩', 0),
       ('百度', '百度在线网络技术公司', 5, '搜搜搜', 0),
       ('京东', '北京京东世纪贸易有限公司', 40, '就是快', 1),
       ('小米', '小米科技有限公司', 50, 'are you ok', 1),
       ('三只松鼠', '三只松鼠股份有限公司', 5, '好吃不上火', 0),
       ('华为', '华为技术有限公司', 100, '万物互联', 1),
       ('小米', '小米科技有限公司', 50, 'are you ok', 1),
       ('格力', '格力电器股份有限公司', 30, '让世界爱上中国造', 1),
       ('阿里巴巴', '阿里巴巴集团控股有限公司', 10, '买买买', 1),
       ('腾讯', '腾讯计算机系统有限公司', 50, '玩玩玩', 0),
       ('百度', '百度在线网络技术公司', 5, '搜搜搜', 0),
       ('京东', '北京京东世纪贸易有限公司', 40, '就是快', 1),
       ('华为', '华为技术有限公司', 100, '万物互联', 1),
       ('小米', '小米科技有限公司', 50, 'are you ok', 1),
       ('格力', '格力电器股份有限公司', 30, '让世界爱上中国造', 1),
       ('阿里巴巴', '阿里巴巴集团控股有限公司', 10, '买买买', 1),
       ('腾讯', '腾讯计算机系统有限公司', 50, '玩玩玩', 0),
       ('百度', '百度在线网络技术公司', 5, '搜搜搜', 0),
       ('京东', '北京京东世纪贸易有限公司', 40, '就是快', 1),
       ('小米', '小米科技有限公司', 50, 'are you ok', 1),
       ('三只松鼠', '三只松鼠股份有限公司', 5, '好吃不上火', 0),
       ('华为', '华为技术有限公司', 100, '万物互联', 1),
       ('小米', '小米科技有限公司', 50, 'are you ok', 1),
       ('格力', '格力电器股份有限公司', 30, '让世界爱上中国造', 1),
       ('阿里巴巴', '阿里巴巴集团控股有限公司', 10, '买买买', 1),
       ('腾讯', '腾讯计算机系统有限公司', 50, '玩玩玩', 0),
       ('百度', '百度在线网络技术公司', 5, '搜搜搜', 0),
       ('京东', '北京京东世纪贸易有限公司', 40, '就是快', 1)
        ;


SELECT * FROM tb_brand;
业务 - 查询所有

后端
BrandMapper.java:这里要注意实体类属性名称和数据库表名称不一致,使用 resultMap 映射/** * 查询所有 * @return */ @Select("select * from tb_brand") @ResultMap("brandResultMap") List<Brand> selectAll();- service
- service 接口:
BrandService.java
package com.ruochen.service; import com.ruochen.pojo.Brand; import java.util.List; public interface BrandService { /** * 查询所有 * @return */ List<Brand> selectAll(); }- service 实现类:
BrandServiceImpl.java
package com.ruochen.service.impl; import com.ruochen.mapper.BrandMapper; import com.ruochen.pojo.Brand; import com.ruochen.service.BrandService; import com.ruochen.util.SqlSessionFactoryUtils; import org.apache.ibatis.session.SqlSession; import org.apache.ibatis.session.SqlSessionFactory; import java.util.List; public class BrandServiceImpl implements BrandService { // 1. 创建 SqlSessionFactory 工厂对象 SqlSessionFactory factory = SqlSessionFactoryUtils.getSqlSessionFactory(); @Override public List<Brand> selectAll() { // 2. 获取 SqlSession 对象 SqlSession sqlSession = factory.openSession(); // 3. 获取 BrandMapper BrandMapper brandMapper = sqlSession.getMapper(BrandMapper.class); // 4. 调用方法 List<Brand> brands = brandMapper.selectAll(); // 5. 释放资源 sqlSession.close(); return brands; } } - service 接口:
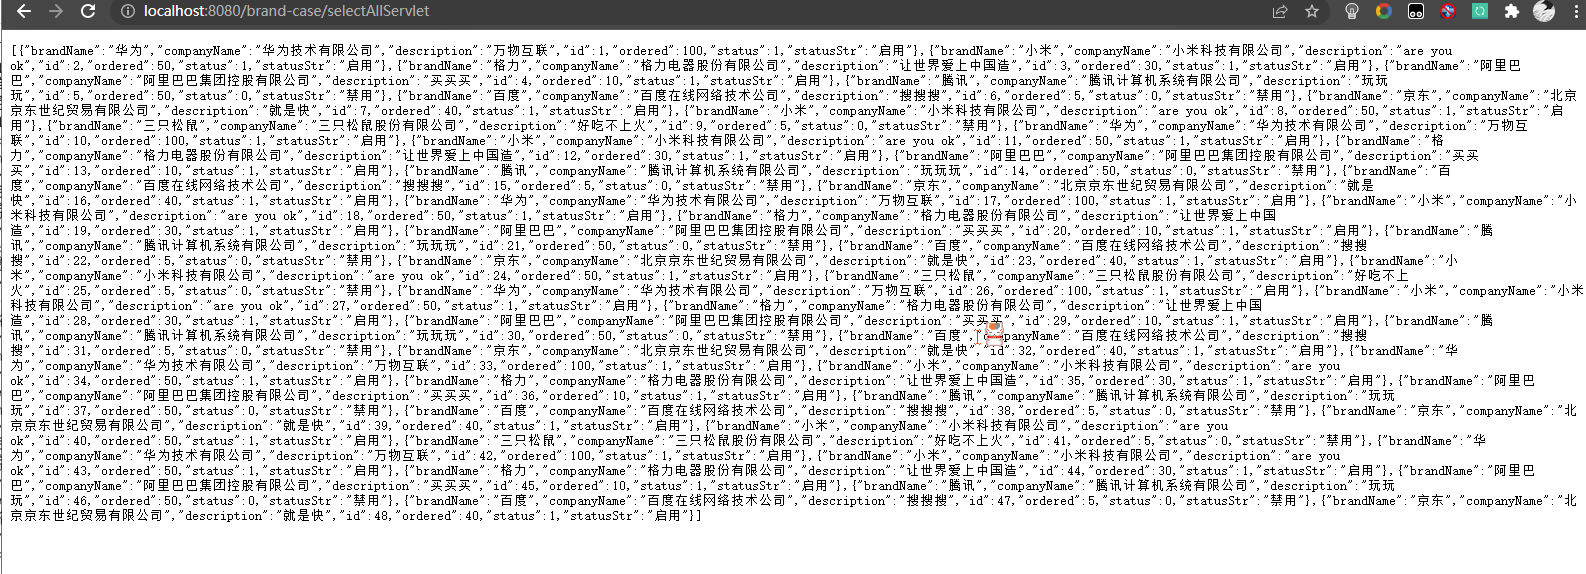
SelectAllServlet.javapackage com.ruochen.web.servlet; import com.alibaba.fastjson.JSON; import com.ruochen.pojo.Brand; import com.ruochen.service.BrandService; import com.ruochen.service.impl.BrandServiceImpl; import javax.servlet.*; import javax.servlet.http.*; import javax.servlet.annotation.*; import java.io.IOException; import java.util.List; @WebServlet("/selectAllServlet") public class SelectAllServlet extends HttpServlet { private BrandService brandService = new BrandServiceImpl(); @Override protected void doGet(HttpServletRequest request, HttpServletResponse response) throws ServletException, IOException { // 1. 调用 service 查询 List<Brand> brands = brandService.selectAll(); // 2. 数据转为 JSON String jsonString = JSON.toJSONString(brands); // 3. 写数据 // 数据存在中文 response.setContentType("text/json;charset=utf-8"); response.getWriter().write(jsonString); } @Override protected void doPost(HttpServletRequest request, HttpServletResponse response) throws ServletException, IOException { this.doGet(request, response); } }- 测试

前端
- 页面加载完成后,发送异步请求,获取数据,绑定表格上模型
tableDatamounted() { // 当页面加载完成后,发送异步请求,获取数据 var _this = this; axios({ method: "get", url: "http://localhost:8080/brand-case/selectAllServlet" }).then(function (resp) { _this.tableData = resp.data; }) }, - 测试

业务 - 新增品牌

后端
BrandMapper.java/** * 添加数据 * @param brand */ @Insert("insert into tb_brand values (null, #{brandName}, #{companyName}, #{ordered}, #{description}, #{status})") void add(Brand brand);- service
- service 接口:
BrandService.java
/** * 添加数据 * @param brand */ void add(Brand brand);- service 实现类:
BrandServiceImpl.java
@Override public void add(Brand brand) { // 2. 获取 SqlSession 对象 SqlSession sqlSession = factory.openSession(); // 3. 获取 BrandMapper BrandMapper brandMapper = sqlSession.getMapper(BrandMapper.class); // 4. 调用方法 brandMapper.add(brand); // 5. 提交事务 sqlSession.commit(); // 6. 释放资源 sqlSession.close(); } } - service 接口:
AddServlet.javapackage com.ruochen.web.servlet; import com.alibaba.fastjson.JSON; import com.ruochen.pojo.Brand; import com.ruochen.service.BrandService; import com.ruochen.service.impl.BrandServiceImpl; import javax.servlet.ServletException; import javax.servlet.annotation.WebServlet; import javax.servlet.http.HttpServlet; import javax.servlet.http.HttpServletRequest; import javax.servlet.http.HttpServletResponse; import java.io.BufferedReader; import java.io.IOException; import java.util.List; @WebServlet("/addServlet") public class AddServlet extends HttpServlet { private BrandService brandService = new BrandServiceImpl(); @Override protected void doGet(HttpServletRequest request, HttpServletResponse response) throws ServletException, IOException { // 1. 接收品牌数据 BufferedReader br = request.getReader(); String params = br.readLine(); // json 字符串 // JSON 字符串转为 brand 对象 Brand brand = JSON.parseObject(params, Brand.class); // 2. 调用 service 添加 brandService.add(brand); // 3. 响应成功标识 response.getWriter().write("success"); } @Override protected void doPost(HttpServletRequest request, HttpServletResponse response) throws ServletException, IOException { this.doGet(request, response); } }
前端
- 我们先将上一个功能中查询所有数据 ajax 请求封装为一个方法,方便调用
// 查询所有数据 selectAll() { // 当页面加载完成后,发送异步请求,获取数据 var _this = this; axios({ method: "get", url: "http://localhost:8080/brand-case/selectAllServlet" }).then(function (resp) { _this.tableData = resp.data; }) }, - 提交按钮绑定了
addBrand方法,点击提交按钮时发送 ajax 请求,添加数据(数据由模型 brand 绑定获得)// 添加数据 addBrand() { var _this = this; // 发送 ajax 请求,添加数据 axios({ method: "post", url: "http://localhost:8080/brand-case/addServlet", data: _this.brand }).then(function (resp) { if (resp.data == 'success') { // 添加成功 // 关闭窗口 _this.dialogVisible = false; // 查询数据 _this.selectAll(); // 弹出消息提示 _this.$message({ message: '恭喜你,添加成功', type: 'success' }); } }) },
Servlet 优化
- 查看文章:Javaweb 自定义 Servlet 实现按照访问路径转发
业务 - 批量删除

后端
- Dao 层
BrandMapper.java/** * 批量删除 * @param ids */ void deleteByIds(@Param("ids") int[] ids);BrandMapper.xml<!--批量删除--> <delete id="deleteByIds"> delete from tb_brand where id in <foreach collection="ids" item="id" separator="," open="(" close=")"> #{id} </foreach> </delete>
- Service 层
- Service 接口:
BrandService.java
/** * 批量删除 * @param ids */ void deleteByIds(int[] ids);- Service 实现类:
BrandServiceImpl.java
@Override public void deleteByIds(int[] ids) { // 2. 获取 SqlSession 对象 SqlSession sqlSession = factory.openSession(); // 3. 获取 BrandMapper BrandMapper brandMapper = sqlSession.getMapper(BrandMapper.class); // 4. 调用方法 brandMapper.deleteByIds(ids); // 5. 提交事务 sqlSession.commit(); // 6. 释放资源 sqlSession.close(); } - Service 接口:
- Web 层:
BrandServlet.java/** * 批量删除 * * @param request * @param response * @throws ServletException * @throws IOException */ public void deleteByIds(HttpServletRequest request, HttpServletResponse response) throws ServletException, IOException { // 1. 接收数据 [1,2,...] BufferedReader br = request.getReader(); String params = br.readLine(); // json 字符串 // 转为 int[] int[] ids = JSON.parseObject(params, int[].class); // 2. 调用 service 添加 brandService.deleteByIds(ids); // 3. 响应成功标识 response.getWriter().write("success"); }
前端
- 首先要给批量删除按钮添加点击事件
<el-button type="danger" plain @click="deleteByIds">批量删除</el-button> - 在编写
deleteByIds方法之前,我们要想办法获取到选中的 id,复选框选中后会执行一个handleSelectionChange回调方法,我们可以通过该方法中的this.multipleSelection获取到选中的对象数组// 复选框选中后执行的方法 handleSelectionChange(val) { this.multipleSelection = val; // console.log(this.multipleSelection) }, - 然后我们再写一个模型
multipleSelection用于存放从this.multipleSelection获取到的 id// 复选框选中数据集合 multipleSelection: [], - 现在我们编写
deleteByIds方法// 批量删除 deleteByIds() { // 弹出确认提示框 this.$confirm('此操作将删除该数据, 是否继续?', '提示', { confirmButtonText: '确定', cancelButtonText: '取消', type: 'warning' }).then(() => { // 用户点击确认按钮 // 1. 创建id 数组 从 this.multipleSelection 获取即可 for (let selectionElement of this.multipleSelection) { this.selectedIds.push(selectionElement.id); } // 2. 发送 ajax 请求,携带 ID var _this = this; // 发送 ajax 请求,添加数据 axios({ method: "post", url: "http://localhost:8080/brand-case/brand/deleteByIds", data: _this.selectedIds }).then(function (resp) { if (resp.data == 'success') { // 删除成功 // 重新查询数据 _this.selectAll(); // 弹出消息提示 _this.$message({ message: '恭喜你,删除成功', type: 'success' }); } }) }).catch(() => { // 用户点击取消按钮 this.$message({ type: 'info', message: '已取消删除' }); }); }
业务 - 分页查询
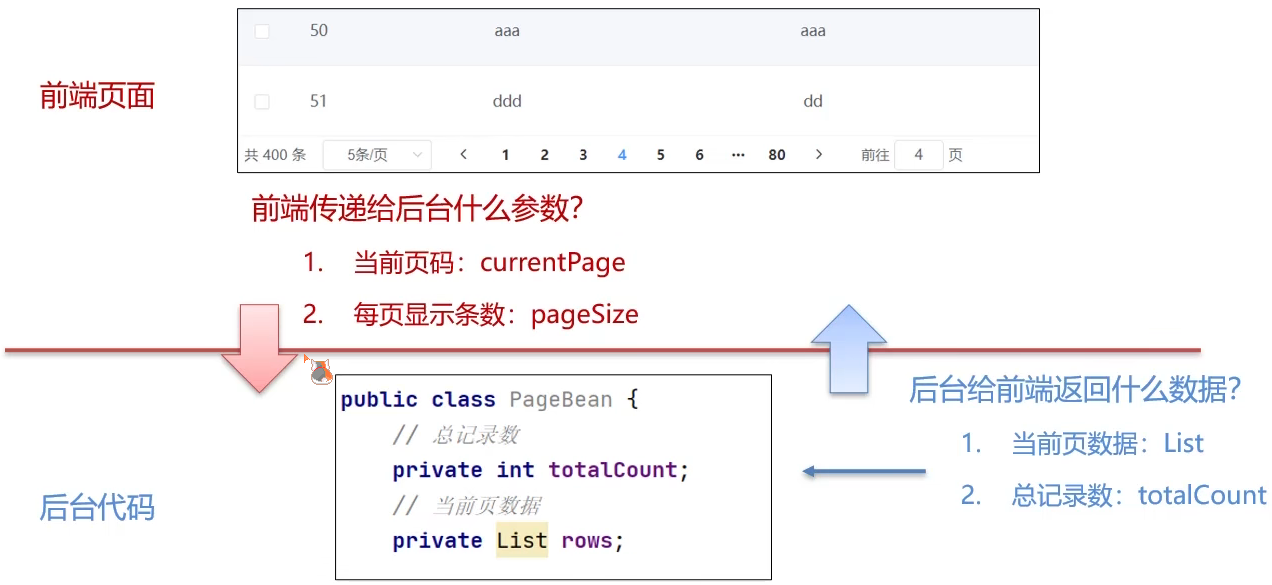
分析
- SQL Limit 查询语句
- 参数1:开始索引
- 参数2:查询的条目数
- 页面传递的参数
- 当前页码
- 每页显示条数
- 计算
- 开始索引 = (当前页码 - 1) * 每页显示条数
- 查询的条目数 = 每页显示条数

后端

- 创建 JavaBean:
PageBean.javapackage com.ruochen.pojo; import java.util.List; // 分页查询的 JavaBean public class PageBean<T> { // 总记录数 private int totalCount; // 当前页数据 private List<T> rows; public int getTotalCount() { return totalCount; } public void setTotalCount(int totalCount) { this.totalCount = totalCount; } public List<T> getRows() { return rows; } public void setRows(List<T> rows) { this.rows = rows; } } - Dao 层:
BrandMapper.java/** * 分页查询 * * @param begin 开始索引 * @param size 查询数据条数 * @return */ @Select("select * from tb_brand limit #{begin}, #{size}") @ResultMap("brandResultMap") List<Brand> selectByPage(@Param("begin") int begin, @Param("size") int size); /** * 查询总记录数 * * @return */ @Select("select count(*) from tb_brand") int selectTotalCount(); - Service 层
- Service 接口类:
BrandService.java
/** * 分页查询 * * @param currentPage 当前页码 * @param pageSize 每页展示条数 * @return */ PageBean<Brand> selectByPage(int currentPage, int pageSize);- Service 实现类:
BrandServiceImpl.java
@Override public PageBean<Brand> selectByPage(int currentPage, int pageSize) { // 2. 获取 SqlSession 对象 SqlSession sqlSession = factory.openSession(); // 3. 获取 BrandMapper BrandMapper brandMapper = sqlSession.getMapper(BrandMapper.class); // 4. 计算 开始索引 和 查询条目数 int begin = (currentPage - 1) * pageSize; int size = pageSize; // 5. 查询当前页数据 List<Brand> rows = brandMapper.selectByPage(begin, size); // 6. 查询总记录数 int totalCount = brandMapper.selectTotalCount(); // 7. 封装 pageBean 对象 PageBean<Brand> pageBean = new PageBean<>(); pageBean.setRows(rows); pageBean.setTotalCount(totalCount); // 8. 释放资源 sqlSession.close(); return pageBean; } - Service 接口类:
- Web 层:
BrandServlet.java/** * 分页查询 * * @param request * @param response * @throws ServletException * @throws IOException */ public void selectByPage(HttpServletRequest request, HttpServletResponse response) throws ServletException, IOException { // 1. 接收 当前页码 和 每页展示条数 url?currentPage=1&pageSize=5 String _currentPage = request.getParameter("currentPage"); String _pageSize = request.getParameter("pageSize"); // 转换为 int 类型 int currentPage = Integer.parseInt(_currentPage); int pageSize = Integer.parseInt(_pageSize); // 2. 调用 Service 查询 PageBean<Brand> pageBean = brandService.selectByPage(currentPage, pageSize); // 2. 数据转为 JSON String jsonString = JSON.toJSONString(pageBean); // 3. 写数据 // 数据存在中文 response.setContentType("text/json;charset=utf-8"); response.getWriter().write(jsonString); } - 测试

前端

- 设置模型总记录数:
totalCount,初值设为100,在selectAll方法中赋值 - 当前页码模型 currentPage 初值设置为1
- 每页条数模型 pageSize,默认值为 5
// 每页显示条数 pageSize: 5, // 总记录数 totalCount: 100, // 当前页码 currentPage: 1, - currentPage 和 pageSize 动态拼接到 selectAll url 中
- selectAll 方法改为查询分页
// 查询分页数据 var _this = this; axios({ method: "get", url: "http://localhost:8080/brand-case/brand/selectByPageAndCondition?currentPage=" + this.currentPage + "&pageSize=" + this.pageSize, }).then(function (resp) { // 设置表格数据 _this.tableData = resp.data.rows; // 设置总记录数 _this.totalCount = resp.data.totalCount; }) - 分页工具条绑定了
handleCurrentChange和handleSizeChange方法,方法中将值设置到模型中,再调用selectAll方法即可//分页 handleSizeChange(val) { // console.log(`每页 ${val} 条`); // 重新设置每页显示条数 this.pageSize = val; // 重新查询 this.selectAll(); }, handleCurrentChange(val) { // console.log(`当前页: ${val}`); // 重新设置当前页码 this.currentPage = val; // 重新查询 this.selectAll(); },
业务 - 条件查询

后端

-
Dao 层
BrandMapper.java
    /**
     * 分页条件查询
     *
     * @param begin 开始索引
     * @param size  查询数据条数
     * @param brand 查询条件
     * @return
     */
    @ResultMap("brandResultMap")
    List<Brand> selectByPageAndCondition(@Param("begin") int begin, @Param("size") int size, @Param("brand") Brand brand);

    /**
     * 根据条件查询总记录数
     *
     * @param brand 查询条件
     * @return
     */
    int selectTotalCountByCondition(Brand brand);
BrandMapper.xml
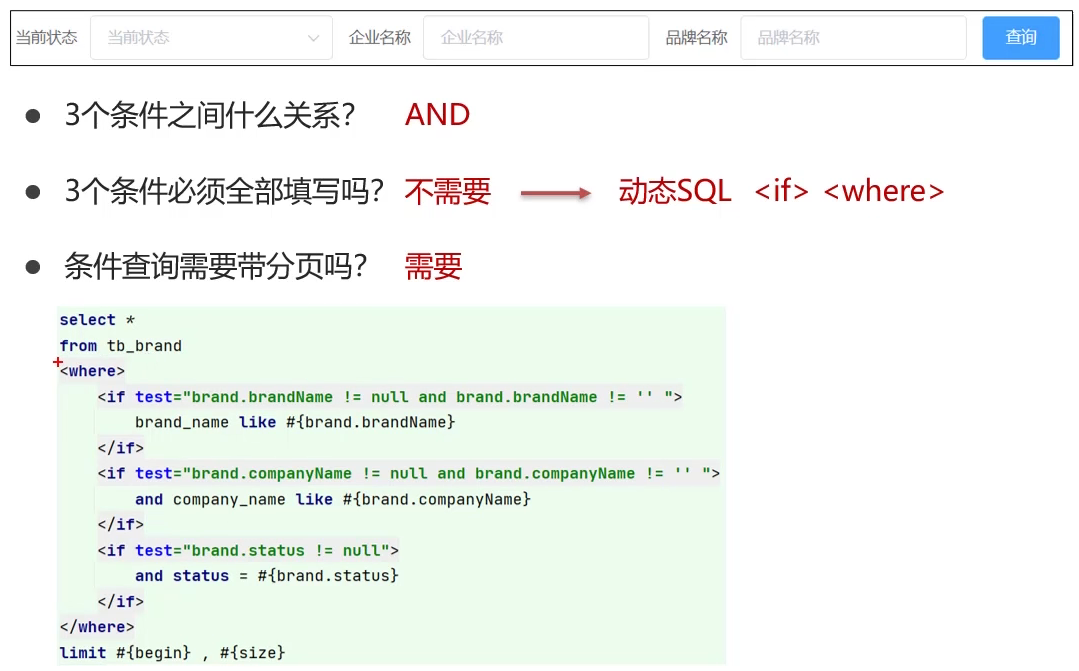
<select id="selectByPageAndCondition" resultMap="brandResultMap"> select * from tb_brand <where> <if test="brand.brandName != null and brand.brandName != ''"> and brand_name like #{brand.brandName} </if> <if test="brand.companyName != null and brand.companyName != ''"> and company_name like #{brand.companyName} </if> <if test="brand.status != null"> and status like #{brand.status} </if> </where> limit #{begin}, #{size} </select> <select id="selectTotalCountByCondition" resultType="java.lang.Integer"> select count(*) from tb_brand <where> <if test="brandName != null and brandName != ''"> and brand_name like #{brandName} </if> <if test="companyName != null and companyName != ''"> and company_name like #{companyName} </if> <if test="status != null"> and status like #{status} </if> </where> </select> -
Service 层
- Service 接口类:
BrandService.java
/** * 分页条件查询 * * @param currentPage * @param pageSize * @param brand * @return */ PageBean<Brand> selectByPageAndCondition(int currentPage, int pageSize, Brand brand);- Service 实现类:
BrandServiceImpl.java
@Override public PageBean<Brand> selectByPageAndCondition(int currentPage, int pageSize, Brand brand) { // 2. 获取 SqlSession 对象 SqlSession sqlSession = factory.openSession(); // 3. 获取 BrandMapper BrandMapper brandMapper = sqlSession.getMapper(BrandMapper.class); // 4. 计算 开始索引 和 查询条目数 int begin = (currentPage - 1) * pageSize; int size = pageSize; // 处理 brand 条件,模糊表达式 String brandName = brand.getBrandName(); if (brandName != null && brandName.length() > 0) { brand.setBrandName("%" + brandName + "%"); } String companyName = brand.getCompanyName(); if (companyName != null && companyName.length() > 0) { brand.setCompanyName("%" + companyName + "%"); } // 5. 查询当前页数据 List<Brand> rows = brandMapper.selectByPageAndCondition(begin, size, brand); // 6. 查询总记录数 int totalCount = brandMapper.selectTotalCountByCondition(brand); // 7. 封装 pageBean 对象 PageBean<Brand> pageBean = new PageBean<>(); pageBean.setRows(rows); pageBean.setTotalCount(totalCount); // 8. 释放资源 sqlSession.close(); return pageBean; } - Service 接口类:
-
Web 层:
BrandServlet.java/** * 分页条件查询 * * @param request * @param response * @throws ServletException * @throws IOException */ public void selectByPageAndCondition(HttpServletRequest request, HttpServletResponse response) throws ServletException, IOException { // 1. 接收 当前页码 和 每页展示条数 url?currentPage=1&pageSize=5 String _currentPage = request.getParameter("currentPage"); String _pageSize = request.getParameter("pageSize"); // 转换为 int 类型 int currentPage = Integer.parseInt(_currentPage); int pageSize = Integer.parseInt(_pageSize); // 获取查询条件对象 BufferedReader br = request.getReader(); String params = br.readLine(); // json 字符串 // 转为 brand 对象 Brand brand = JSON.parseObject(params, Brand.class); // 2. 调用 Service 查询 PageBean<Brand> pageBean = brandService.selectByPageAndCondition(currentPage, pageSize, brand); // 2. 数据转为 JSON String jsonString = JSON.toJSONString(pageBean); // 3. 写数据 // 数据存在中文 response.setContentType("text/json;charset=utf-8"); response.getWriter().write(jsonString); }
前端

- 搜索框绑定模型 brand
<!--搜索表单--> <el-form :inline="true" :model="brand" class="demo-form-inline"> - 给按钮绑定单击事件 onSubmit ,调用 selectAll 方法,这里我们就要给后台携带
brand参数(post 方式),但是我们还需要在 url 中携带 currentPage 和 pageSize 参数(get方式),需要同时传输 post 和 get 数据,所以把请求方式改为 post// 查询分页数据 var _this = this; axios({ method: "post", url: "http://localhost:8080/brand-case/brand/selectByPageAndCondition?currentPage=" + this.currentPage + "&pageSize=" + this.pageSize, data: this.brand }).then(function (resp) { // 设置表格数据 _this.tableData = resp.data.rows; // 设置总记录数 _this.totalCount = resp.data.totalCount; }) onSubmitthis.currentPage = 1;- 最后,测试时我们发现 status 显示的仍然是数字,我们要让其显示
启动/禁用,我们在Brand.java里面有逻辑视图getStatusStr,所以在前端页面表格中当前状态prpo取statusStr即可<el-table-column prop="statusStr" align="center" label="当前状态"> </el-table-column>
业务 - 删除功能
后端
- Dao 层:
BrandMapper.java/** * 删除操作 * @param id */ @Delete("delete from tb_brand where id = #{id}") void deleteById(int id); - Service 层
- Service 接口类:
BrandService.java
/** * 删除 * @param id */ void deleteById(int id);- Service 实现类:
BrandServiceImpl.java
@Override public void deleteById(int id) { // 2. 获取 SqlSession 对象 SqlSession sqlSession = factory.openSession(); // 3. 获取 BrandMapper BrandMapper brandMapper = sqlSession.getMapper(BrandMapper.class); // 4. 调用方法 brandMapper.deleteById(id); // 5. 提交事务 sqlSession.commit(); // 6. 释放资源 sqlSession.close(); } - Service 接口类:
- Web 层:
BrandServlet.java,这里我们不需要单独编写根据 id 删除的 servlet,直接调用deleteByIdIds即可
前端
- 删除操作前端要返回给后端删除数据的 id,这里我们通过
template参数scope可以获取到当前行的数据,然后从数据中取出 id,携带 id 通过 axios 向后端发起请求即可<el-table-column align="center" label="操作"> <template slot-scope="scope"> <el-row> <el-button type="primary">修改</el-button> <el-button type="danger" @click="deleteById(scope.row)">删除</el-button> </el-row> </template> </el-table-column>// 根据Id 删除 deleteById(row) { this.$confirm('此操作将永久删除该文件, 是否继续?', '提示', { confirmButtonText: '确定', cancelButtonText: '取消', type: 'warning' }).then(() => { // 用户点击确认按钮 let rowId = [row.id]; // 发送 ajax 请求,携带 id axios({ method: "pose", url: "http://localhost:8080/brand-case/brand/deleteByIds", data: rowId }).then(resp => { if (resp.data == 'success') { // 删除成功 // 重新查询数据 this.selectAll(); // 弹出消息提示 this.$message({ message: '恭喜你,删除成功', type: 'success' }); } }) }).catch(() => { this.$message({ type: 'info', message: '已取消删除' }); }); }
业务 - 修改功能
后端
- Dao 层:
BrandMapper.java/** * 更新操作 * * @param brand */ @Update("update tb_brand set brand_name = #{brandName}, company_name = #{companyName}, ordered = #{ordered}, " + "description = #{description}, status = #{status} where id = #{id}") void update(Brand brand); - Service 层
- Service 接口类:
BrandService.java
/** * 修改 * @param brand */ void update(Brand brand);- Service 实现类:
BrandServiceImpl.java
@Override public void update(Brand brand) { // 2. 获取 SqlSession 对象 SqlSession sqlSession = factory.openSession(); // 3. 获取 BrandMapper BrandMapper brandMapper = sqlSession.getMapper(BrandMapper.class); // 4. 调用方法 brandMapper.update(brand); // 5. 提交事务 sqlSession.commit(); // 6. 释放资源 sqlSession.close(); }- Web 层:
BrandServlet.java
/** * 更新操作 * * @param request * @param response * @throws ServletException * @throws IOException */ public void update(HttpServletRequest request, HttpServletResponse response) throws ServletException, IOException { // 1. 接收品牌数据 BufferedReader br = request.getReader(); String params = br.readLine(); // json 字符串 // JSON 字符串转为 brand 对象 Brand brand = JSON.parseObject(params, Brand.class); // 2. 调用 service 添加 brandService.update(brand); // 3. 响应成功标识 response.getWriter().write("success"); } - Service 接口类:
前端
- 首先,我们要新建一个 dialog 来进行数据回显(不用直接用新增数据的 dialog 的原因是新增 dialog 绑定的模型 brand 在搜索框也有绑定,直接使用会出现乱七八糟的问题),同时绑定模型
updateBrand<!--更新数据对话框表单--> <el-dialog title="更新品牌" :visible.sync="updateVisible" width="30%" > <el-form ref="form" :model="updateBrand" label-width="80px"> <el-form-item label="品牌名称"> <el-input v-model="updateBrand.brandName"></el-input> </el-form-item> <el-form-item label="企业名称"> <el-input v-model="updateBrand.companyName"></el-input> </el-form-item> <el-form-item label="排序"> <el-input v-model="updateBrand.ordered"></el-input> </el-form-item> <el-form-item label="备注"> <el-input type="textarea" v-model="updateBrand.description"></el-input> </el-form-item> <el-form-item label="状态"> <el-switch v-model="updateBrand.status" active-value="1" inactive-value="0" ></el-switch> </el-form-item> <el-form-item> <el-button type="primary" @click="updateByBrand">提交</el-button> <el-button @click="updateVisible = false">取消</el-button> </el-form-item> </el-form> </el-dialog> - updateBrand 模型 和
updateVisible定义如下// 更新brand updateBrand: { status: '', brandName: '', companyName: '', id: "", ordered: "", description: "" }, // 更新数据对话框是否展示的标记 updateVisible: false, - 在修改按钮通过
slot-scope的scope.row获取选中行数据<el-table-column align="center" label="操作"> <template slot-scope="scope"> <el-row> <el-button type="primary" @click="update(scope.row)">修改</el-button> <el-button type="danger" @click="deleteById(scope.row)">删除</el-button> </el-row> </template> </el-table-column> - 修改按钮绑定
update方法,进行数据回显// 数据回显 update(row) { // 数据回显 this.updateBrand = { status: row.status, brandName: row.brandName, companyName: row.companyName, id: row.id, ordered: row.ordered, description: row.description }; // 打开窗口 this.updateVisible = true; }, - update dialog 绑定
updateByBrand方法,进行更新操作// 更新数据 updateByBrand() { // 发送 ajax 请求,添加数据 axios({ method: "post", url: "http://localhost:8080/brand-case/brand/update", data: this.updateBrand }).then(resp => { if (resp.data == 'success') { // 添加成功 // 关闭窗口 this.updateVisible = false; // 重新查询数据 this.selectAll(); // 弹出消息提示 this.$message({ message: '恭喜你,更新成功', type: 'success' }); } }) }
问题:status(switch开关)回显有问题,目前不会实现
前端代码优化
- 最后,我们对 axios 进行一下优化,之前我们的异步请求代码是这样的
var _this = this; axios({ method: "post", url: "http://localhost:8080/brand-case/brand/selectByPageAndCondition?currentPage=" + this.currentPage + "&pageSize=" + this.pageSize, data: this.brand }).then(function (resp) { // 设置表格数据 _this.tableData = resp.data.rows; // 设置总记录数 _this.totalCount = resp.data.totalCount; }) - 因为在 axios 中 this 指代的是 axios 而不是 vue,我们每次都需要在 axios 外面先将指代 vue 的 this 赋值给 _this,然后在 axios 中使用 _this 调用 vue 中的模型,这样很不方便
- 我们可以将 axios then 的 function 改为箭头函数,箭头函数中 this 会根据上下文语义进行判断,这样就可以代表 vue 对象,修改如下
axios({
    method: "post",
    url: "http://localhost:8080/brand-case/brand/selectByPageAndCondition?currentPage=" + this.currentPage + "&pageSize=" + this.pageSize,
    data: this.brand
}).then(resp => {
    // 设置表格数据
    this.tableData = resp.data.rows;
    // 设置总记录数
    this.totalCount = resp.data.totalCount;
})
最后的成品我也打包放在了网盘,需要可以自行下载
链接:https://pan.baidu.com/s/1Ps3parEeOJtazS-Kv7bWEw
提取码:msjj
觉得本文还不错可以点个赞支持一下 😄