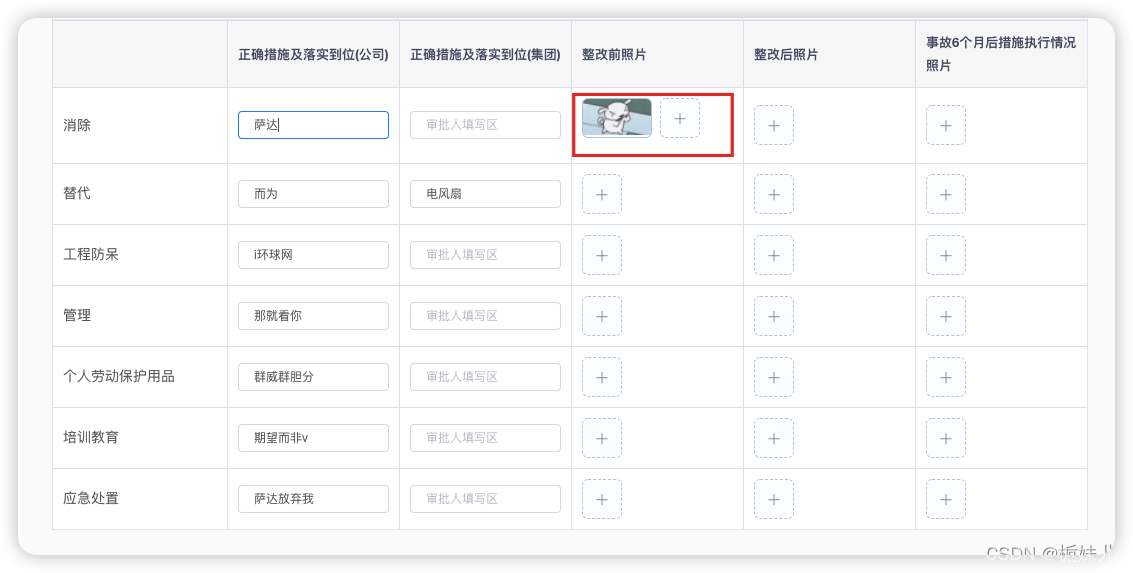
表格内嵌套上传图片实现:

Data中我绑定的table格式:
tableData: [
  {
    reasonName: "消除",//左边小标题
    reasonValue: "",//第一行的“公司措施”
    jituanValue: "",//第一行的“集团措施”
    uploadFilePath1:[],//第一行的“整改前照片”
    uploadFilePath2:[],//第一行的“整改后照片”
    uploadFilePath3:[],//第一行的“事故6个月后照片”
  },
],
上传图片的接口返回的成功数据:

template中的el-table以及其包含的el-input和el-upload:
<el-table border :data="tableData" style="width: 100%">
	 <el-table-column label=" " prop="reasonName" />
	 <el-table-column label="正确措施及落实到位(公司)">
	   <template slot-scope="scope">
	     <el-input size="mini" v-model="scope.row.reasonValue" />
	   </template>
	 </el-table-column>
	 <el-table-column label="正确措施及落实到位(集团)">
	   <template slot-scope="scope">
	     <el-input size="mini" v-model="scope.row.jituanValue" placeholder="审批人填写区"/>
	   </template>
	 </el-table-column>
	 <el-table-column label="整改前照片">
	   <template slot-scope="scope">
	     <el-upload
	       action="/file/file/uploadDocOrImg"
	       list-type="picture-card"
	       :file-list="scope.row.uploadFilePath1"
	       :auto-upload="true"
	       :on-success="
	         (response, file, fileList) =>
	           handleSuccess(
	             response,
	             file,
	             fileList,
	             scope.$index,
	             1
	           )
	       "
	     >
	       <i slot="default" class="el-icon-plus"></i>
	       <div slot="file" slot-scope="{ file }">
	         <img
	           class="el-upload-list__item-thumbnail"
	           :src="path + file.uploadFilePath"
	           alt=""
	         />
	         <span class="el-upload-list__item-actions">
	           <span
	             class="el-upload-list__item-preview"
	             @click="handlePictureCardPreview(file)"
	           >
	             <i class="el-icon-zoom-in"></i>
	           </span>
	           <span
	             class="el-upload-list__item-delete"
	             @click="handleRemove(file, scope.$index, 1)"
	           >
	             <i class="el-icon-delete"></i>
	           </span>
	         </span>
	       </div>
	     </el-upload>
	     <el-dialog :visible.sync="dialogVisible" append-to-body>
	       <img width="100%" :src="path + dialogImageUrl" alt="" />
	     </el-dialog>
	   </template>
	 </el-table-column>
	 <el-table-column label="整改后照片">
	   <template slot-scope="scope">
	     <el-upload
	       action="/file/file/uploadDocOrImg"
	       list-type="picture-card"
	       :file-list="scope.row.uploadFilePath2"
	       :auto-upload="true"
	       :on-success="
	         (response, file, fileList) =>
	           handleSuccess(
	             response,
	             file,
	             fileList,
	             scope.$index,
	             2
	           )
	       "
	     >
	       <i slot="default" class="el-icon-plus"></i>
	       <div slot="file" slot-scope="{ file }">
	         <img
	           class="el-upload-list__item-thumbnail"
	           :src="path + file.uploadFilePath"
	           alt=""
	         />
	         <span class="el-upload-list__item-actions">
	           <span
	             class="el-upload-list__item-preview"
	             @click="handlePictureCardPreview(file)"
	           >
	             <i class="el-icon-zoom-in"></i>
	           </span>
	           <span
	             class="el-upload-list__item-delete"
	             @click="handleRemove(file, scope.$index, 2)"
	           >
	             <i class="el-icon-delete"></i>
	           </span>
	         </span>
	       </div>
	     </el-upload>
	   </template>
	 </el-table-column>
	 <el-table-column label="事故6个月后措施执行情况照片">
	   <template slot-scope="scope">
	     <el-upload
	       action="/file/file/uploadDocOrImg"
	       list-type="picture-card"
	       :file-list="scope.row.uploadFilePath3"
	       :auto-upload="true"
	       :on-success="
	         (response, file, fileList) =>
	           handleSuccess(
	             response,
	             file,
	             fileList,
	             scope.$index,
	             3
	           )
	       "
	     >
	       <i slot="default" class="el-icon-plus"></i>
	       <div slot="file" slot-scope="{ file }">
	         <img
	           class="el-upload-list__item-thumbnail"
	           :src="path + file.uploadFilePath"
	           alt=""
	         />
	         <span class="el-upload-list__item-actions">
	           <span
	             class="el-upload-list__item-preview"
	             @click="handlePictureCardPreview(file)"
	           >
	             <i class="el-icon-zoom-in"></i>
	           </span>
	           <span
	             class="el-upload-list__item-delete"
	             @click="handleRemove(file, scope.$index, 3)"
	           >
	             <i class="el-icon-delete"></i>
	           </span>
	         </span>
	       </div>
	     </el-upload>
	   </template>
	 </el-table-column>
	</el-table>
提取上传部分主要代码:
<el-table-column label="整改前照片">
  <template slot-scope="scope">
    <el-upload
      action="你自己的上传路径"
      list-type="picture-card"
      :file-list="scope.row.uploadFilePath1"   //你自己的图片列表
      :auto-upload="true"
      :on-success="
        (response, file, fileList) =>   //改造图片上传成功函数
          handleSuccess(
            response,
            file,
            fileList,
            scope.$index,
            1  //因为我一行是三个图片列表,都用这个函数,so这里1代表第一组图片
          )
      "
    >
      <i slot="default" class="el-icon-plus"></i>
      <div slot="file" slot-scope="{ file }">
        <img
          class="el-upload-list__item-thumbnail"
          :src="file.你接收的那个地址"
          alt=""
        />
        <span class="el-upload-list__item-actions">
          <span
            class="el-upload-list__item-preview"
            @click="handlePictureCardPreview(file)"//预览函数
          >
            <i class="el-icon-zoom-in"></i>
          </span>
          <span
            class="el-upload-list__item-delete"
            @click="handleRemove(file, scope.$index, 1)"//删除函数
          >
            <i class="el-icon-delete"></i>
          </span>
        </span>
      </div>
    </el-upload>
    <el-dialog :visible.sync="dialogVisible" append-to-body> //预览弹出框
      <img width="100%" :src="dialogImageUrl" alt="" />
    </el-dialog>
  </template>
</el-table-column>
JS
如果成功我需要给我的tabledata中push完成的对象数据
点击删除tabledata需要删除对应图片
handleSuccess(res, file, fileList, index, flag) {
      let aaaa = {
        uploadFilePath: res.data.uploadFilePath,
        fileName: res.data.fileName,
      };
      switch (flag) {
      //找到第一组 往进push 下面同理
        case 1:
          this.tableData[index].uploadFilePath1.push(aaaa);
          break;
        case 2:
          this.tableData[index].uploadFilePath2.push(aaaa);
          break;
        case 3:
          this.tableData[index].uploadFilePath3.push(aaaa);
          break;
      }
    },
    handleRemove(file, index, flag) {
      switch (flag) {
        case 1:
          for (
            let i = 0;
            i < this.tableData[index].uploadFilePath1.length;
            i++
          ) {
            let element = this.tableData[index].uploadFilePath1[i];
            if (element.uploadFilePath == file.uploadFilePath) {
              this.tableData[index].uploadFilePath1.splice(i, 1);
            }
          }
          break;
        case 2:
          for (
            let i = 0;
            i < this.tableData[index].uploadFilePath2.length;
            i++
          ) {
            let element = this.tableData[index].uploadFilePath2[i];
            if (element.uploadFilePath == file.uploadFilePath) {
              this.tableData[index].uploadFilePath2.splice(i, 1);
            }
          }
          break;
        case 3:
          for (
            let i = 0;
            i < this.tableData[index].uploadFilePath3.length;
            i++
          ) {
            let element = this.tableData[index].uploadFilePath3[i];
            if (element.uploadFilePath == file.uploadFilePath) {
              this.tableData[index].uploadFilePath3.splice(i, 1);
            }
          }
          break;
      }
    },
    handlePictureCardPreview(file) {
      this.dialogImageUrl = file.uploadFilePath;
      this.dialogVisible = true;
    },
然后你就得到了这样的上传表格!

回传也很简单,只要给tabledata中对应的uploadFilePath123相应赋值即可
 this.measureTableData = [
    {
      reasonName: "消除",
      reasonValue:this.editObjOne.xcPlanCompany || "",
      jituanValue: this.editObjOne.xcPlanGroup || "",
      uploadFilePath1:this.editObjOne.xcFrontImage || [],
      uploadFilePath2:this.editObjOne.xcAfterImage || [],
      uploadFilePath3:this.editObjOne.xcSixAfterImage || [],
    },
    ...
]