🌼注:
在 2.6.0 中,我们为具名插槽和作用域插槽引入了一个新的统一的语法 (即 v-slot 指令)。它取代了 slot 和 slot-scope 这两个目前已被废弃但未被移除且仍在文档中的 attribute。新语法的由来可查阅这份 RFC。
用于替换solt标签的内部文本内容
插槽的关键词:
slot
普通插槽
标签内部会代替slot标签的内容
语法
在template内部放入
slot标签
当为传入值时则为默认内容,反之替代原来内容
Vue.component('alert-box',{
        template:
        `
        <div class='alert'>
            <h2>错误信息<h2>
            <slot>默认信息</slot>
        </div>
        `
   })
示例
.alert{
            background-color: yellowgreen;
        }
<div id="app">
        <alert-box></alert-box>
        <alert-box>你好,碰磕</alert-box>    <!--标签内部会代替slot标签的内容-->
    </div>
Vue.component('alert-box',{
        template:
        `
        <div class='alert'>
            <h2>错误信息<h2>
            <slot>默认信息</slot>
        </div>
        `
    })
    var vm=new Vue({
        el:'#app'
    })
效果图
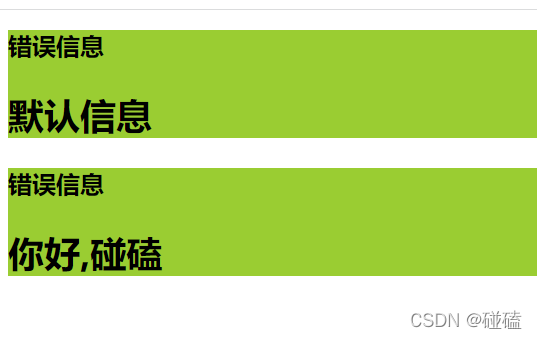
🚀当不传入信息时,则为默认信息,传入信息时则会替代slot标签
具名插槽
通过name命名指定插槽,向指定插槽替代文本
语法
主要代码:
<slot name='header'></slot>

HTML中:
<template slot="header">
        <p>header内容</p>
        <img src="./img/chunyu01.png" width="50" height="50" />
</template>
这样slot中为header中的内容会替代原来的文本
示例
.alert{
            background-color: yellowgreen;
        }
        header{
            background-color: green;
        }
<h1>具名插槽</h1>
    <div id="app">
        <!-- 使用 -->
        <base-layout>
            <template slot="header">
            <p>header内容</p>
            <img src="./img/chunyu01.png" width="50" height="50" />
            </template>
            <p>main1内容</p>
            <p>main2内容</p>
            <p slot="footer">footer内容</p>
        </base-layout>
    </div>
 Vue.component('base-layout',{
        template:
        `
        <div>
            <header>
                <slot name='header'></slot>
            </header>
            <main>
                <slot></slot>
            </main>
            <footer>
                <slot name='footer'></slot>
            </footer>
        </div>
        `
    })
    var vm=new Vue({
        el:'#app'
    })
效果图
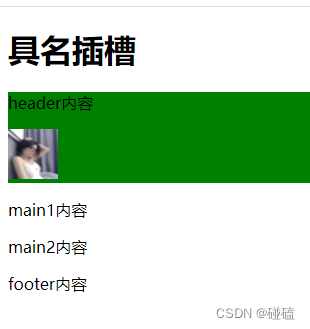
🚀slot标签的内部内容成功被替代,并且是根据name替代对应的
作用域插槽
用于获取子组件数据
语法
关键词v-solt
老版本slot-scope  2.6版本后v-slot代替

子组件中:<slot :属性名="值"></slot>
网页中:
		<template v-slot="scope">
                <h3>拿子组件数据{{scope.属性名.值}}</h3>
            </template>
示例
 body {
         background: linear-gradient(270deg, #0E6251, #28B463);
        }

       #app {
         display: flex;
       }

       .my-list {
         flex: 1 1 50%;
         font-family: Arial;
         color: white;
         margin: 20px;
       }
       .my-list .title {
         background: #A93226;
         padding: 20px;
         font-weight: bold;
         font-size: 22px;
         border-top-left-radius: 4px;
         border-top-right-radius: 4px;
       }
       .my-list .list {
         background: #34495E;
         padding: 20px;
         font-size: 16px;
         border-bottom-left-radius: 4px;
         border-bottom-right-radius: 4px;
       }
       .my-list .list-item:not(:last-child) {
         padding-bottom: 20px;
       }

       .swatch {
         display: inline-block;
         width: 15px;
         height: 10px;
         margin-right: 8px;
       }
<div id='app'>
 <!-- 形状列表 -->
        <my-list title="形状列表" :items="shapes">
            <template v-slot="list">
                <div>
                    {{list.item.name}}
                   <small>{{list.item.sides}}</small>
                </div>
            </template>
        </my-list>
        <!-- 颜色列表 -->
        <my-list title="颜色列表" :items="colors">
            <template v-slot="list">
                <div>
                    <div :style="{backgroundColor:[list.item.lab],width:'20px',height:'20px',display:'inline-block'}"></div>
                    <span :style="{color:[list.item.lab]}">{{list.item.name}}</span>
                </div>
            </template>
        </my-list>
 </div>
Vue.component("my-list",{
        props:['title','items'],
        template:
        `
        <div class="my-list">
            <div class="title">{{title}}</div>
            <div class="list">
                <div class="list-item" v-for="item in items">
                    <slot :item="item"></slot>
                </div>
            </div>
        </div>
        `
    });
    var vm=new Vue({
        el:"#app",
        data:{
            shapes:[
                {name: '正方形',sides:4},
                {name: '长方形',sides:6},
                {name: '三角形',sides:3}
            ],
            colors:[
                {name:'黄色',lab:'#F4D03F'},
                {name:'绿色',lab:'#229954'},
                {name:'粉色',lab:'#9B59B6'},
            ]
        }
    })
效果图
成功获取到值并且显示
终极练习
实现一个购物车…
做法
css样式:
.container {
    }
    .container .cart {
      width: 300px;
      margin: auto;
    }
    .container .title {
      background-color: lightblue;
      height: 40px;
      line-height: 40px;
      text-align: center;
      /*color: #fff;*/
    }
    .container .total {
      background-color: #FFCE46;
      height: 50px;
      line-height: 50px;
      text-align: right;
    }
    .container .total button {
      margin: 0 10px;
      background-color: #DC4C40;
      height: 35px;
      width: 80px;
      border: 0;
    }
    .container .total span {
      color: red;
      font-weight: bold;
    }
    .container .item {
      height: 55px;
      line-height: 55px;
      position: relative;
      border-top: 1px solid #ADD8E6;
    }
    .container .item img {
      width: 45px;
      height: 45px;
      margin: 5px;
    }
    .container .item .name {
      position: absolute;
      width: 90px;
      top: 0;left: 55px;
      font-size: 16px;
    }

    .container .item .change {
      width: 100px;
      position: absolute;
      top: 0;
      right: 50px;
    }
    .container .item .change a {
      font-size: 20px;
      width: 30px;
      text-decoration:none;
      background-color: lightgray;
      vertical-align: middle;
    }
    .container .item .change .num {
      width: 40px;
      height: 25px;
    }
    .container .item .del {
      position: absolute;
      top: 0;
      right: 0px;
      width: 40px;
      text-align: center;
      font-size: 40px;
      cursor: pointer;
      color: red;
    }
    .container .item .del:hover {
      background-color: orange;
    }
网页:
<div id="app">
    <h1></h1>
    <div class="container">
      <my-cart :title="mycart[0].cart_title" :list="mycart[1].cart_list" :total="mycart[2].cart_total" :dellist="del" :addnum="addnum" :jiannum="jiannum"></my-cart>
    </div>
  </div>
vue代码
将购物车分为三部分
标题(CartTitle),列表(CartList),总计(CartTotal)
var CartTitle = {
      props:['title'],
      template: `
        <div class="title">{{title}}</div>
      `
    }
    var CartList = {
      props:['list'],
      template: `
              <div>
                <div class="item" v-for="item,i in list">
                  <img :src="'./img/'+item.img"/>
                  <div class="name">{{item.name}}</div>
                  <div class="change">
                  <a href="#" @click="$emit('jian-num',i)">-</a>
                  <input type="text" class="num" :value="item.num" />
                  <a href="#" @click="$emit('add-num',i)">+</a>
                  </div>
                  <div class="del" @click="$emit('del-list',i)">×</div>
                </div>
              </div>
      `
    }
    var CartTotal = {
      props:['total'],
      template: `
      <div class="total">
        <span>总价:{{total}}</span>
        <button>结算</button>
      </div>
      `
    }
再加入到购物车上
- dellist代表清空购物车某一项的方法
- addnum 代表数量+1
- jiannum 代表数量-1
通过$emit实现通知父组件调用对应方法
Vue.component('my-cart',{
      props:['title','list','total','dellist','addnum','jiannum'],
      template: `
        <div class='cart'>
          <cart-title :title="title"></cart-title>
          <cart-list :list="list" @del-list="dellist" @add-num="addnum" @jian-num="jiannum"></cart-list>
          <cart-total :total="total"></cart-total>
        </div>
      `,
      components: {
        'cart-title': CartTitle,
        'cart-list': CartList,
        'cart-total': CartTotal
      }
    });
父组件数据与函数的编写
 var vm = new Vue({
      el: '#app',
      data: {
        mycart:
        [
          {cart_title:'我的购物车'},
          {cart_list:[
            {name:'1号商品',img:'chunyu01.png',price:10,num:2},
            {name:'2号商品',img:'chunyu02.png',price:16,num:2},
            {name:'3号商品',img:'chunyu03.png',price:11,num:2},
          ]},
          {cart_total:74}
        ]
      },
      methods:{
        addnum(v){
            this.mycart[1].cart_list[v].num++;
            this.mycart[2].cart_total+=this.mycart[1].cart_list[v].price;
        },
        jiannum(v){
          if(this.mycart[1].cart_list[v].num==1){
            alert("已经只剩一件了~");
            return;
          }
          this.mycart[1].cart_list[v].num--;
          this.mycart[2].cart_total-=this.mycart[1].cart_list[v].price;
        },
        del(v){
        this.mycart[2].cart_total-=this.mycart[1].cart_list[v].price*this.mycart[1].cart_list[v].num;
          this.mycart[1].cart_list.splice(v,1);
        }
      }
    });
效果图
当数量为1时便会提示最后一件~,总价也会随着数量的变化而变化
购物车就这样成功实现了~


