webpack 优化配置
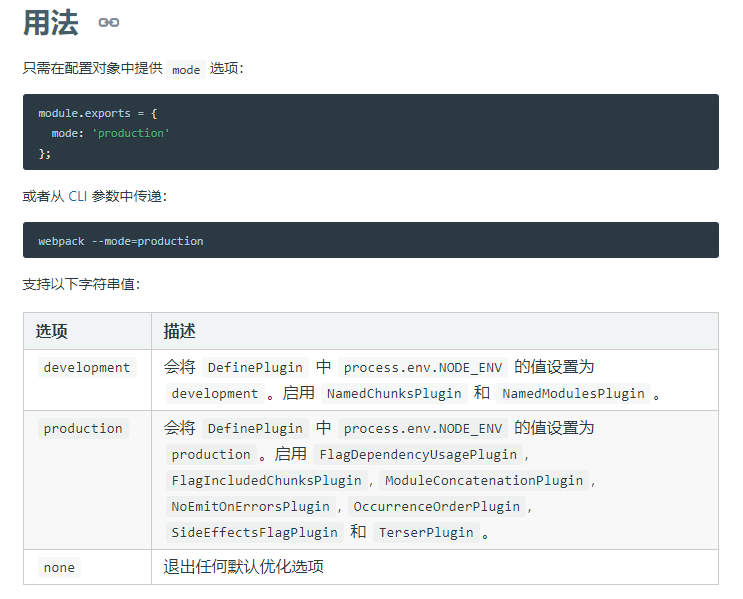
webpack4 引入了 mode 模式,可以配置开发和生产模式,就可以使用一些已经默认好的插件帮我们达到想做的效果

Tree-shaking
-
上下文未用到的代码(dead code)
-
给予 ES6 import export
Tree-shaking 基础:无论是自己还是第三方,必须是模块化的,要基于 ES6 import export 导入导出的形式才可以,生产模式会默认启动 Tree-shaking,主要依赖于
TerserPlugin插件Tree-shaking 原理:从 index.js 开始,去看引用了哪些东西,进一步分析所有引入的包或模块里又引用了哪些模块或其他一些包,最后会把需要的东西都留下
-
package.json中配置sideEffects因为它的实现是基于一定的规则,不过在 JS 里,可能会涉及到修改全局作用域(window 对象),如果把这个 shake 掉,代码就会出现问题,这时就需要使用
sideEffects来告诉 webpack 哪些文件不需要 shake"sideEffects": [ "*.css" ] -
注意 Babel 默认配置的影响
presets就是把常用的 babel 插件做了一个集合。它有个问题:在转码时会把 ES6 模块化的语法转换成其他语法,我们希望保留 ES6 模块化语法,所以要加上modules: false,这样 Tree-shaking 才能起到作用module.exports = { presets: [ [ '@babel/preset-env', { modules: false, targets: { browsers: ['>0.25%'], }, useBuiltIns: 'usage', bugfixes: true, }, ], '@babel/preset-react', ], plugins: ['@babel/plugin-proposal-class-properties', '@babel/plugin-transform-runtime'], }
JS 压缩
-
uglifyjs-webpack-plugin:不支持 ES6 压缩 (Webpack4 以前)const UglifyJsPlugin = require('uglifyjs-webpack-plugin') module.exports = { optimization: { minimizer: [new UglifyJsPlugin()], }, } -
terser-webpack-plugin:支持压缩 ES6 (Webpack4)terser 无论从销量还是效果上都比 uglifyjs 好,所以 terser 后面座位生产模式下默认的压缩插件
const TerserPlugin = require('terser-webpack-plugin')

module.exports = {
  optimization: {
    minimizer: [new TerserPlugin()],
  },
}
作用域提升
-
代码体积减小
减少调用关系逻辑上的代码,把一些函数进行合并
-
提高执行效率
要进行引用的话,回花时间进行查找
-
同样注意 Babel 的 modules 的配置
需要加上
modules: false的配置
没有启用作用域提升的话,会把这两个模块打成单独的模块,当其中一个依赖到另一个时,会把依赖到的模块 require 进来,再通过 require 进来的模块进行调用
启用作用域提升,会做一个合并和分析,发现有这种依赖调用时,试图把依赖合并到调用里,最终变得更加精简
/**************** util.js ********************/
export default 'Hello,Webpack';

/**************** index.jsx ******************/
import str from './util';
console.log(str);

/***************** 没有 scope hoisting, webpack 打包后 *******************/
[
  (function (module, __webpack_exports__, __webpack_require__) {
    var __WEBPACK_IMPORTED_MODULE_0__util_js__ = __webpack_require__(1);
    console.log(__WEBPACK_IMPORTED_MODULE_0__util_js__["a"]);
  }),
  (function (module, __webpack_exports__, __webpack_require__) {
    __webpack_exports__["a"] = ('Hello,Webpack');
  })
]
/************************************/

/***************** 有 scope hoisting, webpack 打包后 ********************/
[
  (function (module, __webpack_exports__, __webpack_require__) {
    var util = ('Hello,Webpack');
    console.log(util);
  })
]
/************************************/
Babel 优化配置
- 在需要的地方引用 polyfill
- 辅助函数的按需引入
- 根据目标浏览器按需转换代码
按需加载 polyfill
-
polyfill 是兼容旧浏览器去进行新功能或新规范的实现
由于这个比较大,需要把所有涉及到的东西都引进来,但我们用到的可能是其中比较小的部分,这时配置
useBuiltIns: 'usage'即可通过
targets: { browsers: ['>0.25%'] }来对市场份额超 0.25% 的浏览器进行支持。browserlistmodule.exports = { presets: [ [ '@babel/preset-env', { modules: false, targets: { browsers: ['>0.25%'], }, useBuiltIns: 'usage', bugfixes: true, }, ], '@babel/preset-react', ], plugins: ['@babel/plugin-proposal-class-properties', '@babel/plugin-transform-runtime'], }
辅助函数的按需引入
- 声明一个 class,babel 转码后如下图:

webpack 依赖优化
noParse(不解析)
-
提高构建速度
-
直接通知 webpack 忽略较大的库
通常是第三方的一些类库,一般是比较大的库,且没用模块化的方式去编写,那么它本身也不会有外部的依赖,所以我们就可以不对它进行解析
-
被忽略的库不能有 import、require、define 的引入方式
module: {
  noParse: /lodash/, // loadsh比较独立
  noParse: /^(vue|vue-router|vuex|vuex-router-sync)$/, // vue-cli里的配置
}
DllPlugin
-
避免打包时对不变的库重复构建
比如:react 和 react-dom 其实从开始构建项目开始到最后上线都不太可能变了,我们可以对其进行动态链接库的引用,不再重复构建
-
提高构建速度
-
应用场景
生产环境应用的可能性比较小,因为生产环境不会经常打包,慢一点也不会介意
/* package.json */
{
  "scripts": {
    "dll-build": "cross-env NODE_ENV=production webpack --config webpack.dll.config.js"
  }
}

/* webpack.dll.config.js */
const path = require('path')
const webpack = require('webpack')
module.exports = {
  mode: 'production',
  entry: {
    react: ['react', 'react-dom'],
  },
  output: {
    filename: '[name].dll.js',
    path: path.resolve(__dirname, 'dll'),
    library: '[name]',
  },
  plugins: [
    new webpack.DllPlugin({
      name: '[name]',
      path: path.resolve(__dirname, 'dll/[name].manifest.json'),
    }),
  ],
}

/* webpack.config.js */
const DllReferencePlugin = require('webpack/lib/DllReferencePlugin');
module.exports = smp.wrap({
  plugins: [
    /* 动态链接库引用 */
    new DllReferencePlugin({
      manifest: require(`${__dirname}/dll/react.manifest.json`),
    }),
  ],
}
webpack 细节优化
代码拆分
- 把单个 bundle文件拆分成若干个 bundles/chunks
- 缩短首屏加载时间
webpack 代码拆分方法:
-
手工定义入口
-
splitChunks 提取公有代码,拆分业务代码与第三方库
- 把我们代码中重复使用的东西提取出来
- 把我们这个业务逻辑与第三方依赖进行拆分
webpack 处理文件路径时,它们始终包含 Unix 系统中的
/和 Windows 系统中的\,所以会在前面加上[\\/]chunks:有效值为
all、async、initial,initial是同步加载,async是一部加载minChunks:拆分前必须共享模块的最小 chunks 数
module.exports = smp.wrap({ optimization: { splitChunks: { cacheGroups: { vendor: { name: 'vendor', test: /[\\/]node_modules[\\/]/, minSize: 0, minChunks: 1, priority: 10, chunks: 'initial', }, common: { name: 'common', test: /[\\/]src[\\/]/, chunks: 'all', minSize: 0, minChunks: 2, }, }, }, }, }) -
动态加载
<Suspense fallback={<div>Loading...</div>}>
  <Card
    key={panel.name}
    image={panel.image}
    title={panel.name}
    route={panel.route}
    description={panel.body}
  />
</Suspense>
资源压缩
- Terser 压缩 JS
- mini-css-extract-plugin 压缩 CSS
- HtmlWebpackPlugin-minify 压缩 HTML
// webpack.production.config.js
module.exports = {
  mode: 'production',
  performance: {
    hints: 'warning',
  },
  output: {
    pathinfo: false,
  },
  optimization: {
    namedModules: false,
    namedChunks: false,
    nodeEnv: 'production',
    flagIncludedChunks: true,
    occurrenceOrder: true,
    sideEffects: true,
    usedExports: true,
    concatenateModules: true,
    splitChunks: {
      hidePathInfo: true,
      minSize: 30000,
      maxAsyncRequests: 5,
      maxInitialRequests: 3,
    },
    noEmitOnErrors: true,
    checkWasmTypes: true,
    minimize: true,
  },
  plugins: [
    new TerserPlugin(/* ... */),
    new webpack.DefinePlugin({ 'process.env.NODE_ENV': JSON.stringify('production') }),
    new webpack.optimize.ModuleConcatenationPlugin(),
    new webpack.NoEmitOnErrorsPlugin(),
  ],
}
mini-css-extract-plugin 压缩 CSS
module.exports = {
  plugins: [
    new MiniCssExtractPlugin({
      filename: '[name].[hash].css',
      chunkFilename: '[id].[chunkhash:8].css',
    }),
    new OptimizeCssAssetsPlugin({
      cssProcessorPluginOptions: {
        preset: ['default', { discardComments: { removeAll: true } }],
      },
      canPrint: true,
    }),
  ]
}
HtmlWebpackPlugin-minify 压缩 HTML
{
  collapseWhitespace: true, // 移除空格、换行符
  keepClosingSlash: true, // 保留元素的末尾斜杠
  removeComments: true, // 移除注释
  removeRedundantAttributes: true, // 移除冗余属性(默认值)
  removeScriptTypeAttributes: true, // 移除script标签中的type属性
  removeStyleLinkTypeAttributes: true, // 移除style标签中的type属性
  useShortDoctype: true // 使用html5短的描述方式
}
资源持久化缓存
-
每次打包的资源文件有唯一的 hash 值
-
修改后只有受影响到的文件 hash 变化
-
充分利用浏览器缓存
hash 特点:离散唯一的值,如果内容不变,计算出来的值也不变
contenthash 会根据内容生成 hash,当只改 JS 时,进行重新打包后,CSS 就会保持原有的 hash 值。当更新部署时,就可以充分利用浏览器缓存,这样就可以保证用户体验且能进行一个平稳的更新过度
module.exports = {
  output: {
    path: `${__dirname}/build`,
    filename: '[name].[hash].bundle.js',
    chunkFilename: '[name].[chunkhash:8].bundle.js',
  },
  plugins: [
    new MiniCssExtractPlugin({
      filename: '[name].[contenthash].css',
      chunkFilename: '[id].[contenthash:8].css',
    }),
  ]
}
应用大小检测与分析
- Stats 分析与可视化图
- webpack-bundle-analyzer 进行体积分析
- speed-measure-webpack-plugin 速度分析
通过:webpack --profile --json > stats.json 生成 stats.json文件,之后将这个上传到这个网站即可

这个可能还是不够细,想进一步分析可以使用 bundle-analyzer 工具实现,这里使用 source-map-explorer 进一步分析
npm i source-map-explorer
这个分析不是基于我们的 bundle 文件,而是基于 sourcemap,需要需要生成 sourcemap
/* package.json */
{
  "scripts": {
    "analyze": "source-map-explorer 'build/*.js'"
  },
}

/* webpack.config.js */
module.exports = smp.wrap({
  mode: 'production',
  devtool: 'source-map'
}

官方推荐的 bundle-analyzer 可以得到可视化图,不过相比 source-map-explorer 相比,它只能看个大概,少一些具体内容

速度分析可以使用speed-measure-webpack-plugin,运行 npm run build 即可看到所有 plugins 和所有 loaders 的使用情况
const SpeedMeasurePlugin = require('speed-measure-webpack-plugin')
const smp = new SpeedMeasurePlugin()

module.exports = smp.wrap({...})
React 按需加载实现方式
- React router 基于 webpack 动态引入
- 使用 Reloadable 高级组件
import loadable from '@loadable/component'

// 使用React-Loadable动态加载组件
const LoadableAbout = loadable(() => import('./About.jsx'), {
  fallback: '<div>loading...</div>',
})
class App extends React.Component {
  render() {
    return (
      <Router>
        <Switch>
          <Route exact path="/" component={Home} />
          <Route path="/about" component={LoadableAbout} />
        </Switch>
      </Router>
    )
  }
}
代码拆分最初是为了解决一个过大请求的问题
-
通过一个请求,把整个包加载到首页,这时网络开销相对少但是包体积大,所以下载耗时长
-
我们可以把较大的包做拆解,拆分成若干个小包,小包只有被调用时才会加载(按需加载)
假如拆分水平定义到组件,那所有组件都被拆分成一个独立的模块,就会有很多 bundle 或 chunk,那就要发起若干个请求,开销会更大
-
通常最合理的方式就是按照路由进行按需加载,而当页面上一些组件在不同路由页面会被进行复用时,才把组件单独进行拆解