铺垫知识
1. ES6模块化
1-1. 回顾:node.js中如何实现模块化
node.js 遵循了 CommeonJS 的模块化规范。其中:
导入其他模块使用 require() 方法
模块对外共享成员使用 module.exports 对象
模块化的好处:
大家都遵守同样的模块化规范写代码,降低了沟通的成本,极大方便了各个模块之间的相互调用,利人利己。
1-2. 前端模块化规范的分类
在 ES6模块化规范 但是之前,JavaScript社区已经尝试并提出了 AMD、CMD、 CommonJS 等模块化规范。
但是,这些由社区提出的模块化标准,还是存在一定的差异性与局限性、并不是浏览器与服务器通用的模块化标准,例如:
AMD 和 CMD 适用于浏览器端的JavaScript模块化
CommonJS 适用于服务器端的JavaScript模块化
太多的模块化规范给开发者增加了学习的难度与开发的成本。因此,大一统的 ES6 模块化规范诞生了!
1-3. 什么是ES6模块化规范
ES6模块化规范是浏览器端与服务器端通用的模块化开发规范。它的出现极大降低了前端开发者的模块化学习成本,开发者不需要再额外学习AMD、CMD或CommonJS等模块化规范。
ES6 模块化规范中定义:
- 每个JS文件都是一个独立的模块
- 导入其他模块成员使用 import 关键字
- 向外共享模块成员使用 export 关键字
1-4. 在node.js中体验ES6模块化
node.js中 默认仅支持CommonJS模块化规范,若想基于node.js体验与学习ES6的模块化语法,可以按照如下两个步骤进行配置:
- 确保安装了 v14.15.1 或更高版本的node.js
- 在 package.json 的根节点中添加 “type”:“module” 节点
PS C:\Users\21757\Desktop\Vue铺垫知识\day1> npm init -y
{
  "type": "module", // 这里配置为module
  "name": "day1",
  "version": "1.0.0",
  "description": "",
  "main": "index.js",
  "scripts": {
    "test": "echo \"Error: no test specified\" && exit 1"
  },
  "keywords": [],
  "author": "",
  "license": "ISC"
}
1-5. ES6 模块化的基本用法
ES6 的模块化主要包含如下3种用法:
- 默认导出 与 默认倒入
- 按需导出 与 按需倒入
- 直接倒入并执行模块中的代码
1-5-1. 默认导出 与 默认导入 及注意事项
默认导出的语法:export default 默认导出的成员
let n1 = 10; // 定义模块私有成员 n1
let n2 = 20; // 定义模块私有成员 n2 (外界访问不到 n2,因为它没有被共享出去)
function show() {} // 定义模块私有方法 show

export default { // 使用 export default 默认导出语法,向外共享 n1 和 show 两个成员
    n1,
    show
}
默认导入的语法:import 接收名称 from ‘模块标识符’
// 从 01.默认导出.js 模块中导入 export default 向外共享的成员
// 并使用 m1 成员进行接收
import m1 from './01.默认导出.js'; //注意:文件后面要有后缀

console.log(m1); // { n1: 10, show: [Function: show] }
每个模块中,只允许使用唯一的一次 export default,否则会报错!
let n1 = 10;
let n2 = 20;

function show() {}

export default {
    n1,
    show
}

// SyntaxError: Identifier '.default' has already been declared
export default {
    n2
}
默认导入时的接收名称可以任意命名,只要是合法的成员名称即可:
// m1 是合法的名称
import m1 from './01.默认导出.js';

// 123m 不是合法的名称,因为成员名称不能以数字开头
import 123m from './01.默认导出.js';
1-5-2. 按需导出 与 按需导入 及注意事项
按需导出的语法:export 按需导出的成员
// 当前模块为03.按需导出.js
// 向外按需导出变量 s1、s2 和 say方法
export let s1 = 'aaa';
export let s2 = 'ccc';
export function say() {};
按需导入的语法:import { s1 } from ‘模块标识符’
import { s1, s2, say } from './03.按需导出.js';

console.log(s1); // aaa
console.log(s2); // ccc
console.log(say); // [Function: say]
注意事项:
- 每个模块中可以使用 多次 按需导出
- 按需 导入的成员名称 必须和 按需导出的成员名称 保持一致
- 按需导入时,可以使用 as关键字 进行重命名
- 按需导入可以和默认导入一起使用
// 示例:as关键字
import { s1, s2 as str2, say } from './03.按需导出.js';
// 示例:默认导入和按需导入一起使用
import info, { s1, s2 as str2, say } from './03.按需导出.js';
1-5-2. 直接导入并执行模块中的代码
如果只想单纯地只想某个模块中的代码,并不需要得到模块中向外共享的成员。此时,可以直接导入并执行模块代码,示例代码如下:
// 当前文件模块为 05.直接运行模块中代码.js
for (let i = 0; i < 3; i++) {
    console.log(i);
}
// 直接导入并执行模块代码,不需要得到模块向外共享的成员
import './05.直接运行模块中代码.js'; // 0 1 2
2. Promise
2-1. 回调地狱
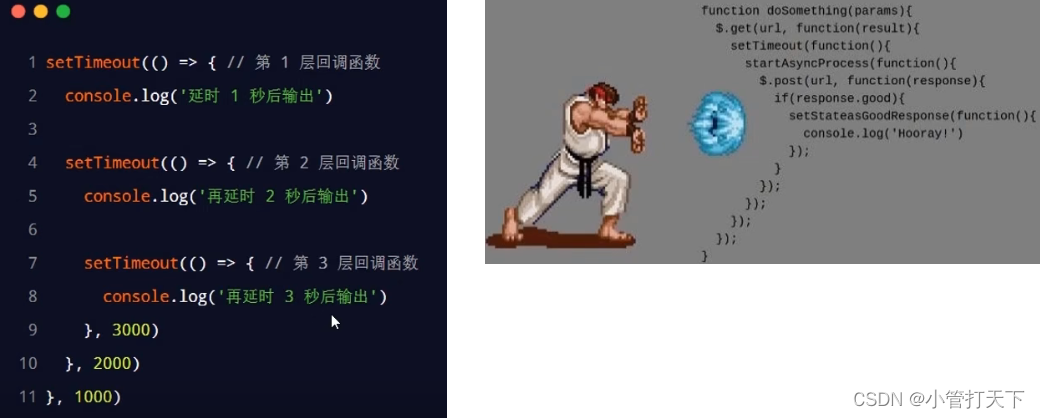
多层回调函数的相互嵌套,就形成了回调地狱。示例代码如下:

回调地狱的缺点:
- 代码耦合性太强,牵一发而动全身,难以维护
- 大量冗余的代码相互嵌套,代码的 可读性差
如何解决回调地狱的问题?
为了解决回调地狱的问题,ES6(ECMAScript2015)中新增了 Promise 的概念。
2-2. Promise的基本概念
Promise是一个构造函数:
- 我们可以创建 Promise 的实例 const p = new Promise
- new 出来的 Promise 实例对象,代表一个异步对象
Promise.prototype 上包含一个 .then() 方法:
- 每一次 new Promise() 构造函数得到的实例对象,
- 都可以通过原型链的方式访问到 .then() 方法,例如 p.then()
then() 方法用来预先指定成功和失败的回调函数:
- p.then(成功的回调函数,失败的回调函数)
- p.then(result=>{}, error=>{})
- 调用 .then() 方法时,成功的回调函数是必选的、失败的回调函数是可选的
2-3. 基于回调函数按顺序读取文件内容
由于 node.js 官方提供的 fs 模块仅支持以回调函数的方式读取文件,不支持Promise的调用方式。因此,需要先运行如下的命令,安装 then-fs 这个第三方包,从而支持我们基于 Promise 的方式读取文件的内容。
npm i then-fs
调用 then-fs 提供的 readFile() 方法,可以异步地读取文件的内容,它的返回值是 Promise 的实例对象。因此可以调用.then()方法为每个 Promise 异步操作指定成功和失败之后的回调函数。示例代码如下:
import thenFs from 'then-fs';
// 注意:.then() 中的失败回调是可选的,可以被省略
thenFs.readFile('./files/1.txt', 'utf8').then((r1) => { console.log(r1) })
thenFs.readFile('./files/2.txt', 'utf8').then((r2) => { console.log(r2) })
thenFs.readFile('./files/3.txt', 'utf8').then((r3) => { console.log(r3) })
注意:上述的代码无法保证文件的读取顺序,需要做进一步的改进!

2-4. then() 方法的特性
如果上一个 .then() 方法中返回了一个新的 Promise 实例对象,则可以通过下一个 .then() 继续进行处理。通过 .then() 方法的链式调用,就解决了回调地狱的问题。
Promise 支持链式调用,从而来解决回调地狱的问题。示例代码如下:
import thenFs from 'then-fs'

thenFs.readFile('./files/1.txt', 'utf8') // 1. 返回值是 Promise 的实例对象
    .then((r1) => { // 2. 通过 .then 为第一个 Promise 实例指定之后的回调函数
        console.log(r1)
        return thenFs.readFile('./files/2.txt', 'utf8') // 3. 在第一个 .then 中返回一个新的 Promise 实例对象
    })
    .then((r2) => { // 4. 继续调用 .then 为上一个 .then 的返回值(新的 Promise 实例)指定之后的回调函数
        console.log(r2)
        return thenFs.readFile('./files/3.txt', 'utf8') // 5. 在第二个 .then 中返回一个新的 Promise 实例对象
    })
    .then((r3) => { // 6. 继续调用 .then 为上一个 .then 的返回值(新的 Promise 实例)指定之后的回调函数
        console.log(r3)
    })
2-5. 通过 .catch 捕获错误
在 Promise 的链式操作中如果发生了错误,可以使用 Promise.prototype.catch 方法进行捕获和处理:
thenFs
    .readFile('./files/11.txt', 'utf8') // 只要报错了那么后面的 .then 就不会执行,直接进入到 .catch 的处理过程
    .then((r1) => {
        console.log(r1)
        return thenFs.readFile('./files/2.txt', 'utf8')
    })
    .then((r2) => {
        console.log(r2)
        return thenFs.readFile('./files/3.txt', 'utf8')
    })
    .then((r3) => {
        console.log(r3)
    })
    .catch((err) => {
        console.log(err.message)
    })
    // 输出:ENOENT: no such file or directory
如果不希望前面的错误导致后续的 .then 无法正常执行,则可以将 .catch 的调用提前,示例代码如下:
import thenFs from 'then-fs'

thenFs
    .readFile('./files/11.txt', 'utf8')
    .catch((err) => {
        console.log(err.message)
    })
    .then((r1) => {
        console.log(r1)
        return thenFs.readFile('./files/2.txt', 'utf8')
    })
    .then((r2) => {
        console.log(r2)
        return thenFs.readFile('./files/3.txt', 'utf8')
    })
    .then((r3) => {
        console.log(r3)
    })
    // 输出:
    // ENOENT: no such file or directory
    // undefined
	// 222
	// 333
2-6. Promise.all() 方法
Promise.all() 方法会发起并行的 Promise 异步操作,等所有的异步操作全部结束后才会执行下一步的 .then 操作(等待机制)。示例代码如下:
import thenFs from 'then-fs'

const promiseArr = [
    thenFs.readFile('./files/3.txt', 'utf8'),
    thenFs.readFile('./files/2.txt', 'utf8'),
    thenFs.readFile('./files/1.txt', 'utf8'),
]

Promise.all(promiseArr).then(result => {
    console.log(result)
})
// 打印结果:[ '333', '222', '111' ]
注意:数组中 Promise 实例的顺序,就是最终结果的顺序!
2-7. Promise.race() 方法
Promise.race() 方法会发起并行的 Promise 异步操作,只要任何一个异步操作完成,就立即执行下一步的 .then 操作(赛跑机制)。示例代码如下:
import thenFs from 'then-fs'

const promiseArr = [
    thenFs.readFile('./files/3.txt', 'utf8'),
    thenFs.readFile('./files/2.txt', 'utf8'),
    thenFs.readFile('./files/1.txt', 'utf8'),
]

Promise.race(promiseArr).then(result => {
    console.log(result) // 拿到的结果是执行最快的
})
// 打印结果:'333'
2-8. 基于 Promise 封装读文件的方法
在new Promise() 的时候可以传一个 function 函数,将具体的异步操作写到 function 函数内部,比如:读取文件、AJAX等
通过 .then 指定的成功和失败的回调函数,可以在 function 的形参中进行接收。
Promise 异步操作的结果,可以调用 resolve 或 reject 回调函数进行处理。示例代码如下:
import fs from 'fs'

function getFile(fpath) {
  return new Promise(function (resolve, reject) {
    fs.readFile(fpath, 'utf8', (err, dataStr) => {
      if (err) return reject(err)
      resolve(dataStr)
    })
  })
}

// 写法一
getFile('./files/11.txt').then((r1) => {console.log(r1)},(err)=>{console.log(err.message)}) 一

// 写法二
getFile('./files/11.txt').then((r1) => {console.log(r1)}).catch((err) => console.log(err.message))
3. async/await
3-1. async/await的概念
async/await 是 ES8(ECMAScrpit 2017)引入的新语法,用来简化 Promise 异步操作。在 async/await 出现之前,开发者只能通过链式 .then() 的方式处理 Promise 异步操作。
import thenFs from 'then-fs'

thenFs.readFile('./files/1.txt', 'utf8')
    .then((r1) => {
        console.log(r1)
        return thenFs.readFile('./files/2.txt', 'utf8')
    })
    .then((r2) => {
        console.log(r2)
        return thenFs.readFile('./files/3.txt', 'utf8')
    })
    .then((r3) => {
        console.log(r3)
    })
.then 链式调用的 优点:解决了回调地狱的问题
.then 链式调用的 缺点:代码冗余、阅读性差、不易理解
3-1. async/await的基本使用
在 async 修饰的方法里,如果某个方法的返回值是一个Promise实例,那么在这个方法的前面加一个 await,接收的返回值就是Promise返回的结果
import thenFs from 'then-fs'

async function getAllFile() {
    const r1 = await thenFs.readFile('./files/1.txt', 'utf8')
    console.log(r1)
    const r2 = await thenFs.readFile('./files/2.txt', 'utf8')
    console.log(r2)
    const r3 = await thenFs.readFile('./files/3.txt', 'utf8')
    console.log(r3)
}

getAllFile()
3-1. async/await 的注意事项
- 如果 function 中使用了 await,则 function 必须被 async 修饰
- 在 async 方法中,第一个 await 之前的代码会同步执行,await之后的代码会异步执行
import thenFs from 'then-fs'

console.log('A')
async function getAllFile() {
    console.log('B')
    // 之后的代码都异步执行
    const r1 = await thenFs.readFile('./files/1.txt', 'utf8')
    console.log(r1)
    const r2 = await thenFs.readFile('./files/2.txt', 'utf8')
    console.log(r2)
    const r3 = await thenFs.readFile('./files/3.txt', 'utf8')
    console.log(r3)
    console.log('D')
}

getAllFile()
console.log('C')
// 打印输出:
// --同步执行--
// A
// B
// C
// --异步执行--
// 111
// 222
// 333
// D
4. EventLoop
4-1. JavaScript是单线程语言
JavaScript是一门单线程执行的编程语言。也就是说,同一时间只能做一件事情。

单线程执行任务队列的问题:
如果前一个任务非常耗时,则后续的任务就不得不一直等待,从而导致程序假死的问题。
4-2. 同步任务和异步任务
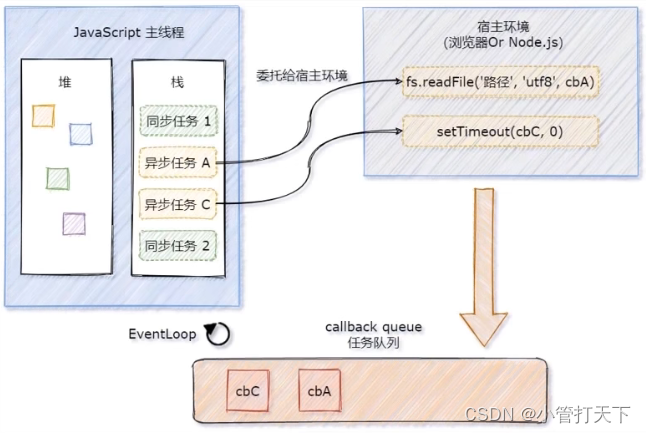
为了防止某个耗时任务导致程序假死的问题,JavaScript把待执行的任务分为了两类:
- 同步任务(synchronous)
由叫做非耗时任务,指的是在主线程上排队执行的那些任务
只有前一个任务执行完毕,才能执行后一个任务 - 异步任务(asynchronous)
又叫座耗时任务,异步任务由JavaScript委托给宿主环境进行执行
当异步任务执行完成后,会通知JavaScript主线程执行异步任务的回调函数
4-3. 同步任务和异步任务的执行过程

① 同步任务由 JavaScript 主线程次序执行
② 异步任务委托给宿主环境执行
③ 已完成的异步任务对应的回调函数,会被加入到任务队列中等待执行
④ JavaScript 主线程的执行栈被清空后,会读取任务队列中的回调函数,次序执行
⑤ JavaScript 主线程不断重复上面的第 4 步
4-4. EventLoop 的基本概念 及 经典面试题
JavaScript 主线程从“任务队列”中读取异步任务的回调函数,放到执行栈中依次执行。 这个过程是循环不断的,所以整个的这种运行机制又称为 EventLoop(事件循环)。
4-5. 经典面试题
import thenFs from 'then-fs'

console.log('A')
thenFs.readFile('./files/1.txt', 'utf8').then(dataStr => {
    console.log('B')
})
setTimeout(() => {
    console.log('C')
}, 0)
console.log('D')
// 打印输出:A、D、C、B
分析:
- A 和 D 属于同步任务。会根据代码的先后顺序依次被执行
- C 和 B 属于异步任务。它们的回调函数会被加入到任务队列中,等待主线程空闲时再执行
(由于延时器比读取文件先完成,所有先进入到任务队列,所以先打印C后打印B)
5. 宏任务和微任务
5-1. 什么是宏任务和微任务
JavaScript 把异步任务又做了进一步的划分,异步任务又分为两类,分别是:
- 宏任务(macrotask)
例如:异步 Ajax 请求,setTimeout、setInterval,文件操作,其它宏任务 - 微任务(microtask)
例如: Promise.then、.catch 和 .finally,process.nextTick,其它微任务

5-2. 宏任务和微任务的执行顺序

每一个宏任务执行完之后,都会检查是否存在待执行的微任务,如果有,则执行完所有微任务之后,再继续执行下一个宏任务。
5-3. 举例分析宏任务和微任务的执行过程
去银行办业务的场景:
- 小云和小腾去银行办业务。首先,需要取号之后进行排队(宏任务队列)
- 假设当前银行网点只有一个柜员,小云在办理存款业务时,小腾只能等待(单线程,宏任务按次序执行)
- 小云办完存款业务后,柜员询问他是否还想办理其它业务?(当前宏任务执行完,检查是否有微任务)
- 小云告诉柜员:想要买理财产品、再办个信用卡、最后再兑换点马年纪念币?(执行微任务,后续宏任务被推迟)
- 小云离开柜台后,柜员开始为小腾办理业务(所有微任务执行完毕,开始执行下一个宏任务)
5-4. 经典面试题
setTimeout(function() { // 宏任务
    console.log('1')
})

new Promise(function(resolve) { // 注意这个实例化Promise是同步任务,后面的.then是微任务
    console.log('2')
    resolve()
}).then(function() {
    console.log('3')
})

console.log('4')
// 打印输出:2、4、3、1
分析:
- 先执行所有的同步任务(执行第 6 行、第 12 行代码)
- 再执行微任务(执行第 9 行代码)
- 再执行下一个宏任务(执行第 2 行代码)
console.log('1') // 1.同步任务
setTimeout(function(){  // 4.宏任务
  console.log('2')
  new Promise(function(resolve){ // 5.同步任务
    console.log('3')
    resolve()
  }).then(function(){ // 6.微任务
    console.log('4')
  })
})

new Promise(function(resolve){ // 2.同步任务
  console.log('5')
  resolve()
}).then(function(){ // 3.微任务
  console.log('6')
})

setTimeout(function(){ // 7.宏任务
  console.log('7')
  new Promise(function(resolve){ // 8.同步任务
    console.log('8')
    resolve()
  }).then(function(){ // 9.微任务
    console.log('9')
  })
})
// 打印输出:156234789
6. API接口案例
6-1. 案例需求
基于 MySQL 数据库 + Express 对外提供用户列表的 API 接口服务。用到的技术点如下:
- 第三方包 express 和 mysql2
- ES6 模块化
- Promise
- async/await
6-2. 主要的实现步骤
- 搭建项目的基本结构
- 创建基本的服务器
- 创建 db 数据库操作模块
- 创建 user_ctrl 业务模块
- 创建 user_router 路由模块
6-3. 搭建项目的基本结构
- 启用 ES6 模块化支持(在 package.json 中声明 “type”: “module”)
- 安装第三方依赖包(运行 npm install express@4.17.1 mysql2@2.2.5)
6-4. 创建基本的服务器
import express from 'express';
let app = new express();

app.listen(80, () => {
    console.log('server is running at http://127.0.0.1');
})
6-5. 创建 db 数据库操作模块
// 用默认导入的形式导入mysql成员
import mysql from 'mysql2';

// 创建数据库连接对象
const pool = mysql.createPool({
    host: '127.0.0.1',
    port: 3306,
    database: 'my_db_01',
    user: 'root',
    password: 'admin123',
});

// 默认到处一个支持 Promise API 的 pool
export default pool.promise();
6-6. 创建 user_ctrl 模块
// 第一步:导入db数据库操作模块
import db from '../db/index.js';

// 第二步:声明 getAllUser方法(这个方法在路由中会使用,方法形参中可以接收req,res)
// 第三步:使用 ES6 的按需导出语法,将 getAllUser 方法导出出去
export async function getAllUser(req, res) {
    const [rows] = await db.query('select id, username, nickname from ev_users');

    res.send({
        status: 0,
        message: '获取用户列表数据成功!',
        data: rows
    })
}
6-7. 创建 user_router 模块
// 第一步:默认导入express
import express from 'express';
// 第二步:按需导入getAllUser方法
import { getAllUser } from '../controller/user_ctrl.js'

// 第三步:创建路由对象
const router = new express.Router();
// 第四步:挂载路由规则
// (监听客户端的get请求,当客户端请求/user这个地址的时候,就会调用getAllUser回调)
router.get('/user', getAllUser);

// 第五步:使用 ES6 的默认导出语法,将路由对象共享出去
export default router;
6-8. 导入并挂载路由模块
import express from 'express';
// 导入路由模块
import userRouter from './router/user_router.js';
const app = new express();

// 使用app.use挂载路由,可以指定统一的访问前缀
app.use('/api', userRouter);

app.listen(80, () => {
    console.log('server is running at http://127.0.0.1');
})
6-9. 使用 try…catch 捕获异常
import db from '../db/index.js';

export async function getAllUser(req, res) {
    // 第一步:把有可能会出错的代码放到try里面
    try {                                                     // 这里写了一个不存在的列xxx
        const [rows] = await db.query('select id, username, nickname, xxx from ev_users');

        res.send({
            status: 0,
            message: '获取用户列表数据成功!',
            data: rows
        })
    } catch (err) { // 第二步:catch的err可以拿到具体的错误信息
        res.send({
            status: 1,
            message: '获取用户数据失败',
            desc: err.message
        })
    }
}

6-10. 总结
- 能够知道如何使用 ES6 的模块化语法
默认导出与默认导入(export default {}、import … from ‘…’)、按需导出与按需导入(export …、import {…} from ‘…’) - 能够知道如何使用 Promise 解决回调地狱问题
promise.then()、promise.catch() - 能够使用 async/await 简化 Promise 的调用
方法中用到了 await,则方法需要被 async 修饰 - 能够说出什么是 EventLoop
EventLoop 示意图 - 能够说出宏任务和微任务的执行顺序
在执行下一个宏任务之前,先检查是否有待执行的微任务