浅谈 React 生命周期
浅谈 React 生命周期
作为一个合格的React,它的生命周期是我们必须得了解的,本文将会以下几个方面介绍React生命周期:
- 新旧生命周期函数的对比
- 详解各个生命周期函数
- 生命周期函数的执行顺序
- Hooks 与 生命周期函数的对应关系
旧版的生命周期

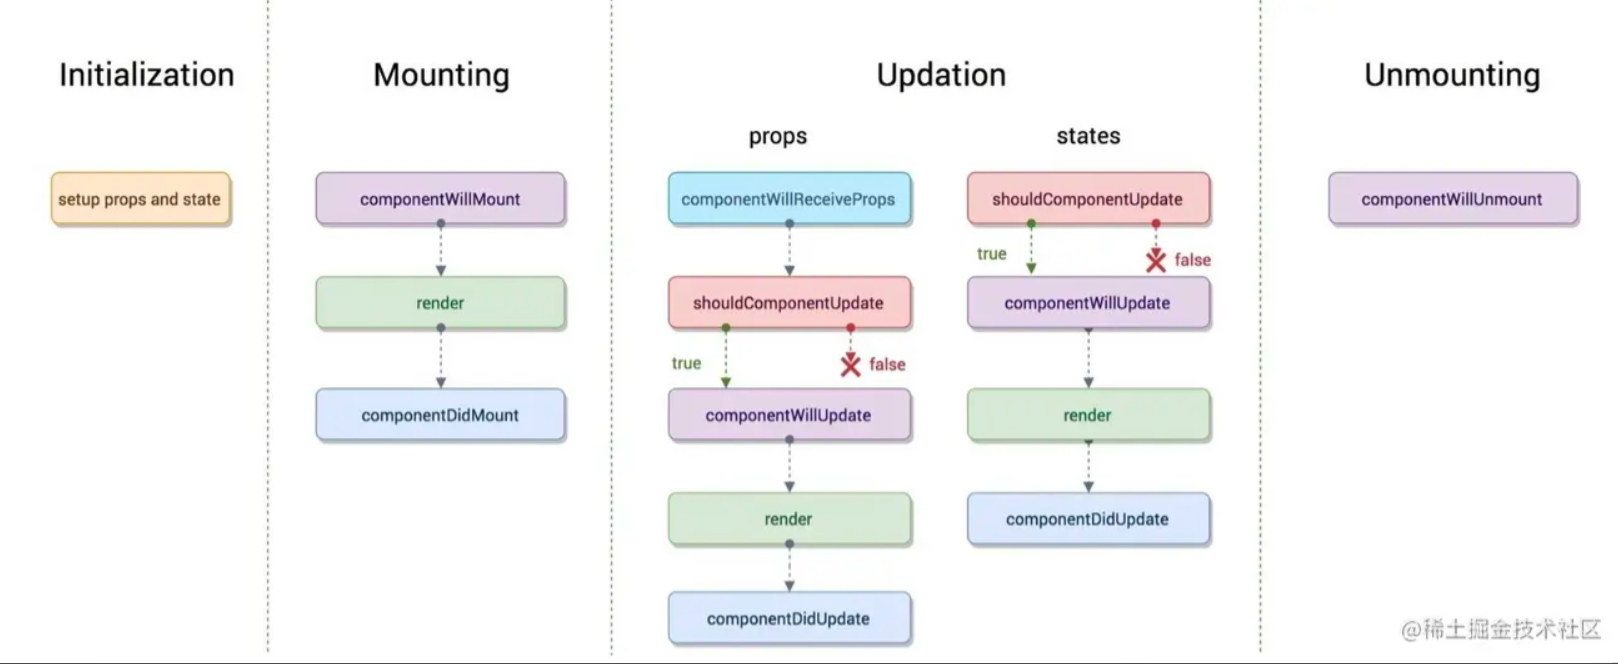
如图所示,我们可以看到,在组件第一次挂载时会经历:
constructor -> componentWillMount -> render -> componentDidMount
组件更新时会经历:
componentWillReceiveProps -> shouldComponentUpdate -> componentWillUpdate -> render -> componentDidUpdate
组件卸载时执行:componentWillUnmount
新版的生命周期

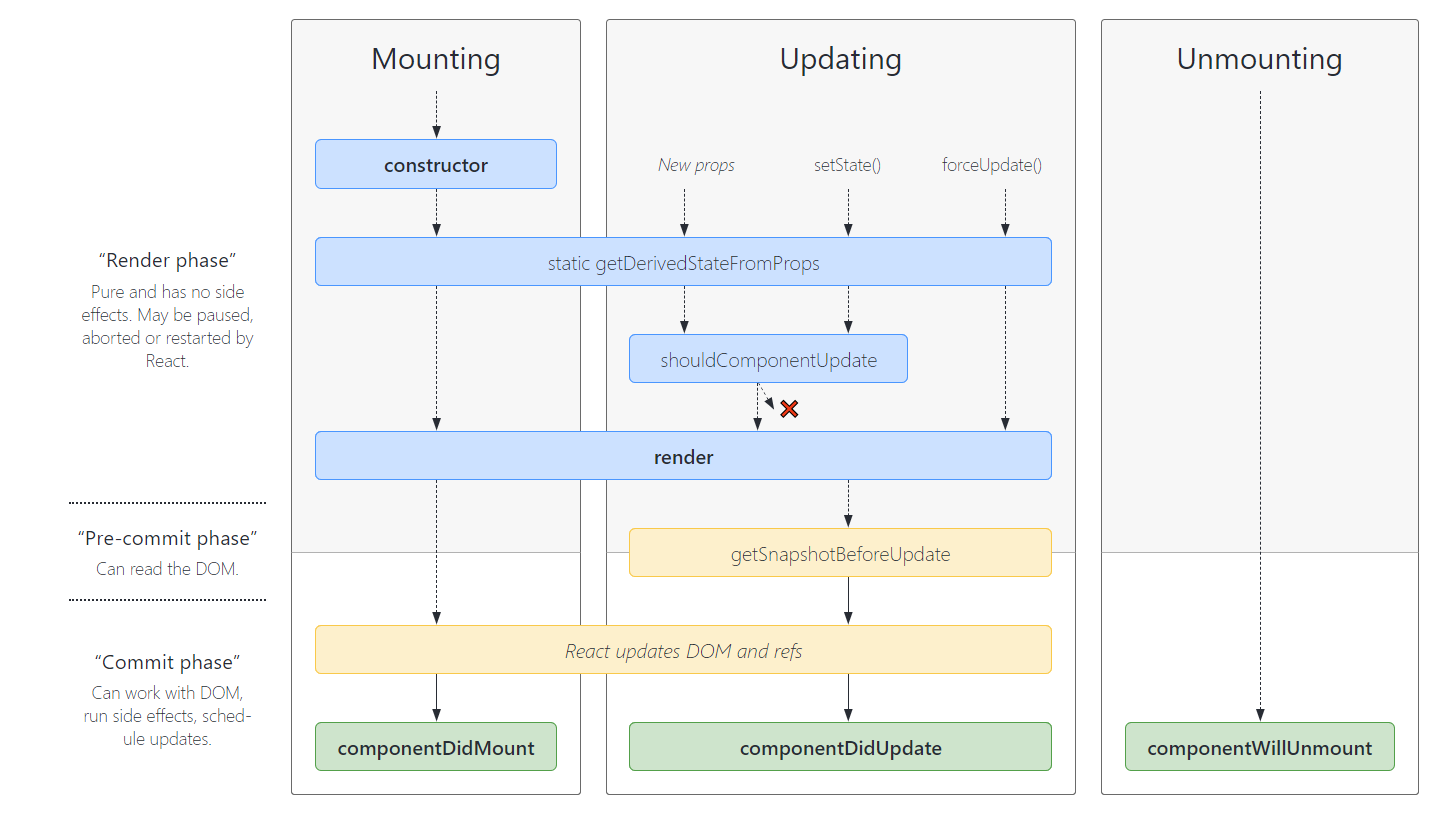
如图所示,我们可以看到,在组件第一次挂载时会经历:
constructor -> getDerivedStateFromProps -> render -> componentDidMount
组件更新时会经历:
getDerivedStateFromProps -> shouldComponentUpdate -> render -> getSnapshotBeforeUpdate -> componentDidUpdate
组件卸载时执行:componentWillUnmount
从以上生命周期的对比,我们不难看出,React废弃 componentWillMount componentWillReceiveProps componentWillUpdate 三个钩子函数,接下来我们先分别介绍各个生命周期函数。
详解各个生命周期函数
constructor
constructor(props)
如果不初始化 state 或不进行方法绑定,则不需要为 React 组件实现构造函数。
在 React 组件挂载之前,会调用它的构造函数。在为 React.Component 子类实现构造函数时,应在其他语句之前调用 super(props)。否则,this.props 在构造函数中可能会出现未定义的 bug。
通常,在 React 中,构造函数仅用于以下两种情况:
- 通过给
this.state赋值对象来初始化内部state。 - 为事件处理函数绑定实例
在 constructor() 函数中不要调用 setState() 方法。如果你的组件需要使用内部 state,请直接在构造函数中为 this.state 赋值初始 state:
constructor(props) {
  super(props);
  // 不要在这里调用 this.setState()
  this.state = { counter: 0 };
  this.handleClick = this.handleClick.bind(this);
}
getDerivedStateFromProps
static getDerivedStateFromProps(props, state)
getDerivedStateFromProps 会在调用 render 方法之前调用,并且在初始挂载及后续更新时都会被调用。它应返回一个对象来更新 state,如果返回 null 则不更新任何内容。
此方法适用于罕见的用例,即 state 的值在任何时候都取决于 props。例如,实现 <Transition> 组件可能很方便,该组件会比较当前组件与下一组件,以决定针对哪些组件进行转场动画。
派生状态会导致代码冗余,并使组件难以维护。 确保你已熟悉这些简单的替代方案:
- 如果你需要执行副作用(例如,数据提取或动画)以响应 props 中的更改,请改用
componentDidUpdate。 - 如果只想在 prop 更改时重新计算某些数据,请使用 memoization helper 代替。
- 如果你想在 prop 更改时“重置”某些 state,请考虑使组件完全受控或使用
key使组件完全不受控 代替。
此方法无权访问组件实例。如果你需要,可以通过提取组件 props 的纯函数及 class 之外的状态,在getDerivedStateFromProps()和其他 class 方法之间重用代码。
render
render() 方法是 class 组件中唯一必须实现的方法。
当 render 被调用时,它会检查 this.props 和 this.state 的变化并返回以下类型之一:
- React 元素。通常通过 JSX 创建。例如,
<div />会被 React 渲染为 DOM 节点,<MyComponent />会被 React 渲染为自定义组件,无论是<div />还是<MyComponent />均为 React 元素。 - 数组或 fragments。 使得 render 方法可以返回多个元素。欲了解更多详细信息,请参阅 fragments 文档。
- Portals。可以渲染子节点到不同的 DOM 子树中。欲了解更多详细信息,请参阅有关 portals 的文档
- 字符串或数值类型。它们在 DOM 中会被渲染为文本节点
- 布尔类型或
null。什么都不渲染。(主要用于支持返回test && <Child />的模式,其中 test 为布尔类型。)
render() 函数应该为纯函数,这意味着在不修改组件 state 的情况下,每次调用时都返回相同的结果,并且它不会直接与浏览器交互。
注意
如果
shouldComponentUpdate()返回 false,则不会调用render()。不要在
render里面setState, 否则会触发死循环导致内存崩溃
componentDidMount
componentDidMount() 会在组件挂载后(插入 DOM 树中)立即调用。依赖于 DOM 节点的初始化应该放在这里。如需通过网络请求获取数据,此处是实例化请求的好地方。
这个方法是比较适合添加订阅的地方。如果添加了订阅,请不要忘记在 componentWillUnmount() 里取消订阅。
你可以在 componentDidMount() 里直接调用 setState()。它将触发额外渲染,但此渲染会发生在浏览器更新屏幕之前。如此保证了即使在 render() 两次调用的情况下,用户也不会看到中间状态。请谨慎使用该模式,因为它会导致性能问题。通常,你应该在 constructor() 中初始化 state。如果你的渲染依赖于 DOM 节点的大小或位置,比如实现 modals 和 tooltips 等情况下,你可以使用此方式处理。
shouldComponentUpdate
shouldComponentUpdate(nextProps, nextState)
根据 shouldComponentUpdate() 的返回值,判断 React 组件的输出是否受当前 state 或 props 更改的影响。默认行为是 state 每次发生变化组件都会重新渲染。大部分情况下,你应该遵循默认行为。
当 props 或 state 发生变化时,shouldComponentUpdate() 会在渲染执行之前被调用。返回值默认为 true。首次渲染或使用 forceUpdate() 时不会调用该方法。
此方法仅作为**性能优化的方式而存在。不要企图依靠此方法来“阻止”渲染,因为这可能会产生 bug。你应该考虑使用内置的 PureComponent 组件**,而不是手动编写 shouldComponentUpdate()。PureComponent 会对 props 和 state 进行浅层比较,并减少了跳过必要更新的可能性。
如果你一定要手动编写此函数,可以将 this.props 与 nextProps 以及 this.state 与nextState 进行比较,并返回 false 以告知 React 可以跳过更新。请注意,返回 false 并不会阻止子组件在 state 更改时重新渲染。
不建议在 shouldComponentUpdate() 中进行深层比较或使用 JSON.stringify()。这样非常影响效率,且会损害性能。
getSnapshotBeforeUpdate
getSnapshotBeforeUpdate(prevProps, prevState)
getSnapshotBeforeUpdate() 在最近一次渲染输出(提交到 DOM 节点)之前调用。它使得组件能在发生更改之前从 DOM 中捕获一些信息(例如,滚动位置)。此生命周期方法的任何返回值将作为参数传递给 componentDidUpdate()。
此用法并不常见,但它可能出现在 UI 处理中,如需要以特殊方式处理滚动位置的聊天线程等。
应返回 snapshot 的值(或 null)。
例如:
class ScrollingList extends React.Component {
  constructor(props) {
    super(props);
    this.listRef = React.createRef();
  }

  getSnapshotBeforeUpdate(prevProps, prevState) {
    // 我们是否在 list 中添加新的 items ?
    // 捕获滚动位置以便我们稍后调整滚动位置。
    if (prevProps.list.length < this.props.list.length) {
      const list = this.listRef.current;
      return list.scrollHeight - list.scrollTop;
    }
    return null;
  }

  componentDidUpdate(prevProps, prevState, snapshot) {
    // 如果我们 snapshot 有值,说明我们刚刚添加了新的 items,
    // 调整滚动位置使得这些新 items 不会将旧的 items 推出视图。
    //(这里的 snapshot 是 getSnapshotBeforeUpdate 的返回值)
    if (snapshot !== null) {
      const list = this.listRef.current;
      list.scrollTop = list.scrollHeight - snapshot;
    }
  }

  render() {
    return (
      <div ref={this.listRef}>{/* ...contents... */}</div>
    );
  }
}
在上述示例中,重点是从 getSnapshotBeforeUpdate 读取 scrollHeight 属性,因为 “render” 阶段生命周期(如 render)和 “commit” 阶段生命周期(如 getSnapshotBeforeUpdate 和 componentDidUpdate)之间可能存在延迟。
componentDidUpdate
componentDidUpdate(prevProps, prevState, snapshot)
componentDidUpdate() 会在更新后会被立即调用。首次渲染不会执行此方法。
当组件更新后,可以在此处对 DOM 进行操作。如果你对更新前后的 props 进行了比较,也可以选择在此处进行网络请求。(例如,当 props 未发生变化时,则不会执行网络请求)。
componentDidUpdate(prevProps) {
  // 典型用法(不要忘记比较 props):
  if (this.props.userID !== prevProps.userID) {
    this.fetchData(this.props.userID);
  }
}
你也可以在 componentDidUpdate() 中直接调用 setState(),但请注意它必须被包裹在一个条件语句里,正如上述的例子那样进行处理,否则会导致死循环。它还会导致额外的重新渲染,虽然用户不可见,但会影响组件性能。
如果组件实现了 getSnapshotBeforeUpdate() 生命周期(不常用),则它的返回值将作为 componentDidUpdate() 的第三个参数 “snapshot” 参数传递。否则此参数将为 undefined。
注意
如果
shouldComponentUpdate()返回值为 false,则不会调用componentDidUpdate()。
componentWillUnmount
componentWillUnmount() 会在组件卸载及销毁之前直接调用。在此方法中执行必要的清理操作,例如,清除 timer,取消网络请求或清除在 componentDidMount() 中创建的订阅等。
componentWillUnmount() 中不应调用 setState(),因为该组件将永远不会重新渲染。组件实例卸载后,将永远不会再挂载它。
过时的生命周期方法
以下生命周期方法标记为“过时”。这些方法仍然有效,但不建议在新代码中使用它们。
UNSAFE_componentWillMount
UNSAFE_componentWillMount()
注意
此生命周期之前名为
componentWillMount。该名称将继续使用至 React 17。
UNSAFE_componentWillMount() 在挂载之前被调用。它在 render() 之前调用,因此在此方法中同步调用 setState() 不会触发额外渲染。通常,我们建议使用 constructor() 来初始化 state。
避免在此方法中引入任何副作用或订阅。如遇此种情况,请改用 componentDidMount()。
此方法是服务端渲染唯一会调用的生命周期函数。
UNSAFE_componentWillReceiveProps
UNSAFE_componentWillReceiveProps(nextProps)
注意
此生命周期之前名为
componentWillReceiveProps。该名称将继续使用至 React 17。使用此生命周期方法通常会出现 bug 和不一致性:
- 如果你需要执行副作用(例如,数据提取或动画)以响应 props 中的更改,请改用
componentDidUpdate生命周期。- 如果你使用
componentWillReceiveProps仅在 prop 更改时重新计算某些数据,请使用 memoization helper 代替。- 如果你使用
componentWillReceiveProps是为了在 prop 更改时“重置”某些 state,请考虑使组件完全受控或使用key使组件完全不受控 代替。
UNSAFE_componentWillReceiveProps() 会在已挂载的组件接收新的 props 之前被调用。如果你需要更新状态以响应 prop 更改(例如,重置它),你可以比较 this.props 和 nextProps 并在此方法中使用 this.setState() 执行 state 转换。
请注意,如果父组件导致组件重新渲染,即使 props 没有更改,也会调用此方法。如果只想处理更改,请确保进行当前值与变更值的比较。
在挂载过程中,React 不会针对初始 props 调用 UNSAFE_componentWillReceiveProps()。组件只会在组件的 props 更新时调用此方法。调用 this.setState() 通常不会触发 UNSAFE_componentWillReceiveProps()。
UNSAFE_componentWillUpdate
UNSAFE_componentWillUpdate(nextProps, nextState)
注意
此生命周期之前名为
componentWillUpdate。该名称将继续使用至 React 17。
当组件收到新的 props 或 state 时,会在渲染之前调用 UNSAFE_componentWillUpdate()。使用此作为在更新发生之前执行准备更新的机会。初始渲染不会调用此方法。
注意,你不能此方法中调用 this.setState();在 UNSAFE_componentWillUpdate() 返回之前,你也不应该执行任何其他操作(例如,dispatch Redux 的 action)触发对 React 组件的更新
通常,此方法可以替换为 componentDidUpdate()。如果你在此方法中读取 DOM 信息(例如,为了保存滚动位置),则可以将此逻辑移至 getSnapshotBeforeUpdate() 中。
那么为什么要弃用它们呢?
原因
弃用 componentWillMount 方法的原因,因为这个方法实在是没什么用。但是为什么要用getDerivedStateFromProps代替 componentWillReceiveProps 呢,除了简化派生 state 的代码,是否还有别的原因?
原来的 componentWillReceiveProps 方法仅仅在更新阶段才会被调用,而且在此函数中调用 setState 方法更新 state 会引起额外的 re-render,如果处理不当可能会造成大量无用的 re-render。getDerivedStateFromProps 相较于 componentWillReceiveProps 来说不是做加法,而是做减法,是 React 在推行只用 getDerivedStateFromProps 来完成 props 到 state 的映射这一最佳实践,确保生命周期函数的行为更加可控可预测,从根源上帮助开发者避免不合理的编程方式,同时也是在为新的 Fiber 架构 铺路。
getSnapshotBeforeUpdate 配合 componentDidUpdate 方法可以涵盖所有 componentWillUpdate使用场景,那废弃 componentWillUpdate 的原因就是换另外一种方式吗?其实根本原因还是在于 componentWillUpdate 方法是 Fiber 架构落地的一块绊脚石,不得不废弃掉。
Fiber 是 React v16 对 React 核心算法的一次重写,简单的理解就是 Fiber 会使原本同步的渲染过程变成增量渲染模式。
在 React v16 之前,每触发一次组件的更新,都会构建一棵新的虚拟 DOM 树,通过与上一次的虚拟 DOM 树进行 Diff 比较,实现对真实 DOM 的定向更新。这一整个过程是递归进行的(想想 React 应用的组织形式),而同步渲染的递归调用栈层次非常深(代码写得不好的情况下非常容易导致栈溢出),只有最底层的调用返回,整个渲染过程才会逐层返回。这个漫长的更新过程是不可中断的,同步渲染一旦开始,主线程(JavaScript 解析与执行)会一直被占用,直到递归彻底完成,在此期间浏览器没有办法处理任何渲染之外的事情(比如说响应用户事件)。这个问题对于大型的 React 应用来说是没办法接受的。
在 React v16 中的 Fiber 架构正是为了解决这个问题而提出的:Fiber 会将一个大的更新任务拆解为许多个小任务。每一个小任务执行完成后,渲染进程会把主线程交回去(释放),看看有没有其它优先级更高的任务(用户事件响应等)需要处理,如果有就执行高优先级任务,如果没有就继续执行其余的小任务。通过这样的方式,避免主线程被长时间的独占,从而避免应用卡顿的问题。这种可以被打断的渲染过程就是所谓的异步渲染。
Fiber 带来了两个重要的特性:任务拆解 与 渲染过程可打断。关于可打断并不是说任意环节都能打断重新执行,可打断的时机也是有所区分的。根据能否被打断这一标准,React v16 的生命周期被划分为了 render 和 commit两个阶段(commit 又被细分为 pre-commit 和 commit)。
- render 阶段:纯净且没有副作用,可以被 React 暂停,终止或重新启动
- pre-commit 阶段:可以读取 DOM
- commit 阶段:可以使用 DOM,运行副作用,安排更新
总体来说就是,render 阶段在执行过程中允许被打断,commit 阶段则总是同步执行。之所以确定这样的标准也是有深入考虑的,在 render 阶段的所有操作一般都是不可见的,所以被重复打断与重新执行,对用户来说是无感知的,在 commit 阶段会涉及到真实 DOM 的操作,如果该阶段也被反复打断重新执行,会导致 UI 界面多次更改渲染,这是绝对要避免的问题。
在了解了 Fiber 架构的执行机制之后,再回过头去看一下被废弃的生命周期函数:
- componentWillMount
- componentWillUpdate
- componentWillReceiveProps
这些生命周期的共性就是它们都处于 render 阶段,都可能被暂停,终止和重新执行。而如果开发者在这些函数中运行了副作用(或者操作 DOM),那么副作用函数就有可能会被多次重复执行,会带来意料之外的严重 bug。
生命周期函数的执行顺序

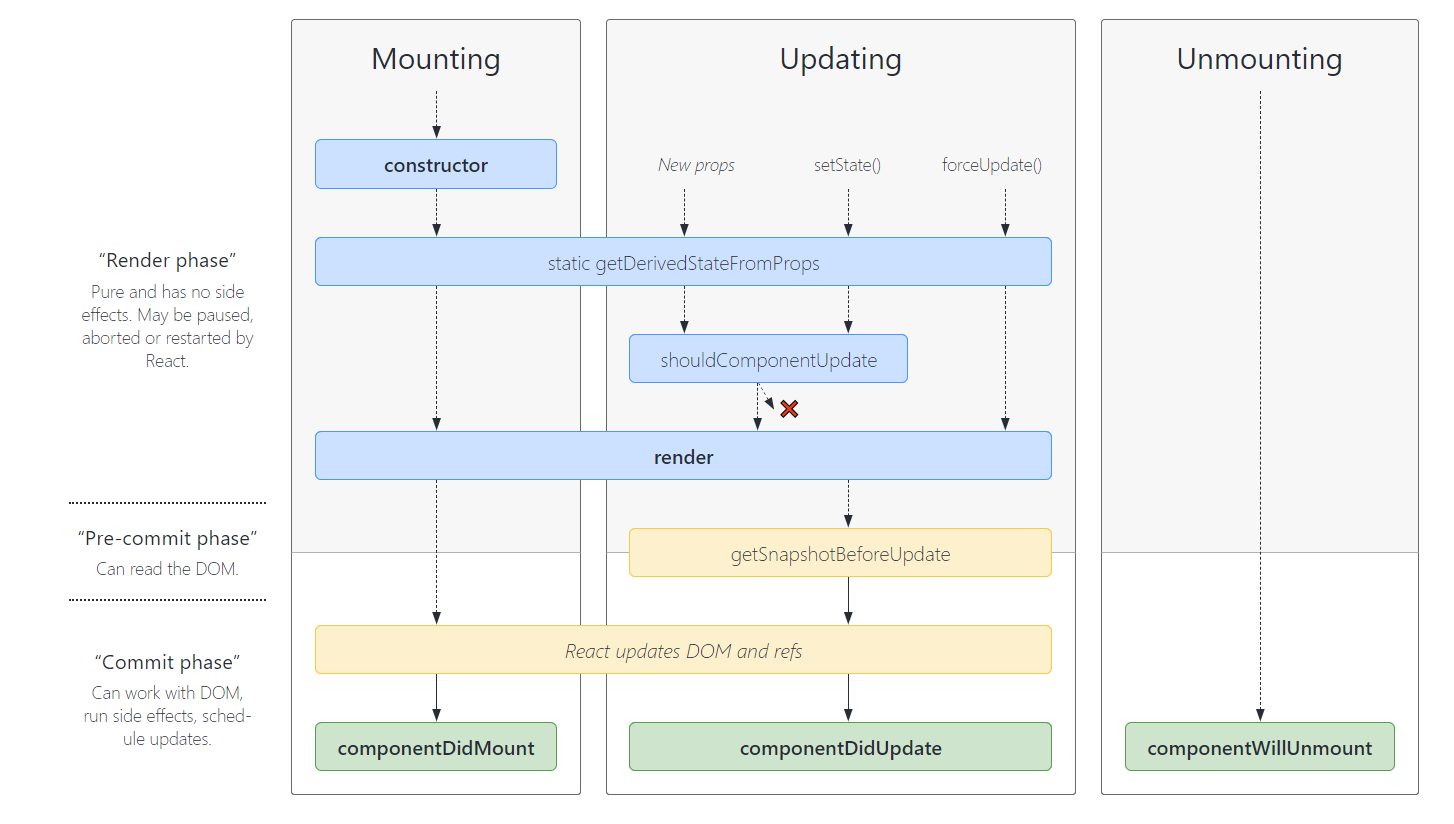
如图所示,我们可以看到,在组件第一次挂载时会经历:
constructor -> getDerivedStateFromProps -> render -> componentDidMount
组件更新时会经历:
getDerivedStateFromProps -> shouldComponentUpdate -> render -> getSnapshotBeforeUpdate -> componentDidUpdate
组件卸载时执行:componentWillUnmount
然而在实际开发中,不是只有一个组件的,可能还涉及到多个组件以及父子关系的组件,那么它们各自的生命周期函数的执行顺序又如何呢?
父子组件生命周期执行顺序总结:
-
当子组件自身状态改变时,不会对父组件产生副作用的情况下,父组件不会进行更新,即不会触发父组件的生命周期
-
当父组件中状态发生变化(包括子组件的挂载以及卸载)时,会触发自身对应的生命周期以及子组件的更新
render以及render之前的生命周期,则 父组件先执行render以及render之后的声明周期,则子组件先执行,并且是与父组件交替执行
当子组件进行卸载时,只会执行自身的
componentWillUnmount生命周期,不会再触发别的生命周期
接下来我们来看一个实际案例来理解一下:
父组件:Parent.js
import React, { Component } from 'react';
import { Button } from 'antd';
import Child from './child';

export default class Parent extends Component {
  constructor() {
    super();
    console.log('Parent 组件:', 'constructor');
    this.state = {
      count: 0,
      mountChild: true,
    };
  }

  static getDerivedStateFromProps(nextProps, prevState) {
    console.log('Parent 组件:', 'getDerivedStateFromProps');
    return null;
  }

  componentDidMount() {
    console.log('Parent 组件:', 'componentDidMount');
  }

  shouldComponentUpdate(nextProps, nextState) {
    console.log('Parent 组件:', 'shouldComponentUpdate');
    return true;
  }

  getSnapshotBeforeUpdate(prevProps, prevState) {
    console.log('Parent 组件:', 'getSnapshotBeforeUpdate');
    return null;
  }

  componentDidUpdate(prevProps, prevState, snapshot) {
    console.log('Parent 组件:', 'componentDidUpdate');
  }

  componentWillUnmount() {
    console.log('Parent 组件:', 'componentWillUnmount');
  }

  /**
   * 修改传给子组件属性 count 的方法
   */
  changeNum = () => {
    let { count } = this.state;
    this.setState({
      count: ++count,
    });
  };

  /**
   * 切换子组件挂载和卸载的方法
   */
  toggleMountChild = () => {
    const { mountChild } = this.state;
    this.setState({
      mountChild: !mountChild,
    });
  };

  render() {
    console.log('Parent 组件:', 'render');
    const { count, mountChild } = this.state;
    return (
      <div>
        <div>
          <h3>父组件</h3>
          <Button onClick={this.changeNum}>改变传给子组件的属性 count</Button>
          <br />
          <br />
          <Button onClick={this.toggleMountChild}>卸载 / 挂载子组件</Button>
        </div>
        {mountChild ? <Child count={count} /> : null}
      </div>
    );
  }
}
子组件: Child.js
import React, { Component } from 'react';
import { Button } from 'antd';

const childStyle = {
  padding: 20,
  margin: 20,
  backgroundColor: 'LightSkyBlue',
};


export default class Child extends Component {
  constructor() {
    super();
    console.log('Child 组件:', 'constructor');
    this.state = {
      counter: 0,
    };
  }

  static getDerivedStateFromProps(nextProps, prevState) {
    console.log('Child 组件:', 'getDerivedStateFromProps');
    return null;
  }

  componentDidMount() {
    console.log('Child 组件:', 'componentDidMount');
  }

  shouldComponentUpdate(nextProps, nextState) {
    console.log('Child 组件:', 'shouldComponentUpdate');
    return true;
  }

  getSnapshotBeforeUpdate(prevProps, prevState) {
    console.log('Child 组件:', 'getSnapshotBeforeUpdate');
    return null;
  }

  componentDidUpdate(prevProps, prevState, snapshot) {
    console.log('Child 组件:', 'componentDidUpdate');
  }

  componentWillUnmount() {
    console.log('Child 组件:', 'componentWillUnmount');
  }

  changeCounter = () => {
    let { counter } = this.state;
    this.setState({
      counter: ++counter,
    });
  };

  render() {
    console.log('Child 组件:', 'render');
    const { count } = this.props;
    const { counter } = this.state;
    return (
      <div style={childStyle}>
        <h3>子组件</h3>
        <p>父组件传过来的属性 count : {count}</p>
        <p>子组件自身状态 counter : {counter}</p>
        <Button onClick={this.changeCounter}>改变自身状态 counter</Button>
      </div>
    );
  }
}
接下来我们从五种组件状态改变的时机来验证生命周期的执行顺序
一、 父子组件初始化
父子组件第一次进行渲染加载时:
控制台的打印顺序为:
- Parent 组件: constructor
- Parent 组件: getDerivedStateFromProps
- Parent 组件: render
- Child 组件: constructor
- Child 组件: getDerivedStateFromProps
- Child 组件: render
- Child 组件: componentDidMount
- Parent 组件: componentDidMount
二、子组件修改自身状态 state
点击子组件 [改变自身状态counter] 按钮,其 [自身状态counter] 值会 +1, 此时控制台的打印顺序为:
- Child 组件: getDerivedStateFromProps
- Child 组件: shouldComponentUpdate
- Child 组件: render
- Child 组件: getSnapshotBeforeUpdate
- Child 组件: componentDidUpdate
三、修改父组件中传入子组件的 props
点击父组件中的 [改变传给子组件的属性 count] 按钮,则界面上 [父组件传过来的属性 count] 的值会 + 1,控制台的打印顺序为:
- Parent 组件: getDerivedStateFromProps
- Parent 组件: shouldComponentUpdate
- Parent 组件: render
- Child 组件: getDerivedStateFromProps
- Child 组件: shouldComponentUpdate
- Child 组件: render
- Child 组件: getSnapshotBeforeUpdate
- Parent 组件: getSnapshotBeforeUpdate
- Child 组件: componentDidUpdate
- Parent 组件: componentDidUpdate
四、卸载子组件
点击父组件中的 [卸载 / 挂载子组件] 按钮,则界面上子组件会消失,控制台的打印顺序为:
- Parent 组件: getDerivedStateFromProps
- Parent 组件: shouldComponentUpdate
- Parent 组件: render
- Parent 组件: getSnapshotBeforeUpdate
- Child 组件: componentWillUnmount
- Parent 组件: componentDidUpdate
五、重新挂载子组件
再次点击父组件中的 [卸载 / 挂载子组件] 按钮,则界面上子组件会重新渲染出来,控制台的打印顺序为:
- Parent 组件: getDerivedStateFromProps
- Parent 组件: shouldComponentUpdate
- Parent 组件: render
- Child 组件: constructor
- Child 组件: getDerivedStateFromProps
- Child 组件: render
- Parent 组件: getSnapshotBeforeUpdate
- Child 组件: componentDidMount
- Parent 组件: componentDidUpdate
Hooks 与 生命周期函数
生命周期函数只存在于类组件,对于没有 Hooks 之前的函数组件而言,没有组件生命周期的概念(函数组件没有 render 之外的过程),但是有了 Hooks 之后,问题就变得有些复杂了。
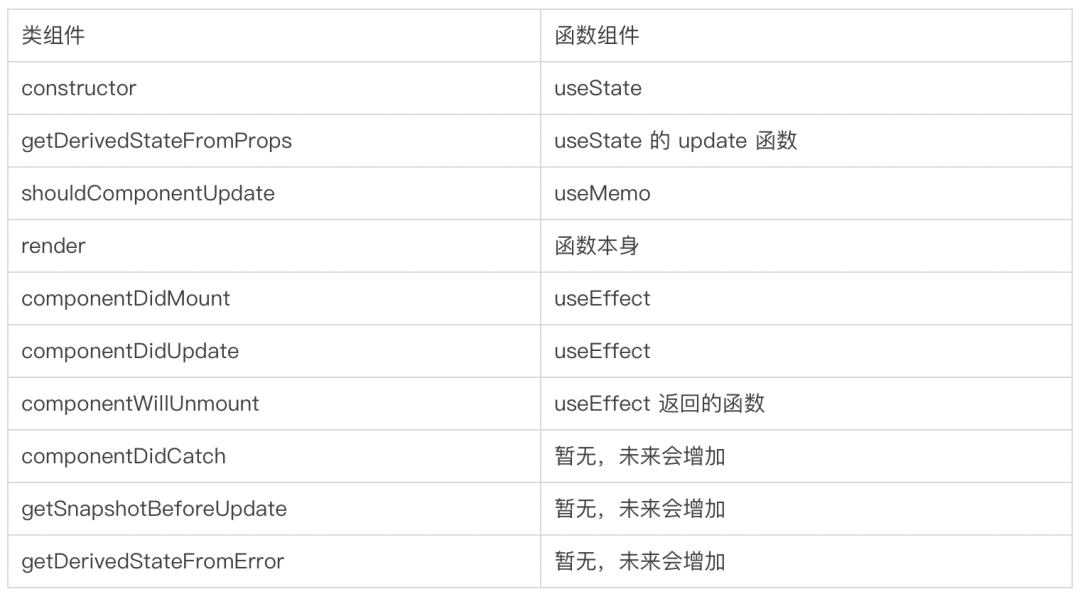
Hooks 能够让函数组件拥有使用与管理 state 的能力,也就演化出了函数组件生命周期的概念(render 之外新增了其他过程),涉及到的 Hook 主要有几个:useState、useMemo、useEffect。
如果想更全面的了解 Hooks,可以看快速上手 React Hook_夏安 的博客-CSDN博客

整体来说,大部分生命周期都可以利用 Hook 来模拟实现,而一些难以模拟的,往往也是 React 不推荐的反模式。
至于为什么设计 Hook,为什么要赋予函数组件使用与管理 state 的能力,React 官网也在 Hook 介绍 做了深入而详细的介绍,总结下来有以下几个点:
- 便于分离与复用组件的状态逻辑(Mixin,高阶组件,渲染回调模式等)
- 复杂组件变得难以理解(状态与副作用越来越多,生命周期函数滥用)
- 类组件中难以理解的 this 指向(bind 语法)
- 类组件难以被进一步优化(组件预编译,不能很好被压缩,热重载不稳定)