上一篇我们自己搭建了npm私服,这一篇我们将基于npm私服务进行Eslint的规则集扩展
上篇链接:企业化npm私服搭建&eslint规范统一 - npm私服
首先我们基于腾讯的eslint规则进行改造
eslint-config-alloy gitHub地址
基于eslint-config-alloy做修改
发布到npm私服上时候 需要修改eslint-config-alloy根目录下.npmrc修改成自己私服地址,然后进行发包
clone项目和修改后包发布 就不过多说了
一、我们如何使用自己在私服发布的包
在项目根目录创建.npmrc和.yarnrc
.npmrc:
@包前缀:registry=私服的源
.yarnrc:
"@包前缀:registry" "私服的源"
在使用npm私服发包时候建议使用包前缀 可以有效的分离开那些包需要在私服中下载
添加包前缀方法修改package.json里的"name": “@前缀/包名”
二、集成和使用eslint-config-alloy规则集
我们公司技术栈主要Vue3为主,今天简单介绍下Vue3的集成方法,React和Vue2可以参考eslint-config-alloy文档进行集成
node版本:Node v16+ | | ^v14.17.0(LTS版本)
Vue3.0使用eslint-config-alloy
npm下载:
npm install --save-dev @包前缀/eslint-config-alloy eslint@7.32.0 @babel/eslint-parser vue-eslint-parser eslint-plugin-vue
yarn下载:
yarn add --dev @包前缀/eslint-config-alloy eslint@7.32.0 @babel/eslint-parser vue-eslint-parser eslint-plugin-vue
修改.eslintrc.js文件
如@包前缀/eslint-config-alloy
eslint引入规则可以省略eslint-config,直接写@包前缀/alloy
module.exports = {
  extends: [
    '@包前缀/alloy',
    '@包前缀/alloy/vue'
  ],
  env: {
    // 你的环境变量(包含多个预定义的全局变量)
    //
    // browser: true,
    // node: true,
    // mocha: true,
    // jest: true,
    // jquery: true
  },
  globals: {
    // 你的全局变量(设置为 false 表示它不允许被重新赋值)
    //
    // myGlobal: false
  },
  rules: {
    // 自定义你的规则
  },
}
Vue3+Ts使用eslint-config-alloy
npm下载:
npm install --save-dev @包前缀/eslint-config-alloy eslint@7.32.0 typescript @typescript-eslint/parser @typescript-eslint/eslint-plugin @babel/eslint-parser vue-eslint-parser eslint-plugin-vue
yarn下载:
yarn add --dev @包前缀/eslint-config-alloy eslint@7.32.0 typescript @typescript-eslint/parser @typescript-eslint/eslint-plugin @babel/eslint-parser vue-eslint-parser eslint-plugin-vue
修改.eslintrc.js文件
module.exports = {
  extends: [
    '@包前缀/alloy',
    '@包前缀/alloy/vue',
    '@包前缀/alloy/typescript'
  ],
  env: {
    // 你的环境变量(包含多个预定义的全局变量)
    //
    // browser: true,
    // node: true,
    // mocha: true,
    // jest: true,
    // jquery: true
  },
  globals: {
    // 你的全局变量(设置为 false 表示它不允许被重新赋值)
    //
    // myGlobal: false
  },
  rules: {
    // 自定义你的规则
  },
}
三、编译器安装Prettier - Code formatter 并创建.prettierrc.js
// .prettierrc.js
module.exports = {
  // 一行最多 120 字符
  printWidth: 120,
  // 使用 2 个空格缩进
  tabWidth: 2,
  // 不使用缩进符,而使用空格
  useTabs: false,
  // 行尾需要有分号
  semi: true,
  // 使用单引号
  singleQuote: true,
  // 对象的 key 仅在必要时用引号
  quoteProps: 'as-needed',
  // jsx 不使用单引号,而使用双引号
  jsxSingleQuote: false,
  // 末尾需要有逗号
  trailingComma: 'all',
  // 大括号内的首尾需要空格
  bracketSpacing: true,
  // jsx 标签的反尖括号需要换行
  bracketSameLine: false,
  // 箭头函数,只有一个参数的时候,也需要括号
  arrowParens: 'always',
  // 每个文件格式化的范围是文件的全部内容
  rangeStart: 0,
  rangeEnd: Infinity,
  // 不需要写文件开头的 @prettier
  requirePragma: false,
  // 不需要自动在文件开头插入 @prettier
  insertPragma: false,
  // 使用默认的折行标准
  proseWrap: 'preserve',
  // 根据显示样式决定 html 要不要折行
  htmlWhitespaceSensitivity: 'css',
  // vue 文件中的 script 和 style 内不用缩进
  vueIndentScriptAndStyle: false,
  // 换行符使用 lf
  endOfLine: 'lf',
  // 格式化内嵌代码
  embeddedLanguageFormatting: 'auto',
};
VSCode 的一个最佳实践
在项目根目录创建.vscode/settings.json 来支持自动修复 Prettier 和 ESLint 错误:
{
  "files.eol": "\n",
  "editor.tabSize": 2,
  "editor.defaultFormatter": "esbenp.prettier-vscode",
  "eslint.validate": ["javascript", "javascriptreact", "vue", "typescript", "typescriptreact"],
  "editor.codeActionsOnSave": {
    "source.fixAll.eslint": true
  }
}
四、不想eslint校验阻断代码运行在vue.config.js中添加 lintOnSave:false,
五、commit前风格规范检查。
npm:
npm i prettier husky lint-staged @commitlint/config-conventional @commitlint/cli -D
yarn:
yarn add --dev eslint-plugin-prettier eslint-config-prettier prettier husky lint-staged @commitlint/config-conventional @commitlint/cli
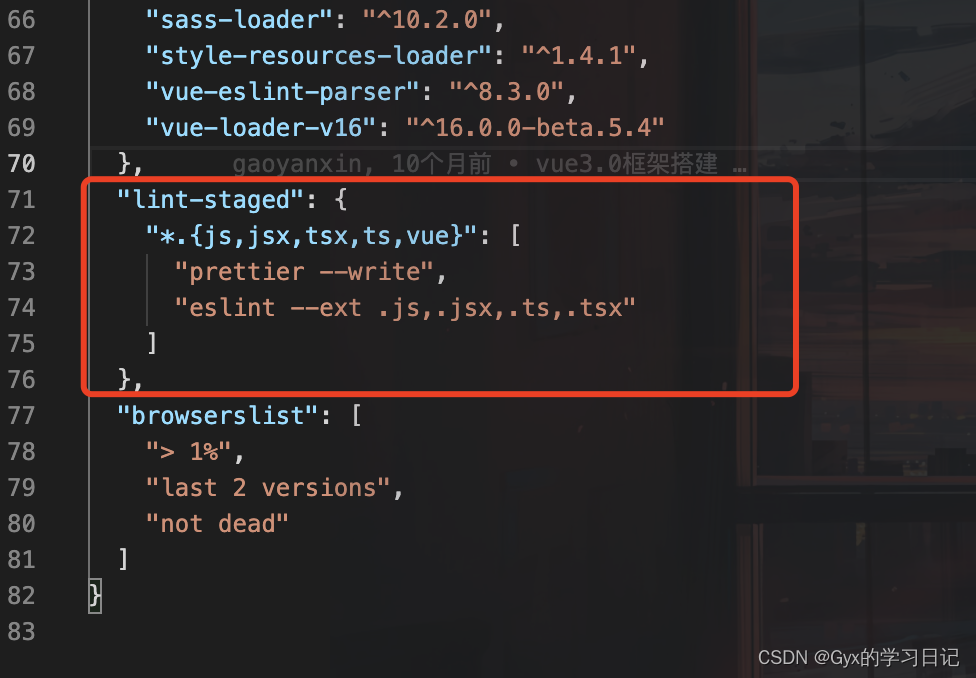
package.json文件添加配置
	"lint-staged": {
        "*.{js,jsx,tsx,ts,vue}": [
            "prettier --write",
            "eslint --ext .js,.jsx,.ts,.tsx"
        ]
    }

在项目根目录创建commitlint.config.js文件,内容如下
module.exports = {
    extends: ['@commitlint/config-conventional'],
}
初始化husky
npx husky-init
修改自动生成的.husky/pre-commit
#!/bin/sh
. "$(dirname "$0")/_/husky.sh"

npx --no-install lint-staged
使用husky生成commit-msg文件
npx husky add .husky/commit-msg "npx --no-install commitlint --edit $1"
# or
yarn husky add .husky/commit-msg "npx --no-install commitlint --edit $1"
Git 正确提交格式:
git commit -m "${type}: ${subject}"
type指本次提交的类型,为必填项,必须为以下之一:
feat: 一项新功能
fix: 一个错误修复
docs: 仅文档更改
style: 不影响代码含义的更改(空白,格式,缺少分号等)
refactor: 既不修正错误也不增加功能的代码更改(重构)
perf: 改进性能的代码更改
test: 添加缺失或更正现有测试
build: 影响构建系统或外部依赖项的更改(gulp,npm等)
ci: 对CI配置文件和脚本的更改
chore: 更改构建过程或辅助工具和库,例如文档生成
subject指本次提交的简要描述,它有如下两个规则。
不要大写第一个字母
末尾没有点(.)
:后有一个空格!!!