前言
在工作中,我们经常使用element-ui、iview等一系列组件库。
久而久之,我自己也在想可不可以开发一个属于自己的组件库,并且到时候直接npm install xxx 之后就可以直接安装引入使用。
本文旨在分享前端萌新自己的vue组件的搭建和发布到npm上的流程。如有错误,请大佬们指出,一起交流。
vue项目初始化
1. 创建vue项目
vue create project-name
2. 将项目目录修改成以下结构(参考了iview的目录结构)
|-- project-name
    |-- build // 存放webpack配置
    |-- examples // 本地预览组件
    |-- public
    |-- src // 主目录
        |-- index.js // 入口文件
        |-- components // 组件存放位置
        |-- styles // 组件样式存放位置
    |-- .browserslistrc
    |-- .editorconfig
    |-- .eslintrc.js
    |-- .gitignore
    |-- .npmignore // npm发布时忽略文件
    |-- babel.config.js
    |-- package-lock.json
    |-- package.json
    |-- README.md
build:webpack配置
src :主目录
index.js: 入口文件
components : 组件存放位置
styles : 组件样式存放位置
.npmignore: npm发布时忽略文件
README.md: 说明文档,发布到npm后,可以在发布包的下方说明显示,和github一样
3. 组件编写-Split(面板分割组件)
vue组件代码:src/components/split/split.vue
<template>
  <div :class="classes" ref="splitOuter">
    <div
      class="pane pane-left"
      :style="{
        width: leftOffSetPercent,
        paddingRight: `${triggerWidth}px`
      }"
    >
      <slot name="left"></slot>
    </div>
    <div
      class="pane pane-trigger"
      :style="{ left: triggerLeft, width: `${triggerWidth}px` }"
      @mousedown="mousedownClick"
    >
      <span>-</span>
      <span>-</span>
      <span>-</span>
      <span>-</span>
    </div>
    <div
      class="pane pane-right"
      :style="{
        left: leftOffSetPercent,
        paddingLeft: `${triggerWidth}px`
      }"
    >
      <slot name="right"></slot>
    </div>
  </div>
</template>
<script>
export default {
  name: 'JSplit',
  props: {
    value: {
      type: Number,
      default: 0.3
    },
    max: {
      type: Number,
      default: 0.9
    },
    min: {
      type: Number,
      default: 0.1
    }
  },
  data () {
    return {
      leftOffSet: this.value,
      triggerWidth: 6,
      canMove: true
    }
  },
  computed: {
    leftOffSetPercent () {
      return `${this.leftOffSet * 100}%`
    },
    triggerLeft () {
      return `calc(${this.leftOffSet * 100}% - ${this.triggerWidth / 2}px)`
    },
    classes () {
      return [
        'split-pane-wrapper'
      ]
    }
  },
  methods: {
    mousedownClick () {
      document.addEventListener('mousemove', this.mousemoveHandleClick)
      document.addEventListener('mouseup', this.mouseupHandleClick)
      this.canMove = true
    },
    mousemoveHandleClick (e) {
      if (!this.canMove) return
      const outerLeft = this.$refs.splitOuter.getBoundingClientRect().left
      const outerWidth = this.$refs.splitOuter.getBoundingClientRect().width
      const currentLeft =
        (e.pageX - outerLeft + this.triggerWidth / 2) / outerWidth
      this.leftOffSet = currentLeft
      if (currentLeft < this.min) this.leftOffSet = this.min
      if (currentLeft > this.max) this.leftOffSet = this.max
    },
    mouseupHandleClick (e) {
      this.canMove = false
    }
  }
}
</script>
每个组件通过一个index.js和vue组件进行维护
src/components/split/index.js
import JSplit from './split.vue'
export default JSplit
组件样式,使用less,在webpack中需要less-loader进行编译解析
src/styles/components/split.less
.split-pane-wrapper {
    min-width: 300px;
    min-height: 200px;
    width: 100%;
    height: 100%;
    position: relative;
    text-align: left;
    border: 1px solid #ccc;
  }
  .split-pane-wrapper .pane {
    height: 100%;
    position: absolute;
    top: 0;
  }
  .split-pane-wrapper .pane-left {
    height: 100%;
    width: 20%;
    word-break: break-all;
  }
  .split-pane-wrapper .pane-right {
    height: 100%;
    right: 0;
    bottom: 0;
    left: 20%;
  }
  .split-pane-wrapper .pane-trigger {
    height: 100%;
    border: 1px solid #dcdee2;
    border-top: none;
    border-bottom: none;
    z-index: 99;
    cursor: col-resize;
    user-select: none;
    display: flex;
    flex-direction: column;
    justify-content: center;
  }
  .split-pane-wrapper .pane-trigger span {
    display: block;
    color: #ccc;
    text-align: center;
  }
4. 样式文件导出,样式文件分层导入,方便管理
src/styles/components/index.less
@import "./split.less";
src/styles/index.less
@import './components/index.less';
5. 导出split组件并注册
导入组件的less样式文件,将组件进行注册
src/index.js
import './styles/index.less'
import JSplit from './components/split'
const components = {
  JSplit
}
const install = function (Vue) {
  // 判断是否安装
  if (install.installed) return
  // 遍历注册全局组件
  Object.keys(components).forEach(key => {
    Vue.component(key, components[key])
  })
}
if (typeof window !== 'undefined' && window.Vue) {
  install(window.Vue)
}
export default {
  // 导出的对象必须具有 install,才能被 Vue.use() 方法安装
  install,
  // 以下是具体的组件列表
  ...components
}
6. 修改webpack配置文件
需要下载webpack、webpack-cli、webpack-merge等其他loader和plugin
我的配置文件是写在build目录下面的,分为了三个文件、公共配置、开发环境配置和生产环境配置。
这里我们重点看生产环境配置和公共配置。
公共配置: 对vue、js、css、fonts、image的编译
const { CleanWebpackPlugin } = require('clean-webpack-plugin')
const VueLoaderPlugin = require('vue-loader/lib/plugin')
const MiniCssExtractPlugin = require('mini-css-extract-plugin')
module.exports = {
  resolve: {
    extensions: ['.vue', '.js']
  },
  module: {
    rules: [
      {
        test: /\.vue$/,
        loader: 'vue-loader'
      },
      {
        test: /\.js$/,
        exclude: /node_modules/,
        loader: 'babel-loader'
      },
      {
        test: /\.(png|jpe?g|gif)$/,
        type: 'asset/resource',
        generator: {
          filename: 'style/images/[name][ext]'
        }
      },
      {
        test: /\.(eot|ttf|woff|woff2|svg)$/,
        use: [
          {
            loader: 'url-loader',
            options: {
              limit: '8192',
              outputPath: 'fonts'
            }
          }
        ]
      },
      {
        test: /\.(less|css)$/,
        use: [
          {
            loader: MiniCssExtractPlugin.loader
          },
          'css-loader',
          'less-loader'
        ]
      }
    ]
  },
  plugins: [
    new CleanWebpackPlugin(),
    new VueLoaderPlugin(),
    new MiniCssExtractPlugin({})
  ]
}
生产环境配置: 对入口文件和最终输出文件的配置
output.libraryTarget:‘umd’- 将你的 library 暴露为所有的模块定义下都可运行的方式。这样你就可以直接引入模块,模块名是library的值
const path = require('path')
const { merge } = require('webpack-merge')
const commonConfig = require('./webpack.common')
const OptimizeCssAssetsWebpackPlugin = require('optimize-css-assets-webpack-plugin')
const UglifyJsPlugin = require('uglifyjs-webpack-plugin')
const prodConfig = {
  mode: 'production',
  devtool: 'cheap-module-source-map',
  entry: {
    'jimo-ui': './src/index.js' // 入口文件
  },
  output: {
    path: path.resolve(__dirname, '../lib'), // 输出文件目录
    publicPath: '/lib/',
    filename: 'jimo.js', // 输出文件名
    library: 'jimo', // 模块名
    libraryTarget: 'umd' // 将你的 library 暴露为所有的模块定义下都可运行的方式。这样你就可以直接引入模块,模块名是library的值
  },
  optimization: {
    minimizer: [
      new OptimizeCssAssetsWebpackPlugin({}) // css代码压缩
    ]
  },
  plugins: [
    new UglifyJsPlugin({
      parallel: true,
      sourceMap: true
    }) // js代码压缩
  ]
}

module.exports = merge(commonConfig, prodConfig) // 合并
7. package.json配置
{
  "name": "jimo-ui", // npm包名称
  "version": "0.1.10", // 版本
  "title": "JimoUI",
  "private": false, // 必须是false 不然 npm会拒绝发布, 因为这是防止意外发布私有存储库的方法
  "main": "lib/jimo.js", // 入口文件
  "files": [ // 需要发布的目录
    "src",
    "lib"
  ],
  "keyword": [ // 关键字
    "vue",
    "JimoUI",
    "vue.js",
    "component",
    "components",
    "ui"
  ],
  "description": "vue ui组件库", // 描述
  "author": "",
  "scripts": { // 打包命令
    "serve": "webpack-dev-server --config ./build/webpack.dev.js",
    "dist": "webpack --config ./build/webpack.prod.js"
  }
  ...
}
注意:
version每次发布的版本都要不相同,否则会导致发布失败
private必须是false,不然 npm会拒绝发布, 因为这是防止意外发布私有存储库的方法
8. 打包生成最终的文件
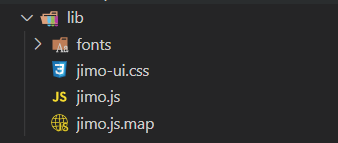
npm run dist
在根目录下生成lib目录

9. 发布到npm上
npm login
npm publish
如果没有账号可以到官网进行注册或者命令行进行注册,注册完成后要在邮箱进行才可以发布包。
npm adduser
10. 项目引入使用
就这个组件库而言,直接
cnpm install jimo-ui -S
之后在main.js中引用,导入jimo-ui及其样式文件
import Jimo from 'jimo-ui'
import 'jimo-ui/lib/jimo-ui.css'
Vue.use(Jimo)
最后在vue文件中进行引用就行
<templatet>
    <div>
        <JSplit>
            <div slot="left">我是左边</div>
            <div slot="right">我是右边</div>
        </JSplit>
    </div>
</template>
效果如下图所示:

项目地址:https://gitee.com/zjinxiaoliang/jimo-ui
npm地址: https://www.npmjs.com/package/jimo-ui
文档地址:http://jimoui.jinxiaoliang.cn/split