前言
记录尚品汇后台管理系统的开发过程,功能模块包括登录、首页、品牌管理、平台属性管理、SKU管理、SPU管理、用户管理、角色管理、菜单管理模块。后台管理系统是CMS内容管理系统的一个子集,通过项目实战可以彻底搞明白菜单权限、按钮权限如何实现,掌握市场中数据可视化ECharts、V-charts的运用。
主要涵盖的技术点:Vue-cli、Axios、Vuex、Element-UI、菜单权限、按钮权限、数据可视化、Scss……
由于项目写的太长了,编辑器真的很卡呜呜呜,因此将项目分成了上、中、下三部分.
【Vue】项目:尚品汇后台管理系统(上)
【Vue】项目:尚品汇后台管理系统(下)
文章目录
十三、平台属性管理的三级联动静态组件
1.由于属性管理、Spu、Sku模块都需要三级联动,因此我们把三级联动封装成静态组件,存放在components中,新建一个文件夹CategorySelect/index.vue。
2.静态组件的注册,在main.js中引入并注册。
//引入并注册CategorySelect
import CategorySelect from '@/components/CategorySelect'
Vue.component(CategorySelect.name,CategorySelect)
3.CategorySelect组件中有两个有阴影的盒子,也可以在element-ui中找到,是card卡片,行内表单为Form表单,因此大致的布局为
<div>
<el-form :inline="true" class="demo-form-inline">
    <el-form-item label="一级分类">
    <el-select  placeholder="请选择" value="">
        <el-option label="区域一" value="shanghai"></el-option>
        <el-option label="区域二" value="beijing"></el-option>
    </el-select>
    </el-form-item>
    <el-form-item label="二级分类">
    <el-select  placeholder="请选择" value="">
        <el-option label="区域一" value="shanghai"></el-option>
        <el-option label="区域二" value="beijing"></el-option>
    </el-select>
    </el-form-item>
    <el-form-item label="三级分类">
    <el-select  placeholder="请选择" value="">
        <el-option label="区域一" value="shanghai"></el-option>
        <el-option label="区域二" value="beijing"></el-option>
    </el-select>
    </el-form-item>
</el-form>
</div>
4.当前效果

十四、获取数据动态的展示三级联动
-
获取三级联动的数据是有响应接口的,每一级对应一个接口,其中二级和三级的接口包含参数,原因是,二级展示什么数据是由一级决定的,而三级是由二级决定的,因此后面两个请求需要包含参数.

-
接口的获取需要在api/product/attr.js中书写代码,代码简单,略过.
-
一级标题的获取需要在组件挂载的时候就进行,因为一级标题是固定的.定义函数获取数据,在mounted中执行函数.需要的数据用三个数组和一个对象来收集.
data() {
  return {
      Category1List:[],
      Category2List:[],
      Category3List:[],
      cForm:{
          category1Id:'',
          category2Id:'',
          category3Id:'',
      }
  }
},
mounted(){
    this.getCategory1List();
},
methods:{
    async getCategory1List(){
        const result = await this.$API.attr.reqCategory1List()
        if(result.code === 200){
            this.Category1List = result.data
        }
    },
}
-
el-form与el-select中需要的数据展示.
el-form :model ------------表单元素收集到的位置
el-select v-model -------------给下拉框绑定数据
@change --------当下拉框数据改变的时候触发事件
el-option :label -----------下拉框展示的内容
:value ----------下拉框内容对应的值 -
一级标题的展示
<el-form :inline="true" class="demo-form-inline" :model="cForm">
   <el-form-item label="一级分类">
     <el-select
       placeholder="请选择"
       v-model="cForm.category1Id"
       @change="handler1">
       <el-option
         :label="c1.name"
         :value="c1.id"
         v-for="(c1, index) in Category1List"
         :key="c1.id"></el-option>
     </el-select>
   </el-form-item>
</el-form>
- 二级标题数据的获取(数据展示和三级数据的获取同理)
async handler1(){
  //   结构出一级分类的Id
  const {category1Id} = this.cForm;
  const result = await this.$API.attr.reqCategory2List(category1Id)
    if(result.code === 200){
        this.Category2List = result.data
    }
},
十五、完成三级联动业务
- 完成表单清除功能:当一级标题修改以后,二级三级标题应该置空,二级标题修改同理.
async handler1(){
   this.Category2List = []
   this.Category3List = []
   this.cForm.category2Id = '';
   this.cForm.category3Id = '';
  }
async handler2(){
	this.Category3List = []
	this.cForm.category3Id = '';
}
- 三级联动业务在子组件中,但需要数据的确实父组件,因此子组件需要给父组件其需要的3个标题id,需要用到自定义事件实现.在父组件中定义事件,子组件中触发事件,传递数据.
- 如果子组件更换一级二级标题,同样的下面的id要置空,且传递过来的id要用level进行标记.
// 父组件:Attr.vue中
<CategorySelect @getCategoryId="getCategoryId"></CategorySelect>
// 父组件:Attr.vue中
data(){
  return{
    category1Id:'',
    category2Id:'',
    category3Id:'',
  }
},
methods:{
  getCategoryId({categoryId,level}){
    if(level === 1){
      this.category1Id = categoryId
      this.category2Id = ''
      this.category3Id = ''
    }else if(level === 2){
      this.category2Id = categoryId
      this.category3Id = ''
    }else{
      this.category3Id = categoryId
      this.getAttrList()
    }
  },
  getAttrList(){
    console.log('发请求');
  }
}
//子组件中
this.$emit('getCategoryId',{categoryId:category1Id,level:1})
this.$emit('getCategoryId',{categoryId:category2Id,level:2})
this.$emit('getCategoryId',{categoryId:category3Id,level:3})
十六、获取平台属性数据与展示平台属性
从这节开始就不再仔细分析每个模块的静态代码了,因为很多都是重复的,且element-ui中都可以查看到.从此开始用图片的方式展示网页的静态结构,但是业务逻辑还是要仔细分析的.
- 结构分析

- 相关代码
<div v-show="isShowTable">
 <el-button
   type="primary"
   icon="el-icon-plus"
   :disabled="category3Id == ''"
   @click="isShowTable = false">添加属性</el-button>
 <el-table :data="categoryList" border style="width: 100%">
   <el-table-column
     prop="date"
     label="序号"
     width="100"
     align="center"
     type="index">
   </el-table-column>
   <el-table-column prop="attrName" label="属性名称" width="150">
   </el-table-column>
   <el-table-column prop="prop" label="属性值列表">
     <template slot-scope="{ row, $index }">
       <el-tag
         type="success"
         v-for="(attrValue, index) in row.attrValueList"
         :key="attrValue.id"
         style="margin: 0 15px"
         >{{ attrValue.valueName }}</el-tag>
     </template>
   </el-table-column>
   <el-table-column prop="address" label="操作" width="150">
     <template slot-scope="{ row, $index }">
       <el-button
         icon="el-icon-edit"
         type="warning"
         size="mini"
         @click="isShowTable = false"></el-button>
       <el-button
         icon="el-icon-delete"
         type="danger"
         size="mini"></el-button>
     </template>
   </el-table-column>
 </el-table>
</div>
十七、添加属性与修改属性静态组件

<div v-show="!isShowTable">
  <el-form :inline="true" class="demo-form-inline">
    <el-form-item label="属性名">
      <el-input placeholder="请输入属性名"></el-input>
    </el-form-item>
  </el-form>
  <el-button type="primary" icon="el-icon-plus" >添加属性值</el-button>
  <el-button @click="isShowTable=true">取消</el-button>
  <el-table :data="categoryList" border style="width: 100% ;margin:20px 0" >
    <el-table-column
      prop="date"
      label="序号"
      width="100"
      align="center"
      type="index"
    >
    </el-table-column>
    <el-table-column prop="prop" label="属性值名称">
    </el-table-column>
    <el-table-column prop="prop" label="操作">
    </el-table-column>
  </el-table>
  <el-button type="primary">保存</el-button>
  <el-button @click="isShowTable=true">取消</el-button>
</div>
十八、收集平台属性以及属性值的操作
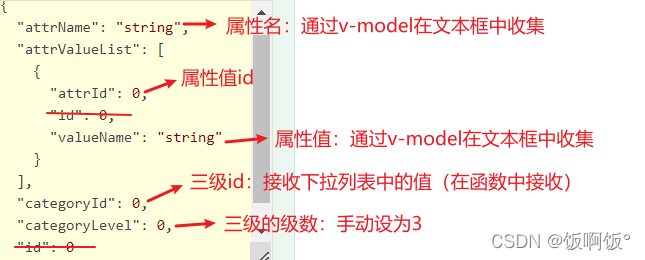
根据属性值更改的接口来看,如果想调用这个接口,需要传递一些参数,我们此处的代码主要围绕需要的参数的展开书写,不能乱写.


关键的js代码如下
data() {
  return {
    attrInfo: {
      attrName: "",
      attrValueList: [
      ],
      categoryId: 0,
      categoryLevel: 0,
    },
  };
},
// 添加属性值按钮的回调
addAttrValue(){
  this.attrInfo.attrValueList.push({
        attrId: undefined,
        valueName: '',
      })
},
// 添加属性按钮的回调
addAttr(){
  this.isShowTable = false;
  // 清除数据
  this.attrInfo = {
    attrName: "",
    attrValueList: [
    ],
    categoryId: this.category3Id,
    categoryLevel: 3,
  }
}
十九、添加与修改属性的操作

由于这部分功能较多,因此分别解释一下:
- 点击编辑后,显示已有的数据,并用span展示,还要保证修改后,点击取消可以恢复.
editAttr(row) {
  this.isShowTable = false;
  this.attrInfo = cloneDeep(row);//深拷贝
  this.attrInfo.attrValueList.forEach((item) => {
    // 不能这样写,flag不是响应式的
    // item.flag = false
    // 应该用响应式的set方法写
    this.$set(item, "flag", false);
  });
},
- 添加属性值:点击添加属性值以后,需要做的事情有给新添加的属性值传递id,name和flag,id就是属性的大id,name是属性值的名称,flag是选择编辑框和span到底展示哪个.还要给新添加的input框聚焦.
// 添加属性值按钮的回调
addAttrValue() {
  this.attrInfo.attrValueList.push({
    attrId: this.attrInfo.id,
    valueName: "",
    flag: true,
  });
  this.$nextTick(() => {
    this.$refs[this.attrInfo.attrValueList.length - 1].focus();
  });
},
- input框和span的切换,input需要聚焦,需要判断输入的值是否符合规则.
//失去焦点事件
toLook(row) {
  if (row.valueName.trim() == "") {
    alert("请你输入一个正常的属性值");
    return;
  }
  let isRepat = this.attrInfo.attrValueList.some((item) => {
    if (row != item) {
      return row.valueName == item.valueName;
    }
  });
  if (isRepat) {
    alert("请你输入一个不重复的属性值");
    return;
  }
  row.flag = false;
},
// 转为编辑模式
toEdit(row, index) {
  row.flag = true;
  // 获取input节点,实现自动聚焦
  // 点击span时,浏览器的渲染需要时间的,不可能一点击就获取得到
  this.$nextTick(() => {
    this.$refs[index].focus();
  });
},
- 点击删除按钮,没啥好说的,传递索引,然后删除
deleteAttrValue(index) {
  this.attrInfo.attrValueList.splice(index, 1);
},
- 点击保存后,发送请求,获取数据.如果用户添加了空的属性值,就不要提交给服务器了.且服务器要求的参数没有flag,因此需要删除.
// 点击保存按钮
async addOrUpdataAttr() {
  //整理参数:1如果用户添加很多属性值,且属性值为空的不应该提交给服务器
  this.attrInfo.attrValueList = this.attrInfo.attrValueList.filter(
    (item) => {
      if (item.valueName != "") {
        delete item.flag;
        return true;
      }
    }
  );
  try {
    await this.$API.attr.reqAddOrUpdateAttr(this.attrInfo);
    this.$message({type:'success',message:'保存成功'})
    this.isShowTable = true;
    this.getAttrList();
  } catch (error) {
    this.$message({message:'保存失败'})
  }
},
二十、完成SPU管理模块的静态与展示
- 静态页面比较简单,都是之前学习过的知识

- 列表展示首先需要获取数据,还是要思考:在什么时候请求数据呢?,应该是在三级分类有数据的时候,才能发请求,获取数据.数据接口需要page(页码),limit(每页数据条数),category3Id(三级分类id),分别可以在分页器和三级分类上获得.考虑到每次点击页码后,也要获取数据,因此可以把获取数据和点击页码放到一起,只需要多加一个页码就可以了,代码如下:
async getSpuList(pages = 1) {
  this.page = pages;
  const { page, limit, category3Id } = this;
  const result = await this.$API.spu.reqSpuList(page, limit, category3Id);
  if (result.code == 200) {
    this.total = result.data.total;
    this.records = result.data.records;
  }
},
展示的部分就和之前写过的相同,就略啦~~~~
二十一、SPU管理内容的切换
- Spu的页面主要有三个页面: (1)展示SPU列表结构. (2)添加/修改SPU. (3)展示添加SKU结构. 可以定义一个变量来区分这几个页面.同时,每个页面要展示的内容很多,因此要分离出两个组件.
<SpuForm v-show="scene == 1" @changeScene="changeScene"  ref="spu"></SpuForm>
<SkuForm v-show="scene == 2"></SkuForm>
- 添加/修改SPU的静态页面和数据展示
主要业务分为四个部分:
①品牌的数据需要发请求的 http://localhost:9529/dev-api/admin/product/baseTrademark/getTrademarkList
②获取平台中全部的销售属性(3个) http://localhost:9529/dev-api/admin/product/baseSaleAttrList
③获取某一个SPU信息 Request URL: http://localhost:9529/dev-api/admin/product/getSpuById/5092
④获取SPU图片 http://localhost:9529/dev-api/admin/product/spuImageList/5092

二十二、SPU管理的业务逻辑
- 首先观察添加SPU的时候需要给服务器携带的参数,大体分为三个部分,分别是基本信息(名称和描述),图片信息和属性信息.其中基本信息就可以直接收集了,没有什么可说的.
{
// 基本信息
  "category3Id": 0,
  "tmId": 0,
  "description": "string",
  "spuName": "string",
//图片信息
  "spuImageList": [
    {
      "id": 0,
      "imgName": "string",
      "imgUrl": "string",
      "spuId": 0
    }
  ],
//属性信息
  "spuSaleAttrList": [
    {
      "baseSaleAttrId": 0,
      "id": 0,
      "saleAttrName": "string",
      "spuId": 0,
      "spuSaleAttrValueList": [
        {
          "baseSaleAttrId": 0,
          "id": 0,
          "isChecked": "string",
          "saleAttrName": "string",
          "saleAttrValueName": "string",
          "spuId": 0
        }
      ]
    }
  ],
}
- 图片信息的收集与展示
照片墙的相关属性
-----action:图片上传的地址:dev-api/admin/product/fileUpload
-----list-type:文件列表类型,当前是照片墙
-----:on-preview 图片预览触发
-----:on-remove 删除图片触发
-----:file-list 展示图片列表
-----:on-success 图片上传成功时的钩子
<el-upload
  action="dev-api/admin/product/fileUpload"
  list-type="picture-card"
  :on-preview="handlePictureCardPreview"
  :on-remove="handleRemove"
  :file-list="spuImageList"
  :on-success="handlerSuccess"
>
  <i class="el-icon-plus"></i>
</el-upload>
<el-dialog :visible.sync="dialogVisible">
  <img width="100%" :src="dialogImageUrl" alt="" />
</el-dialog>
图片预览时触发:on-preview="handlePictureCardPreview"
handlePictureCardPreview(file) {
  //把要展示的照片给dialogImageUrl
  this.dialogImageUrl = file.url;
  //遮罩层设置成可见
  this.dialogVisible = true;
},
删除图片时触发:on-remove="handleRemove"
handleRemove(file, fileList) {
  // file是删除的图片,fileList是照片墙剩余的图片
  this.spuImageList = fileList;
},
图片上传成功触发:on-success="handlerSuccess"
handlerSuccess(response, file, fileList) {
    // 更新图片列表
  this.spuImageList = fileList;
},
- 属性信息的收集与展示
下拉框
数据收集到attrIdAndAttrName中,结构是id:name.
<el-select
  :placeholder="`还有${unSelectSaleAttr.length}未选择`"
  value=""
  v-model="attrIdAndAttrName"
>
  <el-option
    :label="saleAttr.name"
    :value="`${saleAttr.id}:${saleAttr.name}`"
    v-for="(saleAttr, index) in unSelectSaleAttr"
    :key="saleAttr.id"
  ></el-option>
</el-select>
<el-button
  type="primary"
  icon="el-icon-plus"
  :disabled="!attrIdAndAttrName"
  @click="addSaleAttr"
  >添加销售属性</el-button
>
点击添加销售属性后,首先解构收集到的数据,然后构造一个符合要求的对象,加入新对象后,将选项框置空.
addSaleAttr() {
  const [baseSaleAttrId, saleAttrName] = this.attrIdAndAttrName.split(":");
  let newSaleAttr = {
    baseSaleAttrId,
    saleAttrName,
    spuSaleAttrValueList: [],
  };
  this.spuById.spuSaleAttrList.push(newSaleAttr);
  this.attrIdAndAttrName = "";
},
属性值的添加
<el-table-column prop="prop" label="属性值名称列表">
	<template slot-scope="{ row, $index }">
	   <el-tag
	     v-for="(attrValue, index) in row.spuSaleAttrValueList"
	     :key="attrValue.id"
	     closable
	     :disable-transitions="false"
	     @close="row.spuSaleAttrValueList.splice(index, 1)"
	   >
	     {{ attrValue.saleAttrValueName }}
	   </el-tag>
	   <el-input
	     class="input-new-tag"
	     v-if="row.inputVisible"
	     v-model="row.inputValue"
	     ref="saveTagInput"
	     size="small"
	     @keyup.enter.native="handleInputConfirm"
	     @blur="handleInputConfirm(row)"
	   >
	   </el-input>
	   <el-button
	     v-else
	     class="button-new-tag"
	     size="small"
	     @click="showInput(row)"
	     >+ 添加</el-button
	   >
	 </template>
	</el-table-column>
@click="showInput(row)"点击添加属性后,输入框可见,自动聚焦.
showInput(row) {
  this.$set(row, "inputVisible", true);
  this.$set(row, "inputValue", "");
  this.$nextTick((_) => {
    this.$refs.saveTagInput.$refs.input.focus();
  });
},
@blur="handleInputConfirm(row)"失去焦点后,触发事件.分别判断加入的值是否为空和是否重复
handleInputConfirm(row) {
  const { baseSaleAttrId, inputValue } = row;
  if (inputValue.trim() == "") {
    this.$message("属性值不能为空");
    return;
  }
  let result = row.spuSaleAttrValueList.every(
    (item) => item.saleAttrValueName != inputValue
  );
  if (!result) {
    this.$message("属性值不能重复");
    return;
  }
  let newSaleAttrValue = { baseSaleAttrId, saleAttrValueName: inputValue };
  row.spuSaleAttrValueList.push(newSaleAttrValue);
  row.inputVisible = false;
},
@close=“row.spuSaleAttrValueList.splice(index, 1)” 点击关闭后,把该属性移除.
二十三、SPU管理的保存操作
- 点击保存后首先要整理参数,因为新加入的图片没有imgName和imgUrl;保存成功后要让Spu知道本次操作是修改还是添加,方便操作页码的变化;最后要清除所有数据.
async addOrUpdateSpu() {
  // 整理参数
  // 对于新添加的图片是没有imgName和imgUrl的
  this.spuById.spuImageList = this.spuImageList.map((item) => {
    return {
      imgName: item.name,
      imgUrl: (item.response && item.response.data) || item.url,
    };
  });
  let result = await this.$API.spu.reqAddOrUpdateSpu(this.spuById);
  if (result.code === 200) {
    this.$message({ type: "success", message: "保存成功" });
    this.$emit("changeScene", {scene:0,flag:this.spuById.id?'修改':'添加'});
  }
  Object.assign(this._data,this.$options.data())
},
- Spu组件做出的响应
changeScene({ scene, flag }) {
  this.scene = scene;
  if (flag == "修改") {
    this.getSpuList(this.page);
  } else {
    this.getSpuList();
  }
},
- 如果是添加数据一开始获取的数据有变化,只需要品牌和销售属性
async addSpuData(category3Id) {
    this.spuById.category3Id = category3Id
    //   获取品牌列表
  const tmResult = await this.$API.spu.reqTrademarkList();
  if (tmResult.code === 200) {
    this.tmList = tmResult.data;
  }
  //   获取销售属性
  const saleResult = await this.$API.spu.reqSaleAttrList();
  if (saleResult.code == 200) {
    this.saleAttrList = saleResult.data;
  }
},
- 取消按钮
cancel(){
    this.$emit('changeScene', {scene:0,flag:''})
    // 清理数据
    // Object.assign是es6中新增的合并对象
    Object.assign(this._data,this.$options.data())
}
二十四、SPU管理的删除操作
直接调用接口就可以了,需要注意的是页码的改变.
async deleteSpu(row) {
  let result = await this.$API.spu.reqDeleteSpu(row.id)
  if(result.code === 200){
    this.$message({type:'success',message:'删除成功'})
    this.getSpuList(this.records.length>1?this.page:this.page-1);
  }else{
    this.$message({message:'删除失败'})
  }
},
二十五、SKU的添加操作
- 静态页面与展示

- 数据传递:在SPU模块中点击添加Sku后,触发函数,传递当前table的id、row信息,使用ref的传递方法。
<el-button
  type="success"
  icon="el-icon-plus"
  size="mini"
  title="添加spu"
  @click="addSku(row)"
></el-button>

<SkuForm v-show="scene == 2" ref="sku" @changeScene = "changeScene"></SkuForm>
addSku(row){
  this.scene = 2
  this.$refs.sku.getData(this.category1Id,this.category2Id,row)
},
- 获取接口数据:需要的数据可以通过接口获得,这次我们通过保存接口的参数来分析每一个参数应该如何获取,可以大致分为三类,1、父组件给的数据;2、需要双向绑定收集的数据;3、需要自己写代码收集的数据。
(1)父组件给的数据:在接收数据时直接获取
this.skuInfo.category3Id = spu.category3Id
this.skuInfo.spuId = spu.id
this.skuInfo.tmId = spu.tmId
this.spu = spu
(2)需要双向绑定收集的数据:在html标签中直接v-model.
(3)需要自己写代码收集的数据,见以下模块。
- 展示并获取平台属性和销售属性
展示可以直接使用两个v-for分别遍历属性名和属性值;
收集的时候根据保存接口,需要收集属性名ID和属性值ID,因此单独定义两个数组接收这个组合。
<el-form-item label="平台属性">
  <el-form :inline="true" ref="form" label-width="80px">
    <el-form-item :label="attr.attrName" v-for="(attr,index) in attrInfoList" :key="attr.id">
      <el-select v-model="attr.attrIdAndValueId" placeholder="请选择" value="" >
        <el-option :label="attrValue.valueName" :value="`${attr.id}:${attrValue.id}`" v-for="(attrValue,index) in attr.attrValueList" :key="attrValue.id"></el-option>
      </el-select>
    </el-form-item>
  </el-form>
</el-form-item>
<el-form-item label="销售属性">
  <el-form :inline="true" ref="form" label-width="80px">
    <el-form-item :label="saleAttr.saleAttrName" v-for="(saleAttr,index) in spuSaleAttrList" :key="saleAttr.id">
      <el-select v-model="saleAttr.saleAttrIdAndValueId" placeholder="请选择" value="">
        <el-option :label="saleAttrValue.saleAttrValueName" :value="`${saleAttr.id}:${saleAttrValue.id}`" v-for="(saleAttrValue,index) in saleAttr.spuSaleAttrValueList" :key="saleAttrValue.id"></el-option>
      </el-select>
    </el-form-item>
  </el-form>
</el-form-item>
- 图片属性的展示与获取
操作部分的是否展示是由获取数据的isDeafulted决定的,点击更改也是通过这个参数实现。
选择框部分需要查找文档,会发现有相应的触发函数,定义新数组,保存图片信息。
<el-form-item label="图片列表">
<el-table :data="spuImageList" style="width: 100%" border @selection-change="handleSelectionChange">
  <el-table-column type="selection" width="80" align="center"> </el-table-column>
  <el-table-column prop="prop" label="图片" width="width">
    <template slot-scope="{row,$index}">
      <img :src="row.imgUrl" style="width:100px;height:100px">
    </template>
  </el-table-column>
  <el-table-column prop="imgName" label="名称" width="width">
  </el-table-column>
  <el-table-column prop="prop" label="操作" width="width">
    <template slot-scope="{row,$index}">
      <el-button type="primary" v-if="row.isDefault==0" @click="chageDefault(row,spuImageList)">设为默认</el-button>
      <el-button v-else>默认</el-button>
    </template>
  </el-table-column>
</el-table>
handleSelectionChange(val){
  this.imageList = val
},
chageDefault(row,spuImageList){
  spuImageList.forEach(item=>{
    item.isDefault = 0
  })
  row.isDefault = 1
  this.skuInfo.skuDefaultImg = row.imgUrl
},
- 保存与取消操作
取消操作只需要改变Spu中的scene值,并清空数据即可。
cancel(){
  this.$emit('changeScene',0)
  Object.assign(this._data,this.$options.data())
},
保存操作涉及到整理参数,其实都可以用forEach()挑选出需要的参数形式,也可以尝试reduce()和map()方法进行整理。
async save(){
  const {attrInfoList,skuInfo,spuSaleAttrList,imageList} = this
  //整理商品属性
  skuInfo.skuAttrValueList = attrInfoList.reduce((prev,item)=>{
    if(item.attrIdAndValueId){
      const [attrId,valueId] = item.attrIdAndValueId.split(":")
      prev.push({attrId,valueId})
    }
    return prev
  },[])
  //整理销售属性
  skuInfo.skuSaleAttrValueList = spuSaleAttrList.reduce((prev,item)=>{
    if(item.saleAttrIdAndValueId){
      const [saleAttrId,saleAttrValueId] = item.saleAttrIdAndValueId.split(":")
      prev.push({saleAttrId,saleAttrValueId})
    }
    return prev
  },[])
  //整理图片
  skuInfo.skuImageList = imageList.map(item=>{
    return {
      imgName:item.imgName,
      imgUrl:item.imgUrl,
      isDefault:item.isDefault,
      spuImgId:item.id
    }
  })
  let result = await this.$API.spu.reqAddSku(skuInfo);
  if(result.code == 200){
    this.$message({type:'success',message:'添加SKU成功'})
    this.$emit('changeScene',0)
    Object.assign(this._data,this.$options.data())
  }
}
