1、进入项目路径

2、创建vue3项目
vue create +项目名称
注意:项目名称要避开特殊名字如echarts、vue等

3、项目配置
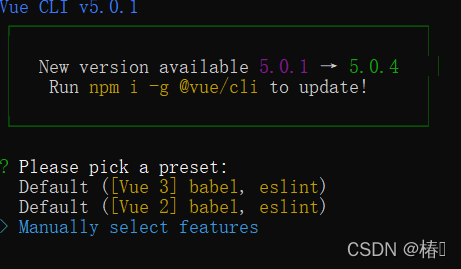
等待后弹出选项窗口,询问用户以什么模板方式进行安装

Default ([Vue 3] babel, eslint):默认预设配置,会快速创建一个Vue2.0项目,提供了babel和eslint支持
Default ([Vue 2] babel, eslint):默认预设配置,会快速创建一个Vue3.0项目,提供了babel和eslint支持
Manually select features:手动配置项目,可根据项目的需要选择合适的选项,具备更多的选择性
通过上下箭头选中手动方式创建项目,Enter键确定显示如下图片

Babel:使用Babel将源码进行转码(把ES6=>ES5)
TypeScript:使用TypeScript进行源码编写。使用TypeScript可以编写强类型JavaScript
Progressive Web App (PWA) Support:使用渐进式Web应用程序
Router:使用Vue路由
Vuex:使用Vuex状态管理器
CSS Pre-processors:CSS 预处理器(如:less、sass)
Linter / Formatter:使用代码风格检查和格式化(如:ESlint)
Unit Testing:使用单元测试(unit tests)
E2E Testing:使用E2E(end to end)黑盒测试
使用空格进项按需选择,Enter进行下一步,选择项目版本

Enter下一步,如图,询问是否使用history路由模式

Enter下一步,如图,选择一种CSS预处理器

按Enter下一步,选择代码格式化检查工具

ESLint with error prevention only:ESLint只会进行错误提醒
ESLint + Airbnb config:ESLint Airbnb标准
ESLint + Standard config:ESLint Standard标准
ESLint + Prettier:代码质量检测+代码格式化工具
Enter下一步进行代码检查方式的选择,通过上下选择,空格选中

Lint on save:保存时检查
Lint and fix on commit:提交时检查
Enter选择文件存放方式

In dedicated config files:放到单独配置文件中
In package.json:放到package.json中
Enter下一步设置是否保存当前配置,以后生成新项目时方便快速构建

Y:保存,后续创建新项目可直接使用改配置
N:不保存,需要重新配置
配置完成后,开始成Vue3.0项目,等待安装相关依赖,完成后如图:

4、输入提示命令运行项目
cd mystudy
npm run serve

