文章目录
一、引出生命周期
1.1、案例目标效果
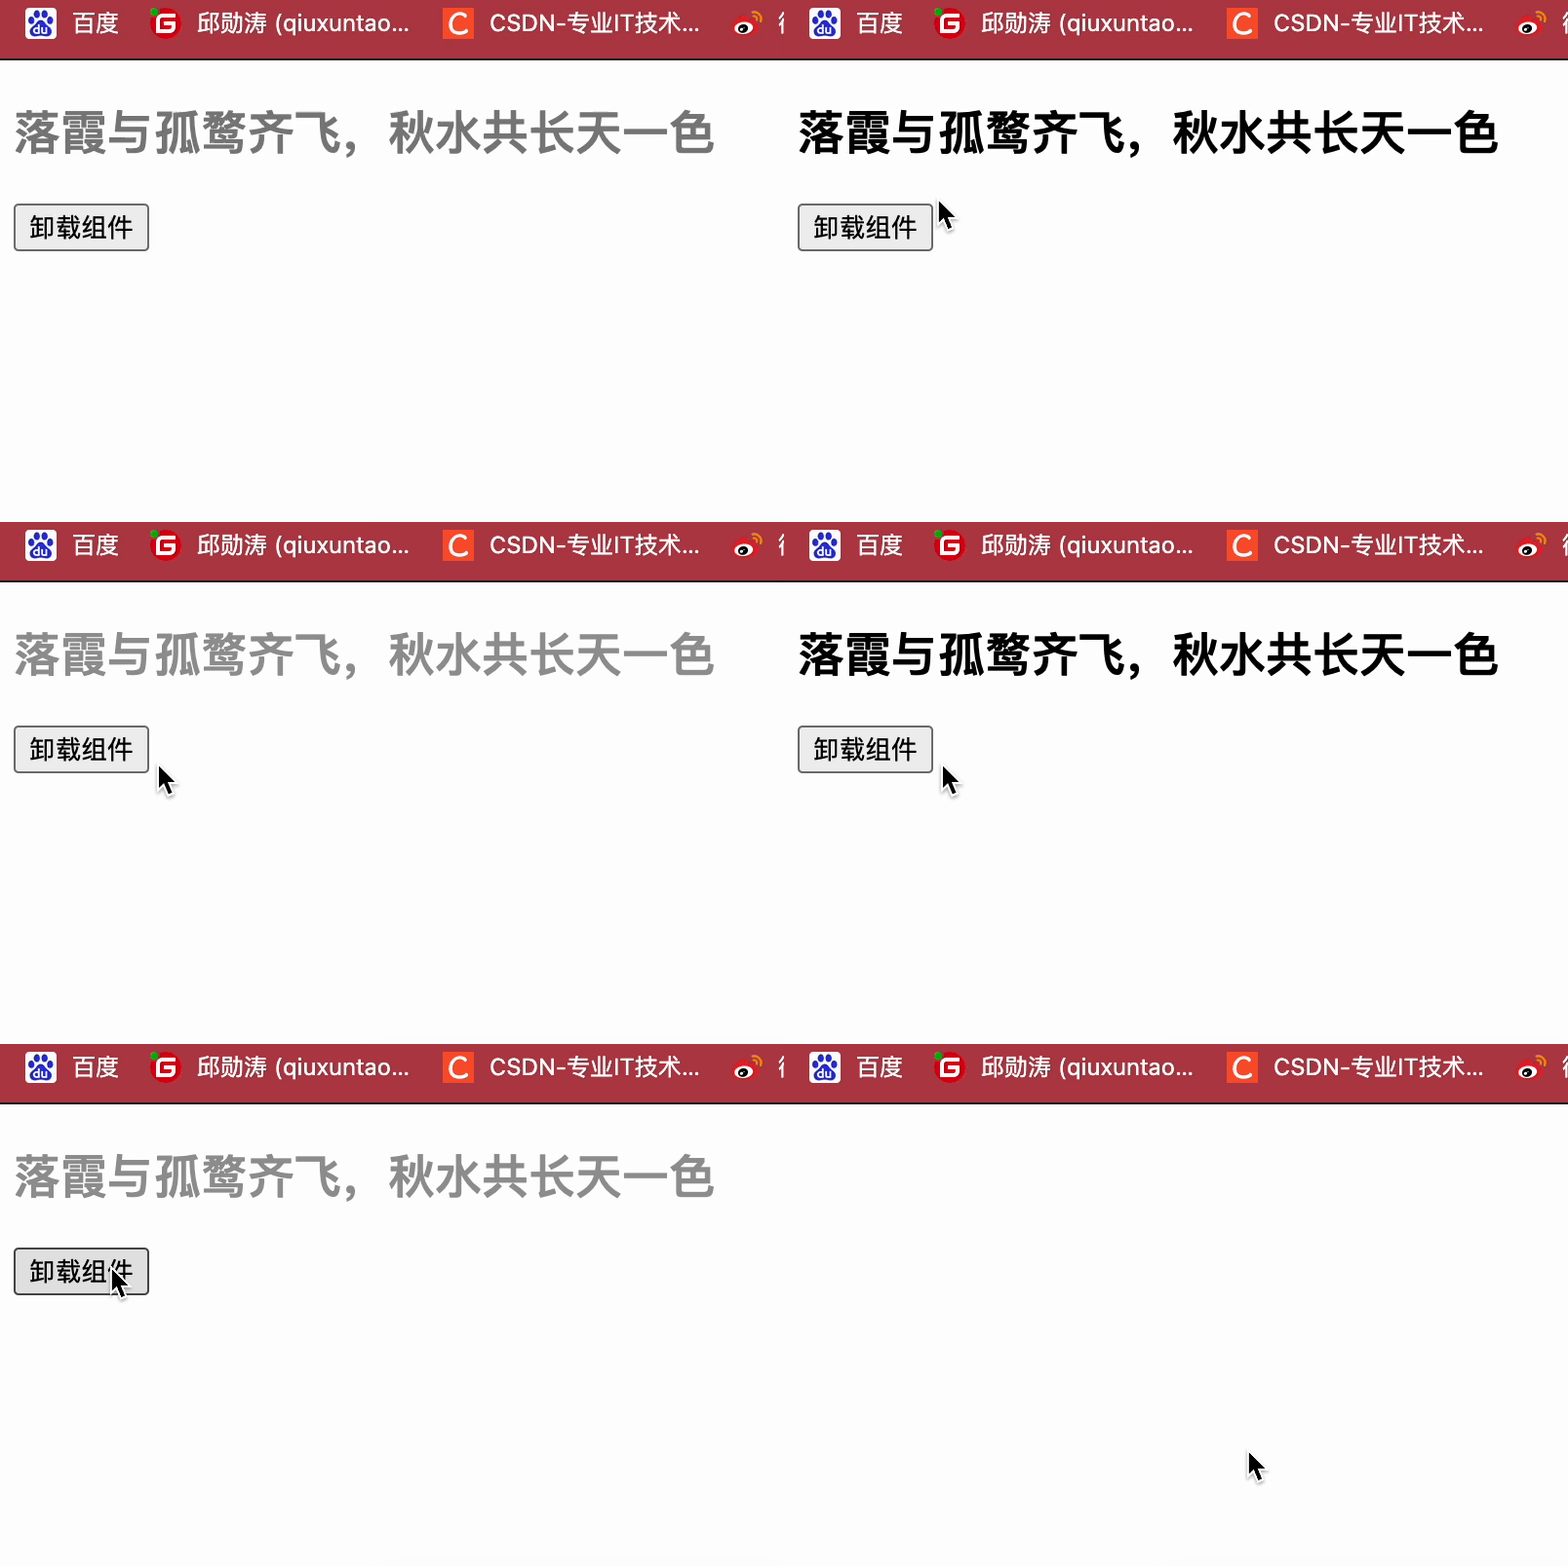
需求:定义组件实现以下功能:
- 让指定的文本做显示 / 隐藏的渐变动画(挂载组件)
- 从完全可见,到彻底消失,耗时2S
- 点击“不活了”按钮从界面中卸载组件
1.2、卸载组件
ReactDOM.unmountComponentAtNode(document.getElementById("test"))
1.3、挂载组件
            //组件挂载完毕
            componentDidMount() {

                setInterval(() => {
                    //获取原状态
                    let { opacity } = this.state

                    //减小0.1
                    opacity -= 0.1

                    if (opacity <= 0) {
                        opacity = 1

                    }

                    //更新状态 透明度
                    this.setState({ opacity: opacity })

                }, 200)
            }
点击卸载组件 报错

原因是组建已经卸载了,定时器里面还在更新状态,所以要在卸载组件之前要清空定时器
需要拿到定时器的id才能清除定时器,把定时器挂在组建实例对象上 this.timerId= setInterval(() => {},这样清空定时器可以通过实例取到timerId—clearInterval(this.timerId)
return (
                    <div>
                        <h2 style={{ opacity: this.state.opacity }}>落霞与孤鹜齐飞,秋水共长天一色</h2>
                        <button onClick={this.death}>卸载组件</button>
                    </div>
                )
//初始化状态
            state = { opacity: 1 }

            death = () => {
                //清空定时器

                clearInterval(this.timerId)
                //卸载组件
                ReactDOM.unmountComponentAtNode(document.getElementById("test"))

            }

            //组件挂载完毕
            componentDidMount() {

               this.timerId= setInterval(() => {
                    //获取原状态
                    let { opacity } = this.state

                    //减小0.1
                    opacity -= 0.1

                    if (opacity <= 0) {
                        opacity = 1

                    }

                    //更新状态 透明度
                    this.setState({ opacity: opacity })

                }, 200)
            }
1.4、组件将要被卸载
组件将要被卸载的时候执行
       //组件将要被卸载的时候执行
            componentWillUnmount() {
                clearInterval(this.timerId)
            }
这段方法一样可以在组件卸载之前清空定时器
1.5、完整代码
<!DOCTYPE html>
<html lang="en">

<head>
    <meta charset="UTF-8">
    <meta http-equiv="X-UA-Compatible" content="IE=edge">
    <meta name="viewport" content="width=device-width, initial-scale=1.0">
    <title>hello_react</title>
</head>

<body>
    <!-- 准备好一个容器 -->
    <div id='test'></div>

    <!-- 引入react核心库 -->
    <script type="text/javascript" src="../js/react.development.js"></script>

    <!-- 引入react-dmo 用于react操作DOM -->
    <script type="text/javascript" src="../js/react-dom.development.js"></script>

    <!-- 引入babel 用于将jsx转为js -->
    <script type="text/javascript" src="../js/babel.min.js"></script>


    <!-- 此处一定要写babel -->
    <script type="text/babel">
        // 1.创建组件
        class Life extends React.Component {

            //初始化状态
            state = { opacity: 1 }

            death = () => {
                //清空定时器

                // clearInterval(this.timerId)
                //卸载组件
                ReactDOM.unmountComponentAtNode(document.getElementById("test"))

            }

            //组件挂载完毕
            componentDidMount() {

                this.timerId = setInterval(() => {
                    //获取原状态
                    let { opacity } = this.state

                    //减小0.1
                    opacity -= 0.1

                    if (opacity <= 0) {
                        opacity = 1

                    }

                    //更新状态 透明度
                    this.setState({ opacity: opacity })

                }, 200)
            }

            //组件将要被卸载的时候执行
            componentWillUnmount() {
                clearInterval(this.timerId)
            }


            // render调用时机:初始化渲染、状态更新之后
            render() {
                return (
                    <div>
                        <h2 style={{ opacity: this.state.opacity }}>落霞与孤鹜齐飞,秋水共长天一色</h2>
                        <button onClick={this.death}>卸载组件</button>
                    </div>
                )

            }
        }

        ReactDOM.render(<Life />, document.getElementById('test'))
    </script>
</body>

</html>
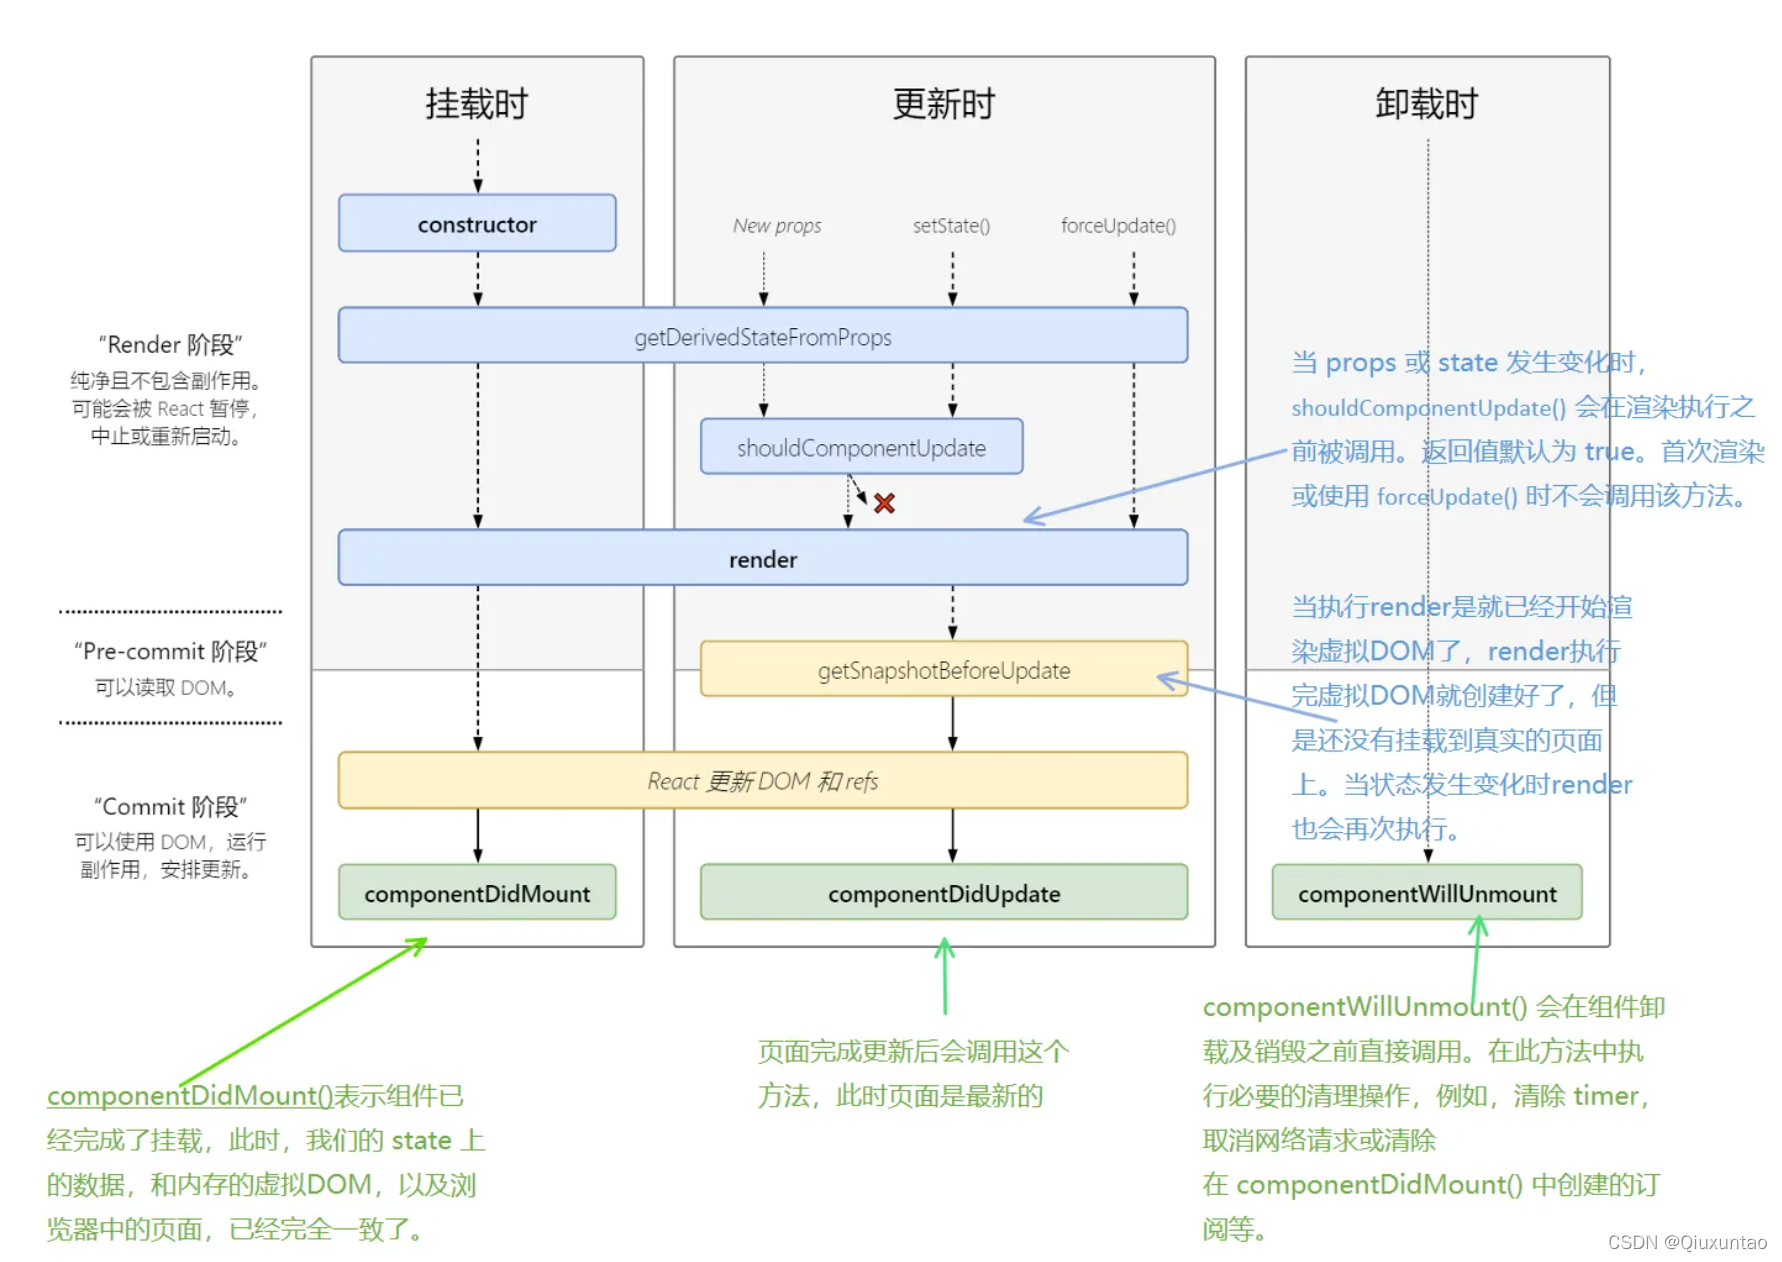
1.6、引出生命周期的目的
为了让我们知道代码执行过程中会在某个特定的时间点执行特定的事
二、生命周期(旧)
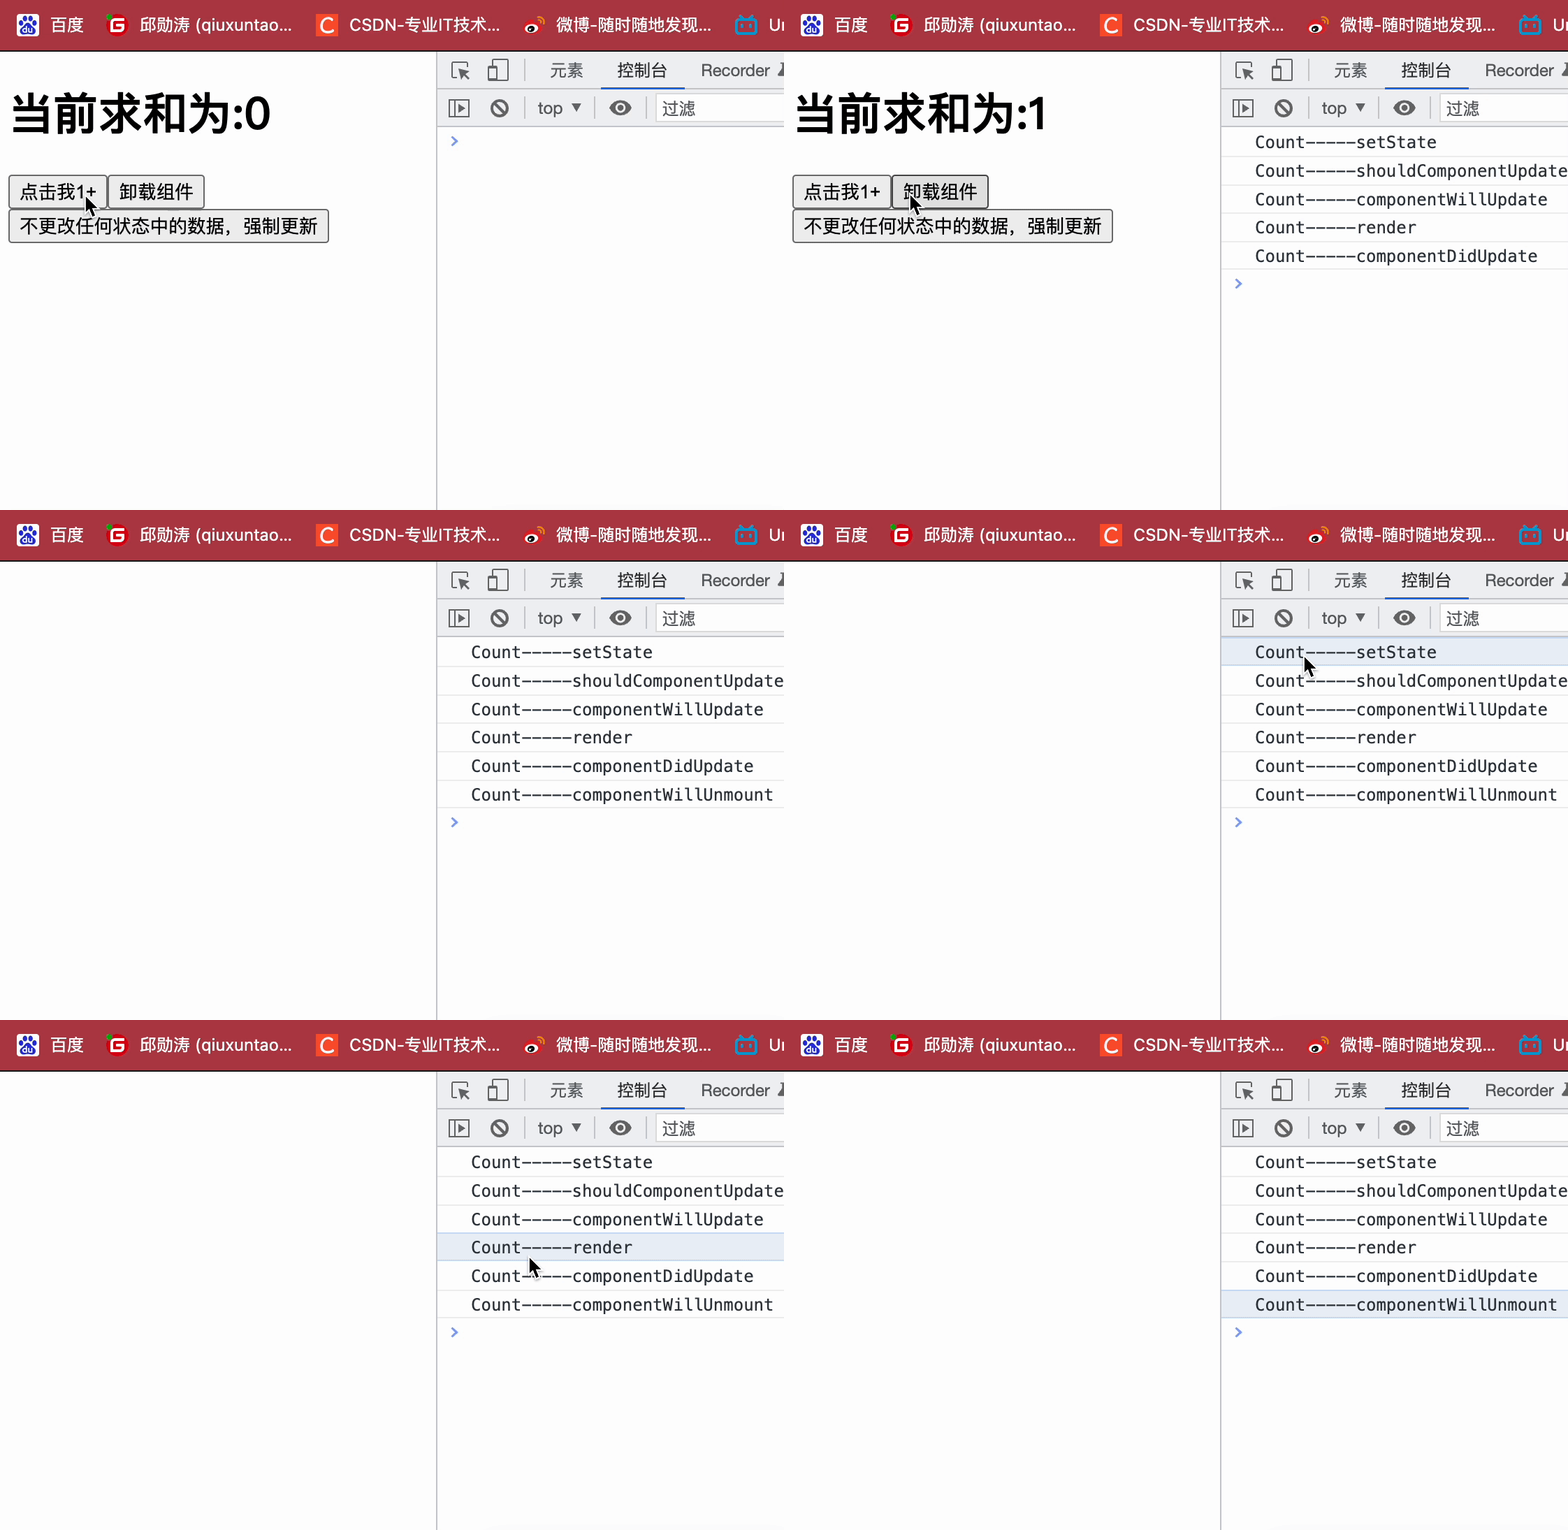
2.1、💋setState 流程💋

setState
//setState
    add = () => {
                const { count } = this.state

                //更新状态
                this.setState({ count: count + 1 })
                console.log('Count-----setState');

            }
shouldComponentUpdate
//控制组件更新的阀门
//如果不写这个钩子函数 默认返回true
   shouldComponentUpdate(){
                console.log('Count-----shouldComponentUpdate')
                return true
            }
componentWillUpdate
//组件将要更新的钩子
            componentWillUpdate(){
                console.log('Count-----componentWillUpdate')

  }
componentDidUpdate
  //  组件更新完毕的钩子
            componentDidUpdate(){
                console.log('Count-----componentDidUpdate')
            }
render
//初始化渲染、状态更新之后
            render() {

                console.log('Count-----render');

            }
componentWillUnmount
  //组件将要卸载的钩子
            componentWillUnmount() {
              console.log('Count-----componentWillUnmount')
            }

完整代码
<!DOCTYPE html>
<html lang="en">

<head>
    <meta charset="UTF-8">
    <meta http-equiv="X-UA-Compatible" content="IE=edge">
    <meta name="viewport" content="width=device-width, initial-scale=1.0">
    <title>hello_react</title>
</head>

<body>
    <!-- 准备好一个容器 -->
    <div id='test'></div>

    <!-- 引入react核心库 -->
    <script type="text/javascript" src="../js/react.development.js"></script>

    <!-- 引入react-dmo 用于react操作DOM -->
    <script type="text/javascript" src="../js/react-dom.development.js"></script>

    <!-- 引入babel 用于将jsx转为js -->
    <script type="text/javascript" src="../js/babel.min.js"></script>


    <!-- 此处一定要写babel -->
    <script type="text/babel">
        // 1.创建组件
        class Count extends React.Component {

            //构造器
            constructor(props) {
                console.log('Count-----constructor');
                super(props)
                //初始化状态
                this.state = {
                    count: 0
                }
            }


            //按钮+1
            add = () => {
                const { count } = this.state

                //更新状态
                this.setState({ count: count + 1 })
                console.log('Count-----setState');

            }


            //组件将要挂载的钩子
            componentWillMount(){
                console.log('Count-----componentWillMount');

            }

            //组件挂载完毕的钩子
            componentDidMount(){
                console.log('Count-----componentDidMount');
            }

            //卸载组件按钮
            death = () => {
                //卸载组件
                ReactDOM.unmountComponentAtNode(document.getElementById("test"))

            }

            //组件将要卸载的钩子
            componentWillUnmount() {
              console.log('Count-----componentWillUnmount')
            }

            //控制组件更新的阀门
            shouldComponentUpdate(){
                console.log('Count-----shouldComponentUpdate')
                return true
            }
            //组件将要更新的钩子

            componentWillUpdate(){
                console.log('Count-----componentWillUpdate')

            }

        //  组件更新完毕的钩子
            componentDidUpdate(){
                console.log('Count-----componentDidUpdate')
            }
            // 初始化渲染、状态更新之后
            render() {

                console.log('Count-----render');
                const { count } = this.state

                return (
                    <div>
                        <h1>当前求和为:{count}</h1>
                        <button onClick={this.add}>点击我1+</button>
                        <button onClick={this.death}>卸载组件</button>

                    </div>
                )

            }
        }
        ReactDOM.render(<Count />, document.getElementById('test'))
    </script>
</body>

</html>
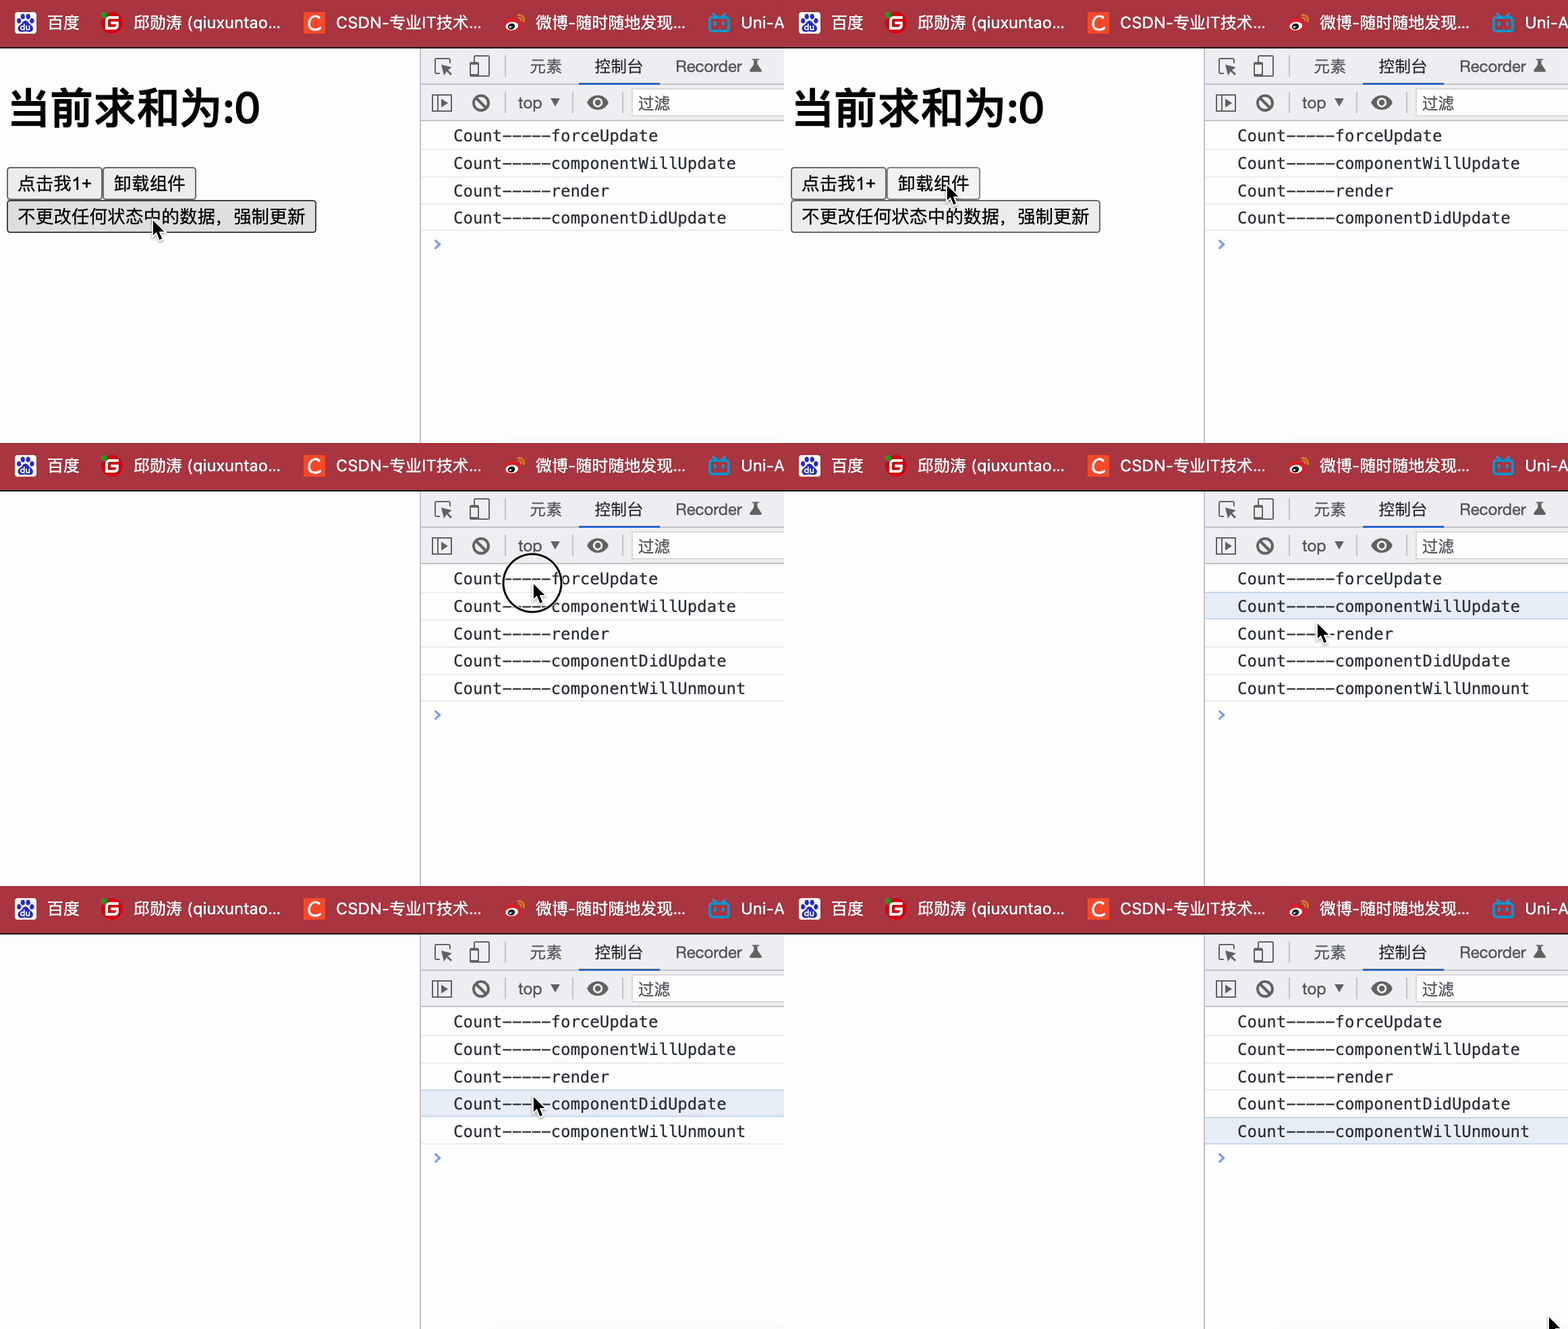
2.2、💋forceUpdate 流程💋

forceUpdate
  //强制更新按钮回调
            force=()=>{
                this.forceUpdate()
                console.log('Count-----forceUpdate');
            }
componentWillUpdate
         //组件将要更新的钩子

            componentWillUpdate(){
                console.log('Count-----componentWillUpdate')

            }
render
           // 初始化渲染、状态更新之后
            render() {

                console.log('Count-----render');
            }
componentDidUpdate
        //  组件更新完毕的钩子
            componentDidUpdate(){
                console.log('Count-----componentDidUpdate')
            }
componentWillUnmount
            //组件将要卸载的钩子
            componentWillUnmount() {
              console.log('Count-----componentWillUnmount')
            }
<!DOCTYPE html>
<html lang="en">

<head>
    <meta charset="UTF-8">
    <meta http-equiv="X-UA-Compatible" content="IE=edge">
    <meta name="viewport" content="width=device-width, initial-scale=1.0">
    <title>hello_react</title>
</head>

<body>
    <!-- 准备好一个容器 -->
    <div id='test'></div>

    <!-- 引入react核心库 -->
    <script type="text/javascript" src="../js/react.development.js"></script>

    <!-- 引入react-dmo 用于react操作DOM -->
    <script type="text/javascript" src="../js/react-dom.development.js"></script>

    <!-- 引入babel 用于将jsx转为js -->
    <script type="text/javascript" src="../js/babel.min.js"></script>


    <!-- 此处一定要写babel -->
    <script type="text/babel">
        // 1.创建组件
        class Count extends React.Component {

            //构造器
            constructor(props) {
                console.log('Count-----constructor');
                super(props)
                //初始化状态
                this.state = {
                    count: 0
                }
            }


            //按钮+1
            add = () => {
                const { count } = this.state

                //更新状态
                this.setState({ count: count + 1 })
                console.log('Count-----setState');

            }


            //组件将要挂载的钩子
            componentWillMount(){
                console.log('Count-----componentWillMount');

            }

            //组件挂载完毕的钩子
            componentDidMount(){
                console.log('Count-----componentDidMount');
            }

            //卸载组件按钮
            death = () => {
                //卸载组件
                ReactDOM.unmountComponentAtNode(document.getElementById("test"))

            }

            //强制更新按钮回调
            force=()=>{
                this.forceUpdate()
                console.log('Count-----forceUpdate');
            }

            //组件将要卸载的钩子
            componentWillUnmount() {
              console.log('Count-----componentWillUnmount')
            }

            //控制组件更新的阀门
            shouldComponentUpdate(){
                console.log('Count-----shouldComponentUpdate')
                return true
            }
            //组件将要更新的钩子

            componentWillUpdate(){
                console.log('Count-----componentWillUpdate')

            }

        //  组件更新完毕的钩子
            componentDidUpdate(){
                console.log('Count-----componentDidUpdate')
            }
            // 初始化渲染、状态更新之后
            render() {

                console.log('Count-----render');
                const { count } = this.state

                return (
                    <div>
                        <h1>当前求和为:{count}</h1>
                        <button onClick={this.add}>点击我1+</button>
                        <button onClick={this.death}>卸载组件</button>
                        <button onClick={this.force}>不更改任何状态中的数据,强制更新</button>
                    </div>
                )

            }
        }
        ReactDOM.render(<Count />, document.getElementById('test'))
    </script>
</body>
</html>
2.3、💋父组件render 流程💋
案例效果(B组件继承A组件)
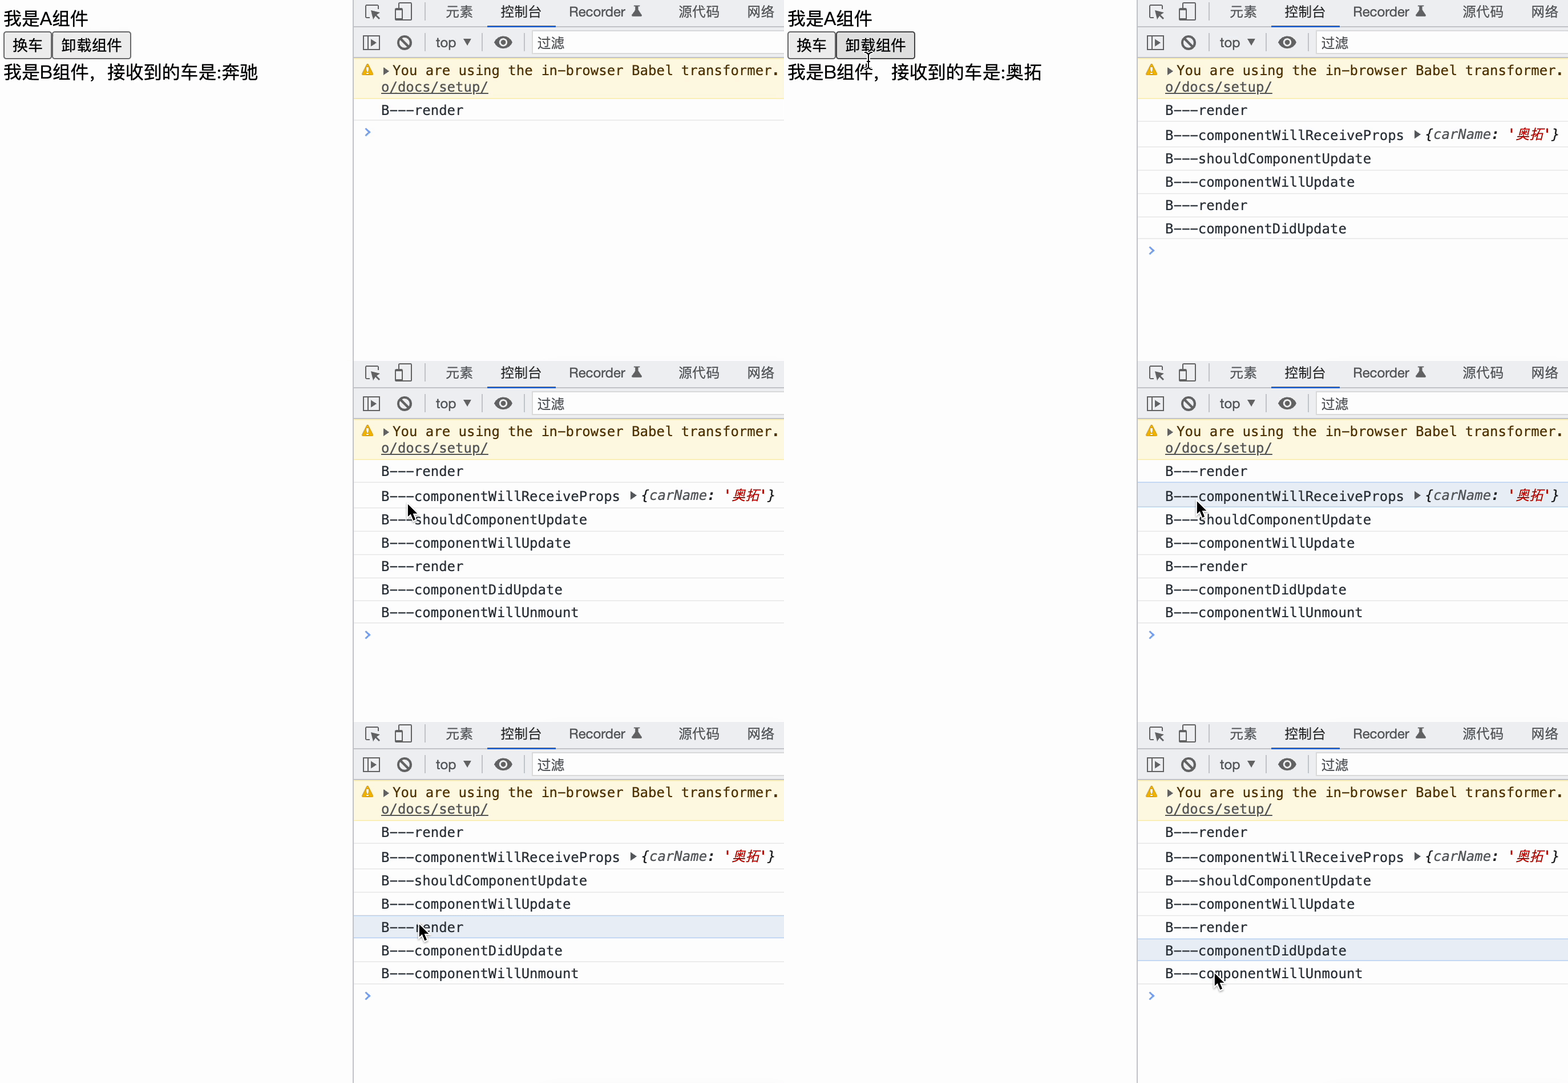

render
			render(){
				console.log('B---render');
				return(
					<div>我是B组件,接收到的车是:{this.props.carName}</div>
				)
			}
componentWillReceiveProps
	//组件将要接收新的props的钩子
	//第一次不算 第二次才会调用
			componentWillReceiveProps(props){
				console.log('B---componentWillReceiveProps',props);
			}
shouldComponentUpdate
			//控制组件更新的“阀门”
			shouldComponentUpdate(){
				console.log('B---shouldComponentUpdate');
				return true
			}
componentWillUpdate
			//组件将要更新的钩子
			componentWillUpdate(){
				console.log('B---componentWillUpdate');
			}
componentDidUpdate
			//组件更新完毕的钩子
			componentDidUpdate(){
				console.log('B---componentDidUpdate');
			}
componentWillUnmount
           //组件将要卸载的钩子
			componentWillUnmount(){
				console.log('B---componentWillUnmount');
			}
完整代码
<!DOCTYPE html>
<html lang="en">
<head>
	<meta charset="UTF-8">
	<title>react生命周期(旧)render父组件</title>
</head>
<body>
	<!-- 准备好一个“容器” -->
	<div id="test"></div>

	<!-- 引入react核心库 -->
	<script type="text/javascript" src="../js/react.development.js"></script>
	<!-- 引入react-dom,用于支持react操作DOM -->
	<script type="text/javascript" src="../js/react-dom.development.js"></script>
	<!-- 引入babel,用于将jsx转为js -->
	<script type="text/javascript" src="../js/babel.min.js"></script>

	<script type="text/babel">
		/*
				1. 初始化阶段: 由ReactDOM.render()触发---初次渲染
									1.	constructor()
									2.	componentWillMount()
									3.	render()
									4.	componentDidMount() =====> 常用
													一般在这个钩子中做一些初始化的事,例如:开启定时器、发送网络请求、订阅消息
				2. 更新阶段: 由组件内部this.setSate()或父组件render触发
									1.	shouldComponentUpdate()
									2.	componentWillUpdate()
									3.	render() =====> 必须使用的一个
									4.	componentDidUpdate()
				3. 卸载组件: 由ReactDOM.unmountComponentAtNode()触发
									1.	componentWillUnmount()  =====> 常用
													一般在这个钩子中做一些收尾的事,例如:关闭定时器、取消订阅消息
		*/
		//创建组件
		//父组件A
		class A extends React.Component{
			//初始化状态
			state = {carName:'奔驰'}

			changeCar = ()=>{
				this.setState({carName:'宝马'})
			}

            //卸载组件
            death1 = ()=>{
				ReactDOM.unmountComponentAtNode(document.getElementById('test'))
			}

			render(){
				console.log('A----render');
				return(
					<div>
						<div>我是A组件</div>
						<button onClick={this.changeCar}>换车</button>
                        <button onClick={this.death1}>卸载组件</button>
						<B carName={this.state.carName}/>
					</div>
				)
			}
		}

		//子组件B
		class B extends React.Component{
			//组件将要接收新的props的钩子
			//第一次不算 第二次才会调用
			componentWillReceiveProps(props){
				console.log('B---componentWillReceiveProps',props);
			}

			//控制组件更新的“阀门”
			shouldComponentUpdate(){
				console.log('B---shouldComponentUpdate');
				return true
			}
			//组件将要更新的钩子
			componentWillUpdate(){
				console.log('B---componentWillUpdate');
			}

			//组件更新完毕的钩子
			componentDidUpdate(){
				console.log('B---componentDidUpdate');
			}

            //组件将要卸载的钩子
			componentWillUnmount(){
				console.log('B---componentWillUnmount');
			}

			render(){
				console.log('B---render');
				return(
					<div>我是B组件,接收到的车是:{this.props.carName}</div>
				)
			}
		}

		//渲染组件
		ReactDOM.render(<A/>,document.getElementById('test'))
	</script>
</body>
</html>
2.4、总结
a、 初始化阶段: 由ReactDOM.render()触发—初次渲染
1. constructor()
2. componentWillMount()
3. render()
4. componentDidMount() =====> 常用
一般在这个钩子中做一些初始化的事,例如:开启定时器、发送网络请求、订阅消息等等
b、 更新阶段: 由组件内部this.setSate()或父组件render触发
1. shouldComponentUpdate()
2. componentWillUpdate()
3. render() =====> 必须使用的一个
4. componentDidUpdate()
c、 卸载组件: 由ReactDOM.unmountComponentAtNode()触发
1. componentWillUnmount() =====> 常用
一般在这个钩子中做一些收尾的事,例如:关闭定时器、取消订阅消息等等
三、生命周期(新)
3.1、生命周期更新(UNSAFE_ )
由于React官方更新了,所以生命周期也更新了,相应的包也更新了

Count类
所以新的生命周期执行代码会爆黄 ,需要在它提示的对应组件加上UNSAFE_

			//组件将要挂载的钩子
			UNSAFE_componentWillMount(){
				console.log('Count---componentWillMount');
			}
			//组件将要更新的钩子
			UNSAFE_componentWillUpdate(){
				console.log('Count---componentWillUpdate');
			}
A类、B类

			//组件将要接收新的props的钩子
			//第一次不算 第二次才会调用
			UNSAFE_componentWillReceiveProps(props){
				console.log('B---componentWillReceiveProps',props);
			}
			//组件将要更新的钩子
			UNSAFE_componentWillUpdate(){
				console.log('B---componentWillUpdate');
			}
完整代码
<!DOCTYPE html>
<html lang="en">
<head>
	<meta charset="UTF-8">
	<title>react生命周期(新)</title>
</head>
<body>
	<!-- 准备好一个“容器” -->
	<div id="test"></div>

	<!-- 引入react核心库 -->
	<script type="text/javascript" src="../js1/react.development.js"></script>
	<!-- 引入react-dom,用于支持react操作DOM -->
	<script type="text/javascript" src="../js1/react-dom.development.js"></script>
	<!-- 引入babel,用于将jsx转为js -->
	<script type="text/javascript" src="../js1/babel.min.js"></script>

	<script type="text/babel">
		//创建组件
		class Count extends React.Component{

			//构造器
			constructor(props){
				console.log('Count---constructor');
				super(props)
				//初始化状态
				this.state = {count:0}
			}

			//加1按钮的回调
			add = ()=>{
				//获取原状态
				const {count} = this.state
				//更新状态
				this.setState({count:count+1})
			}

			//卸载组件按钮的回调
			death = ()=>{
				ReactDOM.unmountComponentAtNode(document.getElementById('test'))
			}


			//强制更新按钮的回调
			force = ()=>{
				this.forceUpdate()
			}

			//组件将要挂载的钩子
			UNSAFE_componentWillMount(){
				console.log('Count---componentWillMount');
			}

			//组件挂载完毕的钩子
			componentDidMount(){
				console.log('Count---componentDidMount');
			}

			//组件将要卸载的钩子
			componentWillUnmount(){
				console.log('Count---componentWillUnmount');
			}

			//控制组件更新的“阀门”
			shouldComponentUpdate(){
				console.log('Count---shouldComponentUpdate');
				return true
			}

			//组件将要更新的钩子
			UNSAFE_componentWillUpdate(){
				console.log('Count---componentWillUpdate');
			}

			//组件更新完毕的钩子
			componentDidUpdate(){
				console.log('Count---componentDidUpdate');
			}

			render(){
				console.log('Count---render');
				const {count} = this.state
				return(
					<div>
						<h2>当前求和为:{count}</h2>
						<button onClick={this.add}>点我+1</button>
						<button onClick={this.death}>卸载组件</button>
						<button onClick={this.force}>不更改任何状态中的数据,强制更新一下</button>
					</div>
				)
			}
		}
		//渲染组件

        		//父组件A
		class A extends React.Component{
			//初始化状态
			state = {carName:'奔驰'}

			changeCar = ()=>{
				this.setState({carName:'宝马'})
			}

            //卸载组件
            death1 = ()=>{
				ReactDOM.unmountComponentAtNode(document.getElementById('test'))
			}

			render(){
				console.log('A----render');
				return(
					<div>
						<div>我是A组件</div>
						<button onClick={this.changeCar}>换车</button>
                        <button onClick={this.death1}>卸载组件</button>
						<B carName={this.state.carName}/>
					</div>
				)
			}
		}

		//子组件B
		class B extends React.Component{
			//组件将要接收新的props的钩子
			//第一次不算 第二次才会调用
			UNSAFE_componentWillReceiveProps(props){
				console.log('B---componentWillReceiveProps',props);
			}

			//控制组件更新的“阀门”
			shouldComponentUpdate(){
				console.log('B---shouldComponentUpdate');
				return true
			}
			//组件将要更新的钩子
			UNSAFE_componentWillUpdate(){
				console.log('B---componentWillUpdate');
			}

			//组件更新完毕的钩子
			componentDidUpdate(){
				console.log('B---componentDidUpdate');
			}

            //组件将要卸载的钩子
			componentWillUnmount(){
				console.log('B---componentWillUnmount');
			}

			render(){
				console.log('B---render');
				return(
					<div>我是B组件,接收到的车是:{this.props.carName}</div>
				)
			}
		}

		ReactDOM.render(<A/>,document.getElementById('test'))
	</script>
</body>
</html>
