父子组件之间数据传递
父向子:属性绑定v-bind(简写 : ) + props
父组件中使用子组件时,绑定属性传递数据给子组件,
子组件使用 props 进行数据的接收
eg:
父组件 传递数据:
<child :num="6"></child>
子组件 接收和使用数据:
<template>
  <div>
    <!-- 使用数据  -->
    {{ num }}
  </div>
</template>

<script>
export default {
  // 、、、
  // 接收数据
  props: ['num'],
  // 、、、
}
</script>
子向父:自定义事件 $emit
子组件传递数据:
this.$emit('自定义事件名', '要传递的数据')
父组件:
接收数据:
<子组件名 @自定义事件名="方法名"/>
methods: {
    方法名(val) {
      // val 是子组件传递过来的数据
      // 、、、
    }
  }
父子双向:v-model + this.$emit()
父组件:
<子组件名 v-model:属性名="属性值"/>
子组件:
<template>
  <div>
    <!-- 使用数据  -->
    {{ 属性名 }}
    <button @click="方法名">点击进行操作</button>
  </div>
</template>

<script>
export default {
  // 接收数据
  props: ['属性名'],
  emits: ['update:属性名'], // 这行可写可不写,写了是方便统计emit方法,写了的话,这里定义了的方法,后面this.$emit才能触发
  methods: {
    方法名() {
      this.$emit('update:属性名', 属性值操作)
   }
  }
}
</script>
示例:
父组件:
<template>
  <div class="home">
    <h1>Home 组件- - -{{ count }}</h1>
    <button @click="count+=1">点击按钮, 数量 +1(父组件)</button>

    <Test v-model:num="count"/>
  </div>
</template>

<script>
import Test from '../components/Test.vue'

export default {
  name: 'Home',
  components: {
    Test,
  },
  data() {
    return {
      count: 1
    }
  },
}
</script>
子组件:
<template>
  <div>
    <h1>Test 组件- - -{{ num }}</h1>
    <button @click="add">点击按钮 数量 +1(子组件)</button>
  </div>
</template>

<script>
export default {
  name: 'Test',
  props: ['num'],
  emits: ['update:num'], // 这行可写可不写,写了是方便统计emit方法,这里定义了的方法,后面this.$emit才能触发
  methods: {
    add() {
      this.$emit('update:num', this.num + 1)
   }
  }
}
</script>

<style>

</style>
兄弟组件之间数据传递:EventBus(eventBus.js、emit、on)
①安装mitt包,创建 eventBus.js 文件
安装mitt:
npm install mitt
// 导入 mitt包
import mitt from "mitt";
// 创建 bus 对象
const bus = mitt()
// 导出 bus 对象
export default bus
②数据接收方导入 bus,使用 bus.on 接收数据
bus.on('自定义方法名', (接收的数据) =>  {
  // 处理流程
})
注意:bus.on 一般写在 created() 函数中
③数据传递方导入 bus, 使用 bus.emit 传递数据
bus.emit('自定义方法名', 传递的数据)
示例:
兄弟组件Left:
<template>
  <div class="left-container">
    <h1>Left 组件</h1>
    <h2>数据发送方- - -{{ count }}</h2>
    <button @click="add">点击 +1</button>
  </div>
</template>

<script>
import bus from '../eventbus/eventBus.js'

export default {
  name: 'Left',
  data() {
    return {
      count: 0
    }
  },
  methods: {
    add() {
      this.count ++
      bus.emit('countChange', this.count)
    }
  }
}
</script>

<style lang="less" scoped>
.left-container {
  width: 500px;
  background: pink;
}
</style>
兄弟组件 Right:
<template>
  <div class="right-container">
    <h1>Right 组件</h1>
    <h3>数据接收方- - -{{ num }}</h3>
  </div>
</template>

<script>
import bus from '../eventbus/eventBus.js'

export default {
  name: 'Right',
  data() {
    return {
      num: 0
    }
  },
  created() {
    bus.on('countChange', (count) =>  {
      this.num = count
    })
  }
}
</script>

<style lang="less" scoped>
.right-container {
  width: 500px;
  background: #eee;
}
</style>

后代组件之间数据传递:provide + inject
传递数据:
provide() {
    return {
      属性名: 属性值
    }
  }
接收数据:
inject: ['属性名'],
接收后可以直接在模板中使用,
eg:
<template>
  <div class="left-container">
    {{ 属性名 }}
  </div>
</template>
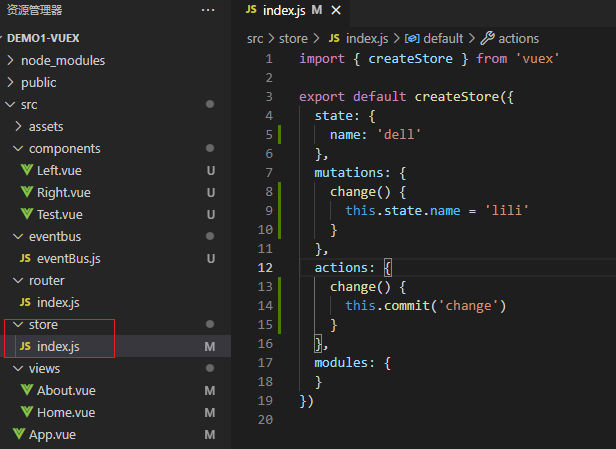
全局数据共享: vuex
安装vuex, store 文件下的 index.js 文件中,进行数据的存储和操作
state- - -存储数据
actions- - -调用mutations中的方法,可以执行异步任务
mutations- - -执行数据操作,设计规定执行同步任务,不执行异步任务(虽然写了异步也不报错)
使用的属性放在 计算属性computed中:
eg:
<script>
export default {
  name: 'Home',
  computed: {
    myName() {
      return this.$store.state.name
    }
  }
}
</script>
如果要修改数据:
① 使用 dispatch 派发执行方法- - -执行 actions 中的方法,
② 然后 actions方法 中使用 commit 再 指派 mutations 中的方法
③ mutations 的方法里- - -执行最终数据操作
组件中发送数据操作请求:
methods: {
    change() {
      this.$store.dispatch('方法名')
    }
  }
actions接收操作请求,转发到 mutations :
actions: {
    方法名() {
      this.commit('mutations方法名')
    }
  },
mutations 中进行最终数据操作:
mutations: {
    mutations方法名() {
      this.state.属性名 = '***'
    }
  },
如果没有异步操作,也可以直接在组件中执行 commit方法,调用 mutations中的方法进行数据操作

